Телефоны Sanyo scp 8100 - инструкция пользователя по применению, эксплуатации и установке на русском языке. Мы надеемся, она поможет вам решить возникшие у вас вопросы при эксплуатации техники.
Если остались вопросы, задайте их в комментариях после инструкции.
"Загружаем инструкцию", означает, что нужно подождать пока файл загрузится и можно будет его читать онлайн. Некоторые инструкции очень большие и время их появления зависит от вашей скорости интернета.


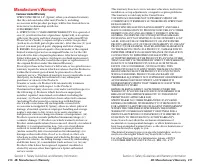

Selecting a Ringer/Image Type for an Entry
You can assign a ringer/image type to an Internal Phone Book
entry so you can identify the caller by the ringer or image type.
(See “Ringer Types” on page 30.)
To select a ringer/image type for an entry:
1.
Press of the Navigation key.
2.
Select the entry you want to set as the incoming ringer or
image and press
.
3.
Press
(right softkey).
4.
Highlight
Edit
and press
.
5.
Select the menu under
Ringer
or
Image
by scrolling up or
down and press
.
6.
Highlight your desired ringer type or image and press
.
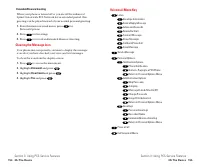
䊳
Get New:
start up a Browser and you can select an item to
download.
䊳
Normal: Ringer
equivalent to With Caller ID or Roaming setting
Image
equivalent to Incoming Calls setting (see
䊳
None:
the setting equivalent to off.
7.
Press
(left softkey).
䊳
To confirm the ringer, highlight
Ringer
and press
(right
softkey).
䊳
To see a display preview, press
(right softkey) during
step 7 above, and press
(right softkey) to see the Sub
LCD preview. (You may also check the image through the
external display.)
䊳
To adjust the position of the image, use your Navigation key
during step 7 above.
䊳
If you set an Animation Ringer (indicated with
icon) and an
Image, your PCS Phone plays the Animation Ringer and
displays the selected Image.
䊳
You should have pictures or downloaded data to set Image.
Sub LCD
Preview
Play
Save
Options
Section 2: Understanding Your PCS Phone
2G: Using the Internal Phone Book
89
Editing an Internal Phone Book Entry
To make changes to an entry:
1.
Display an Internal Phone Book entry.
2.
Highlight the entry you wish to edit and press
.
3.
Highlight a phone number, press
(right softkey),
highlight
Edit
, and press
.
– or –
Highlight an Email address or Web address, and press
(right softkey).
4.
Highlight the box under the following labels and edit by using
the Number keys.
䊳
Name
to change the entry’s name. Enter the new name. (See
“Entering Characters by Tapping the Keypad” on page 81.)
䊳
Home
to change the entry’s phone number. Enter the new
home phone number.
䊳
Work
to change the entry’s phone number. Enter the new
work phone number.
䊳
Mobile
to change the entry’s phone number. Enter the new
mobile phone number.
䊳
Pager
to change the entry’s pager number. Enter the new
pager number.
䊳
Data
to change the entry’s number for data. Enter the new data
number.
䊳
Fax
to change the entry’s fax number. Enter the new fax
number.
䊳
No Label
to change the entry’s number. Enter the new number.
䊳
to change the entry’s email address. Enter the new email
address.
䊳
Web
to change the entry’s Web address. Enter the new Web
address.
䊳
Ringer
to assign a ringer type to the entry. (See “Selecting a
Ringer/Image Type for an Entry” on page 89.)
䊳
Image
to assign an image type to the entry. (See “Selecting a
Ringer/Image Type for an Entry” on page 89.)
5.
Press
(left softkey).
Tip:
You can also store the phone number in the Pager, Data, or Fax
category.
Save
Edit
Options
Section 2: Understanding Your PCS Phone
88
2G: Using the Internal Phone Book

