Хлебопечки Scarlett SC-400 - инструкция пользователя по применению, эксплуатации и установке на русском языке. Мы надеемся, она поможет вам решить возникшие у вас вопросы при эксплуатации техники.
Если остались вопросы, задайте их в комментариях после инструкции.
"Загружаем инструкцию", означает, что нужно подождать пока файл загрузится и можно будет его читать онлайн. Некоторые инструкции очень большие и время их появления зависит от вашей скорости интернета.


IM012
6
SC-400
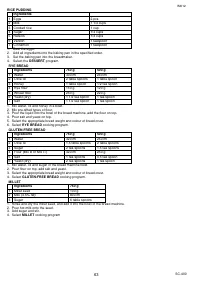
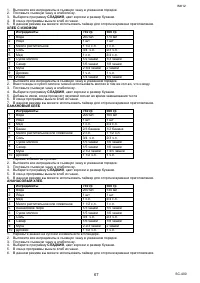
Baking Program 9. Loaf
This mode allows you to make filled bread. During the cooking cycle of this mode you may fill the dough with a variety
of toppings. You may add, e.g. marzipan or poppy filling. In this mode of cooking the bread becomes fluffy, the filling
is not mixed with dough, but forms a good-looking inner layer.
Baking program 10. Dessert
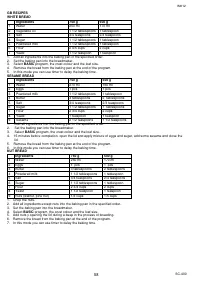
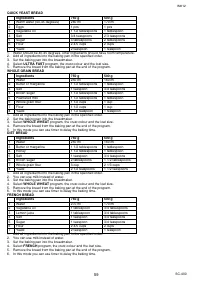
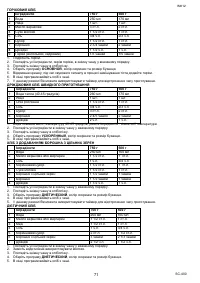
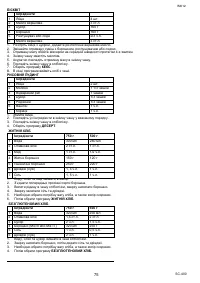
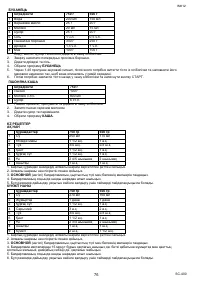
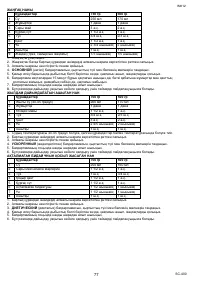
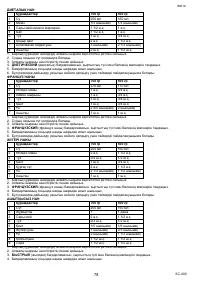
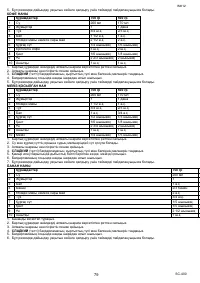
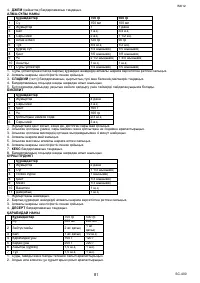
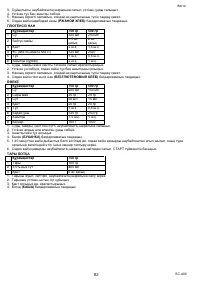
This mode is used for pastry. The pastry is light and compact. For ingredients see the table at the end of the manual.
Baking program 11. Pasta
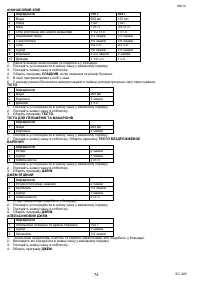
This mode is used for preparing pasta. In this mode pasta is kneaded without further baking. For ingredients see the
table at the end of the manual.
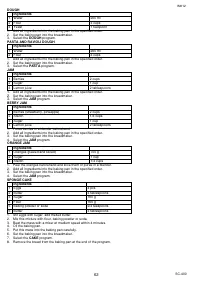
Baking program 12. Dough
This mode is used for preparing dough. In this mode dough is kneaded without further baking. For ingredients see the
table at the end of the manual.
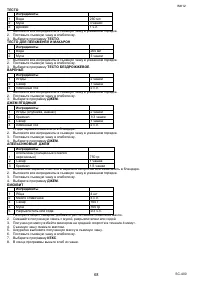
Baking program 13. Jam
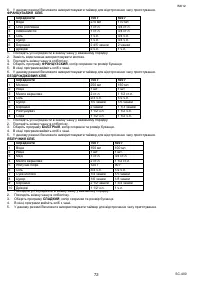
This mode is used for preparing jam. For ingredients see the table at the end of the manual.
Baking program 14. Cake
This mode is used for baking cakes and pies. For ingredients see the table at the end of the manual.
Baking Program 15. Bake
This mode operates for 10 minutes and creates darker bread crust or finishes the baking process, if it is not yet
finished.
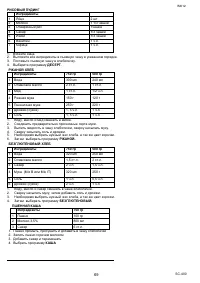
Baking Program 16. Porridge
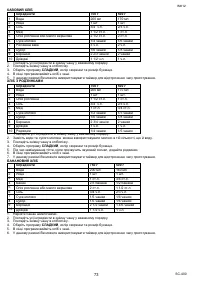
This mode is used for cooking cereal foods. It makes it possible to prepare various cereals, using milk or water. This
mode is also used for cooking crumbly pilaf, millet, couscous and many others.
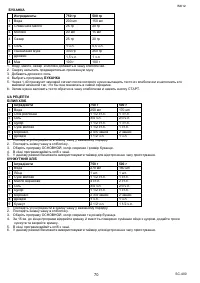
In modes 1-8 you can add extra ingredients such as nuts or fruit after a beep according to the baking program.
If you set timer, you can add fruit and nuts at the beginning, but they must be chopped.
TIMER
The timer option enables to delay baking.
The maximum period of delay is 13 hours.
For example: the current time is 20:30, you want the bread to be ready by 7:00, i.e. in 10 hours 30 minutes. Press the
«
MENU
»
key, select the mode, select the crust colour and loaf size, then press
key to increase time up to 10
hours 30 minutes. The LCD-display will indicate the time. Then press the
«
STOP/START
»
key to set the timer. The
display will show countdown.
ATTENTION: do not use the timer if you use ingredients that spoil quickly, such as eggs, milk, cream and cheese.
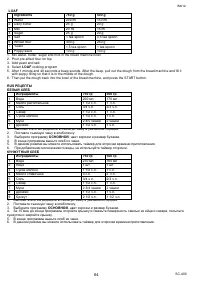
TIPS
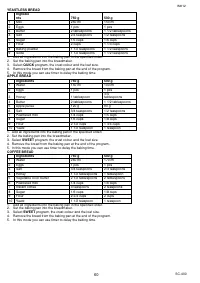
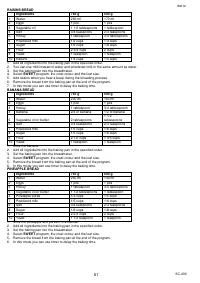
Remove the baking pan first, add the necessary ingredients and then set the baking pan into the breadmaker.
Strictly follow the order of adding ingredients. First add liquids, butter, sugar, salt, then add flour and other
supplements, add yeast at the end.
All ingredients should have room temperature to maintain optimal yeast growth.
Measure the ingredients accurately. Even slight deviations from the amounts specified in the recipe can affect the
result of baking.
OPERATION ORDER
Remove the baking pan.
Push the kneading blade to check its operation.
Add ingredients into the baking pan.
ATTENTION: make sure that yeast does not contact salt and liquid.
Set the baking pan into the breadmaker.
Make sure that you place the baking pan correctly.
Close the lid.
Plug the breadmaker into a power outlet. You will hear a beep and the display will indicate the program number and
the baking time.
Press the
«
MENU
»
key and select the program.
Select the crust colour and the loaf size.
Now you can adjust the baking time with the help of timer.
Press the
«
STOP/START
»
key to start the program.
After the baking process is completed you will hear a beep and the display will indicate 0:00.
Let the bread rest.
Before opening the lid, plug the breadmaker out of a power outlet.
Remove the baking pan with a potholder or oven mitts.
Turn the baking pan and shake it gently. If the bread does not slip out, you can use wooden or plastic spatulas to
remove the bread from the baking pan. Under no circumstances use metal objects, they can scratch the baking pan
surface.
Let the bread cool for 30 minutes, then it can be cut.
Характеристики

Остались вопросы?Не нашли свой ответ в руководстве или возникли другие проблемы? Задайте свой вопрос в форме ниже с подробным описанием вашей ситуации, чтобы другие люди и специалисты смогли дать на него ответ. Если вы знаете как решить проблему другого человека, пожалуйста, подскажите ему :)


