Электропилы Hitachi CH66EB3 - инструкция пользователя по применению, эксплуатации и установке на русском языке. Мы надеемся, она поможет вам решить возникшие у вас вопросы при эксплуатации техники.
Если остались вопросы, задайте их в комментариях после инструкции.
"Загружаем инструкцию", означает, что нужно подождать пока файл загрузится и можно будет его читать онлайн. Некоторые инструкции очень большие и время их появления зависит от вашей скорости интернета.


8
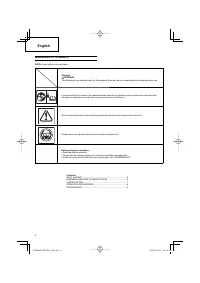
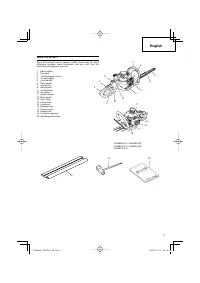
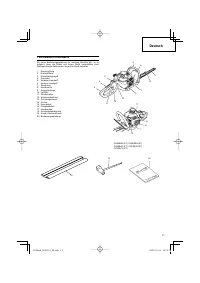
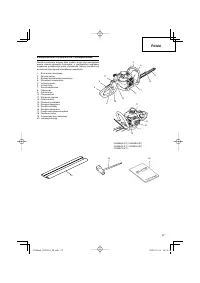
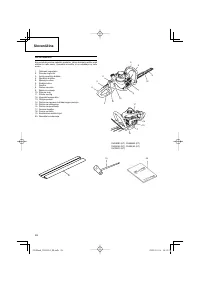
English
OPERATING
PROCEDURES
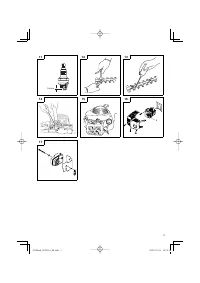
Fuel
(
Fig.
1
)
WARNING
The hedge trimmer is equipped with a two- stroke engine.
Always run the engine on fuel, mixed with oil.
Provide good ventilation, when fueling or handling fuel.
Fuel
○
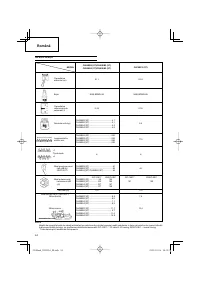
Always use branded 89 octane unleaded gasoline.
○
Use genuine two-cycle oil or use a mix between 25:1 to 50:1,
please consult the oil bottle for the ratio or Hitachi dealer.
○
If genuine oil is not available, use an anti-oxidant added quality
oil expressly labeled for air-cooled 2-cycle engine use (JASO
FC GRADE OIL or ISO EGC GRADE). Do not use BIA or TCW
(2-stroke water-cooling type) mixed oil.
○
Never use multi-grade oil (10W/30) or waste oil.
○
Always mix fuel and oil in a separate clean container.
Always start by
fi
lling half the amount of fuel, which is to be used.
Then add the whole amount of oil. Mix (shake) the fuel mixture. Add
the remaining amount of fuel.
Mix (shake) the fuel-mix thoroughly before
fi
lling the fuel tank.
Fueling
WARNING
(
Fig.
2
)
○
Always shut o
ff
the engine before refueling.
○
Slowly open the fuel tank (1), when
fi
lling up with fuel, so that
possible over-pressure disappears.
○
Tighten the fuel cap carefully, after fueling.
○
Always move the unit at least 3 m from the fueling area before
starting.
Before fueling, clean the tank cap area carefully, to ensure that
no dirt falls into the tank. Make sure that the fuel is well mixed by
shaking the container, before fueling.
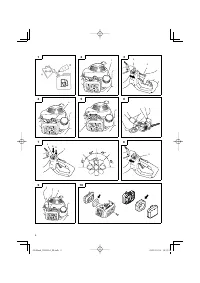
Starting
CAUTION
Before starting, make sure the cutting attachment does not
touch anything.
1. Set ignition switch (2) to ON position (A). (
Fig.
3
)
* Push priming bulb (4) several times so that fuel
fl
ows through
the bulb or return pipe. (If so equipped) (
Fig.
4
)
2. With the throttle trigger lockout (3) pressed, pull throttle trigger,
then slowly release throttle the trigger
fi
rst, then the throttle
trigger lockout. This will lock the throttle in starting position.
(
Fig.
3
)
3. Set choke lever (5) to CLOSED position (B). (
Fig.
5
)
4. Pull recoil starter briskly, taking care to keep the handle in your
grasp and not allowing it to snap back. (
Fig.
6
)
5. When you hear the engine attempts to start, return choke lever
to RUN position (open) (C). Then pull recoil starter briskly
again.
NOTE
If engine does not start, repeat procedures from 2 to 4.
6. After starting engine, allow the engine about 2-3 minutes to
warm up before subjecting it to any load.
Cutting
When cutting, operate engine at full throttle as this maintains proper
cutter speed. When trimming top of hedge, hold trimmer so blades
are between 15 and 30 degrees from a horizontal position and
swing trimmer in an arc toward edge of hedge to sweep cuttings o
ff
.
When trimming sides of hedge, hold blade vertically and swing unit
in an arc.
NOTE
○
Multi-position
twist
handle
(
Fig.
7
)
The rear control handle turns 90 degrees to provide comfortable
use while accommodating a variety of cutting angles. The
handle allows for
fi
ve di
ff
erent locking positions. Before
attempting to adjust rear handle, make sure the machine is at
idle or engine is shut o
ff
.
○
The machine will automatically shut o
ff
if the throttle lever
is pressed while the handle is NOT secured in one of the
fi
ve
preset positions. Never attempt to operate the machine unless
the rear handle is properly locked in place.
To rotate the handle; push the lock lever (6) allowing the handle
to turn. Press the lock lever (6) to release the lock and allow
the handle to turn. Rotate the handle to the desired 0°, 45° or
90° locking position and press the release lever (7) to lock the
handle in place.
D:
LOCK
E:
UNLOCK
Stopping
(
Fig.
8
)
Decrease engine speed, and push ignition switch to stop position
(F).
MAINTENANCE
MAINTENANCE, REPLACEMENT OR REPAIR OF THE EMISSION
CONTROL DEVICES AND SYSTEM MAY BE PERFORMED
BY ANY NONROAD ENGINE REPAIR ESTABLISHMENT OR
INDIVIDUAL.
Carburetor
adjustment
(
Fig.
9
)
WARNING
○
The cutting attachment may be spinning during carburetor
adjustments.
○
Never start the engine without the complete clutch cover.
Otherwise the clutch can come loose and cause personal
injuries.
In the carburetor, fuel is mixed with air. When the engine is test run
at the factory, the carburetor is adjusted. A further adjustment may
be required, according to climate and altitude. The carburetor has
one adjustment possibility:
T
=
Idle
speed
adjustment
screw.
Idle
speed
adjustment
(
T
)
Check that the air
fi
lter is clean. When the idle speed is correct, the
cutting attachment will not rotate. If adjustment is required, close
(clockwise) the T-screw, with the engine running, until the cutting
attachment starts to rotate. Open (counter-clockwise) the screw
until the cutting attachment stops. You have reached the correct idle
speed when the engine runs smoothly in all positions well below the
rpm when the cutting attachment starts to rotate.
If the cutting attachment still rotates after idle speed adjustment,
contact Hitachi dealer.
Air
fi
lter
(
Fig.
10
)
The air
fi
lter must be cleaned from dust and dirt in order to avoid:
○
Carburetor
malfunctions.
○
Starting
problems.
○
Engine power reduction.
○
Unnecessary wear on the engine parts.
○
Abnormal fuel consumption.
Clean the air
fi
lter daily or more often if working in exceptionally
dusty areas.
Cleaning
the
air
fi
lter
Remove the air
fi
lter cover and the
fi
lter. Rinse it in warm soap suds.
Check that the
fi
lter is dry before reassembly. An air
fi
lter that has
been used for some time cannot be cleaned completely. Therefore,
it must regularly be replaced by a new one. A damaged
fi
lter must
always be replaced.
NOTE
Saturate the element in 2-cycle oil or the equivalent. Squeeze
the element to distribute the oil completely and to remove any
excess oil.
000Book̲CH50EA3̲EE.indb 8
000Book̲CH50EA3̲EE.indb 8
2009/12/04 18:55:53
2009/12/04 18:55:53


