Усилители Yamaha R-S500 - инструкция пользователя по применению, эксплуатации и установке на русском языке. Мы надеемся, она поможет вам решить возникшие у вас вопросы при эксплуатации техники.
Если остались вопросы, задайте их в комментариях после инструкции.
"Загружаем инструкцию", означает, что нужно подождать пока файл загрузится и можно будет его читать онлайн. Некоторые инструкции очень большие и время их появления зависит от вашей скорости интернета.


ix
Neuhaus
4009, 4048, 4218,
4219, 4217
Neusat
4217
Next Level
4019
NextWave
4223
Nikko
4011, 4217
Nokia
4006, 4040
Nordmende
4001, 4006, 4007,
4010, 4052
Nova
4222
Novis
4013
Oceanic
4051
Octagon
4001, 4004, 4050
Okano
4011
Optex
4048
Optus
4213, 4222, 4223
Orbitech
4001, 4212, 4213,
4218
OSat
4004
Otto Versand
4015
Pace
4006, 4015, 4035,
4043, 4047, 4216
Pacific
4051
Packsat
4216
Palcom
4007
Palladium
4011, 4218
Palsat
4212, 4218
Panasat
4222
Panasonic
4121, 4126, 4124,
4006, 4035, 4036,
4221, 4198
Panda
4006, 4219
Pansat
4125
Patriot
4216
Paysat
4127
PCT
4110
Philco
4101
Philips
4071, 4068, 4127,
4006, 4055, 4053,
4061, 4033, 4213,
4216, 4196, 4202,
4203, 4201, 4206
Phoenix
4050
Phonotrend
4006, 4005, 4048
Pioneer
4046, 4213
Polsat
4052
Predki
4013
Premiere
4048, 4213
Priesner
4011
Primestar
4076
Profile
4216
Promax
4006
Prosat
4007, 4005
Proscan
4093, 4066, 4122,
4197
Protek
4051
Proton
4016
Provision
4010
Quadral
4024, 4007, 4005,
4008, 4216
Quelle
4015, 4215, 4219
Quiero
4052
RadioShack
4019
Radiola
4055, 4053
Radix
4014, 4037
Rainbow
4004
RCA
4093, 4066, 4112,
4113, 4118, 4119,
4116, 4122, 4197,
4207
Realistic
4078
Redpoint
4009
Redstar
4024, 4008
RFT
4005, 4055, 4053
Roadstar
4217
Roch
4031
Rover
4024, 4217
Saba
4010, 4215, 4219,
4216
Sabre
4006
Sagem
4023, 4052
Sakura
4050
Samsung
4064, 4071, 4069,
4123, 4120, 4003,
4000, 4001, 4032,
4196, 4200
SAT
4007, 4218
Sat Cruiser
4223
Sat Partner
4001, 4004, 4010,
4013, 4049, 4218
Sat Team
4217
Satcom
4012, 4219
Satec
4217
Satelco
4024
Satford
4012
Satmaster
4012
Satplus
4212
Schneider
4008, 4212, 4216
Schwaiger
4051, 4212, 4219
SCS
4215
Seemann
4011, 4009, 4014
SEG
4024, 4001, 4008,
4013
Seleco
4048
Servi Sat
4031, 4217
Siemens
4015
Silva
4049
Skantin
4217
Skardin
4009
Skinsat
4218
SKR
4217
Skymaster
4017, 4022, 4005,
4212, 4217
Skymax
4055, 4053
SkySat
4212, 4218, 4219,
4217
Skyvision
4048
SM Electronic 4212, 4217
Smart
4215, 4217
Sony
4067, 4070, 4213
SR
4011, 4054
Star Choice
4019
Starland
4217
Starring
4013
Start Trak
4001
Strong
4024, 4001, 4004,
4008, 4049, 4222
STS
4115
STVI
4031
Sumida
4011
Sunny Sound
4024
Sunsat
4217
Sunstar
4024, 4011, 4054
Supermax
4223
Tandberg
4052
Tandy
4004
Tantec
4006
TCM
4008
Techniland
4012
TechniSat
4021, 4026, 4027,
4014, 4053, 4038,
4039, 4212, 4213,
4218
Technology
4222
Technosat
4223
Technowelt
4219
Teco
4011, 4054
Telanor
4007
Telasat
4215, 4219
Telecom
4217
Telefunken
4017, 4001, 4216
Teleka
4004, 4011, 4014,
4218, 4219
Telemaster
4010
Telesat
4219
Telestar
4212, 4213, 4218
Televes
4006, 4218
Telewire
4048
Tempo
4223
Tevion
4008, 4217
Thomson
4020, 4006, 4052,
4058, 4208, 4215,
4213, 4219, 4216,
4217
Thorens
4051
Thorn
4006
Tivax
4104
Tivo
4196
Tokai
4053
Tonna
4006, 4012, 4048,
4218, 4217
Toshiba
4194, 4202, 4203
Triad
4049
Triasat
4218
Triax
4015, 4215, 4218,
4217
Turnsat
4217
Tvonics
4214
Twinner
4031, 4217
UEC
4222
Uher
4212
UltimateTV
4070
Uniden
4079, 4127
Unisat
4011, 4050, 4053
Unitor
4013
Universum
4015, 4215, 4219
US Digital
4016
Variosat
4015
Vega
4024
Ventana
4055, 4053
Viewsat
4098
Visiosat
4013, 4048, 4216,
4217
Voom
4019
Vortec
4001
Welltech
4212
WeTeKom
4212, 4218
Wevasat
4006
Wewa
4006
Winersat
4013
Wisi
4006, 4014, 4015,
4218, 4219
Woorisat
4010
Worldsat
4216
Xrypton
4024
XSat
4217
Zehnder
4024, 4010, 4008,
4209, 4215
Zenith
4102, 4107, 4195
Zodiac
4004
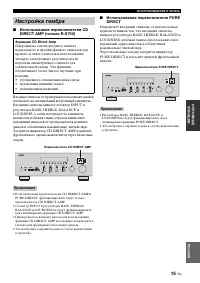
CD player
Yamaha 5082, 5095
CD recorder
Yamaha 5083
MD recorder
Yamaha 5080, 5081, 5086
Tape deck
Yamaha 5084, 5087
LD player
Yamaha 2080
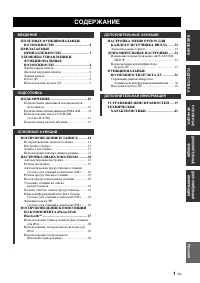
Содержание
- 3 RADIO DATA SYSTEM; CONTENTS; INTRODUCTION
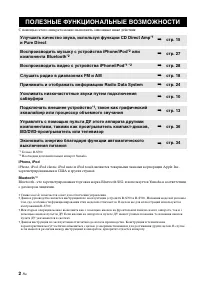
- 4 Sophisticated AM/FM tuner; FEATURES
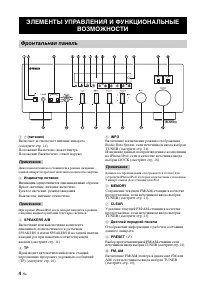
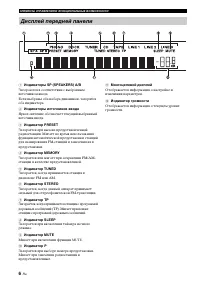
- 5 INTR; Press to control the input source of Zone 2.; Remote control sensor; Receives infrared signals from the remote control.; Front panel display; CONTROLS AND FUNCTIONS; Front panel; Note
- 6 Increases or decreases the sound output level.
- 7 Lights up when this unit is in the automatic tuning mode.; Europe model only; A B
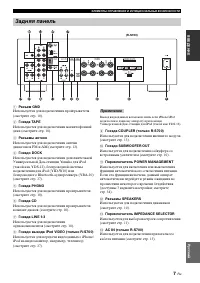
- 8 Connect a subwoofer with built-in amplifier.; Asia and General models only; Rear panel
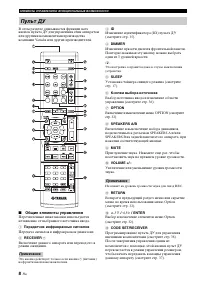
- 9 Sends infrared signals.
- 10 CODE SET; Sets the sleep timer.; MUTE; Notes
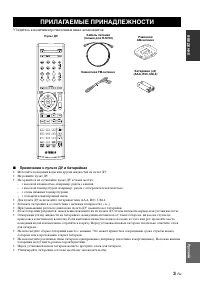
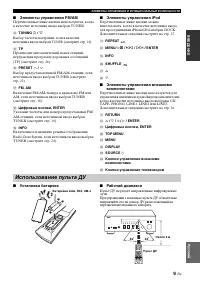
- 11 Notes on batteries; Open the battery compartment cover.; Handling the remote control; Installing batteries in the remote control
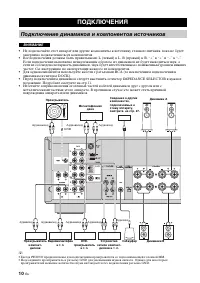
- 12 CONNECTIONS; CAUTION
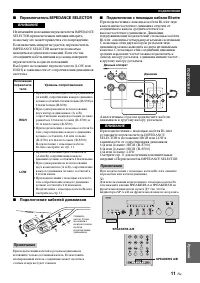
- 13 PREP; Connecting the banana plug; IMPEDANCE SELECTOR; Connecting speakers
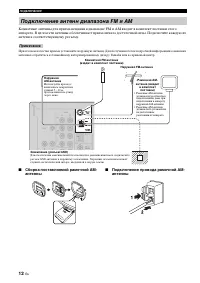
- 14 Connecting the AM and FM antennas
- 15 Connecting the AM loop antenna; Set up the AM loop antenna.
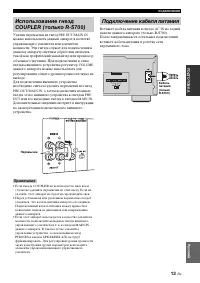
- 16 Main Zone of this unit turns on.; Connecting the power supply cord; Turning on and off this unit
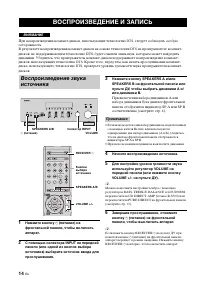
- 17 BA; PLAYING AND RECORDING; Playing a source
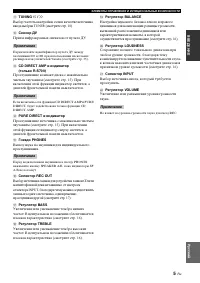
- 18 Adjusting the BALANCE control; Adjust the high and low frequency response.; BASS; Increases or decreases the low frequency response.; TREBLE; Increases or decreases the high frequency response.; Adjusting the LOUDNESS control; Adjusting the tonal quality
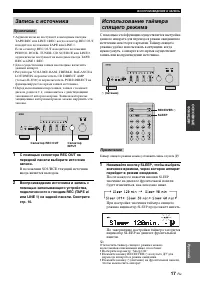
- 19 Play the selected source to record from.; Recording a source
- 20 Start playback on the selected input source.; Using the sleep timer
- 21 Muting the sound output
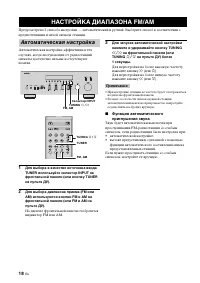
- 22 FM or AM appears in the front panel display.; Press TUNING; Press; Automatic tuning
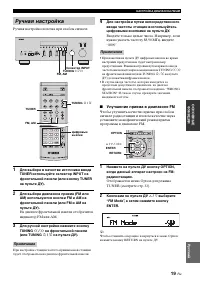
- 23 Manual tuning is effective when station signals are weak.; Hold down the button to continue tuning search.; Manual tuning
- 24 FM appears in the front panel display.; Automatic preset tuning
- 25 Customized automatic preset tuning
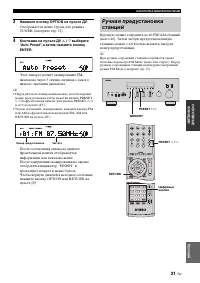
- 26 Manual preset tuning
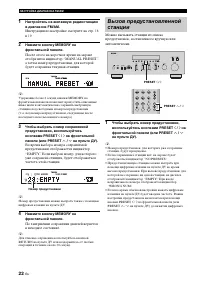
- 27 Selecting preset stations; Exchanging preset stations
- 28 See “EON function” on page 28.
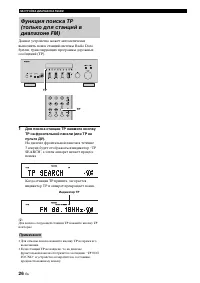
- 29 PTY SEEK function
- 30 • The unit stops searching when it finds a station; To cancel this function; POP M; EON function
- 31 ADVANCED SETUP menu parameters; Factory presets; PRESET; CANCEL; • Select CANCEL if you do not want the parameters of; Remote; REMOTE; Tuner; TU; ADVANCED SETUP
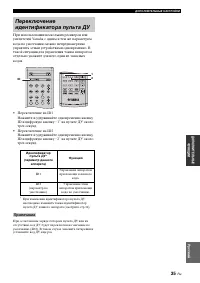
- 32 Switching the remote control ID
- 33 Multi-room configuration and connections; Connecting the Zone 2 components
- 34 Press ZONE 2 CONTROL on the front panel; Controlling Zone 2
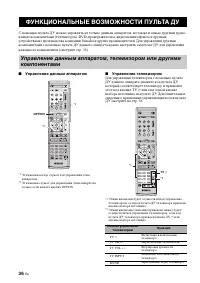
- 35 Controlling this unit; The shaded areas below can be used to control this unit.; Controlling other components; REMOTE CONTROL FEATURES; Control area
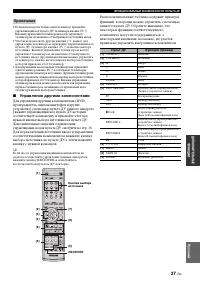
- 37 Remote control code default settings; Setting remote control codes
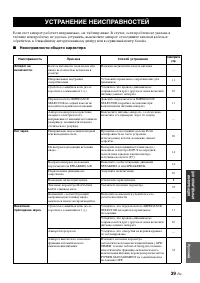
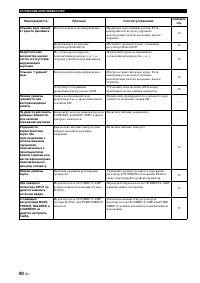
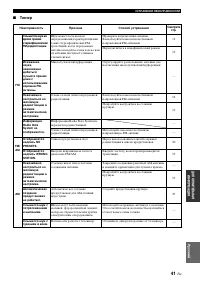
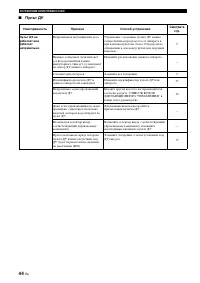
- 38 General; TROUBLESHOOTING
- 39 ADDITION
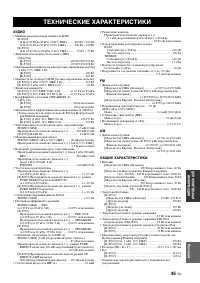
- 41 FM SECTION; GENERAL; SPECIFICATIONS
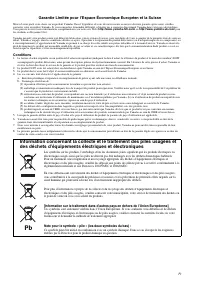
- 42 ATTENTION: VEUILLEZ LIRE CE QUI SUIT AVANT D’UTILISER; AVERTISSEMENT
- 43 RADIO DATA SYSTEM (MODÈLE POUR; PARTICULARITÉS DE LA; TABLE DES MATIÉRES
- 44 Amplificateur intégré à 2 voies; PARTICULARITÉS
- 45 Appuyez pour régler la source d’entrée de Zone 2.; Capteur de télécommande; Il reçoit les signaux émis par le boîtier de télécommande.; Afficheur de la face avant; Il fournit des informations relatives à l’état de l’appareil.; COMMANDES ET FONCTIONS; Face avant; Remarque; Secours de la mémoire; Remarques
- 46 Ces touches augmentent ou diminuent le niveau sonore.
- 47 S’allume lorsque Zone 2 est activé.; Modèle pour l’Europe seulement
- 55 Raccordements de l’antenne cadre AM; Raccordements de l’antenne cadre AM.


