Усилители Pioneer A-10 / A-20 / A-30 - инструкция пользователя по применению, эксплуатации и установке на русском языке. Мы надеемся, она поможет вам решить возникшие у вас вопросы при эксплуатации техники.
Если остались вопросы, задайте их в комментариях после инструкции.
"Загружаем инструкцию", означает, что нужно подождать пока файл загрузится и можно будет его читать онлайн. Некоторые инструкции очень большие и время их появления зависит от вашей скорости интернета.
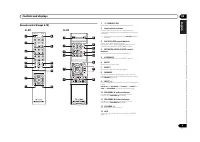


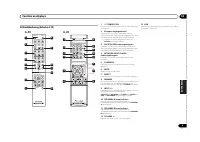


02
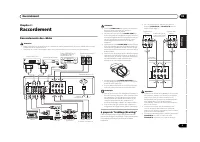
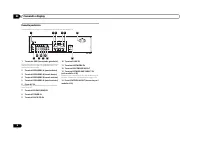
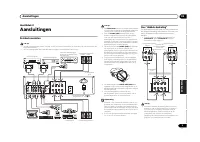
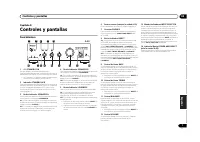
Connecting up
6
En
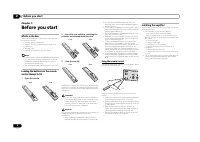
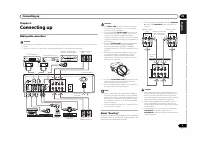
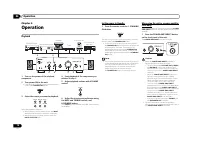
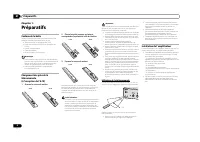
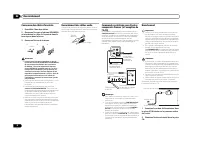
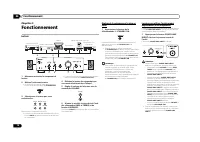
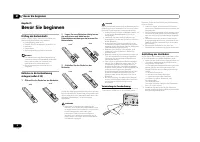
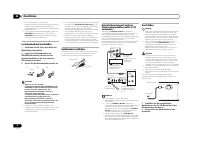
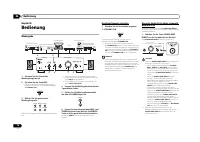
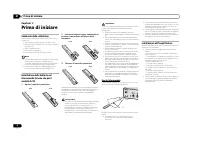
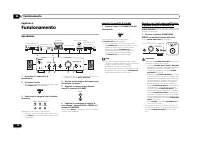
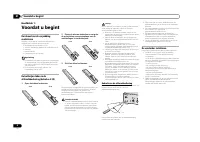
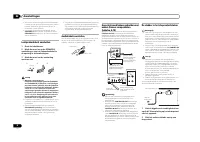
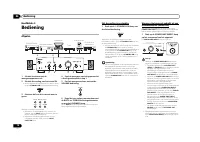
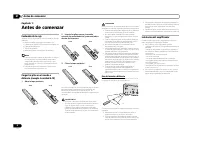
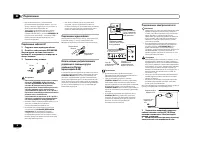
Connecting speaker cables
1
Twist the cable cores.
2
Loosen the nut on the SPEAKERS
terminal, and insert the speaker cable into
the exposed hole in the terminal shaft.
3
Retighten the terminal nut.
Caution
• When using only one set of speaker terminals
(SPEAKERS A or SPEAKERS B), or when utilizing
bi-wiring connections, the speaker used should
have a nominal impedance between 4
Ω
and
16
Ω
. When using both sets of terminals, the
connected speakers should have nominal
impedance between 8
Ω
and 32
Ω
. Consult the
instructions accompanying your speakers for
details regarding the impedance value.
• Make sure the positive and negative (+/–) terminals
on the amplifier match those on the speakers.
• These speaker terminals carry
HAZARDOUS live
voltage
. To prevent the risk of electric shock when
connecting or disconnecting the speaker cables,
disconnect the power cord before touching any
uninsulated parts.
• Make sure that all the bare speaker wire is twisted
together and inserted fully into the speaker
terminal. If any of the bare speaker wire touches the
back panel it may cause the power to cut off as a
safety measure.
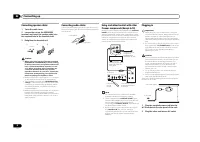
Connecting audio cables
Connect the white plug to the left (L) jack, and the red
plug to the right (R) jack. Be sure to insert the plugs fully
into the jacks.
1
2
3
10 mm
Left (white)
Right (red)
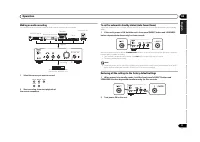
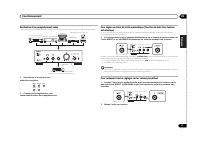
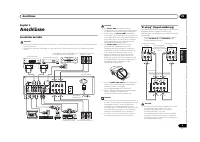
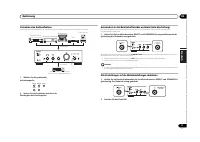
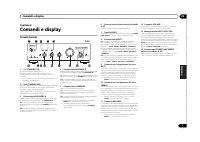
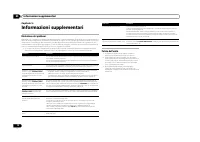
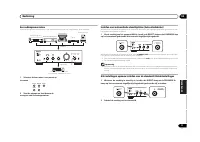
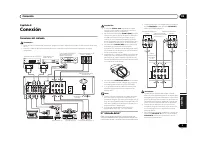
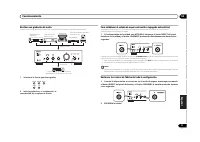
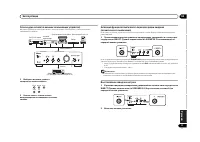
Using centralized control with other
Pioneer components (Except A-10)
Multiple Pioneer components equipped with
CONTROL
IN/OUT
jacks can be connected to the A-30/A-20 unit,
allowing centralized control of the components via the
remote sensor on the A-30/A-20. This also allows remote
control of components not equipped with a remote
sensor, or installed in places where the component’s
remote sensor cannot be accessed.
Note
• For connections use a commercially available
monaural miniplug cord (without resistor).
• When connecting the
CONTROL IN/OUT
jacks,
commercially available audio cords must also be
used to make analog connections. Merely
connecting the
CONTROL IN/OUT
jacks alone will
not allow proper system control.
• When a control cord is connected to the A-30/A-
20’s
CONTROL IN
jack, the unit cannot be
controlled by pointing the remote control at the A-
30/A-20 (the remote sensor is automatically
disabled).
Plugging in
Important
• When going on a trip or otherwise not using the
unit for an extended period, always disconnect the
power cord from its outlet. Note that various
internal settings will not be lost even if the power
cord is disconnected from its outlet for an extended
time.
• If it is necessary to detach the power cord, first be
sure to press the
/I STANDBY/ON
button on the
front panel of the unit so the A-30/A-20 is turned
OFF or the A-10 is in standby mode before
detaching the cord.
Caution
• The use of a power cord other than the one provided
will invalidate the warranty, since Pioneer will not
be responsible for any damage incurred. (The
power cord provided with the model A-30 has a
rated current capacity of 10 A, while the cord
provided with the A-20/A-10 has a rated current
capacity of 2.5 A.)
• Do not use any power cord other than the one
supplied with this unit.
• Do not use the supplied power cord for any purpose
other than that described below.
After you’ve finished making all connections, plug the
unit into an AC outlet.
1
Plug the supplied power cord into the
AC IN socket on the rear panel of the unit.
2
Plug the other end into an AC outlet.
IN
OUT
CONTROL
Other Pioneer
component equipped
with CONTROL IN/
OUT jacks
To other Pioneer
component
equipped with
CONTROL IN jack
A-30/A-20
Aim remote control
at the sensor on the
A-30/A-20.
A-30/A-20
remote
control
To AC outlet
Power cord
A-30’s rear panel
02_connecting_up.fm 6 ページ
年6月
日 木曜日 午後
時
分


