
Триммеры CROWN CT20051 - инструкция пользователя по применению, эксплуатации и установке на русском языке. Мы надеемся, она поможет вам решить возникшие у вас вопросы при эксплуатации техники.
Если остались вопросы, задайте их в комментариях после инструкции.
"Загружаем инструкцию", означает, что нужно подождать пока файл загрузится и можно будет его читать онлайн. Некоторые инструкции очень большие и время их появления зависит от вашей скорости интернета.


17
English
trunk, the tool will be thrown back on you and this may
lead to serious injuries�
•
In the process of operation move the tool in a
pendulum manner to the right and to the left� Movement
from the right to the left is the operational one and
movement from the left to the right is a backstroke.
•
If you incline cutting disc
21
a little bit to the left, the
mown grass will be getting stowed in even rows�
Attention: take care to ensure that
cutting disc 21 does not touch the
ground, stones, curbs, trees, etc. In case
of cutting disc 21 hitting any object,
immediately switch off the tool and check whether
cutting disc 21 has not got any damages. It is
expressly prohibited to use cutting disc 21 that
has any damages.
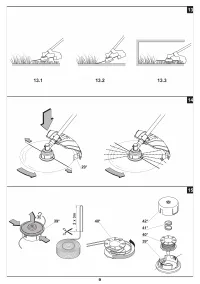
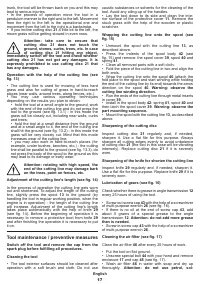
Operation with the help of the cutting line (see
fig. 13)
•
The cutting line is used for mowing of less hard
grass and also for cutting of grass in hard-to-reach
places (near walls, around trees, along fences, etc�)�
•
You may use various operating techniques
depending on the results you plan to obtain:
•
hold the tool at a small angle to the ground, work
with the end of the cutting line and do not press the
tool to the ground (see fig. 13.1) - in this mode the
grass will be closely cut, including near walls, curbs
and trees;
•
hold the tool at a small distance from the ground
and at a small angle to it, the end of the cutting line
shall hit the ground (see fig. 13.2) - in this mode the
grass will be very closely cut� Mind that this mode
increases wear of the cutting line;
•
you may also work in hard-to-reach places (for
example, under bushes, benches, etc�) - the cutting
line shall be parallel to the ground (see fig. 13.3), do
not press the body of the spool to the ground as this
may lead to its damage or early wear�
Attention: rotating with high speed, the
end of the cutting line may damage bark
on the trees, paint on fences, etc.
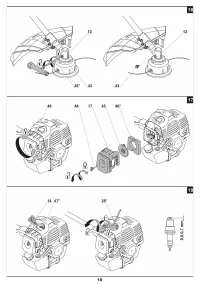
Adjustment of the cutting line's length (see fig. 14)
In the process of operation the cutting line gets worn
out and shortened� To adjust the length of the cutting
line, slightly press the spool
13
to the ground (by
handling the tool in regular working position, when the
engine is in operation) - the length of the cutting line
will increase� Adjustment of the cutting line's length
takes place automatically with the help of knife
29
(see fig. 14). Before the beginning of operation it is
necessary to remove a protective boot from knife
29
and after finishing the operation it is necessary to put
it on�
Tool maintenance / preventive measures
Switch off the tool and remove the cap from the
spark plug before fulfilling all procedures.
Cleaning the tool
•
The tool exterior surfaces should be cleaned after
operation with a soft brush and cloth� Do not use
caustic substances or solvents for the cleaning of the
tool� Avoid any oiling-up of the handles�
•
Lay the tool down to its side and clean the inte-
rior surface of the protective cover
11
� Remove the
stuck grass with the help of the wooden or plastic
scratcher�
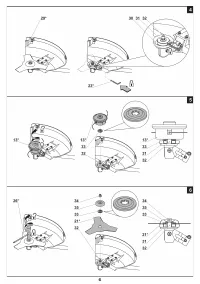
Wrapping the cutting line onto the spool (see
fig. 15)
•
Unmount the spool with the cutting line
13
, as
described above�
•
Press the indents of the spool body
42
(see
fig. 15) and remove: the spool cover
39
, spool
40
and
spring
41
�
•
Clean all removed parts with a soft cloth�
•
Fold the piece of the cutting line in two and align the
both ends�
•
Wrap the cutting line onto the spool
40
(attach the
fold place to the spool and start winding while holding
the end of the cutting line by its end) towards the arrow
direction on the spool
40
�
Warning: observe the
cutting line winding direction.
•
Run the ends of the cutting line through metal inserts
in cover
39
�
•
Install in the spool body
42
: spring
41
, spool
40
and
then latch the spool cover
39
�
Warning: observe the
part mounting sequence.
•
Mount the spool with the cutting line
13
, as described
above�
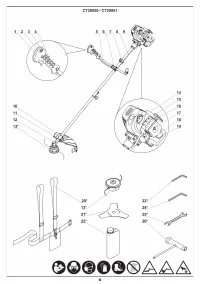
Sharpening of the cutting disc
Inspect cutting disc
21
regularly and, if needed,
sharpen it. Use a flat file for this purpose. Always
sharpen all cutting edges evenly to avoid unbalance
of cutting disc
21
(the tool in this case will be vibrating
intensely)� Replace cutting disc
21
if it is severely
worn�
Sharpening of the knife for shorten the cutting line
Inspect knife
29
regularly and, if needed, sharpen it�
Use a flat file for this purpose. Replace knife
29
if it is
severely worn�
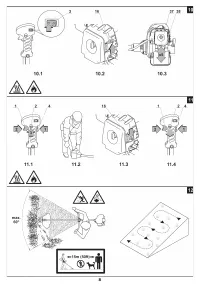
Lubrication of gears (see fig. 16)
Check whether there is grease in angle transmission
12
every 25 hours of using the tool�
•
Screw out screw cap
43
with the help of a screwdriver
of multi-purpose wrench
26
(see fig. 16).
•
If there is no oil at the end of screw cap
43
, add
about 5 grams of a special grease to the angle
transmission
12
�
Attention: do not add more grease
than is needed.
•
Screw in screw cap
43
with the help of a screwdriver
of multi-purpose wrench
26
�
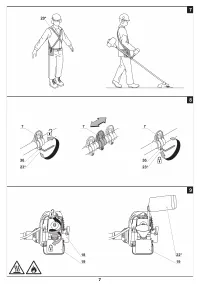
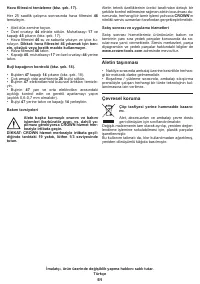
Cleaning the air filter (see fig. 17)
Clean the air filter
46
after every 25 hours of work.
•
Put the tool on flat ground.
•
Unscrew special bolt
44
with your hand and remove
enclosure
17
and cap
45
(see fig. 17).
•
Wash air filter
46
in water with soap and dry up
thoroughly�
Attention: do not use petrol, sol
-


