
Швейная машина Janome DC 4030 - инструкция пользователя по применению, эксплуатации и установке на русском языке. Мы надеемся, она поможет вам решить возникшие у вас вопросы при эксплуатации техники.
Если остались вопросы, задайте их в комментариях после инструкции.
"Загружаем инструкцию", означает, что нужно подождать пока файл загрузится и можно будет его читать онлайн. Некоторые инструкции очень большие и время их появления зависит от вашей скорости интернета.


1
2
3
3
6
6
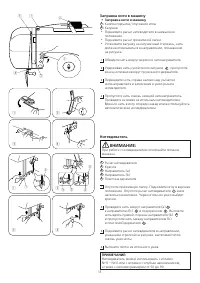
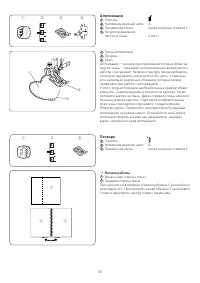
РАЗДЕЛ IV.
УХОД ЗА МАШИНОЙ
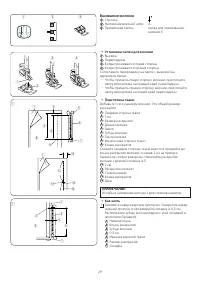
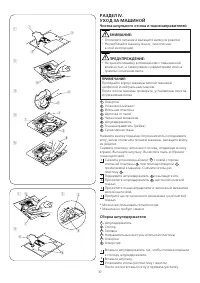
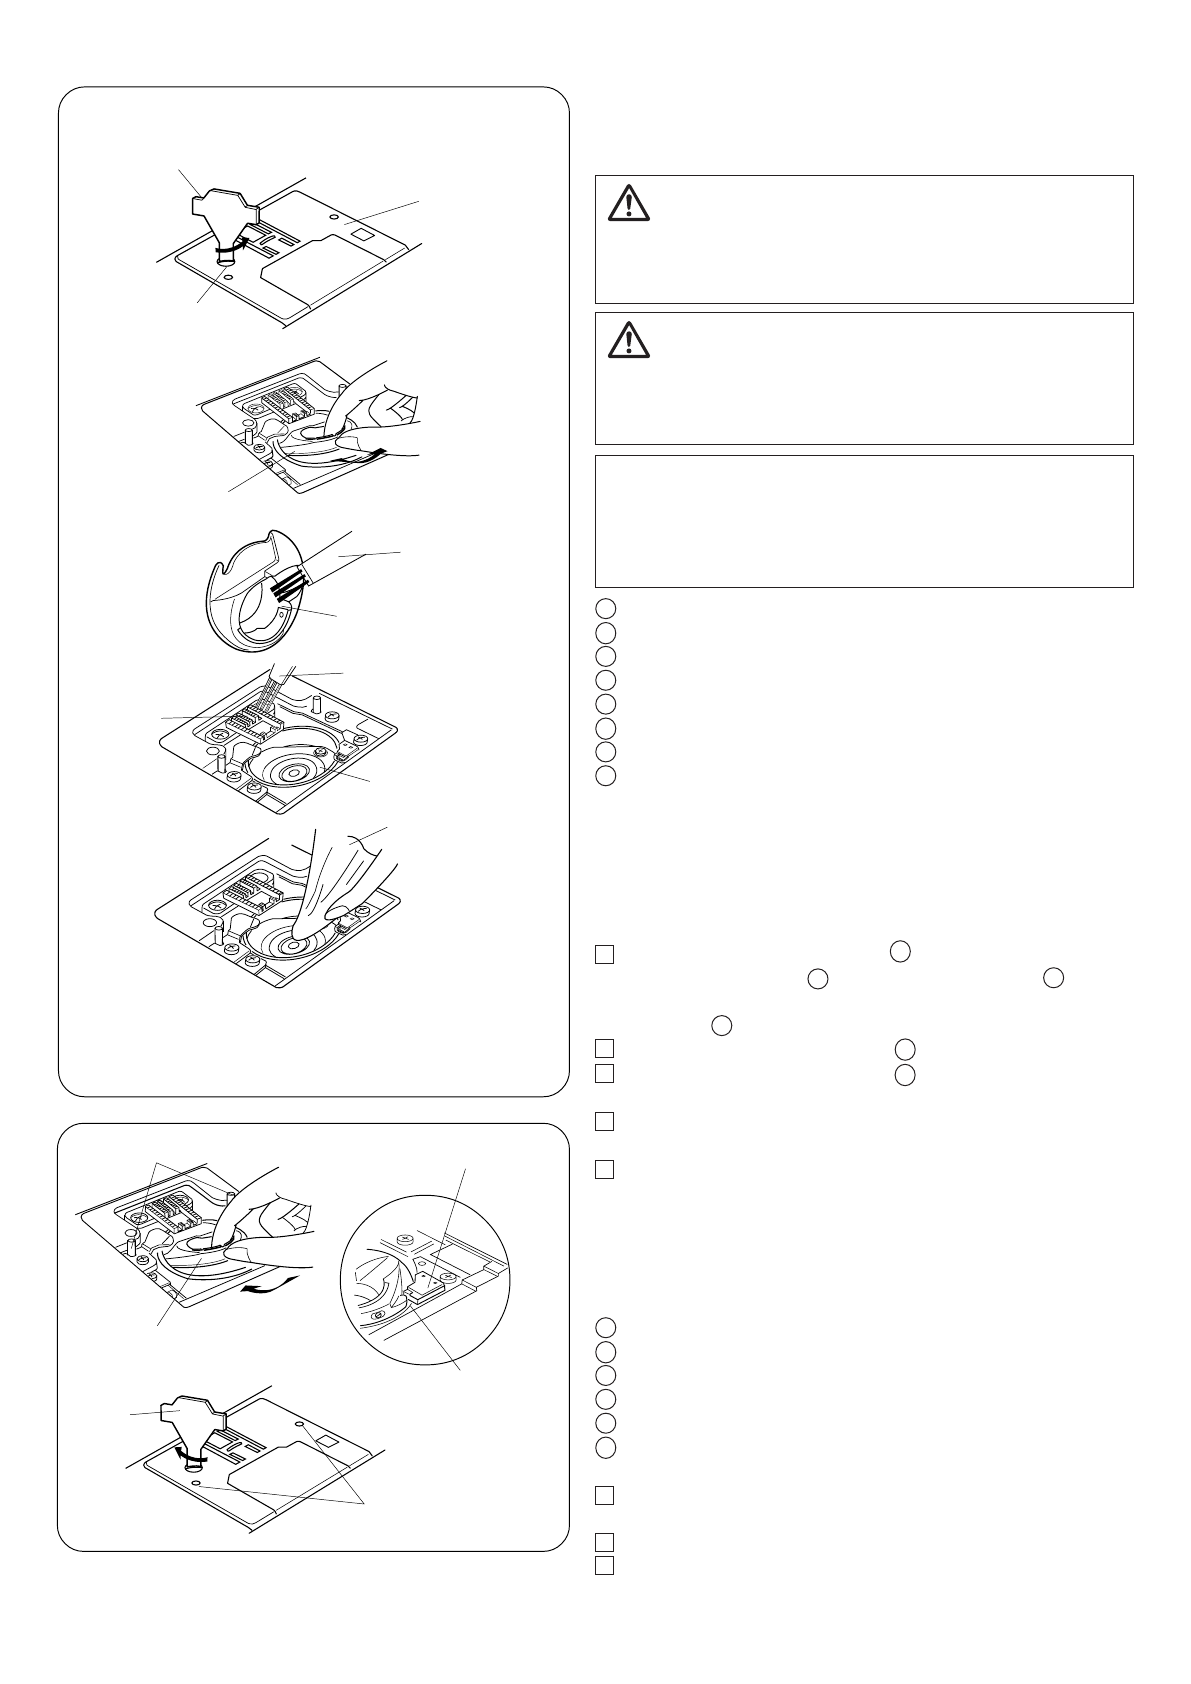
Чистка шпульного отсека и тканенаправителей
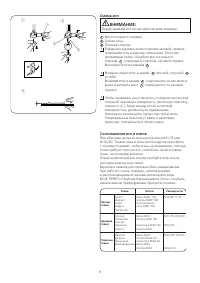
ВНИМАНИЕ:
• Отключите питание и вытащите вилку из розетки.
• Не разбирайте машину иначе, чем описано
в этой инструкции.
ПРЕДУПРЕЖДЕНИЕ:
• Не храните машину в помещениях с повышенной
влажностью, а также рядом с радиаторами или на
прямом солнечном свете.
ПРИМЕЧАНИЕ:
Протирайте корпус машины мягкой тканевой
салфеткой и нейтральным мылом.
После чистки машины проверьте, установлены ли игла
и прижимная лапка.
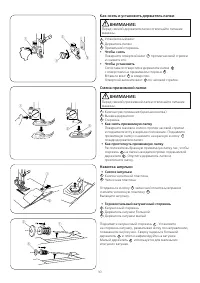
Отвертка
Установочный винт
Игольная пластина
Щеточка от пыли
Челночный механизм
Шпуледержатель
Тканенаправитель (рейка)
Сухая мягкая ткань
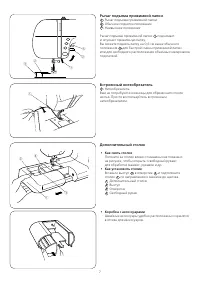
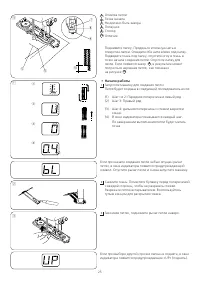
Нажмите кнопку подъема/опускания иглы и поднимите
иглу, затем отключите питание машины, вытащите вилку
из розетки.
Снимите пластину челночного отсека, отодвинув кнопку
вправо. Вытащите шпульку. Вычистите пыль и обрезки
ткани щеточкой.
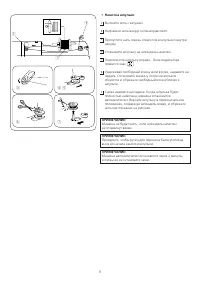
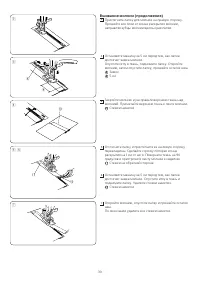
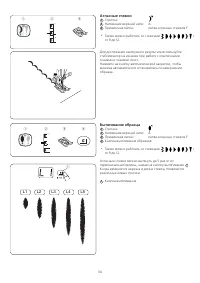
Снимите установочный винт с левой стороны
игольной пластины при помощи отвертки ,
прилагаемой к машине. Снимите игольную
пластину .
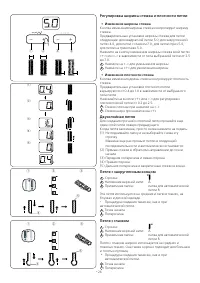
Поднимите шпуледержатель и вытащите его.
Прочистите шпуледержатель щеточкой и мягкой
тканью.
Прочистите тканенаправители и челночный механизм
мягкой щеточкой.
Протрите центр челночного механизма сухой мягкой
тканью.
* Можно воспользоваться пылесосом.
* Машина не требует смазки.
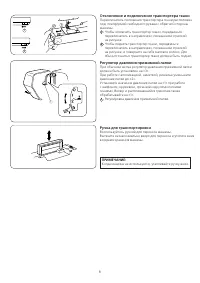
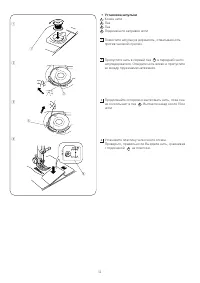
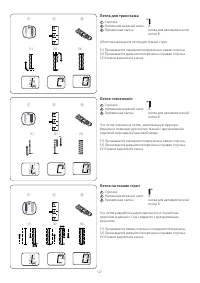
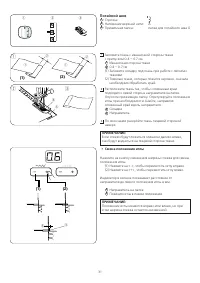
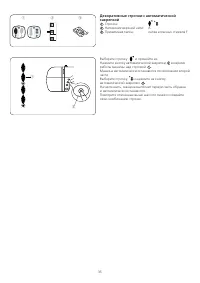
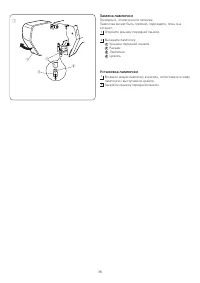
Сборка шпуледержателя
Шпуледержатель
Стопор
Головка
Направительные выступы игольной пластины
Отвертка
Отверстия
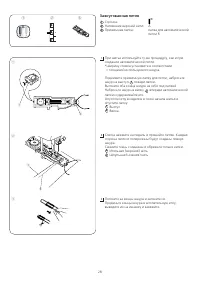
Вставьте шпуледержатель так, чтобы головка подошла
к стопору шпуледержателя.
Вставьте шпульку.
Установите игольную пластину с винтом.
После чистки вставьте иглу и прижимную лапку.
37
SECTION IV. CARE OF YOUR MACHINE
Clean the Hook Race and Feed Dog
WARNING:
• Turn the power switch off and unplug the machine
before cleaning.
• Do not dismantle the machine other than as explained in
this section.
q
w
e
y
r
y
r
u
t
r
w
e
q
t
y
z
x
c
v
b
z
x
c
CAUTION:
• Do not store the machine in a high-humidity area, near
a heat radiator, or in direct sunlight.
NOTE:
Clean the outside of the machine with a soft cloth and
neutral soap.
After cleaning the machine, make sure the needle and
presser foot are attached.
q
Screw driver
w
Set screw
e
Needle plate
r
Lint brush
t
Hook race
y
Bobbin holder
u
Feed dog
i
Soft, dry cloth
Press the up/down needle position button to raise the
needle, then unplug the sewing machine.
Remove the cover plate by sliding the cover plate
release button to the right. Take out the bobbin. Brush
out dust and lint. (You may also use a vacuum cleaner.)
z
Remove the set screw
w
on the left hand side of the
needle plate
e
with the screwdriver
q
supplied with
the machine. Remove the needle plate
e
.
x
Lift up the bobbin holder
y
and remove it.
c
Clean the bobbin holder
y
with a lint brush.
v
Clean the feed dog and hook race with the lint brush.
b
Clean the center of the hook race with a dry cloth.
* You may also use a vacuum cleaner.
* The machine does not require oiling.
Assemble the Hook Race
q
Bobbin holder
w
Stopper
e
Knob
r
Needle plate guide pins
t
Screwdriver
y
Guide holes
z
Insert the bobbin holder so that the knob fits next to
the stopper in the hook race.
x
Insert the bobbin.
c
Attach the needle plate with screw.
After cleaning the machine, make sure the needle
and presser foot are attached.
i
37
4
q
w
r
t
y
SECTION II. GETTING READY TO SEW
Connecting Machine to Power Supply
Before connecting the power cord, make sure the voltage
and frequency shown on the machine conform to your
electrical power.
e
r
w
q
e
Operating Instructions:
The symbol “O” of a switch indicates the “off ” position of
a switch.
For appliances with a polarized plug (one blade wider
than the other). To reduce the risk of electric shock, this
plug is intended to fit in a polarized outlet only one way.
If it does not fit fully in the outlet, reverse the plug. If it
still does not fit, contact a qualified electrician to install
the proper outlet. Do not modify the plug in any way.
For Your Safety
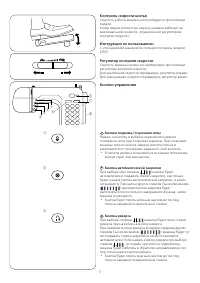
* While in operation, always keep your eyes on the
sewing area. Do not touch any moving parts such as
the thread take-up lever, handwheel or needle.
* Always turn off the power switch and unplug from the
power supply:
- When leaving the machine unattended.
- When attaching or removing any par ts.
- When cleaning the machine.
* Do not place anything on the foot control, when not
sewing.
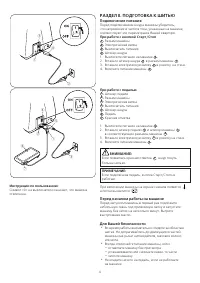
Using the foot control
q
Foot control plug
w
Machine socket
e
Power supply plug
r
Power switch
t
Machine plug
y
Foot control
u
Red mark
1. Turn off the power switch
r
.
2. Insert the foot control plug
q
, and machine plug
t
into the machine socket
w
.
3. Insert the power supply plug
e
into the outlet.
4. Turn on the power switch
r
.
NOTE:
The start/stop button does not work when the foot control
is connected.
Before Using Your Sewing Machine
Before using your sewing machine for the first time,
place a waste fabric under the presser foot and run the
machine without thread for a few minutes. Wipe away
any oil which may appear.
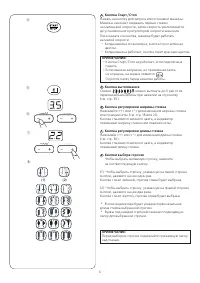
Using the start/stop button
q
Machine socket
w
Power supply plug
e
Power switch
r
Machine plug
1. Turn off the power switch
e
.
2. Insert the machine plug
r
into the machine socket
q
.
3. Insert the power supply plug
w
into the outlet.
4. Turn on the power switch
e
When the machine is turned on, the mark is lit after
one second, and the indicator window will show .
CAUTION:
Do not pull the foot control cord beyond the red mark
u
.
u
4
q
w
r
t
y
SECTION II. GETTING READY TO SEW
Connecting Machine to Power Supply
Before connecting the power cord, make sure the voltage
and frequency shown on the machine conform to your
electrical power.
e
r
w
q
e
Operating Instructions:
The symbol “O” of a switch indicates the “off ” position of
a switch.
For appliances with a polarized plug (one blade wider
than the other). To reduce the risk of electric shock, this
plug is intended to fit in a polarized outlet only one way.
If it does not fit fully in the outlet, reverse the plug. If it
still does not fit, contact a qualified electrician to install
the proper outlet. Do not modify the plug in any way.
For Your Safety
* While in operation, always keep your eyes on the
sewing area. Do not touch any moving parts such as
the thread take-up lever, handwheel or needle.
* Always turn off the power switch and unplug from the
power supply:
- When leaving the machine unattended.
- When attaching or removing any par ts.
- When cleaning the machine.
* Do not place anything on the foot control, when not
sewing.
Using the foot control
q
Foot control plug
w
Machine socket
e
Power supply plug
r
Power switch
t
Machine plug
y
Foot control
u
Red mark
1. Turn off the power switch
r
.
2. Insert the foot control plug
q
, and machine plug
t
into the machine socket
w
.
3. Insert the power supply plug
e
into the outlet.
4. Turn on the power switch
r
.
NOTE:
The start/stop button does not work when the foot control
is connected.
Before Using Your Sewing Machine
Before using your sewing machine for the first time,
place a waste fabric under the presser foot and run the
machine without thread for a few minutes. Wipe away
any oil which may appear.
Using the start/stop button
q
Machine socket
w
Power supply plug
e
Power switch
r
Machine plug
1. Turn off the power switch
e
.
2. Insert the machine plug
r
into the machine socket
q
.
3. Insert the power supply plug
w
into the outlet.
4. Turn on the power switch
e
When the machine is turned on, the mark is lit after
one second, and the indicator window will show .
CAUTION:
Do not pull the foot control cord beyond the red mark
u
.
u
1
2
3
4
5
6
1
2
3
4
5
6
7
8
2
1
3
2
1
3
4
5
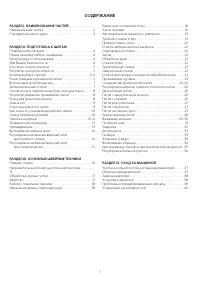
Содержание
- 3 СОДЕРЖАНИЕ
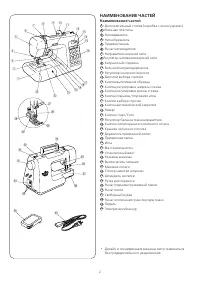
- 4 НАИМЕНОВАНИЕ ЧАСТЕЙ; Наименование частей
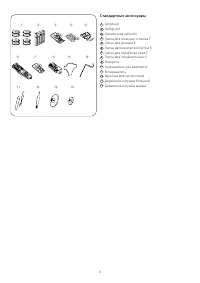
- 5 Стандартные аксессуары
- 6 РАЗДЕЛ II. ПОДГОТОВКА К ШИТЬЮ; Подключение питания; При работе с кнопкой Старт/Стоп; Перед началом работы на машине; Инструкции по пользованию:
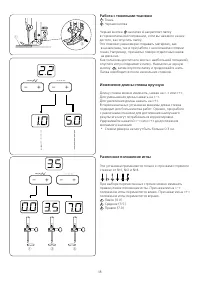
- 7 Кнопка подъема/опускания иглы
- 8 Кнопка вытягивания
- 9 Как снять столик
- 13 • Намотка шпульки; v b
- 14 • Установка шпульки
- 15 Заправка нити в машину; • Заправка нити в машину; Нитевдеватель
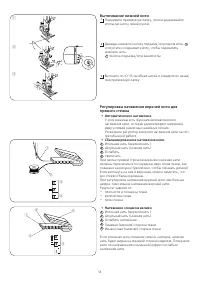
- 16 • Автоматическое натяжение
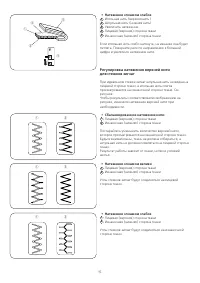
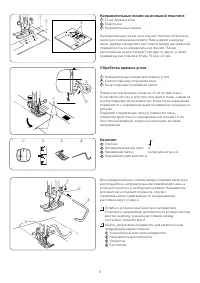
- 17 • Натяжение слишком слабое; Регулировка натяжения верхней нити; • Сбалансированное натяжение нити
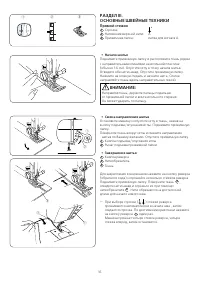
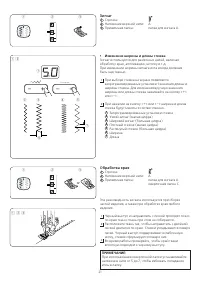
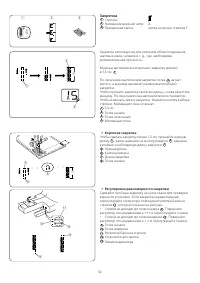
- 18 ОСНОВНЫЕ ШВЕЙНЫЕ ТЕХНИКИ; Прямой стежок; • Начало шитья
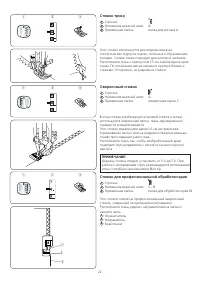
- 23 Зигзаг; Изменение ширины и длины стежка; Обработка края; z x; z x c; or
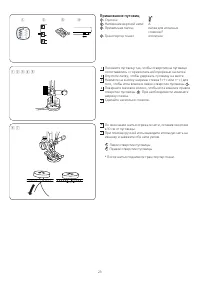
- 25 Пришивание пуговиц; z x c v b
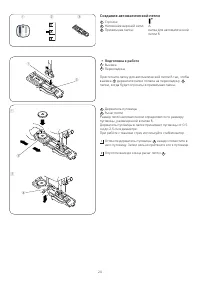
- 26 Создание автоматической петли; • Подготовка к работе
- 28 Double Layer Buttonhole; • To change the stitch width; Регулировка ширины стежка и плотности петли; • Изменение ширины стежка; Двухслойная петля; Round End Buttonhole; • To change the stitch width; Double Layer Buttonhole
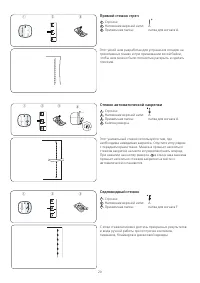
- 29 Faux Chain Buttonhole
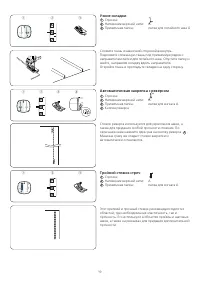
- 31 • Установка лапки для молнии; Zipper Sewing
- 32 b n
- 33 Blind Hemming; Blind Hemming; • Adjusting the needle drop position; Blind Hemming
- 34 • To sew a shorter tack; • Короткая закрепка; Bartacking; • To sew a shorter tack
- 35 Applique; Аппликация; • Начало работы; Applique; • To sew; Applique; Patchwork; • To sew
- 36 Elongation
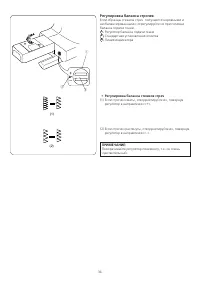
- 38 Регулировка баланса строчек; • Регулировка баланса стежков стреч; Adjusting Pattern Balance; Feed balancing dial; turning the dial in the direction of “+”.; • Adjusting distorted stretch stitch patterns
- 39 УХОД ЗА МАШИНОЙ; Чистка шпульного отсека и тканенаправителей; SECTION IV. CARE OF YOUR MACHINE
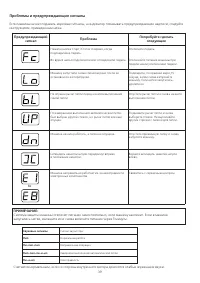
- 41 Проблемы и предупреждающие сигналы; Предупреждающий
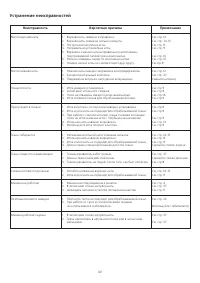
- 42 Устранение неисправностей


