
Швейная машина Janome DC 4030 - инструкция пользователя по применению, эксплуатации и установке на русском языке. Мы надеемся, она поможет вам решить возникшие у вас вопросы при эксплуатации техники.
Если остались вопросы, задайте их в комментариях после инструкции.
"Загружаем инструкцию", означает, что нужно подождать пока файл загрузится и можно будет его читать онлайн. Некоторые инструкции очень большие и время их появления зависит от вашей скорости интернета.


31
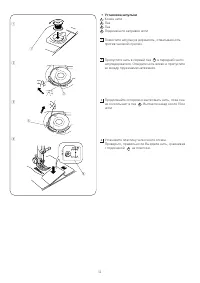
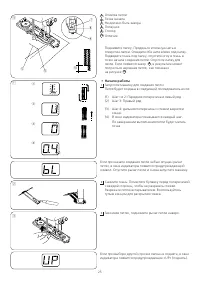
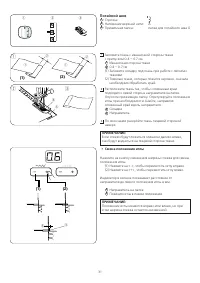
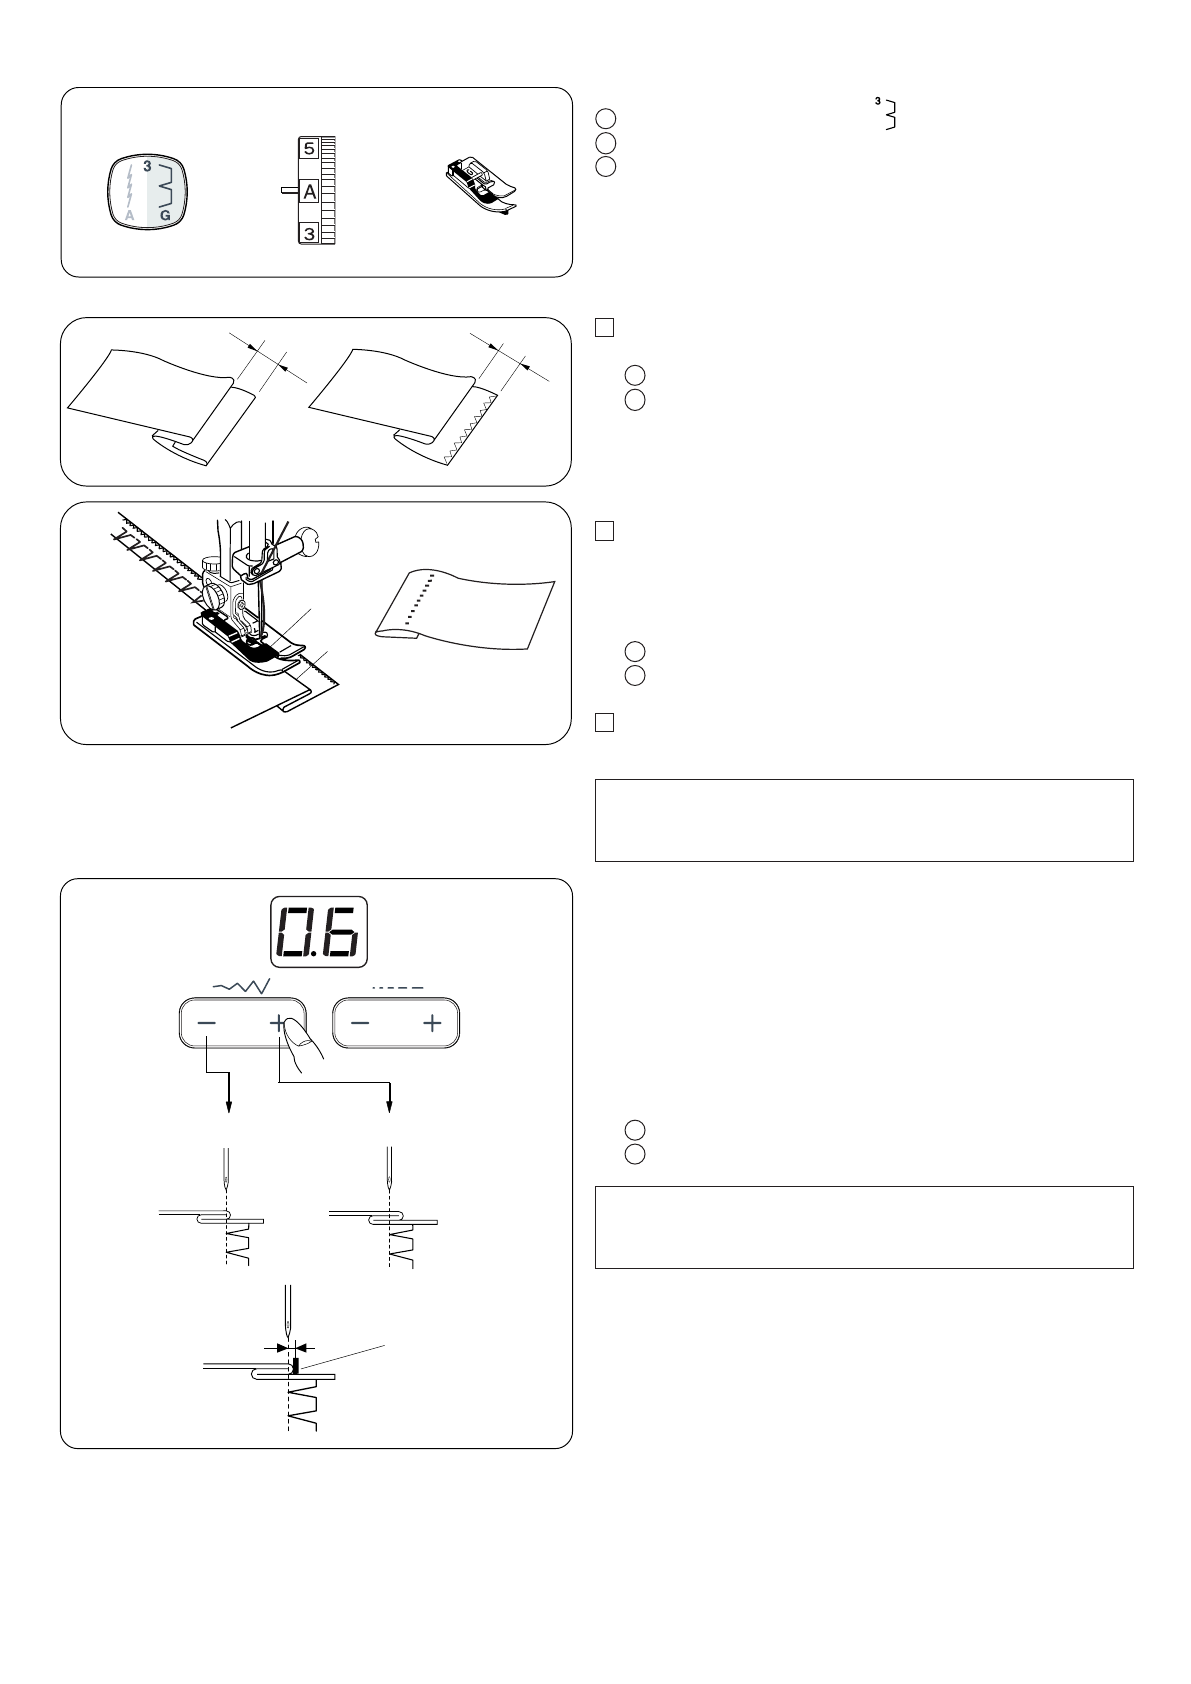
• Adjusting the needle drop position
The needle drop position can be adjusted by pressing
stitch width adjusting button.
(1)
Press the minus (–) key to move the needle drop
position to the right.
(2)
Press the plus (+) key to move the needle drop
position to the left.
The indicator window will show the distance between the
guide and left needle drop position in millimeter.
r
Guide
t
Left needle drop position
NOTE:
The needle drop position will move to the left or right,
but the stitch width is remained the same.
q
w
(1)
q
w
(2)
e
r
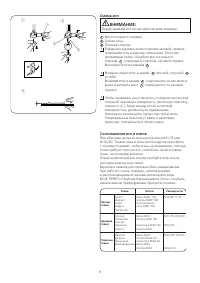
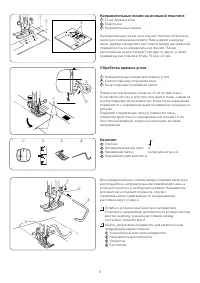
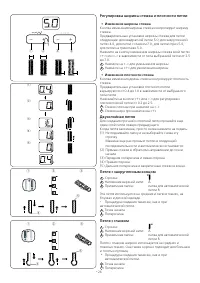
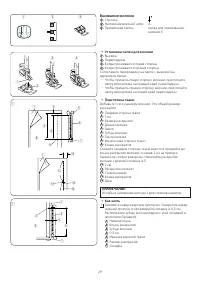
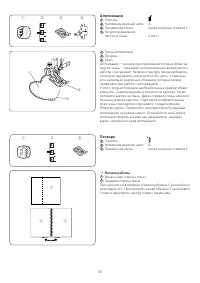
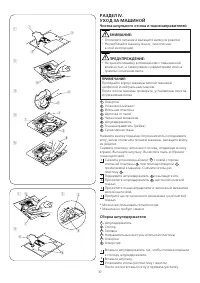
Blind Hemming
q
Stitch pattern:
w
Thread tension dial:
A
e
Presser foot:
Blind hem foot: G
z
x
c
t
r
(1)
(2)
q
w
e
z
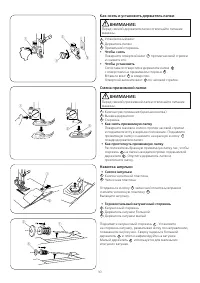
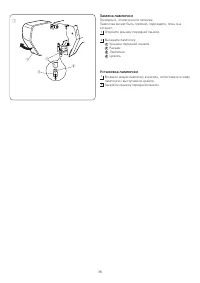
Fold a hem with the wrong side of the fabric up to form
a 0.4 – 0.7 cm allowance.
q
Wrong side of fabric
w
0,4 – 0,7 cm
(1) Fold the hem under the fabric for lightweight fabrics.
(2) On heavyweight fabrics that tend to ravel, the raw
edge should be overcast first.
x
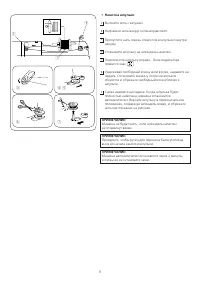
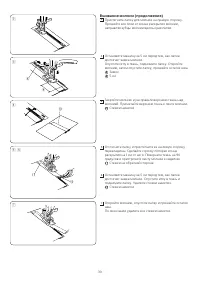
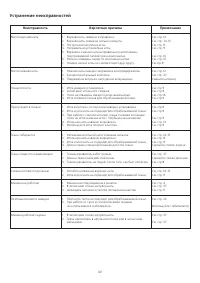
Place the fabric so that the fold is next to the guide on
the foot. Lower the presser foot. Adjust the needle drop
position if necessary. Sew while guiding the fold along
the guide.
e
Fold
r
Guide
c
Open the fabric after sewing is finished.
NOTE:
If the needle pierces too far left, the stitch will show
through on the right side of the fabric.
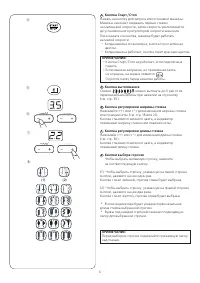
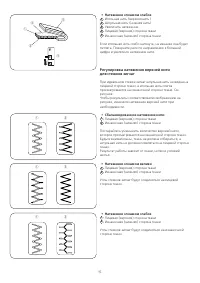
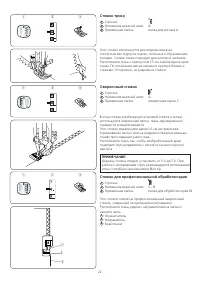
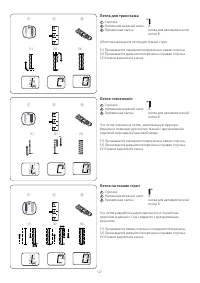
Потайной шов
Строчка:
Натяжение верхней нити:
А
Прижимная лапка:
лапка для потайного шва G
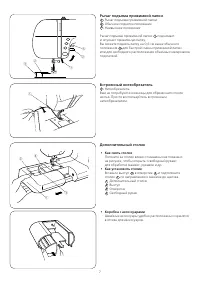
Заложите ткань с изнаночной стороны ткани
с припуском 0.4 – 0.7 см.
Изнаночная сторона ткани
0.4 – 0.7 см
(1) Заложите складку под ткань при работе с легкими
тканями.
(2) Тяжелые ткани, которые ложатся неровно, сначала
необходимо обработать край.
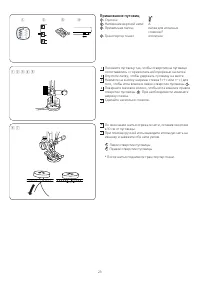
Расположите ткань так, чтобы сложенный край
подходил к левой стороне направителя на лапке.
Опустите прижимную лапку. Отрегулируйте положение
иглы при необходимости. Шейте, направляя
сложенный край вдоль направителя.
Складка
Направитель
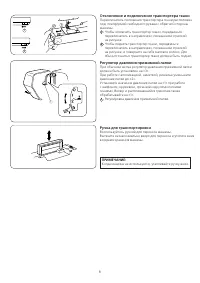
По окончании раскройте ткань лицевой стороной
наверх.
ПРИМЕЧАНИЕ:
Если стежки будут ложиться слишком далеко влево,
они будут виднеться на лицевой стороне ткани.
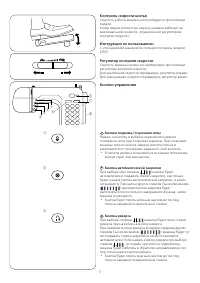
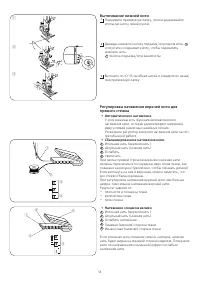
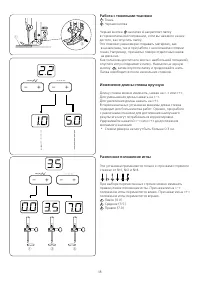
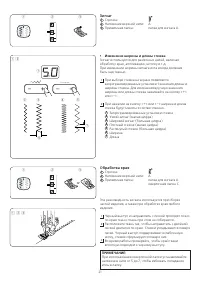
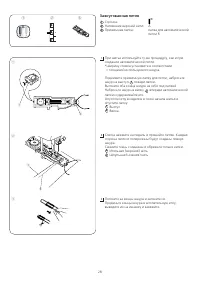
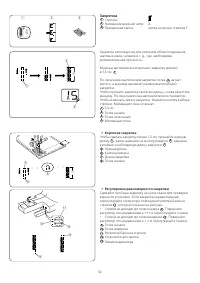
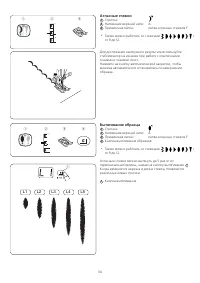
• Смена положения иглы
Нажмите на кнопку изменения ширины стежка для смены
положения иглы.
(1) Нажмите на «-», чтобы переместить иглу вправо.
(2) Нажмите на «+», чтобы переместить иглу влево.
Индикатор в окошке показывает расстояние от
направителя до левого положения иглы в мм.
Направитель на лапке
Позиция иглы в левом положении
ПРИМЕЧАНИЕ:
Положение иглы меняется вправо или влево, но при
этом ширина стежка остается неизменной.
31
• Adjusting the needle drop position
The needle drop position can be adjusted by pressing
stitch width adjusting button.
(1)
Press the minus (–) key to move the needle drop
position to the right.
(2)
Press the plus (+) key to move the needle drop
position to the left.
The indicator window will show the distance between the
guide and left needle drop position in millimeter.
r
Guide
t
Left needle drop position
NOTE:
The needle drop position will move to the left or right,
but the stitch width is remained the same.
q
w
(1)
q
w
(2)
e
r
Blind Hemming
q
Stitch pattern:
w
Thread tension dial:
A
e
Presser foot:
Blind hem foot: G
z
x
c
t
r
(1)
(2)
q
w
e
z
Fold a hem with the wrong side of the fabric up to form
a 0.4 – 0.7 cm allowance.
q
Wrong side of fabric
w
0,4 – 0,7 cm
(1) Fold the hem under the fabric for lightweight fabrics.
(2) On heavyweight fabrics that tend to ravel, the raw
edge should be overcast first.
x
Place the fabric so that the fold is next to the guide on
the foot. Lower the presser foot. Adjust the needle drop
position if necessary. Sew while guiding the fold along
the guide.
e
Fold
r
Guide
c
Open the fabric after sewing is finished.
NOTE:
If the needle pierces too far left, the stitch will show
through on the right side of the fabric.
31
1
2
1
2
3
4
5
3
4
1
2
3
Содержание
- 3 СОДЕРЖАНИЕ
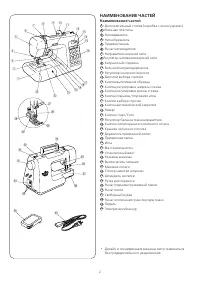
- 4 НАИМЕНОВАНИЕ ЧАСТЕЙ; Наименование частей
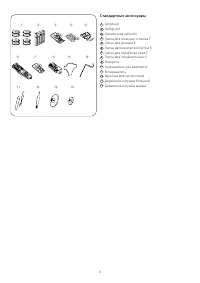
- 5 Стандартные аксессуары
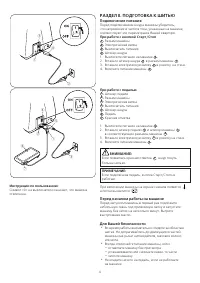
- 6 РАЗДЕЛ II. ПОДГОТОВКА К ШИТЬЮ; Подключение питания; При работе с кнопкой Старт/Стоп; Перед началом работы на машине; Инструкции по пользованию:
- 7 Кнопка подъема/опускания иглы
- 8 Кнопка вытягивания
- 9 Как снять столик
- 13 • Намотка шпульки; v b
- 14 • Установка шпульки
- 15 Заправка нити в машину; • Заправка нити в машину; Нитевдеватель
- 16 • Автоматическое натяжение
- 17 • Натяжение слишком слабое; Регулировка натяжения верхней нити; • Сбалансированное натяжение нити
- 18 ОСНОВНЫЕ ШВЕЙНЫЕ ТЕХНИКИ; Прямой стежок; • Начало шитья
- 23 Зигзаг; Изменение ширины и длины стежка; Обработка края; z x; z x c; or
- 25 Пришивание пуговиц; z x c v b
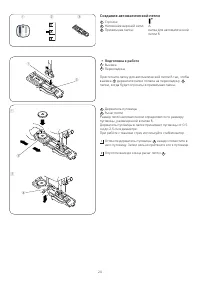
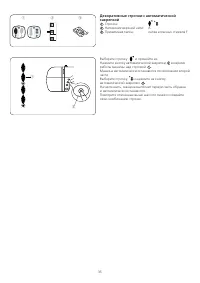
- 26 Создание автоматической петли; • Подготовка к работе
- 28 Double Layer Buttonhole; • To change the stitch width; Регулировка ширины стежка и плотности петли; • Изменение ширины стежка; Двухслойная петля; Round End Buttonhole; • To change the stitch width; Double Layer Buttonhole
- 29 Faux Chain Buttonhole
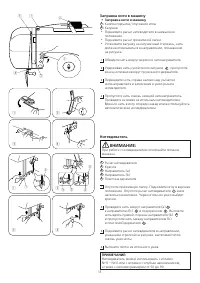
- 31 • Установка лапки для молнии; Zipper Sewing
- 32 b n
- 33 Blind Hemming; Blind Hemming; • Adjusting the needle drop position; Blind Hemming
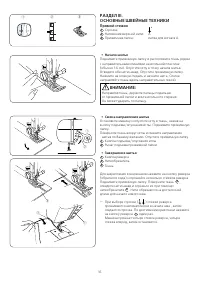
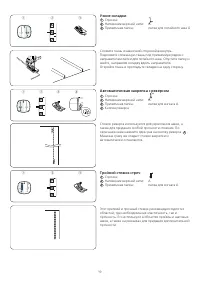
- 34 • To sew a shorter tack; • Короткая закрепка; Bartacking; • To sew a shorter tack
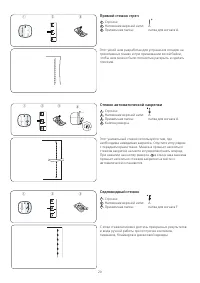
- 35 Applique; Аппликация; • Начало работы; Applique; • To sew; Applique; Patchwork; • To sew
- 36 Elongation
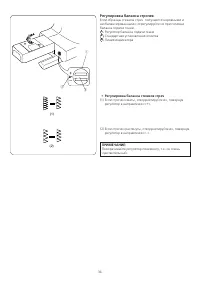
- 38 Регулировка баланса строчек; • Регулировка баланса стежков стреч; Adjusting Pattern Balance; Feed balancing dial; turning the dial in the direction of “+”.; • Adjusting distorted stretch stitch patterns
- 39 УХОД ЗА МАШИНОЙ; Чистка шпульного отсека и тканенаправителей; SECTION IV. CARE OF YOUR MACHINE
- 41 Проблемы и предупреждающие сигналы; Предупреждающий
- 42 Устранение неисправностей


