Швейная машина Brother SL-7 - инструкция пользователя по применению, эксплуатации и установке на русском языке. Мы надеемся, она поможет вам решить возникшие у вас вопросы при эксплуатации техники.
Если остались вопросы, задайте их в комментариях после инструкции.
"Загружаем инструкцию", означает, что нужно подождать пока файл загрузится и можно будет его читать онлайн. Некоторые инструкции очень большие и время их появления зависит от вашей скорости интернета.


43
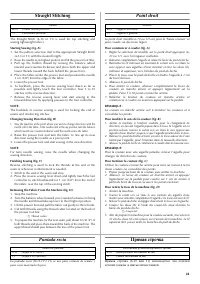
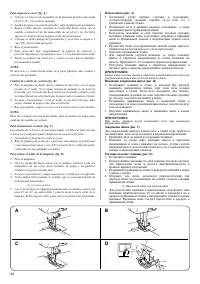
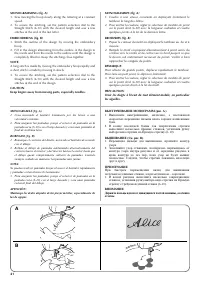
Oiling
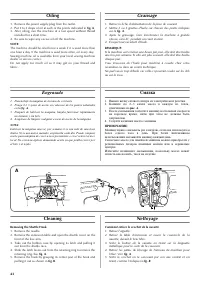
1. Remove the power supply plug from the outlet.
2. Put 2 to 3 drops of oil at each of the points indicated in
fig. A
.
3. After oiling, run the machine at a fast speed without thread
installed for a short time.
4. Be sure to wipe any excess oil off the machine.
NOTE:
The machine should be oiled once a week if it is used more than
one hour a day. If the machine is used more often, oil every day.
Sewing machine oil is available from your local sewing machine
dealer or service center.
Do not apply too much oil as it may get on your thread and
fabric.
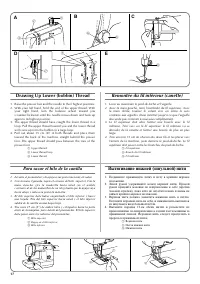
Cleaning
Removing the Shuttle Hook
1. Remove the needle.
2. Remove the extension table and open the shuttle cover on the
front of the free arm.
3. Take out the bobbin case by opening its latch and pulling it
out from the shuttle race.
4. Slide the latch levers out from the retaining ring to remove the
retaining ring. See
fig. A
.
5. Remove the hook by grasping its center post of the hook and
pulling it out as shown in
fig. B
.
Graissage
1. Retirer la fiche d’alimentation de la prise de courant.
2. Mettre 2 ou 3 gouttes d’huile sur chacun des points indiqués
sur la
fig. A
.
3. Après le graissage, faire fonctionner la machine à grande
vitesse, sans fil, pendant un court instant.
4. Essuyer tout excédent d’huile.
REMARQUE:
Si la machine sert environ une heure par jour, elle doit être huilée
une fois par semaine. Si elle sert plus souvent, elle doit être huilée
chaque jour.
Vous trouverez de l’huile pour machine à coudre chez votre
revendeur ou dans un centre technique.
Ne pad verser trop d’huile car celle-ci pourrait couler sur les dils
ou sur le tissu.
Nettoyage
Comment retirer le crochet de la navette
1. Retirer l’aiguille.
2. Retirer la table d’extension et ouvrir le couvercle de la
navette, devant le bras libre.
3. Sortir le boîtier de la canette en tirant sur la languette
métallique pour le sortir de la coursière.
4. Retirer les pattes de blocage de l’anneau de maintien pour
l’ôter. Voir
fig. A
.
5. Sortir le crochet en le saisissant par son axe central et en
tirant, comme l’indique la
fig. B
.
Engrasado
1. Desenchufe la máquina de la toma de corriente.
2. Ponga 2 ó 3 gotas de aceite en cada uno de los puntos señalados
en la
fig. A
.
3. Después de lubricar la máquina, hágala funcionar rápidamente
un instante y sin hilo.
4. Asegúrese de limpiar cualquier exceso de aceite de la máquina.
NOTA:
Lubricar la máquina una vez por semana si se usa más de una hora
diaria. Si se usa más a menudo, engrasarla cada día. Puede comprar
aceite para máquina de coser a su representante o en el centro técnico
local. No conviene aplicar demasiada aceite ya que podrîa correr por
el hilo y el tejido.
Смазка
1. Выньте вилку сетевого шнура из электрической розетки.
2. Капните по 2–3 капли масла в каждую из точек,
отмеченных на
рис. A
.
3. После смазывания запустите машину на большой скорости
на короткое время; нити при этом не должны быть
заправлены.
4. Сотрите излишки масла с машины.
ПРИМЕЧАНИЕ:
Машину нужно смазывать раз в неделю, если она используется
более одного часа в день. При более интенсивном
использовании смазывайте машину каждый день.
Смазочное масло для швейной машины можно приобрести у
региональных дилеров швейных машин или в сервисных
центрах.
Избегайте излишнего смазывания, поскольку масло может
попасть как на нить, так и на изделие.
A
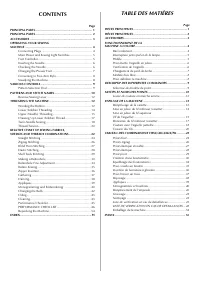
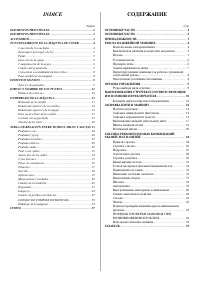
Содержание
- 9 INDICE; СОДЕРЖАНИЕ
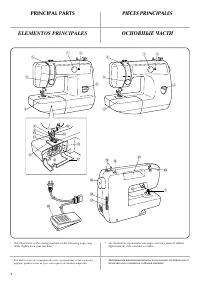
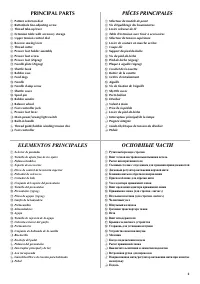
- 11 PIÉCES PRINCIPALES
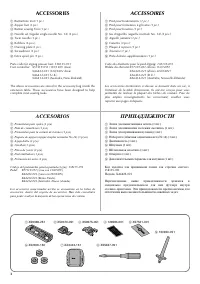
- 12 ACCESSORIES; ACCESSOIRES; ПРИНАДЛЕЖНОСТИ
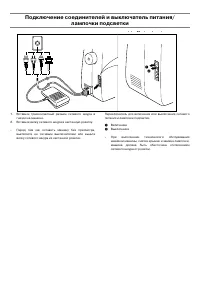
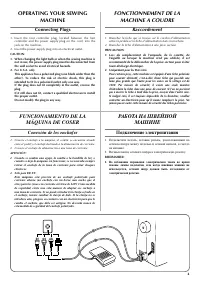
- 13 Connecting Plugs; FONCTIONNEMENT DE LA; Raccordement; FUNCIONAMIENTO DE LA; Conexión de los enchufes; РАБОТА НА ШВЕЙНОЙ; Подключение электропитания
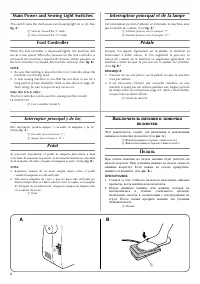
- 14 Main Power and Sewing Light Switches; Foot Controller; Interrupteur principal et de la lampe; Interruptor principal y de luz; Выключатель питания и лампочки
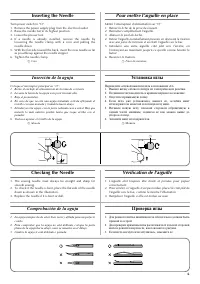
- 15 Inserting the Needle; Checking the Needle; Pour mettre l’aiguille en place; Vérification de l’aiguille; Comprobación de la aguja; Установка иглы; Проверка иглы
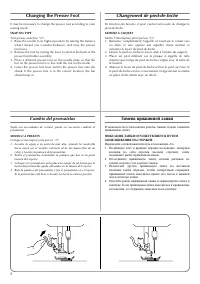
- 16 Changing the Presser Foot; Cambio del prensatelas; Замена прижимной лапки
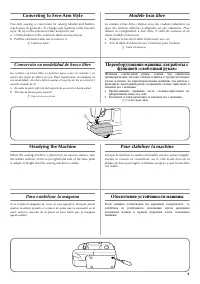
- 17 Converting to Free-Arm Style; Steadying the Machine; Modèle bras libre; Pour stabiliser la machine; Para estabilizar la máquina; Переоборудование машины для работы с; Обеспечение устойчивости машины
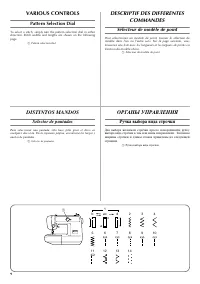
- 18 ac; VARIOUS CONTROLS; Pattern Selection Dial; DESCRIPTIF DES DIFFERENTES; DISTINTOS MANDOS; Selector de puntadas; ОРГАНЫ УПРАВЛЕНИЯ; Ручка выбора вида строчки
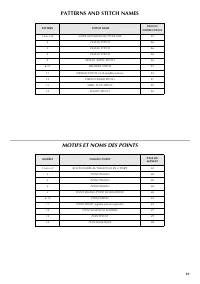
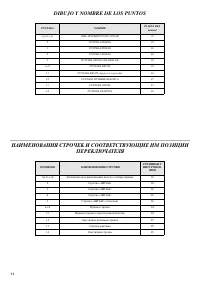
- 20 DIBUJO Y NOMBRE DE LOS PUNTOS
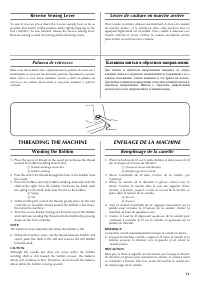
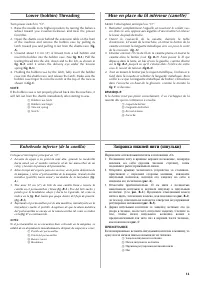
- 21 Reverse Sewing Lever; THREADING THE MACHINE; Winding the Bobbin; Levier de couture en marche arrière; ENFILAGE DE LA MACHINE; Remplissage de la canette; Palanca de retroceso; Клавиша шитья в обратном направлении
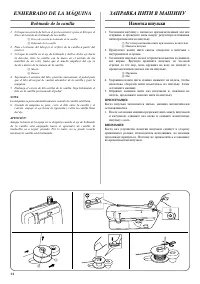
- 22 ENHEBRADO DE LA MÁQUINA; Bobinado de la canilla; ЗАПРАВКА НИТИ В МАШИНУ; Намотка шпульки
- 26 Para sacar el hilo de la canilla
- 28 Costura con aguja doble; Шитье двойной иглой; УСТАНОВКА ДВОЙНОЙ ИГЛЫ; ЗАПРАВКА ДВОЙНОЙ ИГЛЫ НИТЬЮ
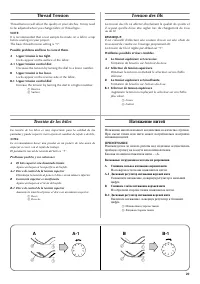
- 29 Thread Tension; Tension des fils; Tensión de los hilos; Натяжение нитей; Возможные затруднения и методы их разрешения.; AE1 Дисковый регулятор натяжения верхней нити; BE1 Дисковый регулятор натяжения верхней нити
- 30 Слишком слабое натяжение нижней нити.
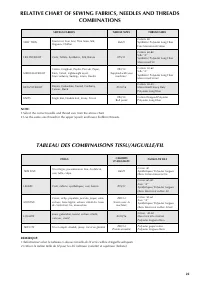
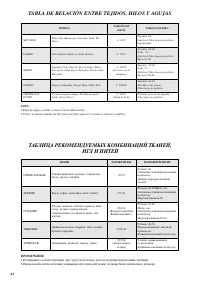
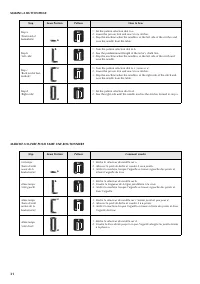
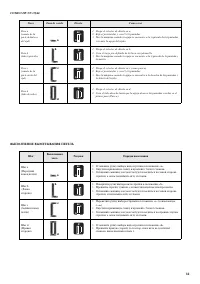
- 32 TABLA DE RELACIÓN ENTRE TEJIDOS, HILOS Y AGUJAS; ТАБЛИЦА РЕКОМЕНДУЕМЫХ КОМБИНАЦИЙ ТКАНЕЙ,
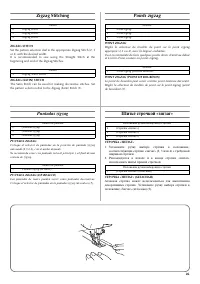
- 35 Zigzag Stitching; ZIGZAG STITCH; Points zigzag; Puntadas zigzag; Шитьё строчкой «зигзаг»; СТРОЧКА «ЗИГЗАГ»
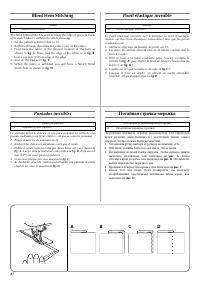
- 36 Blind Hem Stitching; Point élastique invisible; Puntadas invisibles; Потайная строчкаEмережка
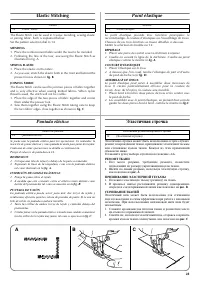
- 37 Elastic Stitching; MENDING; JOINING FABRIC; Point élastique; Puntada elástica; Эластичная строчка; РЕМОНТ ТКАНИ; ПРИШИВАНИЕ ЭЛАСТИЧНОЙ ТЕСЬМЫ; СТАЧИВАНИЕ ТКАНЕЙ
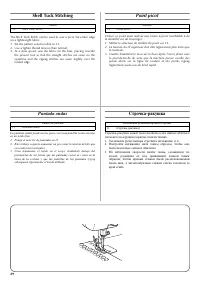
- 38 Shell Tuck Stitching; Point picot; Puntada ondas; СтрочкаEракушка
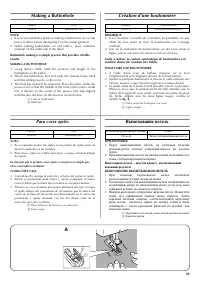
- 39 Making a Buttonhole; MAKING A BUTTONHOLE; Création d’une boutonnière; Para coser ojales; Выметывание петель; ВЫПОЛНЕНИЕ ВЫМЕТЫВАНИЯ ПЕТЕЛЬ
- 42 ЗАКРЕПЛЕНИЕ СТРОЧКИ И ПРОРЕЗКА ПЕТЛИ
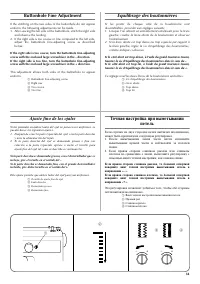
- 43 Buttonhole Fine Adjustment; Equilibrage des boutonnières; Ajuste fino de los ojales; Точная настройка при выметывании
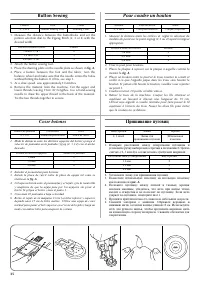
- 44 Button Sewing; Pour coudre un bouton; Coser botones; Пришивание пуговиц
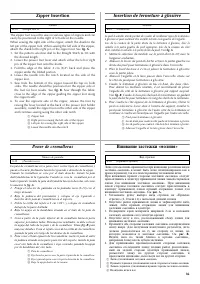
- 45 Zipper Insertion; Insertion de fermeture à glissière; Poner de cremalleras; Вшивание застежки «молния»
- 46 Gathering; Pour froncer un tissu; Fruncido; Выполнение сборок
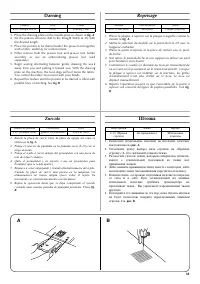
- 47 Darning; Reprisage; Zurcido; Штопка
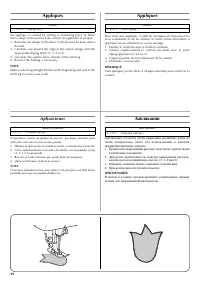
- 48 Appliques; Aplicaciones; Аппликации
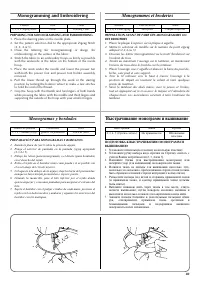
- 49 Monogramming and Embroidering; PREPARING FOR MONOGRAMMING AND EMBROIDERING; Monogrammes et broderies; Monogramas y bordados; Выстрачивание монограмм и вышивание
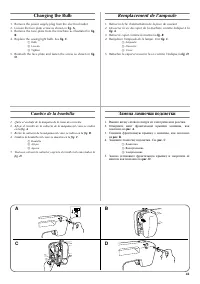
- 51 Changing the Bulb; Remplacement de l’ampoule; Cambio de la bombilla; Замена лампочки подсветки
- 52 Removing the Shuttle Hook; Graissage; Engrasado; Смазка
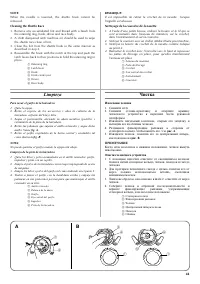
- 53 Cleaning the Shuttle Race; Limpieza; Чистка; Извлечение челнока
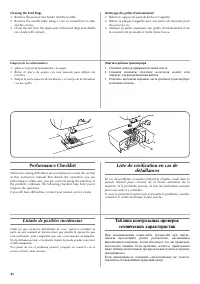
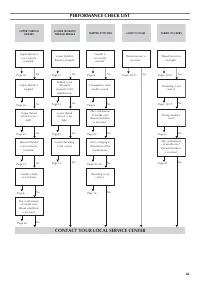
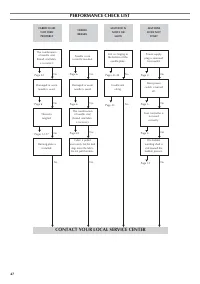
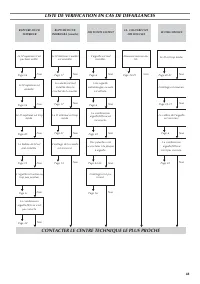
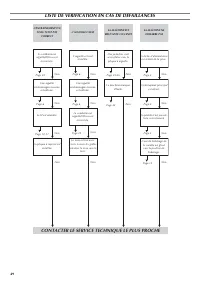
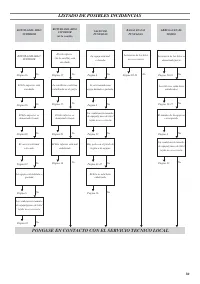
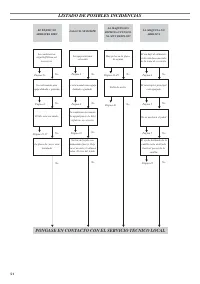
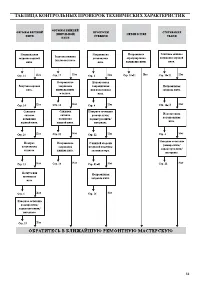
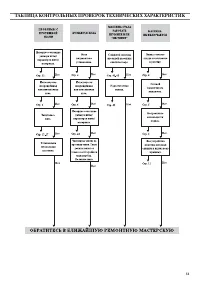
- 54 Cleaning the Feed Dogs; Performance Checklist; Liste de vérification en cas de; Listado de posibles incidencias; Очистка гребенок транспортера; Таблица контрольных проверок
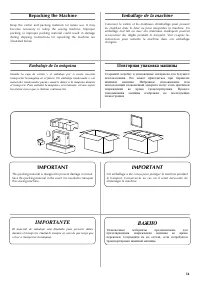
- 63 Repacking the Machine; Emballage de la machine; IMPORTANT; Embalaje de la máquina; IMPORTANTE; Повторная упаковка машины; ВАЖНО
- 67 УКАЗАТЕЛЬ


