Швейная машина Brother SL-7 - инструкция пользователя по применению, эксплуатации и установке на русском языке. Мы надеемся, она поможет вам решить возникшие у вас вопросы при эксплуатации техники.
Если остались вопросы, задайте их в комментариях после инструкции.
"Загружаем инструкцию", означает, что нужно подождать пока файл загрузится и можно будет его читать онлайн. Некоторые инструкции очень большие и время их появления зависит от вашей скорости интернета.

31
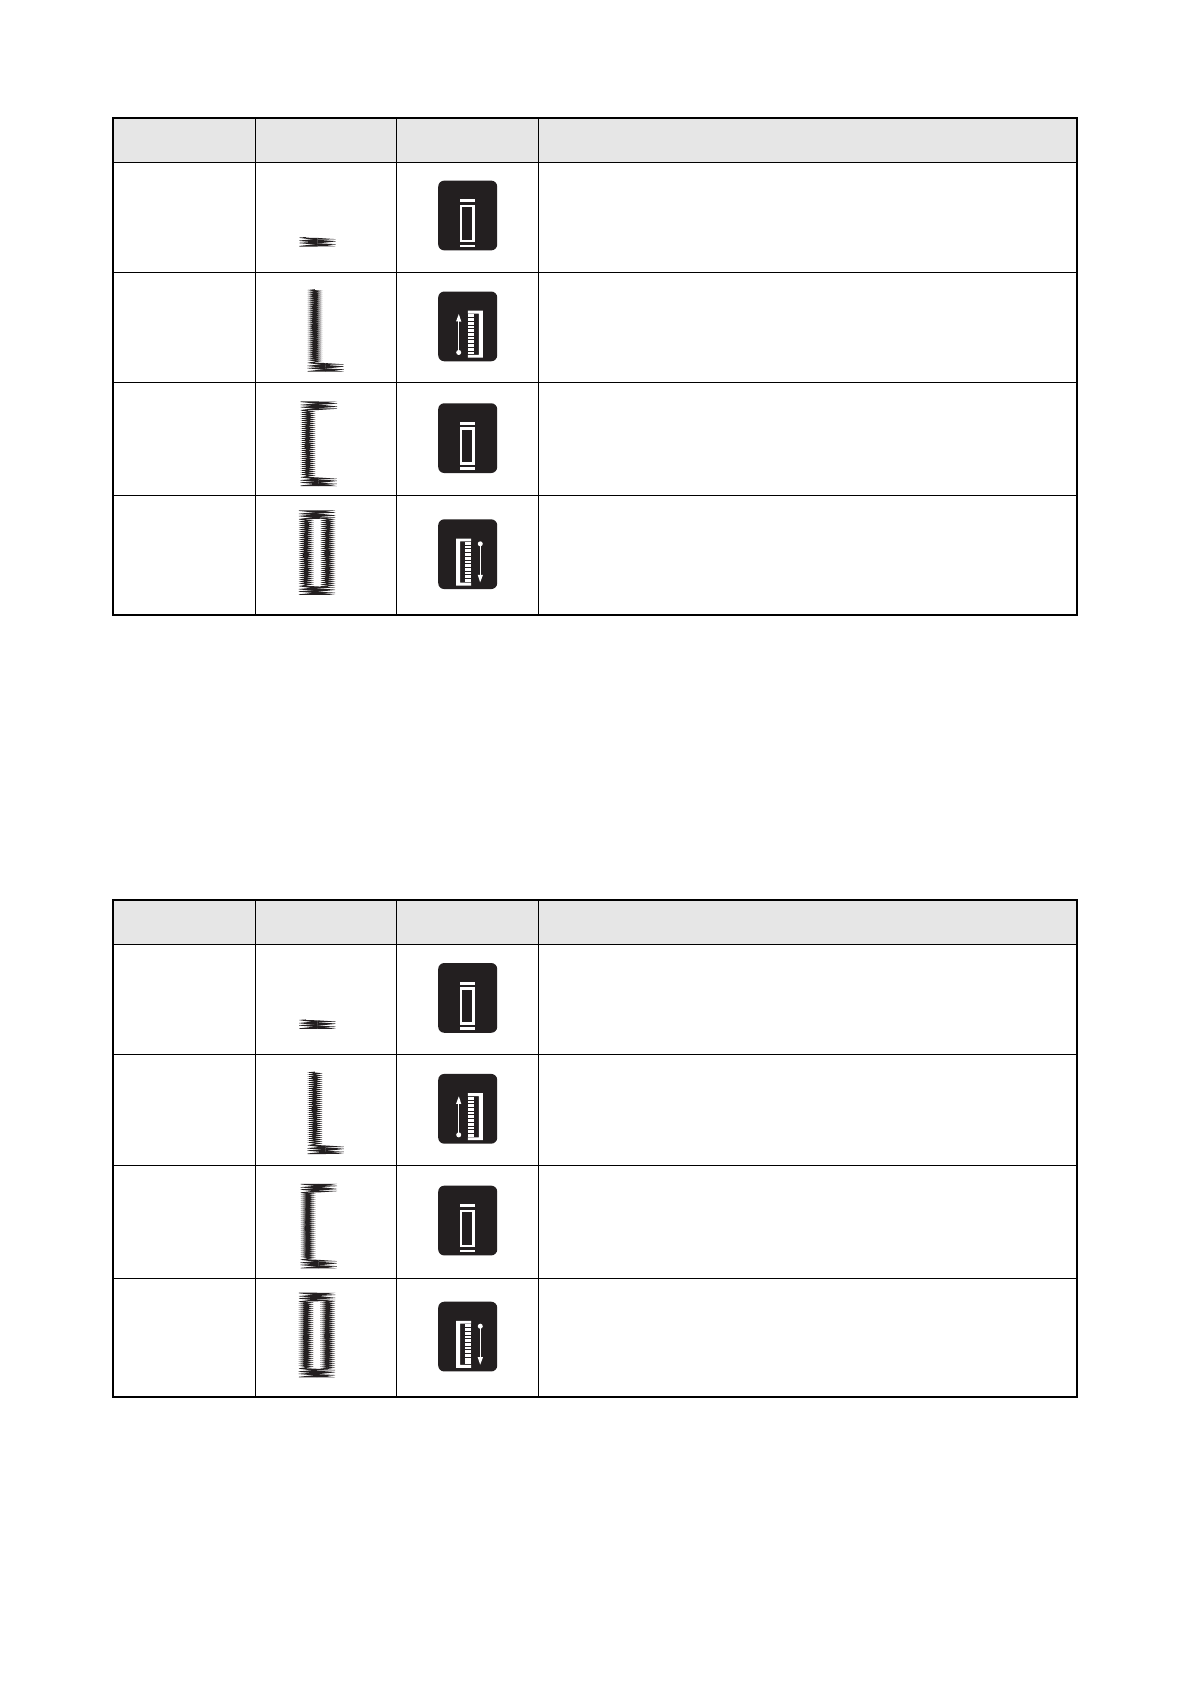
MAKING A BUTTONHOLE
Step
Sewn Portion
Pattern
How to Sew
Step a
(Front end of
buttonhole)
1. Set the pattern selection dial to a.
2. Lower the presser foot and sew 5 to 6 stitches.
3. Stop the machine when the needle is at the left side of the stitches and
raise the needle from the fabric.
Step b
(Left side)
1. Turn the pattern selection dial to b.
2. Sew the predetermined length of the tailor’s chalk line.
3. Stop the machine when the needle is at the left side of the stitch and
raise the needle.
Step c
(Back end of but-
tonhole)
1. Turn the pattern selection dial to c (same as a).
2. Lower the presser foot and sew 5 to 6 stitches.
3. Stop the machine when the needle is at the right side of the stitch and
raise the needle from the fabric.
Step d
(Right side)
1. Set the pattern selection dial to d.
2. Sew the right side until the needle reaches the stitches formed in step a.
a
ac
a
c
b
b
c
ac
a
c
d
d
MARCHE A SUIVRE POUR FAIRE UNE BOUTONNIERE
Step
Sewn Portion
Pattern
Comment coudre
1er temps
(barre d’arrêt
avant de la
boutonnière)
1. Mettre le sélecteur de modèle sur a.
2. Abaisser le pied-de-biche et coudre 5 ou 6 points.
3. Arrêter la machine lorsque l’aiguille se trouve à gauche des points et
relever l’aiguille du tissu.
2ème temps
(côté gauch)
1. Mettre le sélecteur de modèle sur b.
2. Coudre la longueur de la ligne pré-définie à la craie.
3. Arrêter la machine lorsque l’aiguille se trouve à gauche des points et
lever l’aiguille.
3ème temps
(barre d’arrêt
arrière de la
boutonnière)
1. Mettre le sélecteur de modèle sur c (même position que pour a).
2. Abaisser le pied-de-biche et coudre 5 à 6 points.
3. Arrêter la machine lorsque l’aiguille se trouve à droite des points et lever
l’aiguille du tissu.
4ème temps
(côté droit)
1. Mettre le sélecteur de modèle sur d.
2. Coudre la lèvre droite jusqu’à ce que l’aiguille atteigne les points formés
à la phase a.
a
ac
a
c
b
b
c
ac
a
c
d
d
Содержание
- 9 INDICE; СОДЕРЖАНИЕ
- 11 PIÉCES PRINCIPALES
- 12 ACCESSORIES; ACCESSOIRES; ПРИНАДЛЕЖНОСТИ
- 13 Connecting Plugs; FONCTIONNEMENT DE LA; Raccordement; FUNCIONAMIENTO DE LA; Conexión de los enchufes; РАБОТА НА ШВЕЙНОЙ; Подключение электропитания
- 14 Main Power and Sewing Light Switches; Foot Controller; Interrupteur principal et de la lampe; Interruptor principal y de luz; Выключатель питания и лампочки
- 15 Inserting the Needle; Checking the Needle; Pour mettre l’aiguille en place; Vérification de l’aiguille; Comprobación de la aguja; Установка иглы; Проверка иглы
- 16 Changing the Presser Foot; Cambio del prensatelas; Замена прижимной лапки
- 17 Converting to Free-Arm Style; Steadying the Machine; Modèle bras libre; Pour stabiliser la machine; Para estabilizar la máquina; Переоборудование машины для работы с; Обеспечение устойчивости машины
- 18 ac; VARIOUS CONTROLS; Pattern Selection Dial; DESCRIPTIF DES DIFFERENTES; DISTINTOS MANDOS; Selector de puntadas; ОРГАНЫ УПРАВЛЕНИЯ; Ручка выбора вида строчки
- 20 DIBUJO Y NOMBRE DE LOS PUNTOS
- 21 Reverse Sewing Lever; THREADING THE MACHINE; Winding the Bobbin; Levier de couture en marche arrière; ENFILAGE DE LA MACHINE; Remplissage de la canette; Palanca de retroceso; Клавиша шитья в обратном направлении
- 22 ENHEBRADO DE LA MÁQUINA; Bobinado de la canilla; ЗАПРАВКА НИТИ В МАШИНУ; Намотка шпульки
- 26 Para sacar el hilo de la canilla
- 28 Costura con aguja doble; Шитье двойной иглой; УСТАНОВКА ДВОЙНОЙ ИГЛЫ; ЗАПРАВКА ДВОЙНОЙ ИГЛЫ НИТЬЮ
- 29 Thread Tension; Tension des fils; Tensión de los hilos; Натяжение нитей; Возможные затруднения и методы их разрешения.; AE1 Дисковый регулятор натяжения верхней нити; BE1 Дисковый регулятор натяжения верхней нити
- 30 Слишком слабое натяжение нижней нити.
- 32 TABLA DE RELACIÓN ENTRE TEJIDOS, HILOS Y AGUJAS; ТАБЛИЦА РЕКОМЕНДУЕМЫХ КОМБИНАЦИЙ ТКАНЕЙ,
- 35 Zigzag Stitching; ZIGZAG STITCH; Points zigzag; Puntadas zigzag; Шитьё строчкой «зигзаг»; СТРОЧКА «ЗИГЗАГ»
- 36 Blind Hem Stitching; Point élastique invisible; Puntadas invisibles; Потайная строчкаEмережка
- 37 Elastic Stitching; MENDING; JOINING FABRIC; Point élastique; Puntada elástica; Эластичная строчка; РЕМОНТ ТКАНИ; ПРИШИВАНИЕ ЭЛАСТИЧНОЙ ТЕСЬМЫ; СТАЧИВАНИЕ ТКАНЕЙ
- 38 Shell Tuck Stitching; Point picot; Puntada ondas; СтрочкаEракушка
- 39 Making a Buttonhole; MAKING A BUTTONHOLE; Création d’une boutonnière; Para coser ojales; Выметывание петель; ВЫПОЛНЕНИЕ ВЫМЕТЫВАНИЯ ПЕТЕЛЬ
- 42 ЗАКРЕПЛЕНИЕ СТРОЧКИ И ПРОРЕЗКА ПЕТЛИ
- 43 Buttonhole Fine Adjustment; Equilibrage des boutonnières; Ajuste fino de los ojales; Точная настройка при выметывании
- 44 Button Sewing; Pour coudre un bouton; Coser botones; Пришивание пуговиц
- 45 Zipper Insertion; Insertion de fermeture à glissière; Poner de cremalleras; Вшивание застежки «молния»
- 46 Gathering; Pour froncer un tissu; Fruncido; Выполнение сборок
- 47 Darning; Reprisage; Zurcido; Штопка
- 48 Appliques; Aplicaciones; Аппликации
- 49 Monogramming and Embroidering; PREPARING FOR MONOGRAMMING AND EMBROIDERING; Monogrammes et broderies; Monogramas y bordados; Выстрачивание монограмм и вышивание
- 51 Changing the Bulb; Remplacement de l’ampoule; Cambio de la bombilla; Замена лампочки подсветки
- 52 Removing the Shuttle Hook; Graissage; Engrasado; Смазка
- 53 Cleaning the Shuttle Race; Limpieza; Чистка; Извлечение челнока
- 54 Cleaning the Feed Dogs; Performance Checklist; Liste de vérification en cas de; Listado de posibles incidencias; Очистка гребенок транспортера; Таблица контрольных проверок
- 63 Repacking the Machine; Emballage de la machine; IMPORTANT; Embalaje de la máquina; IMPORTANTE; Повторная упаковка машины; ВАЖНО
- 67 УКАЗАТЕЛЬ


