Мясорубки VITEK VT-1673 - инструкция пользователя по применению, эксплуатации и установке на русском языке. Мы надеемся, она поможет вам решить возникшие у вас вопросы при эксплуатации техники.
Если остались вопросы, задайте их в комментариях после инструкции.
"Загружаем инструкцию", означает, что нужно подождать пока файл загрузится и можно будет его читать онлайн. Некоторые инструкции очень большие и время их появления зависит от вашей скорости интернета.


8
ENGLISH
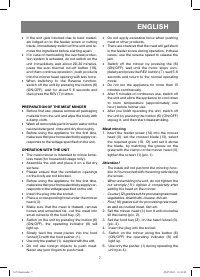
Note
- For better meat processing slice it in
strips or cubes,
defrost frozen meat.
- During operating the unit use only the
pusher, supplied with the unit, do not use
foreign objects to push the meat; do not
push it with your hands.
7. After you stop the operation, switch off the unit,
by pressing the (6) (ON/OFF) button and un-
plug it, after it you can disassemble it.
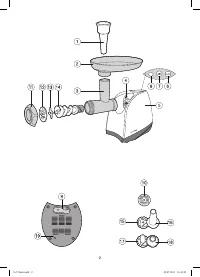
8. Press the clamp button to remove the mincer
head (4), turn the head (3) clock wise and re-
move it.
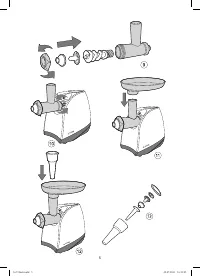
9. To disassemble the mincer, unscrew the nut
(11) and take out the grate (10, 12), the blade
(13) and feeder screw (14) from the mincer
head.
Attention!
• There are chances that the meat will
get stuck in the feeder screw during op-
eration. In these cases, use the reverse
speed to release the jam. Switch off the
mincer with the (6) (ON/OFF) button,
wait until the motor stops completely
and press the REV button (7), wait 5-6
seconds and return to the normal oper-
ating mode.
• If during operation the feeder screw (14)
and the blade (13) stop rotating:
- switch off the mincer, by pressing the off
button (6) (ON/OFF) and unplug it.
- let the motor cool down during 20-30
minutes.
-
check the auto cut-off condition by
pressing the button (19)
-
switch on the mincer again.
Making sausages
Prepare minced meat.
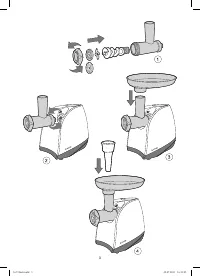
1.
Insert the feeder screw (14) into the mincer
2.
head body (3), set the sausage attachments
(15, 16) on the feeder screw, provide that the
groove on the attachment (15) matches the
clamp on the mincer head (3), and slightly
tighten the nut (11) (pic.5).
Set the mincer head, by turning it anti clock-
3.
wise till clamping (see the picture of the
mincer appearance), screw the nut com-
pletely (11) (pic.6).
Set the food tray (2) (pic.7).
4.
Place the minced meat on the food tray (2).
5.
Use natural cover for sausages, putting it
6.
firstly into a bowl with warm water for 10 min-
utes.
Thread softened cover on the attachment
7.
(16) and knot on the tip.
Insert the plug into the socket.
8.
Switch on the mincer by using the button (6)
9.
(ON/OFF), the operating indicator (8) will
light up.
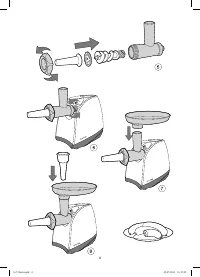
Use the pusher to pull down the minced
10.
meat (1) (pic.8), according to the cover fill-
ing, move it away from the attachment (16),
as the cover dries, wet it.
After you stop the operation, switch off the
11.
unit, by pressing the (6) (ON/OFF) button and
unplug it, after it you can disassemble it.
To remove the mincer head press the clamp
12.
button (4), turn the head clockwise and re-
move it.
Unscrew the nut (11), and disassemble the
13.
mincer head.
“Kebbe” attachment using
Kebbe is a traditional Middle East dish cooked
from the lamb meat, wheat flour and spices
which are cut together to get a base for cook-
ing of rolls. Rolls are filled and fried deep. You
can make different dessert with the help of this
attachment.
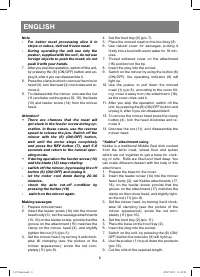
Prepare the base for the cover.
1.
Insert the feeder screw (14) into the mincer
2.
head body (3), set Kebbe attachments (17,
18), on the feeder screw, provide that the
groove on the attachment (17) matches the
clamp on the mincer head, and slightly tight-
en the nut (11) (pic.9).
Set the mincer head, by turning it anti clock-
3.
wise till clamping (see the picture of the
mincer appearance), screw the nut com-
pletely (11) (pic.10).
Set the food tray (2) (pic.11).
4.
Place the base on the food tray (2).
5.
Insert the plug into the socket.
6.
Switch on the unit, by pressing the (6) (ON/
7.
OFF) button the indicator (8) will light up.
Use the pusher (1) to pull down the products
8.
(pic.12).
Cut the rolls of the required length.
9.
1673 Instr.indd 8
1673 Instr.indd 8
22.07.2011 16:13:05
22.07.2011 16:13:05


