Материнские платы GIGABYTE GA EX58 UD3R SLI rev 1 0 - инструкция пользователя по применению, эксплуатации и установке на русском языке. Мы надеемся, она поможет вам решить возникшие у вас вопросы при эксплуатации техники.
Если остались вопросы, задайте их в комментариях после инструкции.
"Загружаем инструкцию", означает, что нужно подождать пока файл загрузится и можно будет его читать онлайн. Некоторые инструкции очень большие и время их появления зависит от вашей скорости интернета.

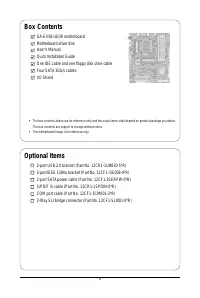
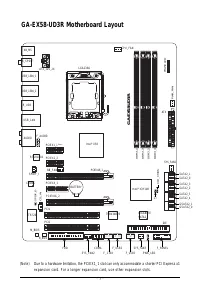
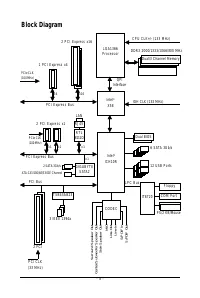


GA-EX58-UD3R Motherboard
- 96 -
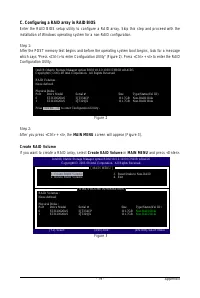
Intel(R) Matrix Storage Manager option ROM v8.0.0.1039 ICH10R wRAID5
Copyright(C) 2003-08 Intel Corporation. All Rights Reversed.
[ MAIN MENU ]
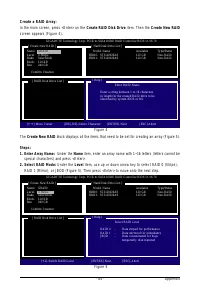
1. Create RAID Volume
2. Delete RAID Volume
[ DISK/VOLUME INFORMATION ]
RAID Volumes :
None defined.
Physical Disks :
Port
Drive Model
Serial #
Size
Type/Status(Vol ID)
0
WDC WD800JD-22LS WD-WMAM9W736201
74.4GB
Member Disk (0)
1
WDC WD800JD-22LS WD-WMAM9W736333
74.4GB
Non-RAID Disk
[
]-Select
[ESC]-Exit
[ENTER]-Select Menu
3. Reset Disks to Non-RAID
4. Exit
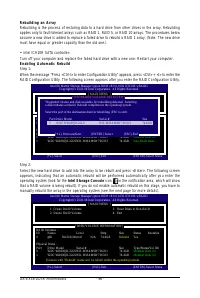
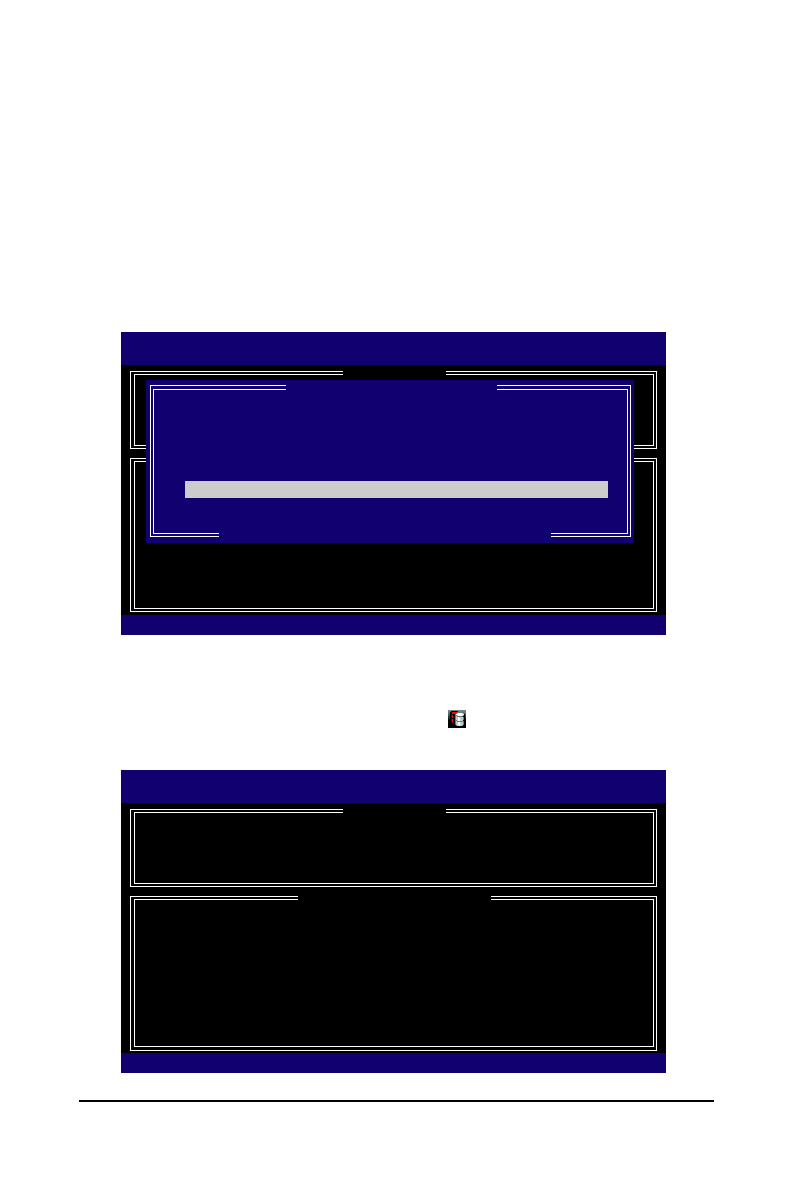
[ DEGRADED VOLUME DETECTED ]
"Degraded volume and disk available for rebuilding detected. Selecting
a disk initiates a rebuild. Rebuild completes in the operating system.
Select the port of the destination disk for rebuilding (ESC to exit):
Port Drive Model
Serial #
Size
1
WDC WD800JD-22LS
WD-WMAM9W736333
74.4GB
[
]-Previous/Next
[ENTER]-Select
[ESC]-Exit
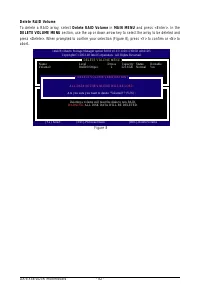
Intel(R) Matrix Storage Manager option ROM v8.0.0.1039 ICH10R wRAID5
Copyright(C) 2003-08 Intel Corporation. All Rights Reversed.
[ MAIN MENU ]
[ DISK/VOLUME INFORMATION ]
RAID Volumes :
I D
N a m e
Level
Strip
Size
Status
Bootable
0
gbb
RAID1(Mirror)
N/A
74.4GB
Rebuild
Yes
Physical Disks :
Port
Drive Model
Serial #
Size
Type/Status(Vol ID)
0
WDC WD800JD-22LS WD-WMAM9W736201
74.4GB
Member Disk (0)
1
WDC WD800JD-22LS WD-WMAM9W736333
74.4GB
Member Disk (0)
[
]-Select
[ESC]-Exit
[ENTER]-Select Menu
1. Create RAID Volume
2. Delete RAID Volume
3. Reset Disks to Non-RAID
4. Exit
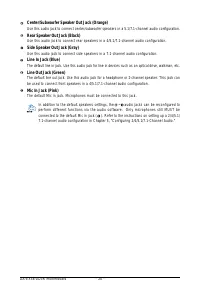
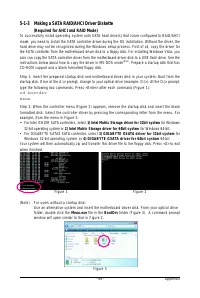
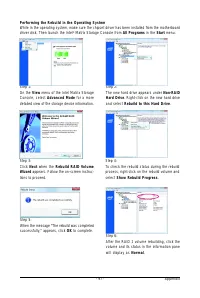
Volumes with "Rebuild" status will be rebuilt within the operating system.
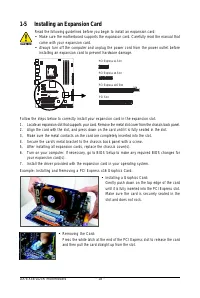
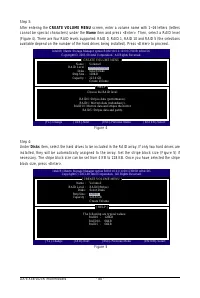
Step 2:
Select the new hard drive to add into the array to be rebuilt and press <Enter>. The following screen
appears, indicating that an automatic rebuild will be performed automatically after you enter the
operating system (look for the
Intel Storage Console
icon in the notification area, which will show
that a RAID volume is being rebuilt). If you do not enable automatic rebuild on this stage, you have to
manually rebuild the array in the operating system (see the next page for more details).
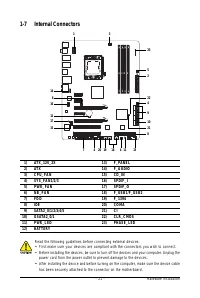
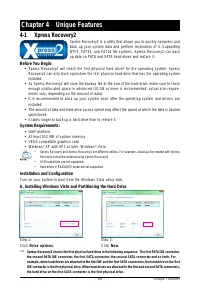
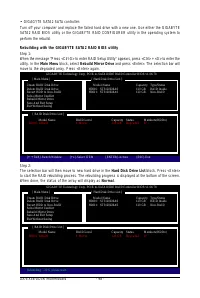
Rebuilding an Array
Rebuilding is the process of restoring data to a hard drive from other drives in the array. Rebuilding
applies only to fault-tolerant arrays such as RAID 1, RAID 5, or RAID 10 arrays. The procedures below
assume a new drive is added to replace a failed drive to rebuild a RAID 1 array. (Note: The new drive
must have equal or greater capacity than the old one.)
•
Intel ICH10R SATA controller:
Turn off your computer and replace the failed hard drive with a new one. Restart your computer.
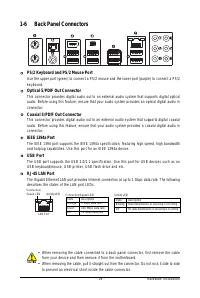
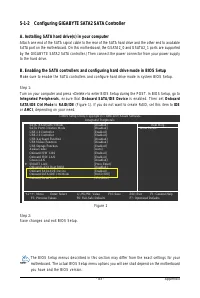
Enabling Automatic Rebuild
Step 1:
When the message "Press <Ctrl-I> to enter Configuration Utility" appears, press <Ctrl> + <I> to enter the
RAID Configuration Utility. The following screen appears after you enter the RAID Configuration Utility.


