Кондиционеры Daikin ATYN-L - инструкция пользователя по применению, эксплуатации и установке на русском языке. Мы надеемся, она поможет вам решить возникшие у вас вопросы при эксплуатации техники.
Если остались вопросы, задайте их в комментариях после инструкции.
"Загружаем инструкцию", означает, что нужно подождать пока файл загрузится и можно будет его читать онлайн. Некоторые инструкции очень большие и время их появления зависит от вашей скорости интернета.


1-10
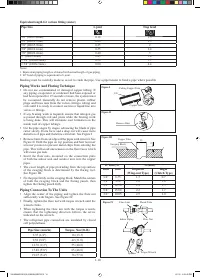
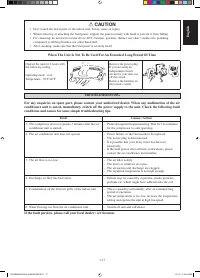
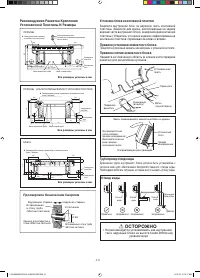
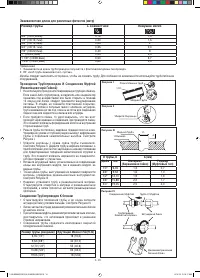
Piping Works And Flaring Technique
Do not use contaminated or damaged copper tubing. If
any piping, evaporator or condenser had been exposed or
had been opened for 15 seconds or more, the system must
be vacuumed. Generally do not remove plastic, rubber
plugs and brass nuts from the valves, fittings, tubing and
coils until it is ready to connect suction or liquid line into
valves or fittings.
If any brazing work is required, ensure that nitrogen gas
is passed through coil and joints while the brazing work
is being done. This will eliminate soot formation on the
inside wall of copper tubings.
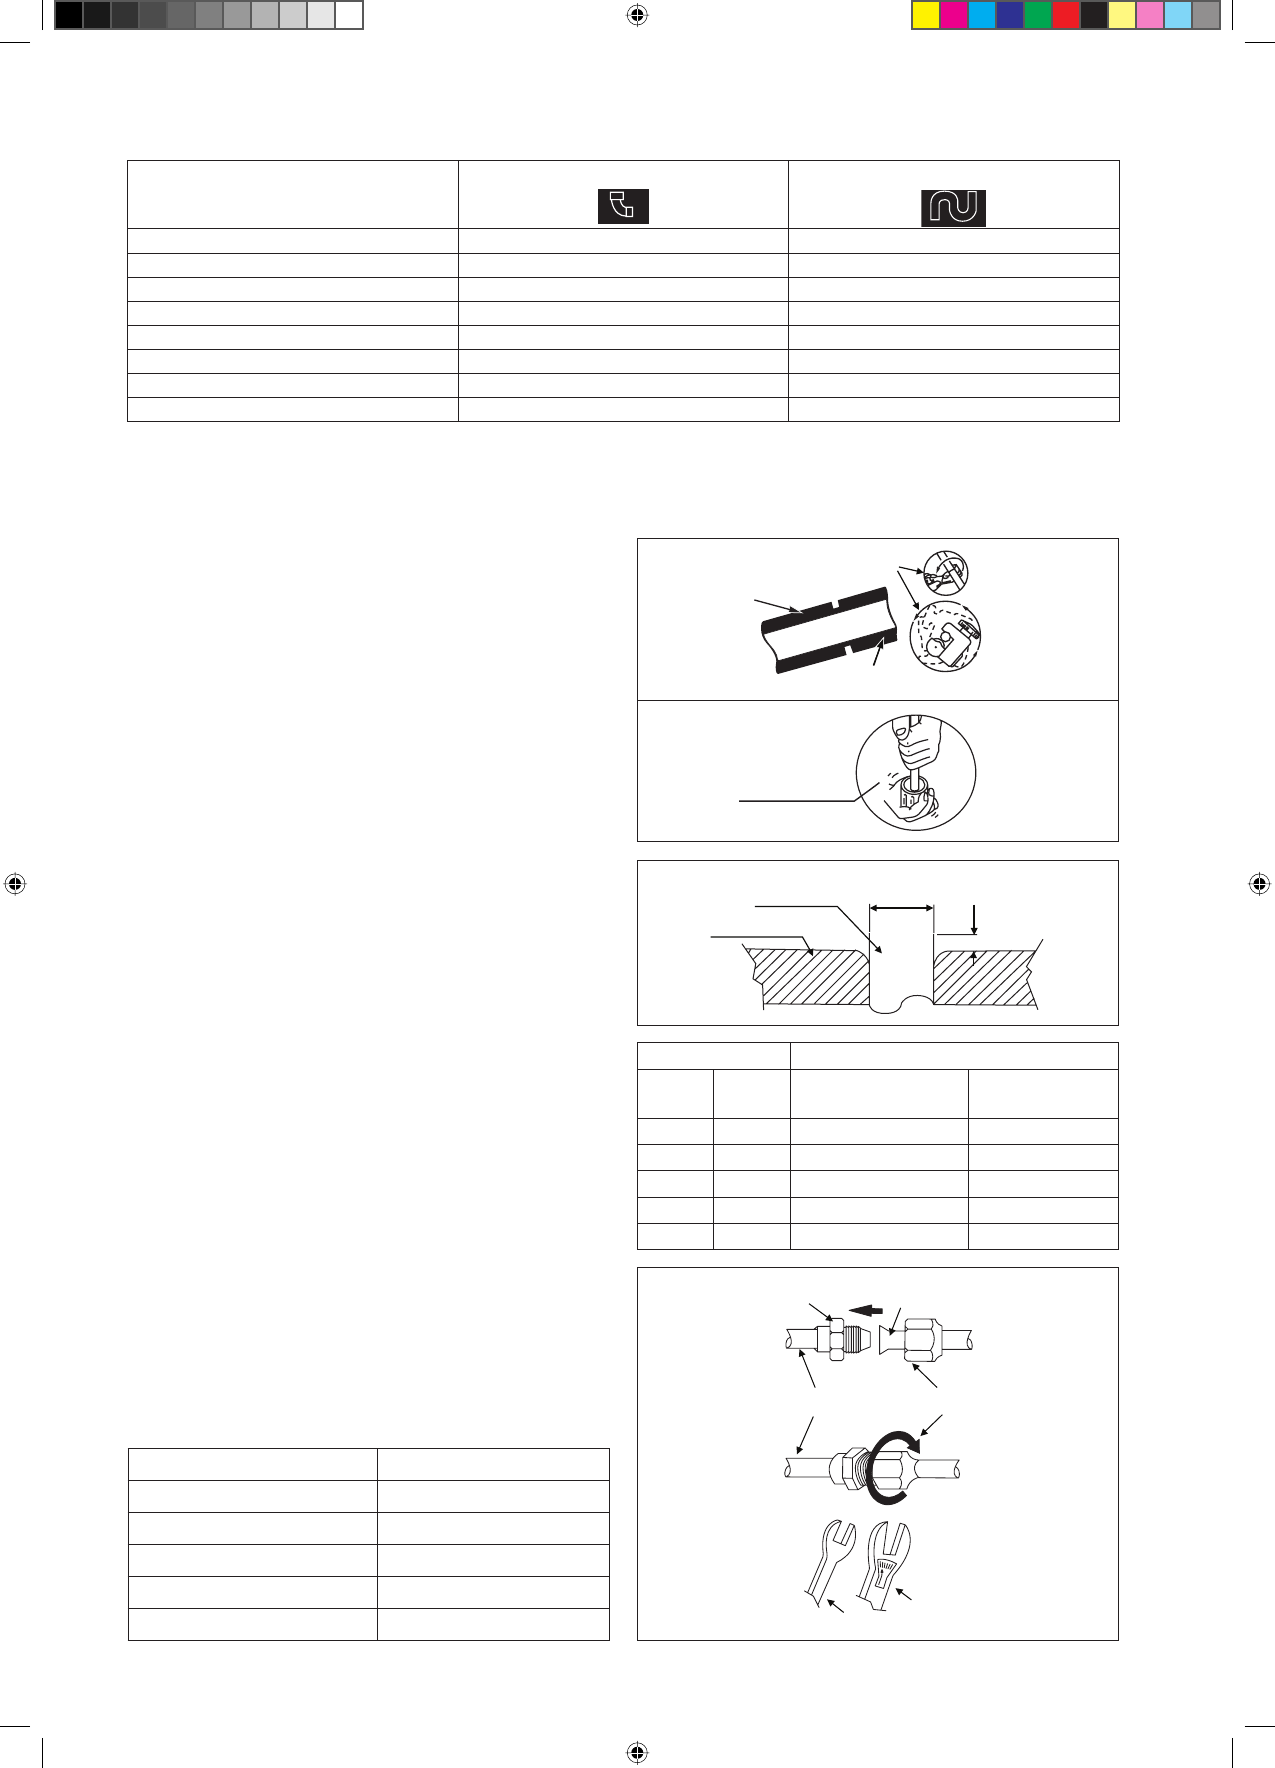
Cut the pipe stages by stages, advancing the blade of pipe
cutter slowly. Extra force and a deep cut will cause more
distortion of pipe and therefore extra burr. See Figure I.
Remove burrs from cut edges of the pipes with remover. See
Figure II. Hold the pipe on top position and burr remover
at lower position to prevent metal chips from entering the
pipe. This will avoid unevenness on the flare faces which
will cause gas leak.
Insert the flare nuts, mounted on the connection parts
of both the indoor unit and outdoor unit, into the copper
pipes.
The exact length of pipe protruding from the top surface
of the swaging block is determined by the flaring tool.
See Figure III.
Fix the pipe firmly on the swaging block. Match the centers
of both the swaging block and the flaring punch, then
tighten the flaring punch fully.
Piping Connection To The Units
Align the center of the piping and tighten the flare nut
sufficiently with fingers. See Figure IV.
Finally, tighten the flare nut with torque wrench until the
wrench clicks.
When tightening the flare nut with the torque wrench,
ensure that the tightening direction follows the arrow
indicated on the wrench.
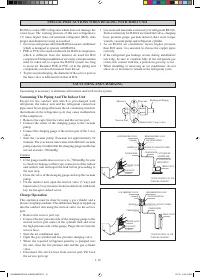
The refrigerant pipe connection are insulated by closed
cell polyurethane.
•
•
•
•
•
•
•
•
•
•
•
1/4t
Cutting Copper Tube
Copper Tube
Swaging Block
Remove Burr
Copper Tube
Figure I
D
A
Pipe Size (mm/in)
Torque, Nm/(ft-lb)
6.35 (1/4")
18 (13.3)
9.52 (3/8")
42 (31.0)
12.70 (1/2")
55 (40.6)
15.88 (5/8")
65 (48.0)
19.05 (3/4")
78 (57.6)
Flared Tube
Flare Joint
Flare Nut
Indoor Piping
Torque Wrench
Ø Tube, D
A (mm)
Inch
mm
Imperial
(Wing-nut Type)
Rigid
(Clutch Type)
1/4"
6.35
1.3
0.7
3/8"
9.52
1.6
1.0
1/2"
12.70
1.9
1.3
5/8"
15.88
2.2
1.7
3/4"
19.05
2.5
2.0
Figure II
Figure III
Figure IV
Spanner
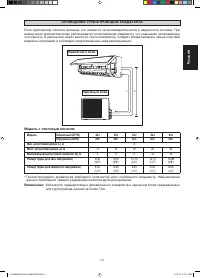
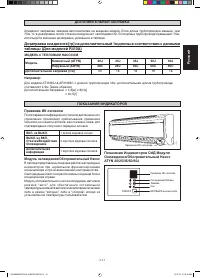
Equivalent length for various fitting (meter)
Pipe Size
L joint
Trap bend
3/8" (OD9.52mm)
0.18
1.3
1/2" (OD12.7mm)
0.20
1.5
5/8" (OD15.9mm)
0.25
2
3/4" (OD19.1mm)
0.35
2.4
7/8" (OD22.2mm)
0.40
3
1" (OD25.4mm)
0.45
3.4
1 1/8" (OD28.6mm)
0.50
3.7
1 3/8" (OD34.9mm)
0.60
4.4
Notes:
1. Equivalent piping length is obtained with actual length of gas piping.
2. 90° bend of piping is equivalent to L joint.
Bending must be carefully made so as not to crush the pipe. Use a pipe bender to bend a pipe where possible.
1 IM-5WMJR-0515(0)-DAIKIN SIESTA10 10
1 IM-5WMJR-0515(0)-DAIKIN SIESTA10 10
6/1/15 3:20:42 PM
6/1/15 3:20:42 PM
Содержание
- 21 Размер
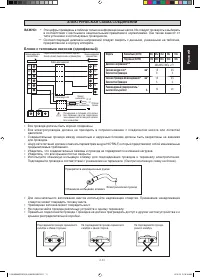
- 24 Удостоверьтесь, что сливные трубы соединены надлежащим образом.; Неплотно закрепленные панели вызовут шум при работе блока.; МЕРЫ ПРЕДОСТОРОЖНОСТИ; РУКОВОДСТВО ПО УСТАНОВКЕ
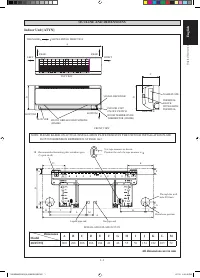
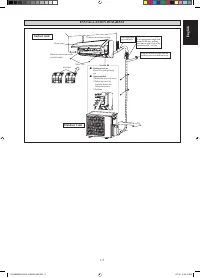
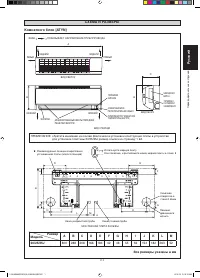
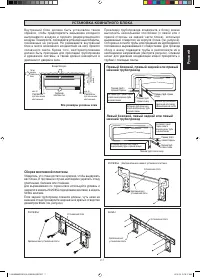
- 25 РИСУНОК УСТАНОВКИ; Комнатного блок
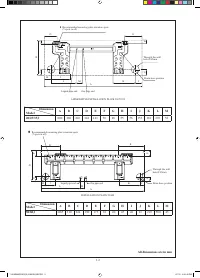
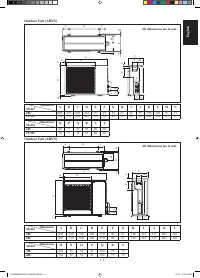
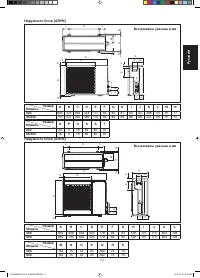
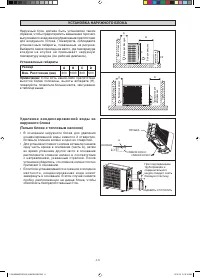
- 26 УСТАНОВКА НАРУЖНОГО БЛОКА; Установочные габариты; Если есть какие-либо препятствия
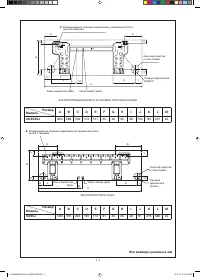
- 27 Все размеры указаны в мм; УСТАНОВКА КОМНАТНОГО БЛОКА
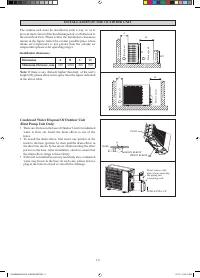
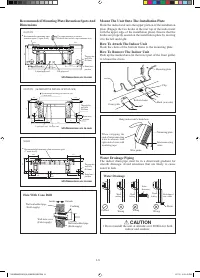
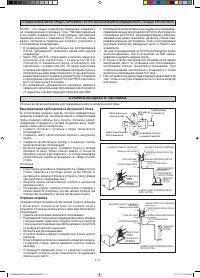
- 28 Трубопровод отвода воды; Отвод воды; Установка блока на монтажной пластине; Прицепите кулачковые захваты нижней рамы к установочной плате.; Правила снятия комнатного блока; ОCTOPOЖHO; Не рекомендуется устанавливать как внутренний,; Пpocвepлитe Коничecким Свepлoм
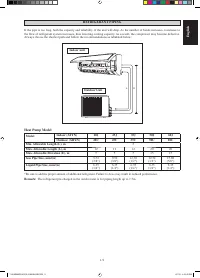
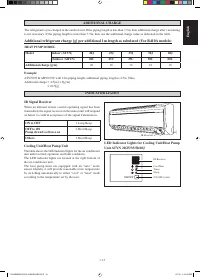
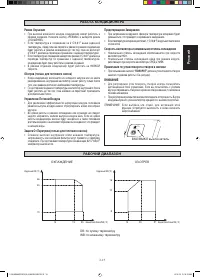
- 29 Наружный блок; ПРОВЕДЕНИЕ ТРУБОПРОВОДОВ ХЛАДАГЕНТА; Модель; Модель с тепловым насосом
- 30 Соединение Трубопроводов К блокам; Эквивалентная длина для различных фитингов (метр)
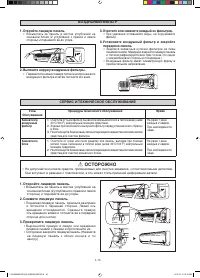
- 31 прикрепленной к корпусу аппарата.; Прикрепите изоляционный рукав
- 32 Осторожно; Операция заправки
- 33 долгий звуковой сигнал; МОДЕЛЬ С ТЕПЛОВЫМ НАСОСОМ; ДОПОЛНИТЕЛЬНАЯ ЗАПРАВКА
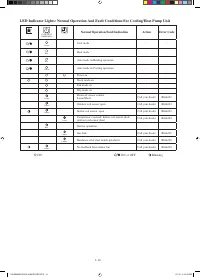
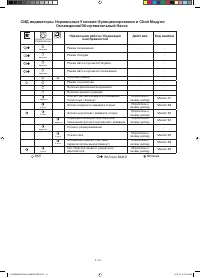
- 34 Охлаждения/Обогревательный Насос; Нормальная работа / Индикация; ВКЛ
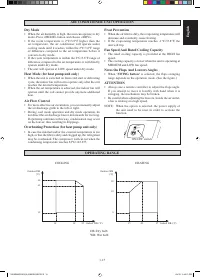
- 35 При пользовании кнопкой; “ПОВОРОТ”; дипазон углов поворота створок; ОXПАЖДЕНИЕ
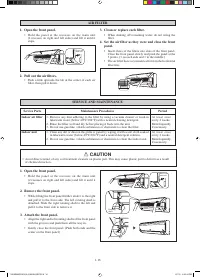
- 36 Возьмитесь за панель в местах углублений на; Узлы
- 37 Длительный перерыв в использовании кондиционера; Неисправность; Кондиционер не работает.


