
Хлебопечки FIRST FA-5152-2 - инструкция пользователя по применению, эксплуатации и установке на русском языке. Мы надеемся, она поможет вам решить возникшие у вас вопросы при эксплуатации техники.
Если остались вопросы, задайте их в комментариях после инструкции.
"Загружаем инструкцию", означает, что нужно подождать пока файл загрузится и можно будет его читать онлайн. Некоторые инструкции очень большие и время их появления зависит от вашей скорости интернета.


4
5
ENGLISH
ENGLISH
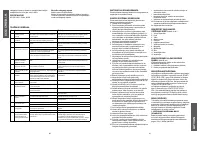
FOR THE FIRST USE
The appliance may emit a little smoke and a
characteristic smell when you turn it on for the first
time. This is normal and will soon stop. Make sure the
appliance has sufficient ventilation.
1. Please check if all parts and accessories are
complete and free of damage.
2. Clean all the parts according to the latter section
“Cleaning and Maintenance”
3. Set the bread maker in baking mode and bake
empty for about 10 minutes. After cooling it down
clean once more.
4. Dry all parts thoroughly and assembly them, so the
appliance is ready for using.
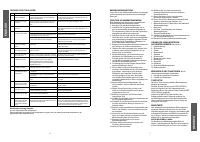
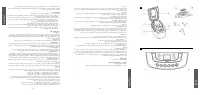
HOW TO MAKE BREAD
1. Place the pan in position, then turn it clockwise
until they click in correct position. Fix the
kneading blade onto the drive shafts. Turn the
kneaders clockwise until they click into place. It
is recommended to fill holes with heat-resisting
margarine prior to placing the kneaders, this avoids
the dough to stick below the kneaders and the
kneaders could be removed from bread easily.
2. Place ingredients into the bread pan. Please keep
to the order mentioned in the recipe.
Usually the water or liquid substance should be put
firstly, then add sugar, salt and flour, always add
yeast or baking powder as the last ingredient. In
case of heavy dough with high Rye or wholemeal
portion we advise to reverse the order of
ingredients. i.e. to fill in first the dry yeast and flour,
and finally the liquid to get a better kneading result.
3. With finger make a small indentation on one side of
the flour. Add yeast to indentation,
Make sure it does not come into contact with the
liquid ingredients or salt.
4. Close the lid gently and plug the power cord into a
wall outlet.
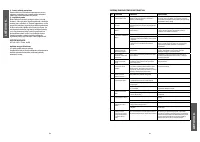
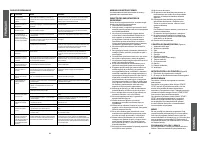
5. Press the Menu button until your desired program
is selected.
6. Press the COLOR button to select the desired
crust color. (if applicable).
7. Press the LOAF SIZE button to select the desired
size (if applicable).
8. Set the delay time by pressing Time+ or Time-
button. This step may be skipped if you want the
bread maker to start working immediately.
9. Press the START/STOP button to start working.
10. Once the process has been completed 10 beeps
sound will be heard. You can press START/STOP
button for approx. 2-4 seconds to stop the process
and tacke out the bread. Open the Lid and while
using oven mitts, firmly grasp the bread pan
handle. Turn the pan anti-clockwise and gently pull
the pan straight up and out of the machine.
11. Use non-stick spatula to gently loosen the sides of
the bread from the pan.
Caution
: the Bread pan and bread may be very hot!
Always handle with care and use oven mitts.
12. Turn bread pan upside down onto a clean cooking
surface and gently shake until bread falls out onto
rack.
13. Remove the bread carefully from the pan and cool
for about 20 minutes before slicing.
14. If you are out of the room or have not pressed the
START/STOP button at the end of operation, the
bread will be kept warm automatically for 1 hour (if
applicable), when keep warm is finished, beeps will
be heard.
15. When do not use or completely operation, turn off
the power switch and unplug the power cord.
Note
: Before slicing the loaf, use the hook to remove
out the Kneading blade hidden on the bottom of loaf.
The loaf is hot, never use the hand to remove the
kneading blade.
CLEANING AND MAINTENANCE
Disconnect the machine from the power and let it cool
down prior to cleaning.
1. Bread pan: Rub inside and outside with a damp
cloth. Do not use any sharp or abrasive agents
for the consideration of protecting the non-stick
coating. The pan must be dried completely prior to
installing.
2. Kneading blade: If the kneading bar is difficult
to remove from the axle, in such an event fill the
Container with warm water and allow it to soak for
approx. 30 minutes.The kneader can then be easily
removed for cleaning. Also wipe the blade carefully
with a cotton damp cloth, Please note both the
bread pan and kneading blade are dishwashing
safe components.
3. Lid and window: clean the lid inside and outside
with a slightly damp cloth.
Vent: To maintain ventilation, the vent cover should
be detached for cleaning periodically.
4. Housing: gently wipe the outer surface of housing
with a wet cloth. Do not use any abrasive cleaner to
clean as this would degrade the high polish of the
surface. Never immerse the housing into water for
cleaning.
5. Before the bread maker is packed away for
storage, ensure that it has completely cooled
down, is clean and dry, and put the spoon and the
kneading blade in the drawer, and the lid is closed.
INTRODUCTION OF BREAD INGREDIENTS
1. Bread flour
Bread flour has high content of high gluten (so it can
be also called high-gluten flour which contains high
protein), it has good elastic and can keep the size
of the bread from sunken after rising. As the gluten
content is higher than the common flour so it can be
used for making bread with large size and better inner
fiber. Bread flour is the most important ingredients of
making bread.
2. Plain flour
Plain flour is made by mixing well-chosen soft and
hard wheat and applicable for making express bread
or cakes.
3. Whole wheat flour
Whole wheat flour is made by grinding whole wheat,
it contains wheat skin and gluten whole wheat flour
is heavier and more nutrient than common flour. The
bread made by whole wheat flour is usually small in
size. So many recipes usually combine the whole
wheat flour and bread flour to achieve best results.
4. Black wheat flour
Black wheat flour, also named by “rough flour“, is a
kind of high fiber flour that is similar to whole wheat
flour. To obtain the large size after rising it must be
used in combination with high proportion of bread
flour.
5. Cake powder
Cake powder is made by grinding soft wheat or low
protein wheat, which is specially used for making
cakes. Different flour seems to be alike, Actually yeast
performance or absorbability of various flour differs
largely for growing areas, growth reasons, grinding
process and storage life. You may choose flour with
different trademark to test, taste and compare in local
market, and select the one which could produce the
best result according to your own experiences and
taste.
6. Corn flour and oatmeal flour
Corn flour and oat flour are made by grinding corn
and oatmeal respectively, they both are the additive
ingredients of making rough bread, which are used
for enhancing the flavor and texture.
7. Sugar
Sugar is very important ingredient to add sweet taste
and color of bread. While it helps to yeast bread as
nourishment. white sugar is largely used. Brown
sugar, powder sugar or cotton sugar may be called by
special requirements.
8. Yeast
Yeast passes doughy yeasting process, then
produces carbon dioxide, making bread expand and
inner fibre soft. However, yeast fast breeding needs
carbohydrate in sugar and flour as nourishment.
• 1 tsp. active dry yeast = 3/4 tsp.instant yeast
• 1.5 tsp. active dry yeast = 1 tsp. instant yeast
• 2 tsp. active dry yeast = 1.5 tsp. instant yeast
Yeast must be stored in refrigerator as it will be
killed at high temperature, before using check the
date and storage life of your yeast. Store it back to
the refrigerator as soon as possible after each use.
Usually the failure of bread rising is caused by the
dead yeast.
The ways described below will check whether your
yeast is fresh and active or not.
(1) pour 1/2 cup warm water (45-50°C) into a
measuring cup
(2) Put 1 tsp. white sugar into the cup and stir, then
sprinkle 2tsp. yeast over the water.
(3) Place the measuring cup in a warm place for
about 10min. Do not stir the water.
(4) The froth will be up to 1 cup. Otherwise the yeast
is dead or inactive.
9. Salt
Salt is necessary to improve bread flavor and crust
color. But salt can also restrain yeast from rising.
Never use too much salt in a recipe. if you don‘t
want to use salt, omit it. And bread would be larger if
without salt.
10. Egg
Eggs can improve bread texture, make the bread
more nourish and larger in size, add special egg
flavor to bread. When using it must be peeled and
stirred evenly.
11. Grease, butter and vegetable oil
Grease can make bread be soft and delay storage
life. Butter should be melted or chopped to small
particles prior use, so as to be stir evenly when you
take it out from refrigerator.
12. Baking powder
Baking powder mainly is used to rise the Ultra Fast
bread and cake. As it do not need rise time and
produce gas which will form bubble or soften the
texture of bread utilizing chemical principle.
13. Soda
The same principle as above. It can also used in
combination with baking powder.
14. Water and other liquid
Water is essential ingredient for making bread.
Generally speaking, water temperature between
20°C and 25°C is the most proper. But the water
temperature should be within 45-50°C for achieving
rising speed for make Ultra Fast bread. The water
may be replaced by fresh milk or water mixed with 2%
milk powder, which may enhance bread flavor and
improve crust color. Some recipes may call for juice
for the purpose of enhancing bread flavor, eg: apple
juice, orange juice, lemon juice and so on.
INGREDIENT MEASUREMENT
One of important step for making good bread is
utilizing proper amount of ingredients.
It is strongly suggest to use measuring cup,
measuring spoon to obtain accurate amount,
otherwise the bread will be largely influenced.
1. Weighing liquid ingredients
Water, fresh milk or milk powder solution should be
measured with measuring cups.
Observe the level of the measuring cup with your
eyes horizontally.
When you measure cooking oil or other ingredients,
clean the measuring cup thoroughly without any other
ingredients.
2. Measure dry powder
Dry powder should be kept in natural and loose
conditions, level the cup mouth gently by blade to
ensure accurate measure.
3. Ingredient sequence
The sequence of placing ingredients should be
observed, generally speaking, the sequence is: liquid
ingredients, eggs, salt and milk powder etc. When
placing the ingredients, the flour can‘t be wet by
liquid completely. The yeast can only be placed on
the dry flour. Exclusively, yeast can‘t touch with salt.
If the auto adding ingredient function is used, after
the flour has been kneaded, fruit ingredients will be
automatically poured into the mixture. When you use
the delaying function for a long time, never add the
perishable ingredients such as eggs, fruit ingredient.
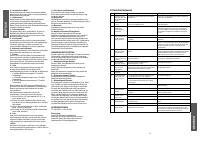
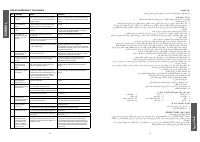
SPECIFICATION
AC 220-240V ~ 50Hz, 800W
Характеристики

Остались вопросы?Не нашли свой ответ в руководстве или возникли другие проблемы? Задайте свой вопрос в форме ниже с подробным описанием вашей ситуации, чтобы другие люди и специалисты смогли дать на него ответ. Если вы знаете как решить проблему другого человека, пожалуйста, подскажите ему :)


