Утюги VITEK VT-1239 B - инструкция пользователя по применению, эксплуатации и установке на русском языке. Мы надеемся, она поможет вам решить возникшие у вас вопросы при эксплуатации техники.
Если остались вопросы, задайте их в комментариях после инструкции.
"Загружаем инструкцию", означает, что нужно подождать пока файл загрузится и можно будет его читать онлайн. Некоторые инструкции очень большие и время их появления зависит от вашей скорости интернета.


6
ENGLISH
•
If• an• item• is• made• of• mixed• fabrics,• the• iron•
should•be•set•to•the•lowest•temperature•(for•
instance,•if•an•item•is•60%•polyester•and•40%•
cotton,• it• should• be• ironed• at• temperature•
used•for•polyester•ironing•«
•
»).
•
If• you• cannot• define• the• fabric• structure,• find•
a• place• that• is• inconspicuous• while• wearing•
and• select• the• ironing• temperature• experi-
mentally•(always•start•with•the•lowest•temper-
ature• and• raise• it• gradually• until• you• get• the•
desired•result).
•
Corduroy• and• other• fabrics• that• become•
glossy• quickly• should• be• ironed• strictly• in•
one•direction•(in•the•direction•of•the•pile)•with•
slight•pressure.
•
To•avoid•appearance•of•glossy•spots•on•syn-
thetic•and•silk•fabrics,•iron•them•backside.
SET TING THE IRONING TEMPERATURE
•
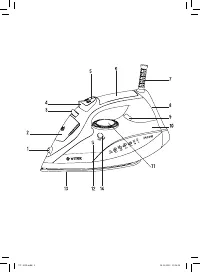
Place•the•iron•on•its•base•(8).
•
Insert•the•power•plug•into•the•mains•socket.•
•
Turn• the• temperature• control• knob• (11)• to•
set• the• required• ironing• temperature:• «
•
»,•
«
••
»,• «
•••
»• or•
«MAX»
• (depending• on• the•
fabric•type)
,
•the•pilot•lamp•(9)•will•light•up.
•
Once• the• temperature• of• the• soleplate• (13)•
reaches•the•set•point,•the•pilot•lamp•(9)•will•go•
out•and•you•can•start•ironing.
Notes
•
If you are ironing at high temperature but you
need to switch to lower temperature, wait until
the soleplate temperature decreases and the
pilot lamp (9) lights up, and only then you may
start ironing.
•
While steam ironing it is necessary to set the
ironing temperature «
•••
» or
«MAX»,
the
steam ironing sector is marked with corre-
sponding symbols on the temperature con-
trol knob (11).
WATER SPRAY
•
You• can• dampen• the• fabric• by• pressing• the•
water•spray•button•(4)•several•times.
•
Make• sure• that• there• is• enough• water• in• the•
water•tank•(10).
DRY IRONING
•
Place•the•iron•on•its•base•(8).
•
Insert•the•power•plug•into•the•mains•socket.
•
Set• the• continuous• steam• supply• knob• (3)• to•
the•utmost•right•position•–•continuous•steam•
supply•is•off.
•
Turn•the•temperature•control•knob•(11)•to•set•the•
required•ironing•temperature:•«
•
»,•«
••
»,•«
•••
»•
or•
«MAX»
• (depending• on• the• fabric• type)
,
• the•
pilot•lamp•(9)•will•light•up.
•
When• the• soleplate• (13)• reaches• the• set• tem-
perature,•the•pilot•lamp•(9)•will•go•out,•you•can•
start•ironing.
•
After• you• finish• ironing,• set• the• temperature•
control•knob•(11)•to•the•«OFF»•position.
•
Pull• the• power• plug• out• of• the• mains• socket•
and•let•the•iron•cool•down•completely.
STEAM IRONING
While• steam• ironing• it• is• necessary• to• set• the•
ironing• temperature• «
•••
»• or
«MAX»,
the•
steam• ironing• sector• is• marked• with• corre-
sponding• symbols• on• the• temperature• control•
knob•(11).•The•iron•is•provided•with•an•anti-drip•
valve• that• stops• water• supply• if• the• soleplate•
temperature• is• too• low;• it• prevents• dripping•
from•the•soleplate•openings•(13).•During•heat-
ing• and• cooling• of• the• iron• soleplate• (13),• you•
will• hear• characteristic• clicks• of• the• anti-drip•
valve•opening/closing,•which•indicates•its•nor-
mal•operation.
•
Place•the•iron•on•its•base•(8).
•
Set• the• continuous• steam• supply• knob• (3)• to•
the• utmost• right• position• –• continuous• steam•
supply•is•off.
•
Insert•the•power•plug•into•the•mains•socket.
•
Make• sure• that• there• is• enough• water• in• the•
water•tank•(10).
•
Turn•the•temperature•control•knob•(11)•to•set•
the• required• ironing• temperature:
«
•••
»• or•
«MAX»
,•the•pilot•lamp•(9)•will•light•up.
•
When•the•soleplate•(13)•reaches•the•set•tem-
perature•and•the•pilot•lamp•(9)•goes•out,•you•
can•start•ironing.
•
Turn•the•continuous•steam•supply•knob•(3)•to•
set•the•steam•generation•rate,•steam•will•start•
going•out•from•the•soleplate•(13)•openings.
•
Set• the• temperature• control• knob• (11)• to• the•
position• «OFF»,• and• the• continuous• steam•
supply•knob•(3)•to•the•utmost•right•position•-•
continuous•steam•supply•is•off.
•
Pull• the• power• plug• out• of• the• mains• socket•
and•let•the•iron•cool•down•completely.
AT TENTION!
If• the• steam• is• not• constantly• supplied• during•
operation,• check• whether• the• temperature• con-
trol•knob•(11)•is•set•properly•and•there•is•water•in•
the•water•tank•(10).
VT-1239.indd 6
10.11.2015 12:24:37
Содержание
- 17 ОПИСАНИЕ; Поверхности утюга нагрева-
- 18 Не разрешайте детям играть с; ПЕРЕД ПЕРВЫМ ИСПОЛЬЗОВАНИЕМ; »,•а•регулятор•постоянной•
- 19 Примечания; ТЕМПЕРАТУРА ГЛАЖЕНИЯ; не•гладить; УСТАНОВК А ТЕМПЕРАТУРЫ ГЛАЖЕНИЯ; или; (в• зависимости• от• типа•
- 20 ДОПОЛНИТЕЛЬНАЯ ПОДАЧА ПАРА
- 21 Важная информация; Примечание; ,• при• этом• загорится•
- 22 ТЕХНИЧЕСКИЕ ХАРАКТЕРИСТИКИ; Срок службы прибора – 3 года; Информация для связи –; Единая•справочная•служба:•
- 36 RUS


