
Телевизоры Toshiba 43UA2063DG - инструкция пользователя по применению, эксплуатации и установке на русском языке. Мы надеемся, она поможет вам решить возникшие у вас вопросы при эксплуатации техники.
Если остались вопросы, задайте их в комментариях после инструкции.
"Загружаем инструкцию", означает, что нужно подождать пока файл загрузится и можно будет его читать онлайн. Некоторые инструкции очень большие и время их появления зависит от вашей скорости интернета.


English
- 15 -
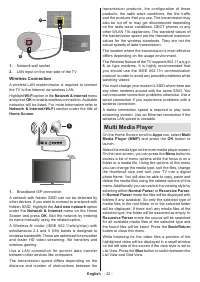
Available networks
When the WLAN function is turned on, available
wireless networks will be listed. Highlight
See all
and
press
OK
to see all networks. Select one and press
OK
to connect. You may be asked to enter a password to
connect to the selected network, in case the network
is password protected. Additionally you can add new
networks by using the related options.
Other options
Add new network:
Add networks with hidden SSID’s.
Scanning always available:
You can let the location
service and other apps scan for networks, even when
WLAN function is turned off. Press
OK
to turn it on
and off.
Wow:
Turn the Wake-On-LAN function on and off.
This function allows you to turn on or awaken your
TV via network.
Wol:
Turn the Wake On WLAN function on and off.
This function allows you to turn on or awaken your TV
via wireless network.
Ethernet
Connected/Not connected:
Displays the status of
the internet connection via Ethernet, IP and MAC
addresses.
Proxy settings:
Set a HTTP proxy for browser manu-
ally. This proxy may not be used by other apps.
IP settings:
Configure your TV’s IP settings.
Channel
Channels
Options of this menu may change or become inac-
tive depending on the
Channel Installation Mode
selection.
Channel Installation Mode - Antenna
Channel Scan:
Start a scan for analogue and digital
channels. You can press the
Back
button to cancel the
scan. The channels that have already been found will
be stored in the channel list.
Update Scan:
Search for updates. Previously added
channels will not be deleted, but any newly found
channels will be stored in the channel list.
Analog Manual Scan:
Start a manual scan for ana-
logue channels. Enter the
Start Frequency
and then
select
Scan Up
or
Scan Down
. When a channel is
found the scan will be completed and the found channel
will be stored in the channel list.
Single RF Scan:
Select the
RF Channel
by using
the Right/Left directional buttons.
Signal Level
and
Signal Quality
of the selected channel will be shown.
Press
OK
to start scan on the selected RF channel.
The found channels will be stored in the channel list.
Manual Service Update:
Start a service update
manually.
LCN:
Set your preference for LCN. LCN is the Logical
Channel Number system that organizes available
broadcasts in accordance with a recognizable channel
number sequence (if available).
Channel Scan Type:
Set your scan type preference.
Channel Store Type:
Set your store type preference.
Favorite Network Select:
Select your favourite net-
work. This menu option will be active, if more than only
one network is available.
Channel Skip:
Set channels to be skipped when
switching the channels via
Programme +/-
buttons
on the remote. Highlight the desired channel/s on the
list and press
OK
to select/unselect.
Channel Sort:
Replace the positions of the two
selected channels in the channel list. Highlight the
desired channels on the list and press
OK
to select.
When the second channel is selected, the position of
this channel will be replaced with the position of the
first selected channel.
Channel Move:
Move a channel to the position of
another channel. Highlight the channel you want to
move and press
OK
to select. Then do the same for a
second channel. When the second channel is selected,
the first selected channel will be moved to the position
of that channel.
Channel Edit:
Edit channels in the channel list. Edit
the name and channel number of the selected channel
and display
Network Name
,
Frequency
,
Color Sys-
tem
and
Sound System
informations related to that
channel if available. Depending on the channel other
options may also be editable. You can press the
Blue
button to delete the highlighted channel.
Analog Channel Fine-tune:
Fine-tune an analogue
channel. A list of available analogue channels will be
displayed. Select the desired one from the list and
press
OK
button. Then change the frequency of the
channel by pressing Left/Right directional buttons.
Press
OK
to store the new frequency for that channel.
Press
Back
to cancel. This item may not be visible,
depending on whether or not the last watched channel
was analogue.
Clear Channel List:
Delete all channels stored in the
channel list of the selected channel installation mode.
A dialogue will be displayed for confirmation. Highlight
OK
and press
OK
button to proceed. Highlight
Cancel
and press
OK
to cancel.
Channel Installation Mode - Cable
Channel Scan:
Start a scan for analogue and digital
cable channels. If available, operator options will be
listed. Select the desired one and press
OK
.
Scan
Mode
,
Channel Scan Type
,
Frequency
and
Network
ID
options may be available. The options may vary
Характеристики

Остались вопросы?Не нашли свой ответ в руководстве или возникли другие проблемы? Задайте свой вопрос в форме ниже с подробным описанием вашей ситуации, чтобы другие люди и специалисты смогли дать на него ответ. Если вы знаете как решить проблему другого человека, пожалуйста, подскажите ему :)


