
Роботы-пылесосы COOLFORT CF-3200 - инструкция пользователя по применению, эксплуатации и установке на русском языке. Мы надеемся, она поможет вам решить возникшие у вас вопросы при эксплуатации техники.
Если остались вопросы, задайте их в комментариях после инструкции.
"Загружаем инструкцию", означает, что нужно подождать пока файл загрузится и можно будет его читать онлайн. Некоторые инструкции очень большие и время их появления зависит от вашей скорости интернета.


7
ENGLISH
Note:
1. Before washing the floors, the manufacturer recom-
mends vacuuming the floors at least three times.
2. To prevent corrosion or damage, do not use cleaning
fluid or disinfectant in the water tank (22).
3. Do not use hot water, as this can deform the water
tank (22).
•
The intensity of the spray of water through the cloth
attachment (15) can be adjusted via the app as needed.
Wet Cleaning
•
Make sure the vacuum cleaner is fully charged and
switch it on by pressing the on/off button (3) or use the
application to enable this function.
Note:
1. It is recommended to rinse and dry the cloth from the
attachment (15) after each wet cleaning to prevent the
appearance of odor or mold.
2. If you don't plan wet cleaning, remove the attachment
(15) from the vacuum cleaner.
3. After 60 minutes of cleaning, the manufacturer recom-
mends cleaning the cloth (15) to reduce water consump-
tion.
•
After it finishes cleaning, the vacuum cleaner will stop
and automatically return to the charging station.
Returning the vacuum cleaner to the charging station
•
When the battery of the vacuum cleaner is discharged, the
vacuum cleaner will notify you with a voice message, after
which it will automatically return to the charging station.
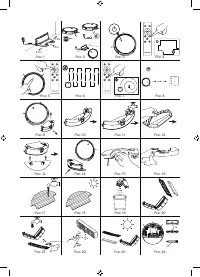
•
You can also forcefully send the vacuum cleaner to the
charging station by pressing the button (35)
on the
remote control or by selecting the "Charge" option in the
application. You will hear a sound message, and the vac-
uum cleaner will perform the command (pic. 8).
Notes:
•
It is recommended to switch the vacuum cleaner on
for the first time from the charging station. It allows to
decrease the time necessary to find the charging sta-
tion after cleaning.
•
Do not switch off the power to the charging station of
the robotic vacuum cleaner during the operation, as the
algorithm provides for a return to the charging station
after cleaning is completed.
•
It is not recommended to change the location of the
charging station, this may lead to inaccuracies in the
operation of the navigation system
•
For proper operation of the vacuum cleaner and return
to the charging station, it is necessary to provide a
free distance in front of the charging station of at least
1.5 meters; on the sides - at least 0.5 meter.
CLEANING AND MAINTENANCE
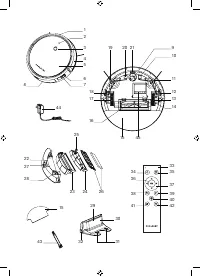
Main brush (16) (pic. 24)
– Turn the vacuum cleaner over and remove the lid of the
main brush (16).
– Remove the main brush (16) (pic. 24).
– Remove the dust and tangled hair from the main brush
(16) with the cleaning brush (43) supplied.
– Install the main brush (16) back to its place.
Water tank (22) and the floor cleaning
attachment (15)
•
Take out the floor cleaner (22) with the attachment (15)
(pic. 9), remove the attachment (15) from the tank (22)
(pic. 25). Wash the tank (22) (pic. 11). Dry with a dry
cloth (pic. 16). Detach the cloth from the floor clean-
ing attachment (15) (pic. 12) and rinse it under running
water and air dry (pic. 17 and 18).
Dust bin (23) and the HEPA filter (26)
•
Remove the combined dust bin/water tank (8) from the
vacuum cleaner (pic. 9). Detach the dust bin (23), disas-
semble and clean it (pic. 19). Disassemble the filter (26)
(pic. 20), rinse and dry it (pic. 21, 22, 23).
Battery
•
The vacuum cleaner is equipped with a high-perfor-
mance lithium-ion battery. Keep the robotic vacuum
cleaner charged to maintain the battery performance.
Note:
•
If you are not going to use the vacuum cleaner for a long
period, switch it off before storing and charge it at least
once every three months to avoid damage to the battery.
Firmware upgrade
•
Upgrade the vacuum cleaner's software via the app.
Place the robot on the docking station after making sure
that the battery level is above 20%. Perform the update.
Cleaning the main parts
•
Clean the sensors and the glass surfaces of the vacuum
cleaner with a damp cloth.
•
Turn the vacuum cleaner over and clean the main wheel
(9) from dust and hair wound around it.
•
Clean the charging contact points (10) of the vacuum
cleaner with a dry cloth.
•
Do not immerse the vacuum cleaner body, the power
adapter (44), the connecting cord of the power adapter
(44) and the charging station (29) into water or any other
liquids. Provide that no liquid gets inside the vacuum
cleaner body.
•
Do not use solvents or abrasives for cleaning the vac-
uum cleaner body, the charging station (29) and the
power adapter (44).
STORAGE
•
Before putting the vacuum cleaner away for long stor-
age, clean the vacuum cleaner in accordance with the
chapter «Cleaning and maintenance».
•
Remove the batteries from the remote control.
•
Use the original package for storage.
•
Keep the vacuum cleaner in a dry cool place out of reach
of children and disabled persons.
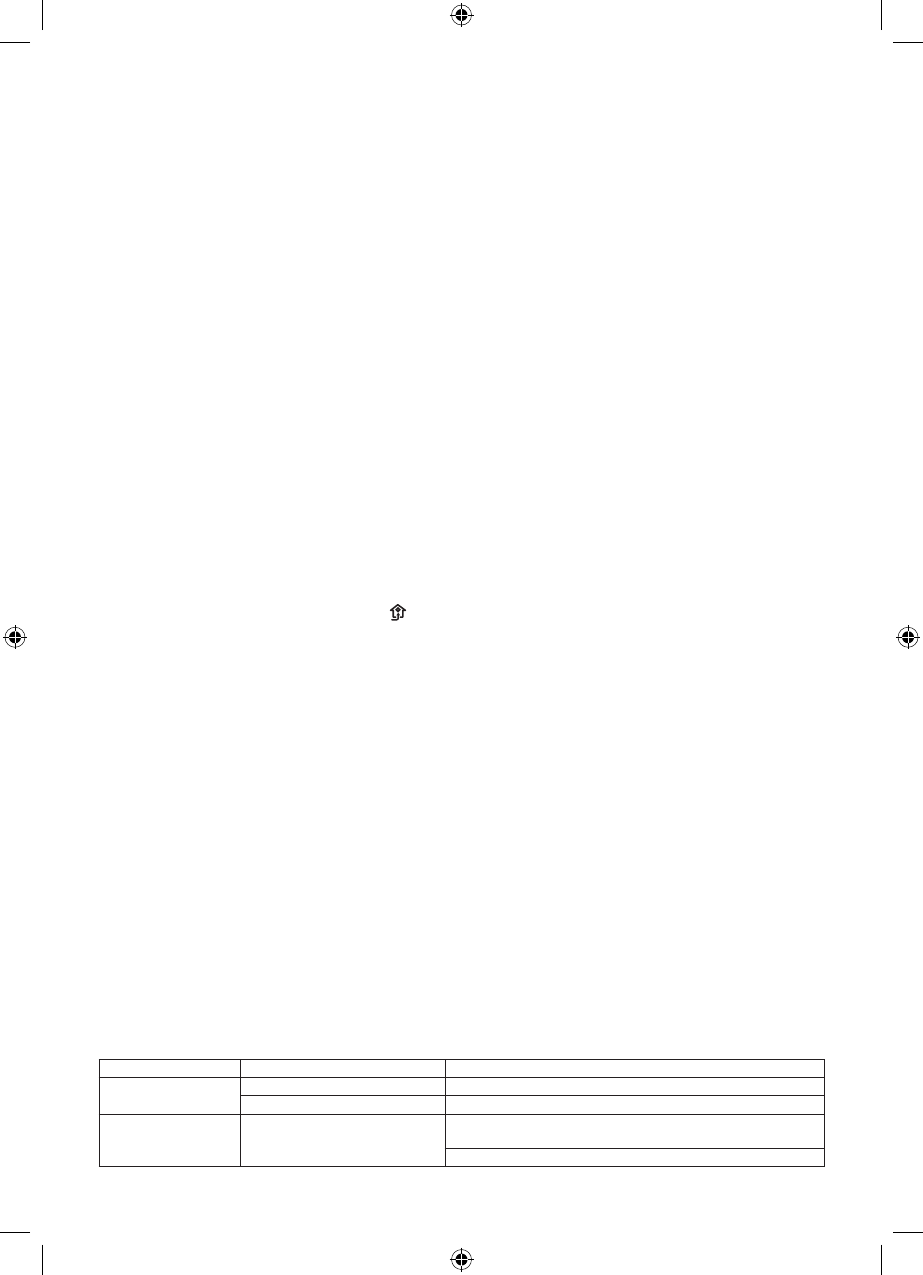
Information about malfunctions of the vacuum cleaner
The vacuum cleaner will report malfunctions and problems that have arisen with sound and light signals.
Malfunction
Possible causes
Solution
The robot does not
work
The on/off button is switched off Switch the button on
The battery is discharged
Charge the battery
The robot does not
charge
The robot is not set properly
on the charging station
Make sure that the robot contact points (20) match the contact
points of the station (31)
Wipe the contact points (20) and (30) with dry cloth.
Содержание
- 10 Не разрешайте детям играть с полиэ-; ПЕРЕД ПЕРВЫМ ИСПОЛЬЗОВАНИЕМ
- 11 Не устанавливайте зарядную станцию; ПЕРЕД ИСПОЛЬЗОВАНИЕМ ПЫЛЕСОСА; При установке пылесоса на зарядную; Включение/выключение пылесоса
- 12 если вам нужно убрать только одну
- 13 – Переверните пылесос и снимите крышку основной; Батарея; Неисправность
- 14 Срок службы устройства – 3 года
- 40 înseamnă că produsul dat a fost fabricat în iunie (luna a asea) 2006.


