
Роботы-пылесосы COOLFORT CF-3200 - инструкция пользователя по применению, эксплуатации и установке на русском языке. Мы надеемся, она поможет вам решить возникшие у вас вопросы при эксплуатации техники.
Если остались вопросы, задайте их в комментариях после инструкции.
"Загружаем инструкцию", означает, что нужно подождать пока файл загрузится и можно будет его читать онлайн. Некоторые инструкции очень большие и время их появления зависит от вашей скорости интернета.


5
ENGLISH
given in the warranty certificate and on the website
www.coolfort.ru.
•
To avoid damages, transport the unit in the original
package only.
•
Before you dispose of the vacuum cleaner, remove the
battery and apply to the corresponding center for recy-
cling of it. Do not burn the vacuum cleaner even if it is
badly damaged without removing the battery to avoid
the battery explosion.
•
Transport the unit in the original package only.
•
Keep the unit in a dry cool place out of reach of children
and disabled persons.
THIS UNIT IS INTENDED FOR HOUSEHOLD USE ONLY. ITS
COMMERCIAL USAGE AND USAGE IN PRODUCTION AREAS
AND WORK SPACES IS PROHIBITED.
FUNCTION CAPABILITIES
Control and navigation in the mobile app
Control the unit, set the cleaning modes and watch the
operation process with the mobile app.
Returning to the charging station
The unit returns to the charging station by itself after it
finishes cleaning or when the battery is low. You can also
force the unit to finish or stop cleaning and send it to the
charging station.
UV lamp (4)
The robotic vacuum cleaner is additionally equipped with an
UV lamp. Ultraviolet emission serves for additional disinfec-
tion of surfaces, destruction of microbes and bacteria, and
works automatically.
BEFORE THE FIRST USE
After unit transportation or storage under cold (winter)
conditions, it is necessary to keep it for at least three
hours at room temperature before switching on.
•
Unpack the vacuum cleaner and remove any advertising
stickers and package materials.
•
Keep the original package.
•
Check the unit for damages, do not use it in case of
damages.
•
Read the safety instructions and the operation manual.
•
Make sure that operating voltage of the power adapter
corresponds to the voltage of your mains.
•
Arrange the furniture carefully, making sure to free up as
much space as possible before cleaning.
•
Put away small household appliances: fans, scales,
floor lamps, etc. from the possible route of the vacuum
cleaner.
•
If there is a carpet with tassels in the room, tuck them
under the carpet.
•
Do not use the mop function on the carpet.
•
To prevent the robotic vacuum cleaner from falling from
the stairs, use the barrier.
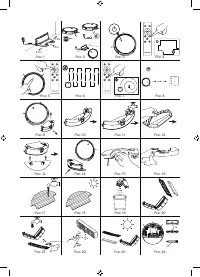
REMOTE CONTROL
To use the remote control, open the battery compartment lid
and insert 2 «AAA» batteries (not included) to the battery
compartment, strictly following the polarity, then close the
battery compartment lid.
If you do not use the unit for a long time, remove the batteries
from the battery compartment of the remote control.
Backup power supply batteries leakage can cause injuries
or the unit damage. To avoid the unit damage, follow the
instructions given below:
– use only the «AAA» batteries;
– do not use old and new batteries at the same time or dif-
ferent types of batteries;
– do not recharge the batteries;
– insert the batteries strictly following the polarity;
– remove the batteries if you are not planning to use the
unit for a long time;
– apply to specialized centers for further recycling of the
batteries;
– avoid the power nippers circuit.
ASSEMBLING THE VACUUM CLEANER
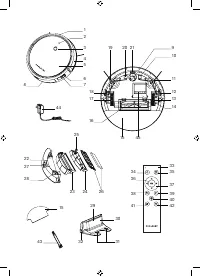
Installing and removing the side brush (11 or 19)
•
Turn the vacuum cleaner over and insert the side brush
(11 or 19) until clicking.
•
The left side brush (11) has a green mark in the center
and the right brush (19) has a red mark.
Note:
1. The right and left side brushes are not interchangeable.
2. After every use clean the brushes from dust and garbage
and, if necessary, wash them under warm water jet.
To remove the side brush (11 or 19), take it by two leads and
pull upwards.
Removing and installing the dust bin/water tank (8)
and the filter (26)
Press on the clamp in the center and pull the dust bin/water
tank (8) towards you (pic. 9). Remove the dust bin container
(23) from the dust bin/tank (8) by pulling it upwards. To
remove the HEPA filter (26), pull the clamp (25) on the right.
Disassemble the HEPA filter (26) (pic. 20).
Insert the HEPA filter (26) in the dust bin container (23) until
clicking.
Install the dust bin container (23) back into the dust bin/tank
(8) and install it into the vacuum cleaner body.
Installing the charging station (29)
•
Place the charging station on the flat floor surface next
to the wall, the charging station base must be perpen-
dicular to the floor.
•
There should be at least 1.5 meters of free space in
front of the charging station and at least 0.5 meter at
the sides (pic. 1).
•
Connect the power adapter connecting cord jack to the
socket (32) on the charging station (29). Carefully wind
up the power adapter connecting cord, do not let it hang
down (pic. 1, 2).
Notes:
Do not place the charging station next to objects with
high reflective power, such as mirrors, otherwise the vacuum
cleaner’s return to the charging station will be hindered.
BEFORE USING THE VACUUM CLEANER
•
Remove all kinds of power cords, power extension cords
and other similar items from the floor that may interfere
with the movement of the vacuum cleaner.
•
The vacuum cleaner is intended for operation on a
smooth floor or on a carpet with low pile (no more than
1,5 cm). Do not use the vacuum cleaner for cleaning the
floors and carpets with high pile.
•
Make sure that there are no tablecloths, curtains or
other furnishings hanging to the floor along the path of
motion of the vacuum cleaner.
•
Arrange furniture for free movement of the vacuum
cleaner, remove foreign objects from the floor.
•
Do not use the vacuum cleaner in the rooms with
unsteady furniture, especially if there are fragile interior
objects or burning candles placed on it.
•
Do not place or install foreign objects on the vacuum
cleaner body, make sure that there are no pets on the
vacuum cleaner body.
Содержание
- 10 Не разрешайте детям играть с полиэ-; ПЕРЕД ПЕРВЫМ ИСПОЛЬЗОВАНИЕМ
- 11 Не устанавливайте зарядную станцию; ПЕРЕД ИСПОЛЬЗОВАНИЕМ ПЫЛЕСОСА; При установке пылесоса на зарядную; Включение/выключение пылесоса
- 12 если вам нужно убрать только одну
- 13 – Переверните пылесос и снимите крышку основной; Батарея; Неисправность
- 14 Срок службы устройства – 3 года
- 40 înseamnă că produsul dat a fost fabricat în iunie (luna a asea) 2006.


