
Роботы-пылесосы COOLFORT CF-3200 - инструкция пользователя по применению, эксплуатации и установке на русском языке. Мы надеемся, она поможет вам решить возникшие у вас вопросы при эксплуатации техники.
Если остались вопросы, задайте их в комментариях после инструкции.
"Загружаем инструкцию", означает, что нужно подождать пока файл загрузится и можно будет его читать онлайн. Некоторые инструкции очень большие и время их появления зависит от вашей скорости интернета.


6
ENGLISH
•
Before using the vacuum cleaner make sure that there
are no narrow places in the path of motion of the vac-
uum cleaner.
•
If there is a carpet with tassels in the room, tuck them
under the carpet.
•
Do not use the wet cleaning function for the carpet.
•
To prevent the robotic vacuum cleaner from falling from
the stairs, use the barrier.
USING THE VACUUM CLEANER
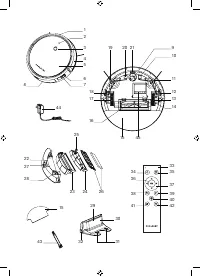
Charging the vacuum cleaner battery
•
Install the charging station (29). The installation recom-
mendations are given above.
•
Plug the power adapter (44) into the mains socket.
•
Place the vacuum cleaner right in the center of
the charging station (29), the contact points (10) on
the vacuum cleaner should match the points (31) on the
charging station. The vacuum cleaner will start charging.
•
For the first time charge the battery for 8 hours.
Note:
1. In the absence of a charging station, the vacuum cleaner
can be charged directly from the mains using the power
adapter (pic. 2). In this case connect the power adapter
(44) connecting cord jack to the socket (6) on the
vacuum cleaner body.
2. When installing the vacuum cleaner on the charging sta-
tion (29) pay attention to the position of the side brushes
(9). The brush bristles should not interfere with the vacu-
um cleaner contact points (10) and the charging contact
points (30). If the bristles are above the vacuum cleaner
contact point (10), turn the brush (11, 19) by the lead.
Note:
When the vacuum cleaner is installed on the charging
station (29) or when it is charged from the power adapter,
the unit will automatically switch on, even if it was previously
turned off.
•
Wait until the buttons (3)
and (2)
illumination
stops flashing and starts glowing continuously. The bat-
tery charging is finished and the vacuum cleaner is ready
for operation.
Switching the vacuum cleaner on/off
•
To switch the vacuum cleaner on, press and hold the
button (3)
for more than 3 seconds. After a while,
you will hear a sound signal, and the illumination of the
buttons (2 and 3) will glow constantly. Vacuum cleaner is
ready for operation.
Note:
– The buttons on the top cover of the robot vacuum
cleaner are sensory; to activate the desired function,
just touch the button.
– Pressing of each button is accompanied by a sound
signal.
•
To switch the vacuum cleaner off, press and hold the
button (3)
for more than 3 seconds until you hear a
sound signal, the vacuum cleaner will switch off and the
illumination of the buttons (2 and 3) will go out.
Attention!
If your robotic vacuum cleaner is equipped with a
floor cleaning attachment (15), it will automatically start wet
cleaning (floor cleaning) when you switch it on and notify you
with the voice message «Starting Wet Cleaning». Dry clean-
ing shall be carried out at the same time with wet cleaning
(vacuum cleaner mode). To use the dry cleaning (vacuum
cleaner) mode, remove the floor cleaning attachment (15).
In this case, when switched on, the vacuum cleaner will say
«Starting Cleaning».
Cleaning mode selection
•
You can select the required cleaning mode with the
remote control.
Notes:
- after you switch the vacuum cleaner off, it will start
cleaning in the automatic mode when switched on again.
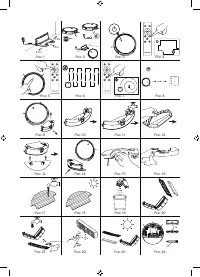
Automatic cleaning mode (pic. 5 and 6)
•
To switch the automatic room cleaning mode on, press
the on/off button (3)
or the button (38)
, the
OK button (36) on the remote control (RC) or select
the «Auto» mode in the application, after selecting the
mode, you will hear a corresponding sound signal.
•
In the automatic mode, the robotic vacuum cleaner
starts with smart zigzag work path (pic. 6), please do not
move or operate it, otherwise the robotic vacuum clean-
er will restart the cleaning path and start cleaning again.
•
During the cleaning process, the robotic vacuum clean-
er can stop to assess the remaining area or plan a fur-
ther route.
•
The time and number of such stops depends on the dif-
ficulty of the area for cleaning.
•
After it finishes cleaning, the vacuum cleaner will stop
and automatically return to the charging station.
•
After finishing the cleaning the vacuum cleaner will stop
and automatically return to the charging station.
Notes:
if you need to clean only one room, close the door
and the vacuum cleaner will clean the room. If there is no
charging station in the room, it will return to the starting point
after cleaning is finished.
Temporary stop of the vacuum cleaner
during cleaning
•
If you need to make a pause during the operation of the
vacuum cleaner, press once the on/off button (3)
or
on any other button on the remote control.
•
To resume cleaning, press again the on/off button
(3)
or the stop button, hibernation (34)
on the
remote control again.
“Spot cleaning” mode
•
In this mode the vacuum cleaner cleans the room mov-
ing in spiral order around one spot.
•
Place the vacuum cleaner in the desired place (at the
point of maximum debris concentration) and select the
"Spot cleaning" function in the application or press the
button (40) on the remote control (pic. 7).
•
It is recommended to use this function in a living room or
other area with the least amount of obstruction.
•
After it finishes cleaning, the vacuum cleaner will stop
and automatically return to the charging station.
«Along the wall» cleaning mode
•
In this mode the vacuum cleaner will clean the room
along the walls.
•
Press the button (39) on the remote control or select
this function in the application (pic. 4). The robot will
start cleaning along the wall. After it finishes cleaning,
the vacuum cleaner will stop and automatically return to
the charging station.
Wet floor cleaning mode
•
In this mode, the vacuum cleaner performs wet clean-
ing of the floor of the room using an attachment with a
microfiber cloth (15).
•
Remove the dust bin/water tank (8) (pic. 9). Remove the
dust bin (23), open the plug (28) on the water tank (22)
(pic. 10). Fill the tank (22) with water and close it with the
plug (28) (pic. 11). Secure the attachment (15) on the lid
(24) (pic. 12). Align the dust bin (23) with the water tank
(22) and the lid (24) (pic. 13) and insert into the vacuum
cleaner (pic. 14).
Содержание
- 10 Не разрешайте детям играть с полиэ-; ПЕРЕД ПЕРВЫМ ИСПОЛЬЗОВАНИЕМ
- 11 Не устанавливайте зарядную станцию; ПЕРЕД ИСПОЛЬЗОВАНИЕМ ПЫЛЕСОСА; При установке пылесоса на зарядную; Включение/выключение пылесоса
- 12 если вам нужно убрать только одну
- 13 – Переверните пылесос и снимите крышку основной; Батарея; Неисправность
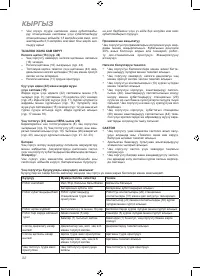
- 14 Срок службы устройства – 3 года
- 40 înseamnă că produsul dat a fost fabricat în iunie (luna a asea) 2006.


