
Пуско-зарядные устройства Telwin Leader 150 - инструкция пользователя по применению, эксплуатации и установке на русском языке. Мы надеемся, она поможет вам решить возникшие у вас вопросы при эксплуатации техники.
Если остались вопросы, задайте их в комментариях после инструкции.
"Загружаем инструкцию", означает, что нужно подождать пока файл загрузится и можно будет его читать онлайн. Некоторые инструкции очень большие и время их появления зависит от вашей скорости интернета.


present) as required (
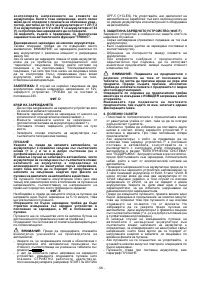
FIG.B.
LOW normal charging,
HIGH rapid charging).
END OF CHARGE
- Check the polarities of the battery terminals: positive for
- Remove the power supply from the battery charger by
the + symbol and negative for the - symbol.
turning the switch to OFF (if present) and/or removing the
NOTE:
if the symbols are indistinguishable remember
power supply cable from the mains outlet.
that the positive terminal is the one not connected to the
- Disconnect the black charge clamp from the chassis of the
vehicle chassis.
vehicle or from the negative terminal of the battery (-
- Connect the red charge clamp to the positive terminal of
symbol).
the battery ( + symbol).
- Disconnect the red charge clamp from the positive
- Connect the black charge clamp to the vehicle chassis, at
terminal of the battery (+ symbol).
a safe distance from the battery and the fuel pipe.
- Store the battery charger in a dry place.
NOTE: if the battery is not installed in the vehicle, connect
- Close up the battery cells with the appropriate plugs (if
the clamp directly to the negative terminal of the battery (-
present).
symbol).
STARTING
CHARGE
Before starting the vehicle, make sure the battery is
- Power the battery charger by inserting the power supply
connected properly to the respective (+ and -) terminals,
cable into the power outlet and turning the switch (if
and that it is in good condition (not sulphated or dud).
present) to ON.
N e v e r e v e r s t a r t v e h i cl e s w i t h t h e b a t t e r i e s
-
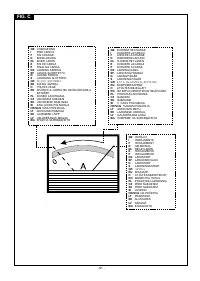
The ammeter (if present) will indicate the current (in
disconnected from their respective terminals; the
Amps) delivered towards the battery: during this phase
presence of the battery is essential for the elimination of
the pointer of the ammeter will decrease slowly to very
possible overvoltage that may be generated due to
low values according to the capacity and condition of the
energy accumulating in the connection cables at the
battery.
starting stage.
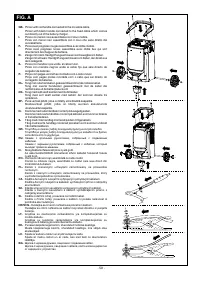
FIG.C
For starting turn the switch to the start position at the voltage
corresponding to that of the vehicle being started.
NOTE:
Once the battery is charged you may note the liquid
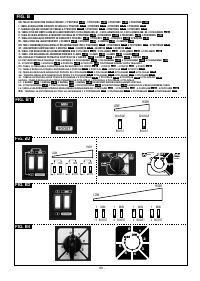
FIG. E
inside the battery starting to “boil”. It is advisable to stop
It is essential, before turning the ignition key, to make a rapid
charging when this phenomenon appears so as to prevent
charge for 5-10 seconds, which will greatly facilitate starting.
damage to the battery.
Rapid charging should always be done with the battery
charger switched to the charge position and NOT to
AUTOMATIC CHARGING
starting.
FOR MODELS WHERE PROVIDED
:
It is possible to enable starting by pressing the remote control
button (only for 3-phase).
1- Switch in automatic position.
(
TRONIC
)
The current supplied is indicated on the scale of the ammeter
This charging mode is advisable for hermetic
with greater capacity.
batteries (GEL/AGM).
During this phase the battery charger will constantly
WARNING:
Before proceeding with starting follow the
monitor the voltage over the ends of the battery and will
vehicle manufacturer's instructions carefully!
automatically deliver or cut off the charge current towards
- Make sure the power line is protected by fuses or
the battery.
automatic circuit-breakers with sizes as indicated on the
2 Switch in manual position.
(
CHARGE
)
rating plate by the (
) symbol.
- In order to prevent overheating in the battery charger,
This charging mode is advisable for WET batteries.
ALWAYS carry out the starting operation according to the
In this position automatic operation is deactivated.
duty cycle (work/pause) as indicated on the appliance (e.g.
For any other information relative to the charging system
START 3s ON 120s OFF-5 CYCLES). Do not insist if the
of the battery please refer to the instruction manual.
engine does not start: this could cause serious damage to
the battery or even to the electrical equipment in the
WARNING: SEALED BATTERIES (GEL/AGM)
vehicle.
If it is necessary to charge this type of battery take
5.
BATTERY CHARGER PROTECTIONS
(FIG. F)
great care. Charge slowly keeping an eye on the voltage
The battery charger has a safeguard that triggers in the case
over the battery terminals. This voltage can be read
of:
easily using a normal tester and when it reaches 14.4V
- Overload (excessive current supplied to the battery).
for 12V batteries (7.2V for 6V batteries and 28.8V for 24V
- Short circuit (charge clamps in contact with one another).
batteries) we recommend terminating the charging
- Polarity inversion on battery terminals.
process.
- For appliances fitted with fuses, if the fuses have to be
For models where foreseen, it is advisable to set the
replaced
always
use the same kind of fuse with the same
automatic function "TRONIC".
rated size.
SIMULTANEOUS CHARGING OF SEVERAL BATTERIES
WARNING: If the replacement fuse has a different
This operation must be performed with great caution:
size from that shown on the rating plate it could cause
WARNING; do not simultaneously charge different types of
damage to people or property. For the same reason,
batteries or batteries with different capacities or levels of
never ever replace the fuse with a bridge in copper or
discharge.
other material.
If you have to charge more than one battery at the same time
T h e p o w e r s u p p l y c a b l e s h o u l d a l w a y s b e
you can connect them “in series” or “in parallel”. Between the
DISCONNECTED from the mains supply while the fuse is
two systems, we recommend connection in series because
being changed.
you can easily check the current charging each battery, as it
When replacing the ribbon fuse, if present, carefully
will be the same as that shown by the ammeter.
fasten the nuts.
NOTE:
If two batteries with rated voltages of 12V are
6. USEFUL ADVICE
connected in series, the battery charger MUST be set to the
- If the positive and negative terminals are incrusted with
24V position.
oxide, clean them to ensure good contacts with the
FIG. D
- 3 -
Характеристики

Остались вопросы?Не нашли свой ответ в руководстве или возникли другие проблемы? Задайте свой вопрос в форме ниже с подробным описанием вашей ситуации, чтобы другие люди и специалисты смогли дать на него ответ. Если вы знаете как решить проблему другого человека, пожалуйста, подскажите ему :)


