
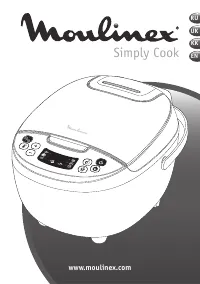
Мультиварки Moulinex MK611832 - инструкция пользователя по применению, эксплуатации и установке на русском языке. Мы надеемся, она поможет вам решить возникшие у вас вопросы при эксплуатации техники.
Если остались вопросы, задайте их в комментариях после инструкции.
"Загружаем инструкцию", означает, что нужно подождать пока файл загрузится и можно будет его читать онлайн. Некоторые инструкции очень большие и время их появления зависит от вашей скорости интернета.


97
96
EN
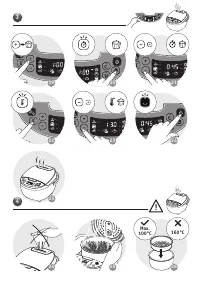
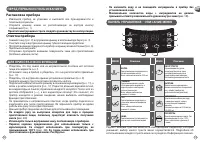
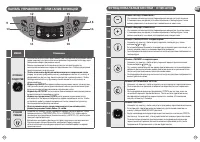
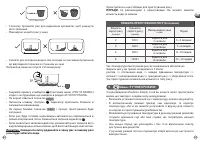
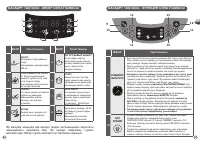
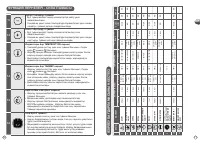
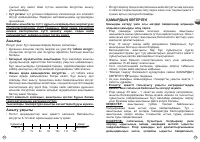
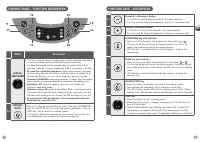
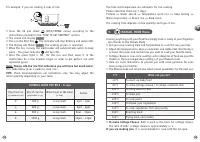
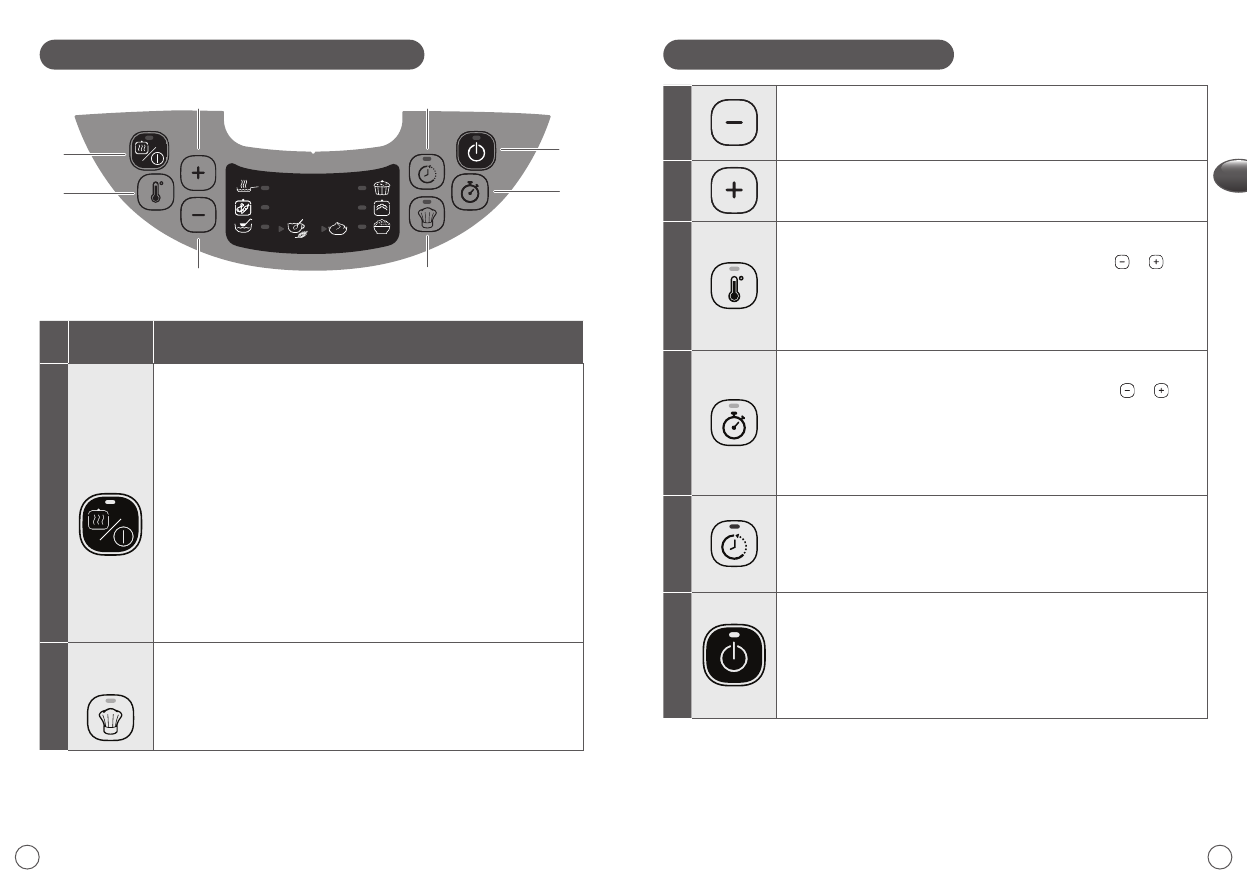
FUNCTION KEYS - DESCRIPTION
11
Backward / «Decrease» button
• This button is used to move backward in the menu selection.
• It is also used for time and temperature settings as «decrease» digit
12
Forward / «Increase» button
• This button is used to move forward in the menu selection
• It is also used for time and temperature settings as «increase» digit
13
TEMPERATURE key with indicator
• Press on this key to adjust the temperature. Then select or
• This key can be pressed during the cooking process if you wish to
modify the temperature during the cooking process.
• LED indicator is activated when the display screen is showing the
temperature.
14
TIMER key with indicator
• Press on this key to adjust the cooking time. Then select or
• This key can be pressed during the cooking process if you wish to add
extra cooking or decrease the cooking time after launching the cooking
menu.
• LED indicator is activated when the display screen is showing the
cooking time.
15
DELAYED START key
• Press this button to postpone the start of the cooking process.
• Once pressed, the countdown will be showed on the display.
• The LED indicator remains ON until the cooking process starts. When
cooking starts, LED indicator switches from Delayed Start Key to Timer key.
16
START key
• Press this button to start a cooking menu.
• When the cooking cycle is stopped, a long press on the Start Key will
turn OFF the display.
• When the LED indicator stops blinking and remains ON, it means that
the cooking is on progress. At the end of the cooking cycle, the LED
switches to automatic keep warm ( if applicable). Otherwise, it will blink.
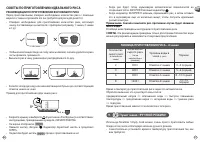
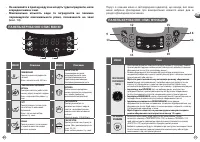
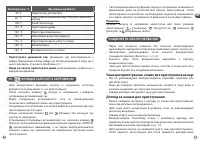
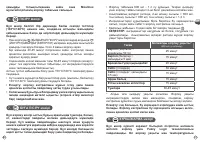
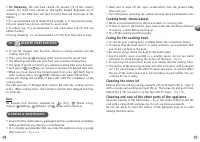
CONTROL PANEL - FUNCTION DESCRIPTION
16
14
9
13
11
10
15
12
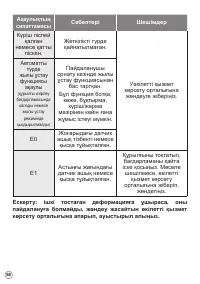
MENU
Description
9
CANCEL/
KEEP WARM
• This key is used to cancel a cooking menu already launched (one press)
or to activate Keep warm manually (during menu selection)
• The Keep Warm mode can be automatically activated at the end of
specified ( refer to " Cooking Programme Table") or manually activated.
• To cancel the automatic keep warm
(before menu launch), you need
to have a long press on this button, until you hear a bip sound. To re-
activate the function, you can have a long press again on the key.
• Indicator is BLINKING
during menu selection: it means that the cooking
menu includes an automatic Keep Warm mode after the cooking cycle.
• Indicator is OFF
when the cooking menu does not include the
automatic Keep Warm mode.
• Indicator remains ON
when the Keep Warm Mode is already activated.
The screen will display the time of keeping warm. If you wish to stop
the keep warm mode, press on the key. The LED indicator will turn off.
• To preserve the taste of your food, it is recommended not to use
Keep warm for more than 12h.
10
MANUAL
MODE
• Press this button to enter the Manual mode. Then press TEMPERATURE
key (13) and TIMER key (14) to set your cooking parameters. Press on
START key (16) to launch the cooking process.
• The settings selected are recorded for the next use. But you can also
reset before each use, or adjust anytime during cooking.
Содержание
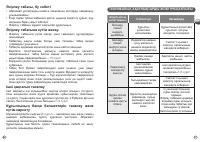
- 5 ВАЖНЫЕ ИНСТРУКЦИИ ПО ТЕХНИКЕ БЕЗОПАСНОСТИ; Прочтите инструкции по эксплуатации и соблюдайте
- 7 Защита окружающей среды на первом месте!; • Не приближайте лицо и руки к отверстию для выхода; ПОДКЛЮЧЕНИЕ ПРИБОРА К ИСТОЧНИКУ ПИТАНИЯ
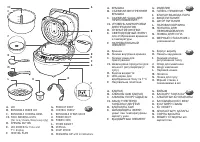
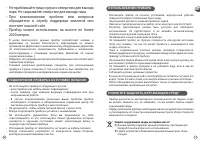
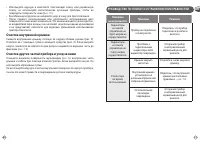
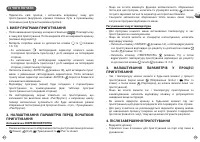
- 8 ПАНЕЛЬ УПРАВЛЕНИЯ – ОПИСАНИЕ МЕНЮ; МЕНЮ; ПЕРЕД ПЕРВЫМ ИСПОЛЬЗОВАНИЕМ; Распаковка прибора; ДЛЯ ПРИБОРА И ВСЕХ ФУНКЦИЙ
- 10 НАЧАЛО РАБОТЫ; ВЫБОР ПРОГРАММЫ ПРИГОТОВЛЕНИЯ; Автоматическое СОХРАНЕНИЕ ТЕПЛА
- 11 ВЫКЛЮЧЕНИЕ ДИСПЛЕЯ; ИНФОРМАЦИЯ О МЕНЮ; РЕГУЛИРОВКА ПАРАМЕТРОВ ВО ВРЕМЯ ПРИГОТОВЛЕНИЯ
- 12 Пункт меню «ЙОГУРТ/ТЕСТО»; ПРИГОТОВЛЕНИЕ ЙОГУРТА; Пункт меню «ТУШЕНИЕ/МЕДЛЕННОЕ ПРИГОТОВЛЕНИЕ»
- 13 Время ферментации; Сладкий; ТЕСТО; Закваска
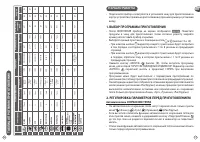
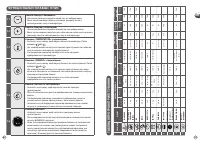
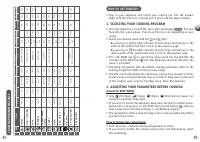
- 14 Пункт меню «РИС/КРУПЫ»
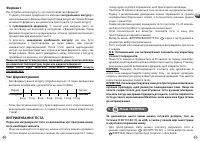
- 15 ТАБЛИЦА ПРИГОТОВЛЕНИЯ РИСА – 8 чашек; Пункт меню «РУЧНОЙ РЕЖИМ»; СОВЕТЫ ПО ПРИГОТОВЛЕНИЮ ИДЕАЛЬНОГО РИСА; РЕКОМЕНДАЦИИ ПО ПРИГОТОВЛЕНИЮ ВКУСНЕЙШЕГО РИСА
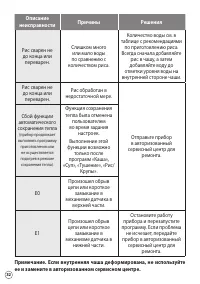
- 16 Примечание; ОЧИСТКА И ОБСЛУЖИВАНИЕ; Чаша для приготовления, паровая корзина; Температура; ФУНКЦИЯ ОТЛОЖЕННОГО ЗАПУСКА
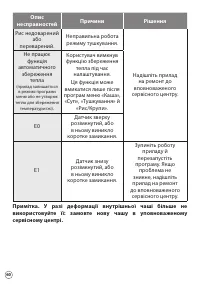
- 17 РУКОВОДСТВО ПО ПОИСКУ И УСТРАНЕНИЮ НЕИСПРАВНОСТЕЙ; Описание; Очистка внутренней крышки
- 18 Примечание. Если внутренняя чаша деформирована, не используйте
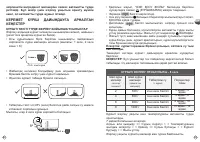
Характеристики

Остались вопросы?Не нашли свой ответ в руководстве или возникли другие проблемы? Задайте свой вопрос в форме ниже с подробным описанием вашей ситуации, чтобы другие люди и специалисты смогли дать на него ответ. Если вы знаете как решить проблему другого человека, пожалуйста, подскажите ему :)


Здравствуйте. Подскажите пожалуйста срок службы прибора.