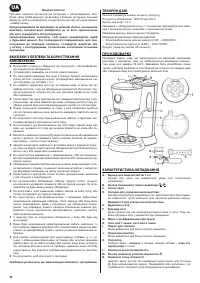
Кофемашина Zelmer 13Z014 - инструкция пользователя по применению, эксплуатации и установке на русском языке. Мы надеемся, она поможет вам решить возникшие у вас вопросы при эксплуатации техники.
Если остались вопросы, задайте их в комментариях после инструкции.
"Загружаем инструкцию", означает, что нужно подождать пока файл загрузится и можно будет его читать онлайн. Некоторые инструкции очень большие и время их появления зависит от вашей скорости интернета.


72
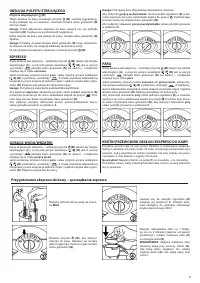
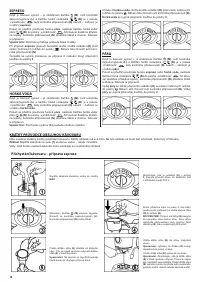
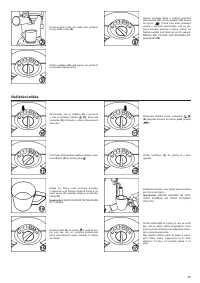
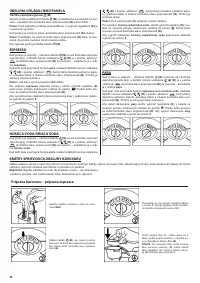
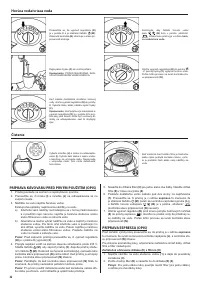
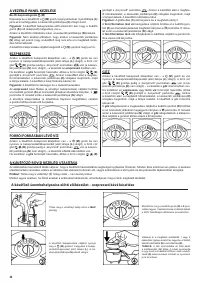
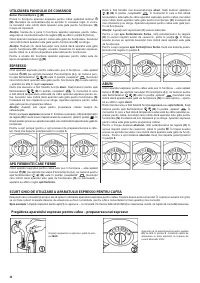
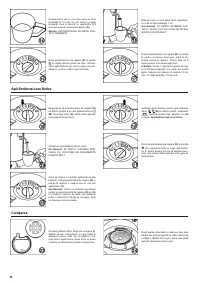
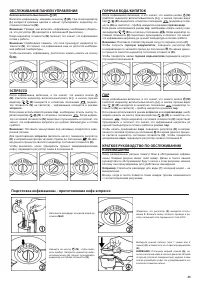
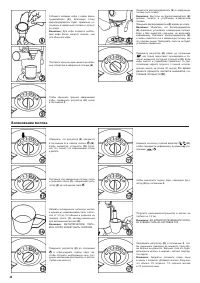
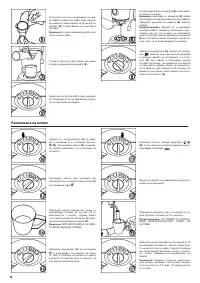
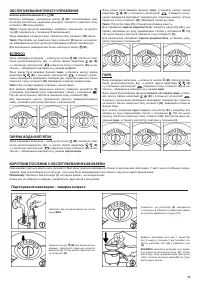
3. Take the ilter holder
(E)
, hold it under the brew head and rinse it with
water by turning the regulator knob
(K)
anticlockwise to the espresso
position
(8)
position to start the low of water and turn it back into
position
0
to turn off the appliance
(9)
.
4. Allow the ilter holder to dry.
Pre-heating cups
5. Cups may be pre-heated by illing them up with hot water. Check that
the espresso machine is in the
espresso
mode, that is that button
is pushed in
(M)
(the on/off pilot light is illuminated
(L)
), and the hot
water/steam button
(B)
is in the “pushed out” position
(the
standby mode light
(N)
is not illuminated). Place the steam wand
(C)
inside a cup. Turn the regulator knob
(K)
into position to start the
low of water from the steam wand
(C)
. To stop the process, set the
knob into position
0
. Pour the hot water out of the cups.
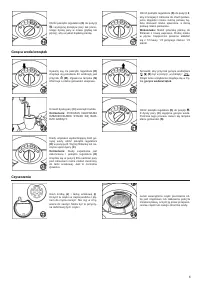
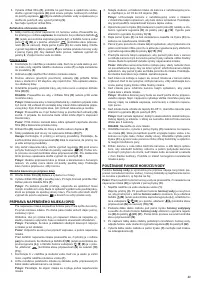
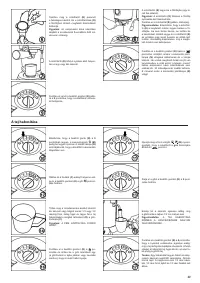
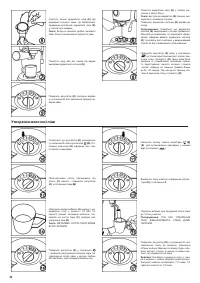
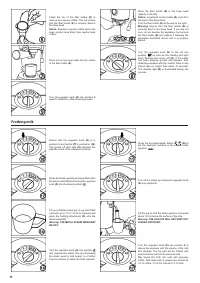
Brewing coffee
6. Check if there is cold water in the tank. If there is no or little water, ill
up the tank with cold water
(1)
and turn on the appliance
(3)
.
7. Using the measure provided
(G)
, put inely ground coffee in the ilter.
8. Using the other end (the lat end) of the measure
(G)
press the coffee
down lightly making a 90 degree turn, to ill the bottom. It will tighten
the tamped coffee.
9. Remove any excess coffee so it is level with the rim of the ilter
(H)
(5)
.
Important
: Ensure there is not too much coffee in the ilter
(H)
.
Tip
: Doses of coffee and the degree to which coffee is tamped should
be the same each time. The pouring time of brewed coffee depends
on the coarseness of ground coffee. The iner the coffee, the lower
the pouring speed.
Tip
: Check that the lat end of the measure
(G)
is dry when tamping
coffee. If it is damp, coffee particles may stick together.
Warning:
Too inely ground coffee
may block the holes of the ilter
(H)
and stop the coffee low.
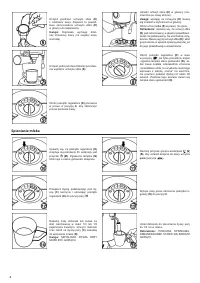
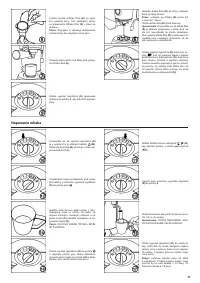
10. Place the ilter holder
(E)
in the brew head and turn it all the way to
the right
(6)
11.
Place cups under the pouring outlets of the holder
(E)
(7)
.
Warning
: Check that the espresso machine is ready to use.
Remember that if the standby pilot light
(N)
lashes, it means that the
espresso machine is not ready to use yet.
12. To resume the coffee pouring process, turn the regulator knob
(K)
anticlockwise into the espresso
(8)
. The standby light
(N)
is
illuminated during this process. To stop the process, turn the regulator
knob into position
0
(9)
.
Tip:
Perfectly brewed coffee is dark, caramel with reddish highlights.
It largely depends on the quality of coffee used. Always serve freshly
brewed, hot coffee.
After brewing
13. Turn the ilter holder
(E)
to the left and remove it from the brew head.
14. Empty the used coffee from the ilter
(H)
. When emptying, hold the
ilter by pressing the ilter lock
(F)
with a thumb.
Tip
: After each use of the espresso machine, we recommend that
brew head is rinsed with a small amount of water. This will wash off
the used coffee which has stuck to the bottom part of the brew head.
To do this, simply turn the regulator knob into the espresso position
and run a short low of water.
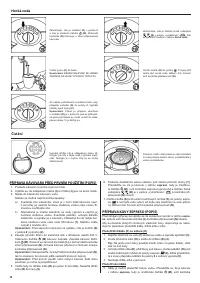
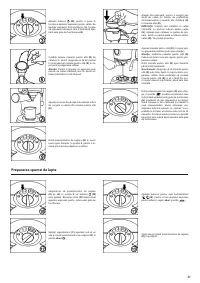
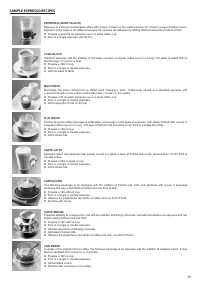
FROTHING MILK (DESCRIPTION)
The steam function is used for frothing milk. Steam performs two functions.
Firstly, it warms milk. Secondly, it mixes milk with air which gives it
a delicate, smooth appearance.
As is the case with brewing coffee, the best results with frothing milk are
achieved with time as the user gains experience.
Tip
: Remember that coffee is the basis of all coffee beverages, and milk is
only an addition.
Notice
: It is recommended that espresso is prepared irst, and milk is
frothed afterwards.
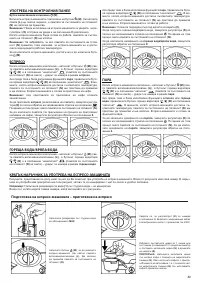
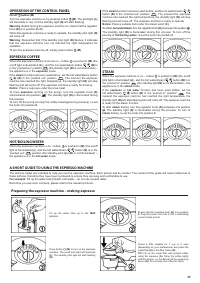
Before the milk frothing process, check that the espresso machine is in the
steam
mode, that is that button
(M)
is pushed in
(the on/off pilot light is
illuminated
(L)
), and the hot water/steam button
(B)
is in the “pushed
in” position
(the standby mode light
(N)
is not illuminated
(10)
(11)
).
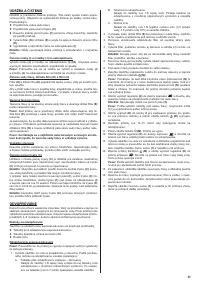
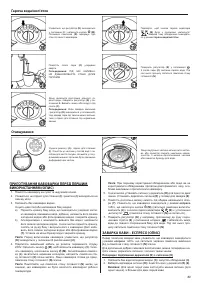
1. Check if there is cold water in the tank. If there is no or little water, ill
up the tank with cold water
(1)
.
2. Determine the amount of milk needed based on the number of cups
of coffee brewed or on the size of the milk jug.
Tip
: Remember that the volume of milk increases during frothing.
3. Pour cold, cooled down milk into a stainless steel jug illing it up to 1/2
or 2/3 of its capacity
(14)
.
Tip
: Store a stainless steel jug with milk in a fridge so that the milk
is well cooled down. Remember not to rinse the jug with warm water
before use.
4. Rinse the steam wand
(C)
by placing a dish under it
(C)
and by
turning the regulator knob
(K)
into the steam position
(12)
. Turn off
the steam by turning the regulator knob
(K)
into position
0
(13)
.
5. Move the steam wand
(C)
to the side of the appliance and attach the
milk frothing attachment
(D)
onto the steam wand
(C)
.
6. Immerse the steam wand in milk so that the wand is about 1/2 cm
below the surface and activate steam dosing by turning the regulator
knob
(K)
into position
(15) (16)
.
7. Hold the frothing jug at an angle so that the steam wand sits in the
jug and lower the jug until the end of the steam wand is immersed just
below the surface of milk. This will start the milk frothing process.
Warning
: Do not allow an uneven outlow of steam, or the froth will
not be properly aired. To avoid it, lift the jug so that the steam wand is
deeper immersed in milk. Remember that the ideal texture of milk is
soft, smooth froth.
8. The moment the milk has warmed up and frothed, the level of milk
in the jug will start rising. If this happens, start lowering the jug but
always keep the end of the steam wand immersed just under the milk
surface.
9. The moment froth has been obtained, lift the jug so that the steam
wand is in the middle of milk.
Tip
: The amount of froth required will change depending on the type
of beverage prepared. E.g. a cappuccino requires more froth than
a coffee beverage on the basis of an espresso served with steam
frothed milk.
10. Immediately after milk has been warmed up to 60-65°C, turn off the
steam by turning the regulator knob
(K)
into position
0
(17)
.
Tip
: If you do not have a thermometer, a good indication of reaching
the right temperature is if you cannot keep a hand against the jar for
longer than 3 seconds.
Important
: Do not boil the milk.
11. Remove the jug and take the frothing attachment
(D)
off the steam
wand
(C).
After each use, clean the wand in warm water with the
addition of washing-up liquid. Clear all its outlets. Promptly wipe the
steam wand
(C)
and its end with a clean damp cloth and rinse with
a small amount of steam.
12. Holding the jug in one hand tap it lightly on the table so as to release
air bubbles and then move the jug in a circular motion until milk gets
shiny and there are no bubbles in it. This will help obtain a uniform
texture of milk and froth.
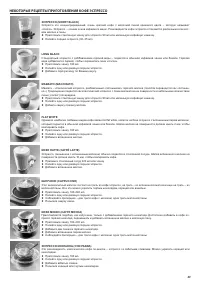
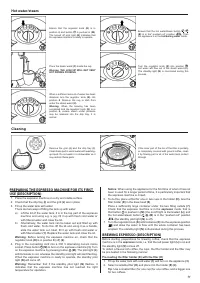
USING THE HOT WATER FUNCTION
The
hot water
function is perfect for preparing the long black drink
(espresso diluted with hot water), hot chocolate and for illing a coffee
plunger or a tea pot.
Warning
: Before using the
hot water
function, check that the milk frothing
attachment
(D)
has been taken off the steam wand
(C)
.
1. Fill up the water tank with cold water
(1)
.
Turn on the espresso machine
(3)
. It is important that the espresso
machine is in the
hot water
mode when using the
hot water
function,
which means that button is pushed in
(M)
(the on/off pilot light is
illuminated
(L)
), and the hot water/steam button
(B)
is in the
“pushed out” position
(the standby mode pilot light
(N)
is not
illuminated)
(18)
(19)
.
2. Place a cup or a dish under the
steam/hot water
wand and activate
the
hot water
function by turning the regulator knob
(K)
into position
(20) (21)
. The standby light
(N)
is illuminated during this process.
3. The moment the cup or dish has been illed with the desired amount
of hot water, close the hot water by turning the regulator knob
(K)
into
position
0
(22)
.
4. Take out the cup or dish and leave the steam wand
(C)
over the drip
tray
(I)
.


