
Электропилы Bosch AKE 45 S 0.600.834.700 - инструкция пользователя по применению, эксплуатации и установке на русском языке. Мы надеемся, она поможет вам решить возникшие у вас вопросы при эксплуатации техники.
Если остались вопросы, задайте их в комментариях после инструкции.
"Загружаем инструкцию", означает, что нужно подождать пока файл загрузится и можно будет его читать онлайн. Некоторые инструкции очень большие и время их появления зависит от вашей скорости интернета.


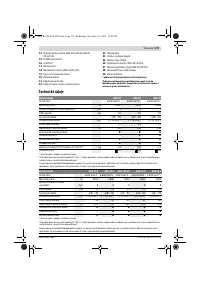


28
| English
F 016 L81 408 | (18.11.15)
Bosch Power Tools
When sawing logs supported on only one end, start the cut
from below (
Y
) about one third of the diameter into the log
and then finish the cut at the same spot from above (
Z
), in or-
der to avoid splitting of the log or jamming of the saw.
Felling Trees (see figure K)
Always wear hard hat to protect head against falling
branches.
The chain saw may only be used to fell trees smaller in
diameter than the length of the chain bar.
Secure the work area. Ensure no persons or animals are
in the vicinity of the falling tree (
).
Never attempt to free a jammed chain saw with the mo-
tor running. Use wooden wedges to free a jammed
chain saw.
When cutting and felling operations are being performed by
two or more persons at the same time, the felling operations
should be separated from the cutting operations by a distance
of at least twice the height of the tree being felled. Trees
should not be felled in a manner that would endanger any per-
son, strike any utility line or cause any property damage. If the
tree does make contact with a utility line, the company should
be notified immediately.
The chain saw operator should keep on the uphill side of the
terrain as the tree is likely to roll or slide downhill after it is
felled.
An escape path (
) should be planned and cleared as neces-
sary before cuts are started. The escape path should extend
back and diagonally to the rear of the expected line of fall.
Before felling is started, consider the natural lean of the tree,
the location of larger branches and the wind direction to judge
which way the tree will fall.
Remove dirt, stones, loose bark, nails, staples, and wire from
the tree.
Notching undercut:
Make the notch (
X – W
) 1/3 the diame-
ter of the tree, perpendicular to the direction of fall. Make the
lower horizontal notching cut first. This will help to avoid
pinching either the saw chain or the guide bar when the sec-
ond notch is being made.
Felling back-cut:
Make the felling back-cut (
Y
) at least
50 mm higher than the horizontal notching cut. Carry out the
felling back-cut parallel to the horizontal notching cut. Make
the felling back-cut so that enough wood is left to act as a
hinge. The hinge-wood keeps the tree from twisting and fall-
ing in the wrong direction. Do not cut through the hinge.
As the felling gets close to the hinge, the tree should begin to
fall. If there is any chance that the tree may not fall in the de-
sired direction or may rock back and bind the saw chain, stop
cutting before the felling back-cut is complete and use wedg-
es of wood, plastic or aluminium to open the cut and drop the
tree along the desired line of fall.
When the tree begins to fall, remove the chain saw from the
cut, stop the motor, put the chain saw down, then use the re-
treat path planned. Be alert for overhead limbs falling and
watch your footing.
Drive a wedge (
Z
) into the horizontal cut to make the tree fall.
When the tree begins to fall, leave the danger area via the re-
treat path planned. Be alert for overhead limbs falling and
watch your footing.
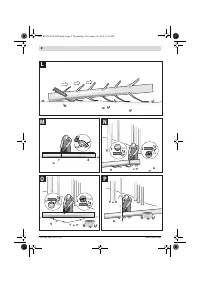
Limbing a Tree (see figure L)
Limbing is removing the branches from a fallen tree. When
limbing, leave larger lower limbs to support the log off the
ground. Remove the small limbs in one cut as illustrated in the
figure. Branches under tension should be cut from the bottom
up to avoid binding the chain saw.
Bucking a Log (see figures M –P)
Bucking is cutting a log into lengths. It is important to make
sure your footing is firm and your weight is evenly distributed
on both feet. When possible, the log should be raised and sup-
ported by the use of limbs, logs or chocks. Follow the simple
directions for easy cutting.
When the log is supported along its entire length, it is cut from
the top (overbuck).
When the log is supported on one end, cut 1/3 the diameter
from the underside (underbuck). Then make the finished cut
by overbucking to meet the first cut.
When the log is supported on both ends, cut 1/3 the diameter
from the top overbuck. Then make the finished cut by under-
bucking the lower 2/3 to meet the first cut.
When bucking on a slope, always stand on the uphill side of
the log. When “cutting through”, release the cutting pressure
near the end of the cut without relaxing your grip on the chain
saw handles in order to maintain complete control. Don’t let
the chain contact the ground. After completing the cut, wait
for the saw chain to stop before you move the chain saw. Al-
ways stop the chain saw motor before moving from tree to
tree.
OBJ_BUCH-2245-002.book Page 28 Wednesday, November 18, 2015 12:45 PM
Содержание
- 200 Электробезопасность; Безопасность людей
- 201 Сервис
- 202 Описание продукта и услуг
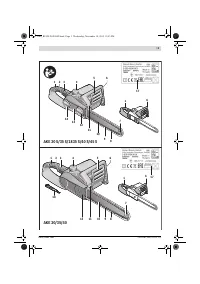
- 203 Изображенные составные части
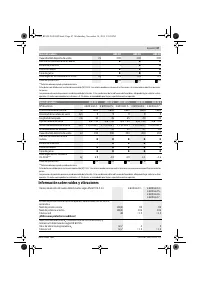
- 204 Данные по шуму и вибрации
- 205 Заявление о соответствии; Монтаж и натяжение пильной цепи
- 207 Работа с инструментом; Работа с цепной пилой; Перед пилением
- 210 Поиск неисправностей
- 211 Техобслуживание и очистка; Затачивание пильной цепи; Принадлежности; Очистка
- 212 Утилизация


