Видеокамеры Sony DCR-TRV240E / DCR-TRV241E - инструкция пользователя по применению, эксплуатации и установке на русском языке. Мы надеемся, она поможет вам решить возникшие у вас вопросы при эксплуатации техники.
Если остались вопросы, задайте их в комментариях после инструкции.
"Загружаем инструкцию", означает, что нужно подождать пока файл загрузится и можно будет его читать онлайн. Некоторые инструкции очень большие и время их появления зависит от вашей скорости интернета.


Загружаем инструкцию

SERIES
TM
©2002 Sony Corporation
Operating Instructions
Before operating the unit, please read this manual thoroughly, and retain
it for future reference.
Инструкция по эксплуатации
Перед эксплуатацией аппарата внимательно прочтите, пожалуйста,
данное руководство и сохраните его для дальнейших справок.
3-072-651-
12
(3)
DCR-TRV240E/TRV241E/TRV340E/
TRV341E/TRV740E
Digital
Video Camera
Recorder
DCR-TRV740E
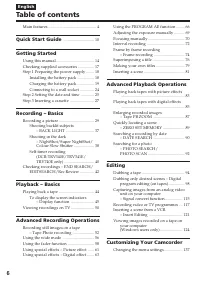
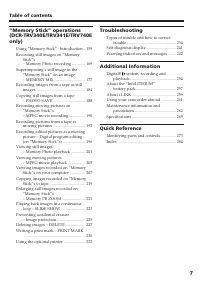
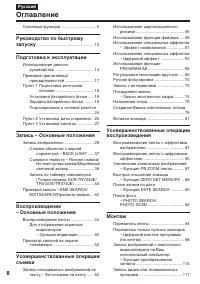
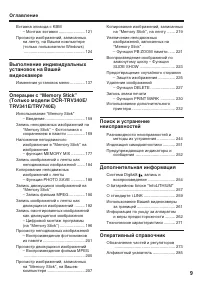
Содержание
- 2 or; WARNING; English; Русский; ПРЕДУПРЕЖДЕНИЕ
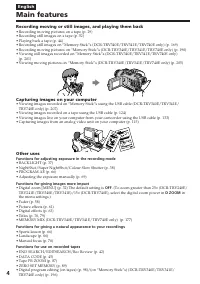
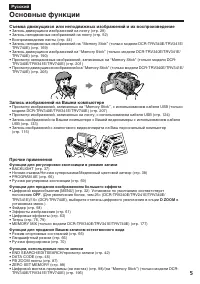
- 5 Основные функции; Запись изображений на Вашем компьютере; положение
- 8 Оглавление; Подготовка к эксплуатации
- 9 Дополнительная информация
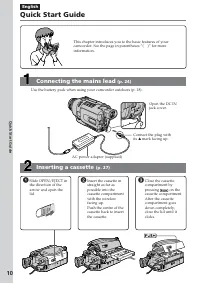
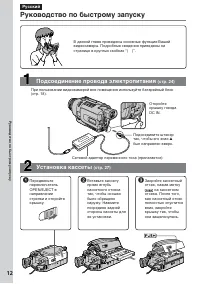
- 12 Установка кассеты; на кассетном; Руководство по быстрому запуску; Сетевой адаптер переменного тока (прилагается)
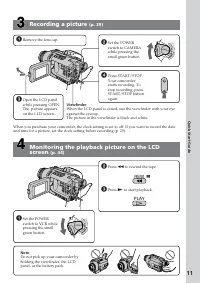
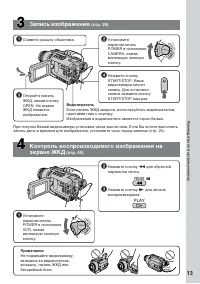
- 13 Запись изображения; Примечание
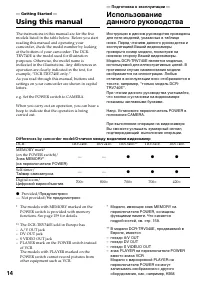
- 14 — Getting Started —; Using this manual; * The models with MEMORY marked on the; Таймер самозапуска
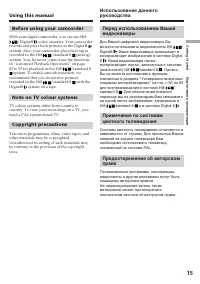
- 15 With your digital camcorder, you can use Hi8; Note on TV colour systems
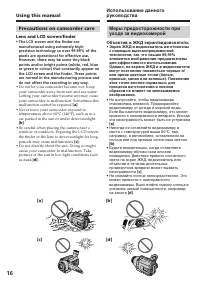
- 16 Lens and LCD screen/finder; • The LCD screen and the finder are; • Do not let your camcorder become wet. Keep; Объектив и ЖКД экран/видоискатель; • Не допускайте, чтобы видеокамера
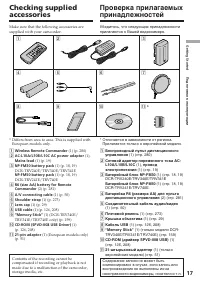
- 17 * Differs from area to area. This is supplied with
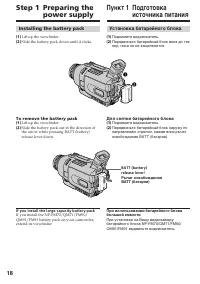
- 18 Installing the battery pack; To remove the battery pack; Lift up the viewfinder.; If you install the large-capacity battery pack; Установка батарейного блока; Поднимите видоискатель.; Поднимите видоискатель.; Пункт 1 Подготовка
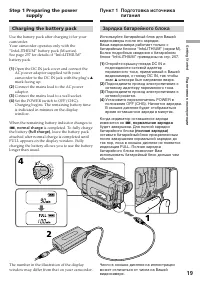
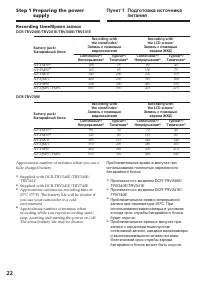
- 19 Charging the battery pack; Connect the mains lead to a wall socket.; normal charge; is completed. To fully charge; Step 1 Preparing the power; Зарядка батарейного блока; штекера был направлен вверх.; нормальная зарядка; Пункт 1 Подготовка источника
- 20 After charging the battery pack; “– – – – min” appears in the display window.; While charging the battery pack; После зарядки батарейного блока
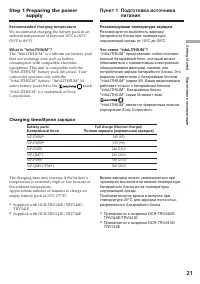
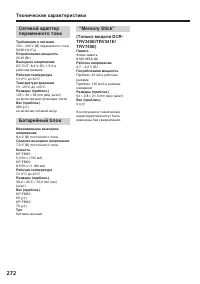
- 21 Recommended charging temperature; C для зарядки полностью; Время зарядки; Батарейный блок
- 22 Время записи
- 23 Время воспроизведения; Playing time
- 24 Connecting to a wall socket; PRECAUTION; • The AC power adaptor can supply power even; Using a car battery; на; ПРЕДОСТЕРЕЖЕНИЕ; • Питание от сетевого адаптера переменного
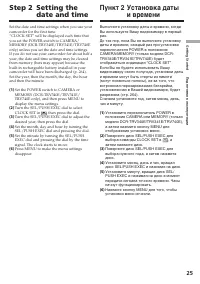
- 25 Step 2 Setting the; Пункт 2 Установка даты
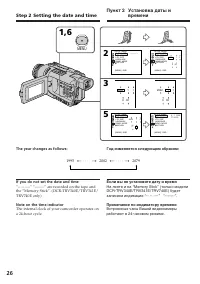
- 26 Step 2 Setting the date and time; The year changes as follows:; MENU; Пункт 2 Установка даты и; Год изменяется следующим образом:
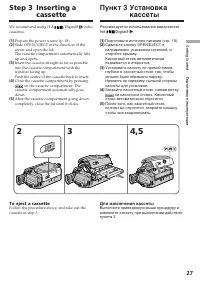
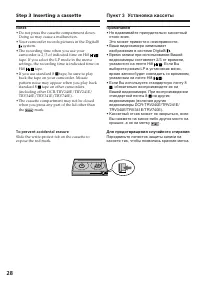
- 27 We recommend using Hi8; To eject a cassette; Step 3 Inserting a; Закройте кассетный отсек, нажав метку; Для извлечения кассеты; Пункт 3 Установка
- 28 Step 3 Inserting a cassette; Notes; Пункт 3 Установка кассеты; Примечания
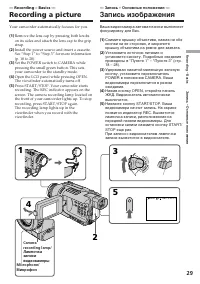
- 29 Your camcorder automatically focuses for you.; Микрофон
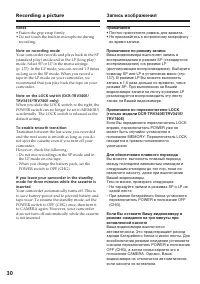
- 30 the LP mode on one tape.; – При замене батарейного блока установите
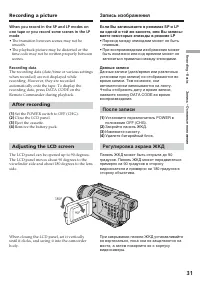
- 31 • The transition between scenes may not be; Recording data; After recording; Remove the battery pack.; Adjusting the LCD screen; • Переход между эпизодами может не быть; Данные записи; После записи; Удалите батарейный блок.; Регулировка экрана ЖКД
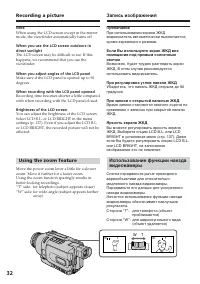
- 32 Using the zoom feature; Сторона “W”: для широкоугольного вида
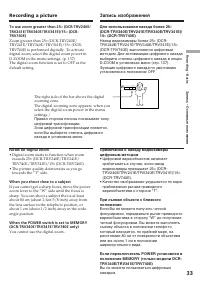
- 33 To use zoom greater than 25; Zoom greater than 25; Notes on digital zoom; • Digital zoom starts to function when zoom; When you shoot close to a subject; You cannot use the digital zoom.; Для использования наезда более 25; Наезд видеокамеры более 25
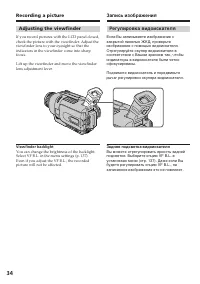
- 34 Adjusting the viewfinder; Viewfinder backlight; Задняя подсветка видоискателя
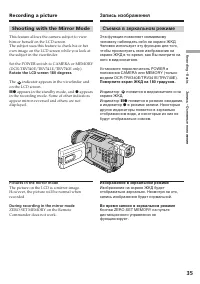
- 35 Shooting with the Mirror Mode; Rotate the LCD screen 180 degrees.; The; Pictures in the mirror mode; Поверните экран ЖКД на 180 градусов.; Индикатор; Изображение в зеркальном режиме
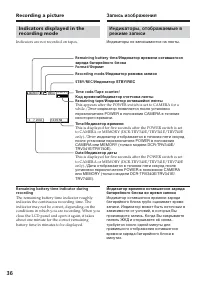
- 36 Indicators are not recorded on tapes.; Индикаторы не записываются на ленты.; Remaining battery time/; Этот индикатор отображается в течение пяти секунд
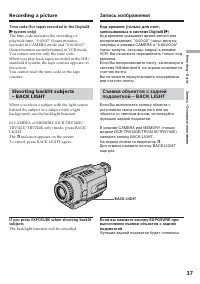
- 37 Time code (for tapes recorded in the Digital8; indicator appears on the screen.; Функция задней подсветки будет отменена.; BACK LIGHT
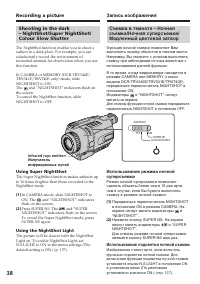
- 38 and “NIGHTSHOT” indicators flash on; Using Super NightShot; and “NIGHTSHOT” indicators; Using the NightShot Light; и “NIGHTSHOT” начнут; Использование подсветки ночной съемки; Infrared rays emitter/
- 39 Using Colour Slow Shutter; and “COLOUR SLOW SHUTTER”; • Do not use the NightShot mode in bright places; • Не используйте функцию ночной съемки в
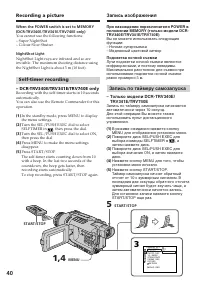
- 40 NightShot Light; Подсветка ночной съемки; Запись по таймеру самозапуска
- 41 To stop the countdown; Для остановки обратного отсчета
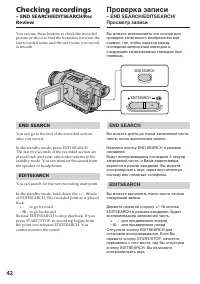
- 42 You can search for the next recording start point.; Checking recordings; EDITSEARCH; END SEARCH; кнопки; Проверка записи
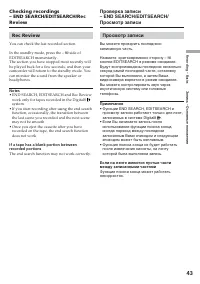
- 43 Rec Review; Просмотр записи; Нажмите кратковременно сторону –; • Функции END SEARCH, EDITSEARCH и
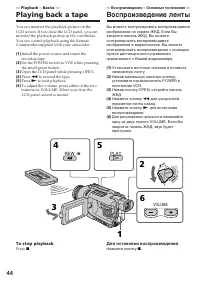
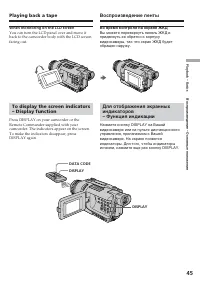
- 44 To stop playback; Playing back a tape; VOLUME; Для остановки воспроизведения; Воспроизведение – Основные положения; Воспроизведение ленты
- 45 When monitoring on the LCD screen; DISPLAY
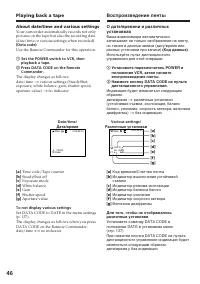
- 46 About date/time and various settings; Set the POWER switch to VCR, then; Различные установки
- 47 Notes on the data code function; Примечания по функции кода данных
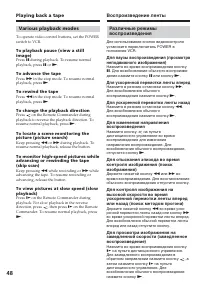
- 48 To advance the tape; Для ускоренной перемотки ленты вперед
- 49 To view pictures at double speed; In the various playback modes; В различных режимах воспроизведения
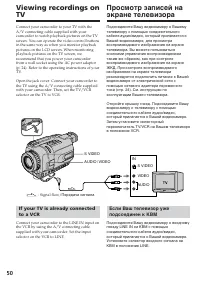
- 50 Передача сигнала
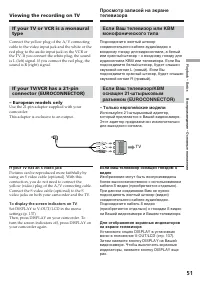
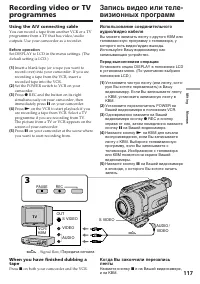
- 51 – European models only; If your TV has an S video jack; Viewing the recording on TV; TV; – Только европейские модели
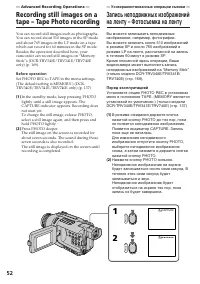
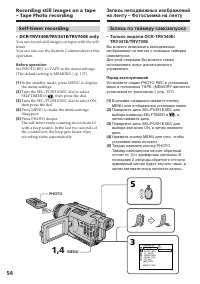
- 52 Before operation; — Advanced Recording Operations —; Перед эксплуатацией
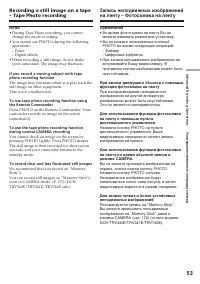
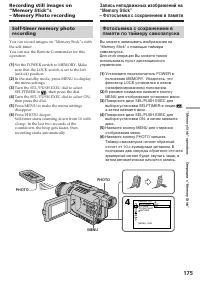
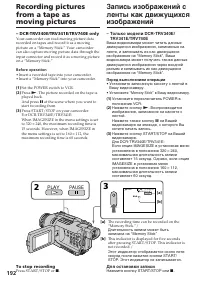
- 53 • During Tape Photo recording, you cannot; To record clear and less fluctuated still images; • Во время фотосъемки на ленту Вы не
- 55 To cancel self-timer recording
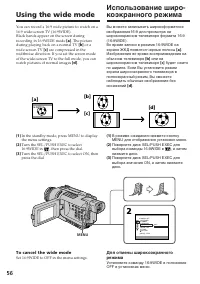
- 56 To cancel the wide mode; Set 16:9WIDE to OFF in the menu settings.; Using the wide mode; или на
- 57 In the wide mode; В широкоэкранном режиме
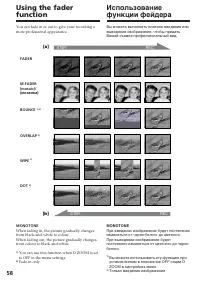
- 58 MONOTONE; Только введение изображения
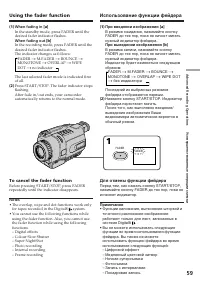
- 59 To cancel the fader function; Using the fader function; При введении изображения; Для отмены функции фейдера; Использование функции фейдера
- 60 Note on the bounce function; settings; Примечание по функции перескакивания; установках меню
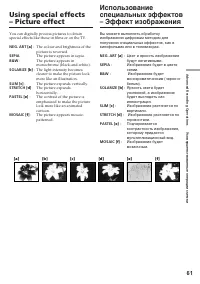
- 61 : The colour and brightness of the; The picture appears in sepia.; SEPIA; : Яркость света будет
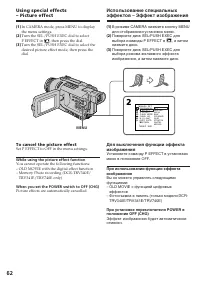
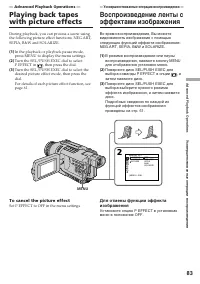
- 62 To cancel the picture effect; Set P EFFECT to OFF in the menu settings.; While using the picture effect function; Picture effects are automatically cancelled.; эффектов
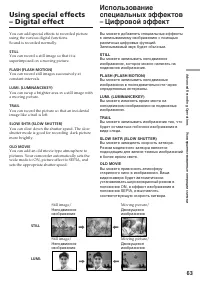
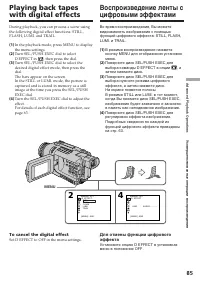
- 63 STILL
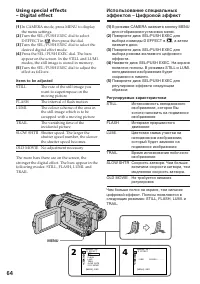
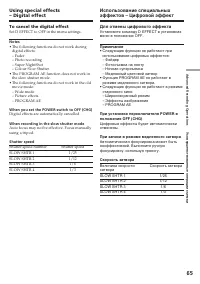
- 64 Items to be adjusted
- 65 To cancel the digital effect; Для отмены цифрового эффекта
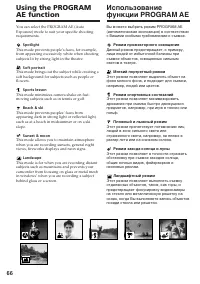
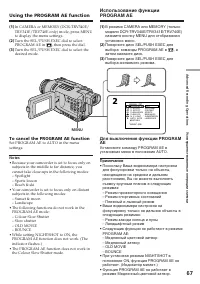
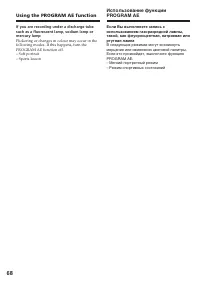
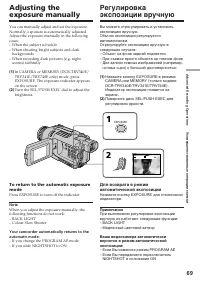
- 67 To cancel the PROGRAM AE function; Using the PROGRAM AE function
- 69 backgrounds; ночных сцен) с большой достоверностью; NIGHTSHOT в положение ON
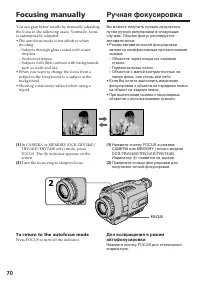
- 70 To return to the autofocus mode; Focusing manually; FOCUS; • Если Вы хотите выполнить изменение; Ручная фокусировка
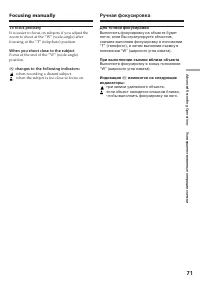
- 71 To focus precisely; Для точной фокусировки
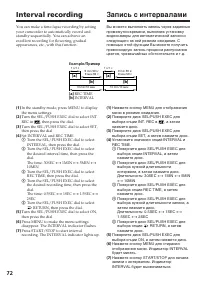
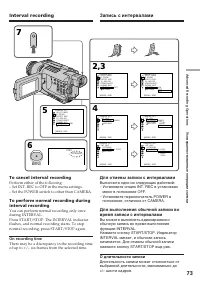
- 72 Interval recording; Запись с интервалами; Пример; REC TIME
- 73 To cancel interval recording; On recording time; Для отмены записи с интервалами; меню в положение OFF.; О длительности записи
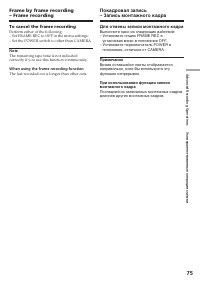
- 75 To cancel the frame recording; The last recorded cut is longer than other cuts.; Для отмены записи монтажного кадра; установках меню в положение OFF.
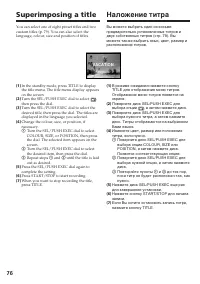
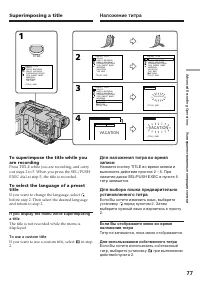
- 76 Superimposing a title; VACATION; Повторяйте пункты; Наложение титра
- 77 To use a custom title; If you want to use a custom title, select; TITLE; перед пунктом 2. Затем; Для использования собственного титра; при выполнении
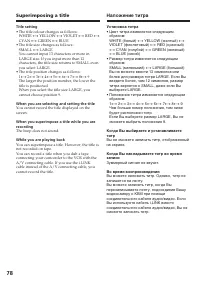
- 78 Title setting; Установка титра; • Цвет титра изменяется следующим; Во время воспроизведения
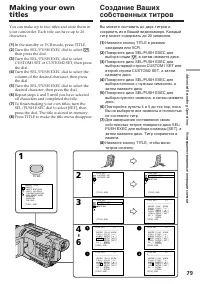
- 79 Turn the SEL/PUSH EXEC dial to select
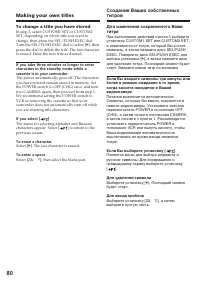
- 80 To change a title you have stored; To erase a character; Making your own titles; Если Вы выберите установку [; выберите пустую часть.
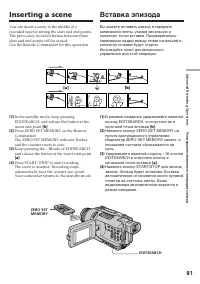
- 81 Keep pressing the –; Inserting a scene; Удерживайте нажатой сторону –; Вставка эпизода
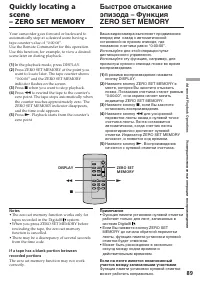
- 82 • The zero set memory function works only for; • Функция памяти установки нулевой отметки
- 84 • Picture effect functions work only for tapes; Pictures processed by picture effect functions; • Функция эффекта изображения работает
- 85 Set D EFFECT to OFF in the menu settings.
- 86 • Digital effect functions work only for tapes; Pictures processed by digital effect functions; • Функция цифрового эффекта работает
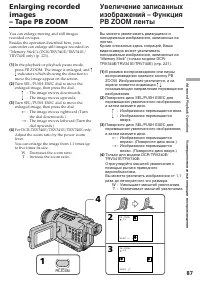
- 87 indicators which showing the direction to; PB ZOOM; : Изображение перемещается
- 88 To cancel the PB ZOOM function; Для отмены функции PB ZOOM; • Функция PB ZOOM работает только для; Изображения в режиме PB ZOOM; – Установка переключателя POWER в
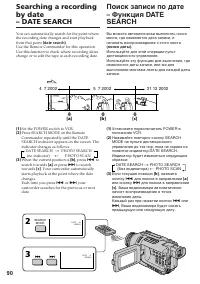
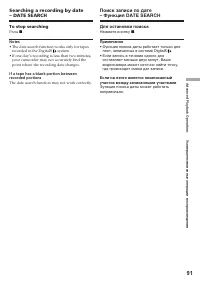
- 91 To stop searching; • The date search function works only for tapes; Для остановки поиска; Нажмите кнопку; • Функция поиска даты работает только для
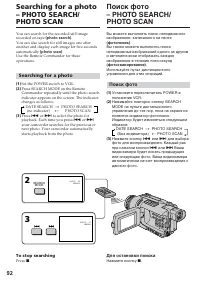
- 92 Searching for a photo; Поиск фото
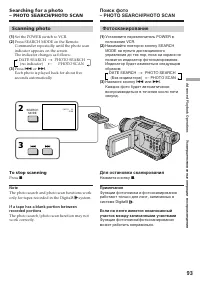
- 93 Scanning photo; To stop scanning; Фотосканирование; Для остановки сканирования
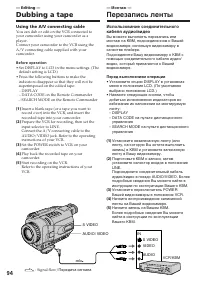
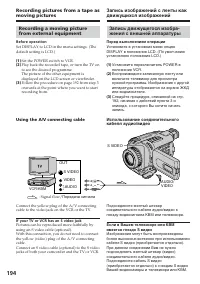
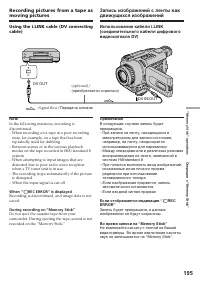
- 94 — Editing —; Dubbing a tape; Using the A/V connecting cable; • Set DISPLAY to LCD in the menu settings. (The; Монтаж; Перезапись ленты; Перед выполнением операции
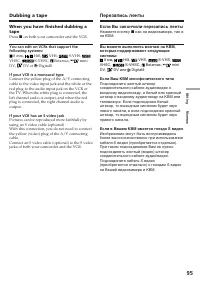
- 95 If your VCR is a monaural type; Если Вы закончили перезапись ленты; Если Ваш КВМ монофонического типа
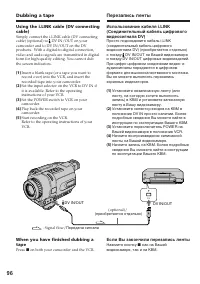
- 97 See page 259 for more information about i.LINK.; If you record playback pause picture with the
- 98 Изменить порядок
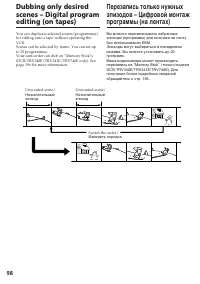
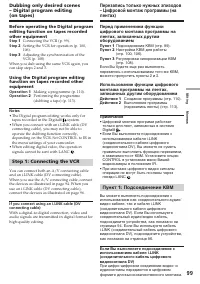
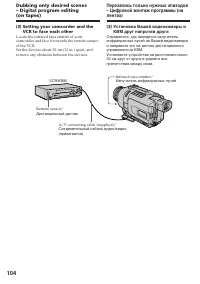
- 99 • The Digital program editing works only for; Step 1: Connecting the VCR; • Цифровой монтаж программ работает; Пункт
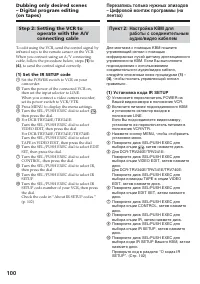
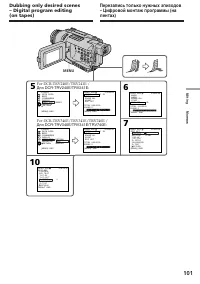
- 100 Step 2: Setting the VCR to; to; Set the IR SETUP code; Press MENU to display the menu settings.; , чтобы послать управляющий сигнал; Установка кода IR SETUP
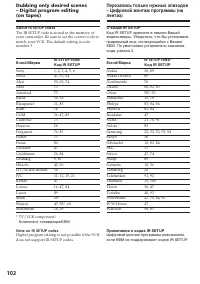
- 102 Компонент телевизора/КВМ
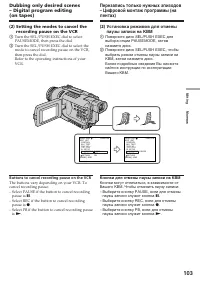
- 103 Buttons to cancel recording pause on the VCR; pause is; Кнопки для отмены паузы записи на КВМ; паузы записи служит кнопка
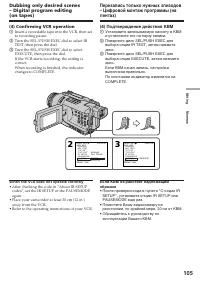
- 105 Confirming VCR operation; When the VCR does not operate correctly; • After checking the code in “About IR SETUP; Подтверждение действия КВМ; • После проверки кода в пункте “О кодах IR
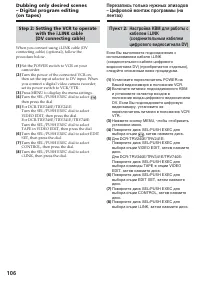
- 106 Step 2: Setting the VCR to operate
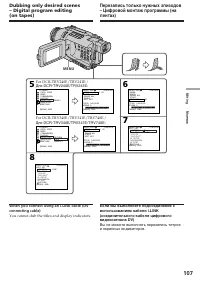
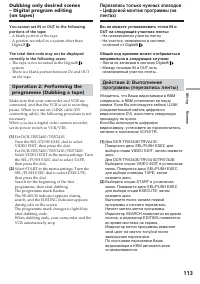
- 107 You cannot dub the titles and display indicators.
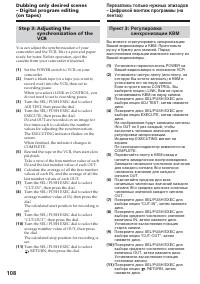
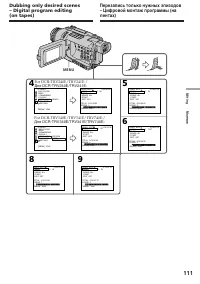
- 108 Step 3: Adjusting the
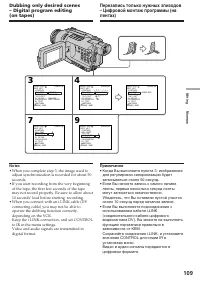
- 109 • When you complete step 3, the image used to; • Когда Вы выполните пункта 3, изображение
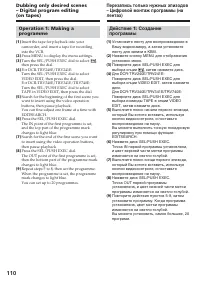
- 110 Действие
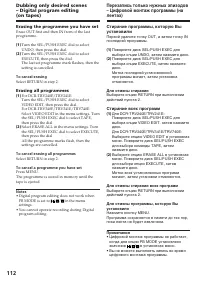
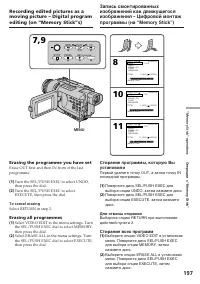
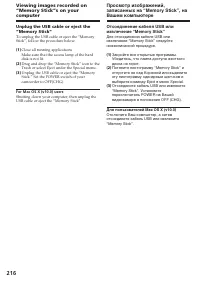
- 112 Erasing the programme you have set; To cancel erasing; Erasing all programmes; To cancel erasing all programmes; Select RETURN in step 2.; To cancel a programme you have set; • Digital program editing does not work when; Для отмены стирания; Стирание всех программ; Для отмены стирания всех программ; • Цифровой монтаж программы не работает,
- 113 Digital8
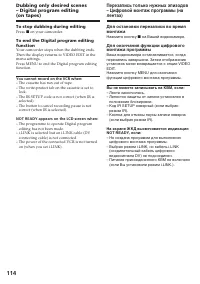
- 114 To stop dubbing during editing; You cannot record on the VCR when:
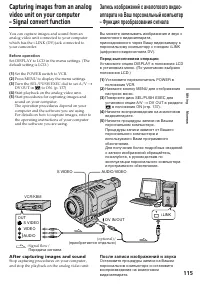
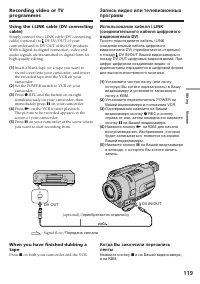
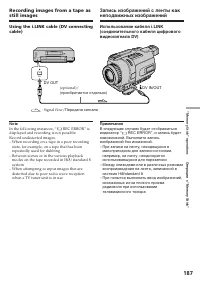
- 115 Set the POWER switch to VCR.; After capturing images and sound; DV OUT в разделе; После записи изображений и звука; VIDEO
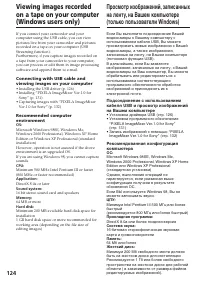
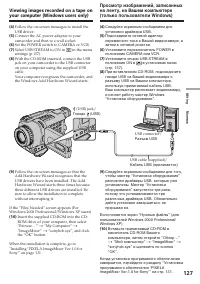
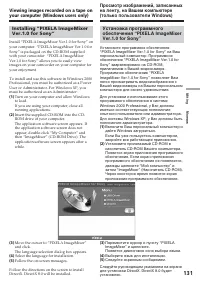
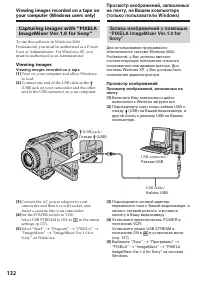
- 116 • You need to install software that supports the; If your computer has a USB jack; • Вам необходимо установить программное
- 118 • To enable smooth transition, we recommend; • Для обеспечения плавного перехода
- 119 DV OUT
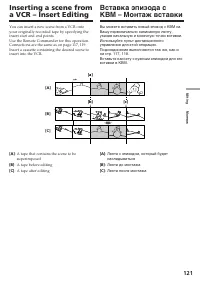
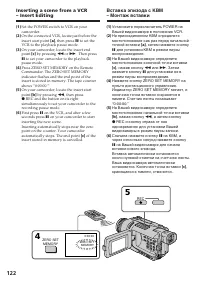
- 121 : A tape that contains the scene to be
- 123 To change the insert end point; When the inserted picture is played back; Skip step 3 and 4. Press
- 124 Прикладная программа:; DirectX 8.0a или более поздняя версия
- 125 MB VRAM video card, Minimum 800; • Operations are not guaranteed for either the; • Выполнение операций не гарантируется и
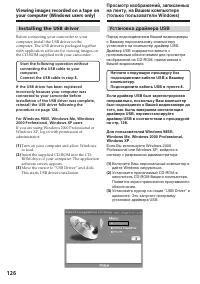
- 126 Installing the USB driver; Установка драйвера USB
- 127 Set the POWER switch to CAMERA or VCR.
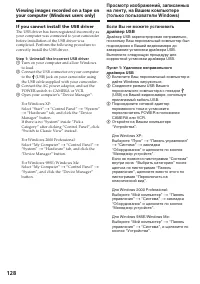
- 128 If you cannot install the USB driver; Step 1: Uninstall the incorrect USB driver
- 129 Windows 98SE/Windows 98 Tweede editie
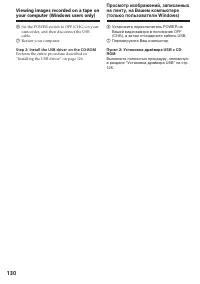
- 130 Restart your computer.; Step 2: Install the USB driver on the CD-ROM; Перезагрузите Ваш компьютер.
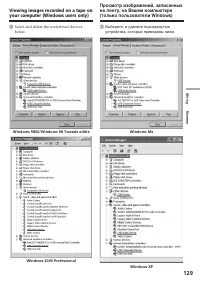
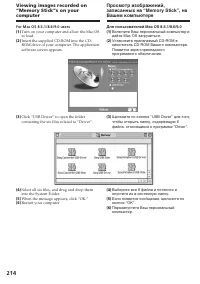
- 131 Select the language for installation.
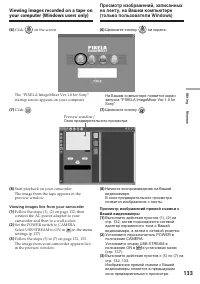
- 132 Viewing images; Просмотр изображений
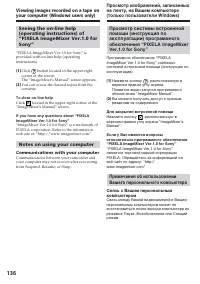
- 133 Click
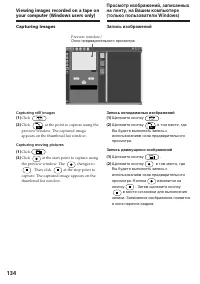
- 134 Capturing images; Capturing moving pictures; Запись изображений; Запись неподвижных изображений
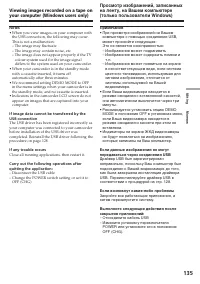
- 135 • When you view images on your computer with; If any trouble occurs; Close all running applications, then restart it.; • При просмотре изображений на Вашем; Если возникнут какие-либо проблемы
- 136 To close on-line help; Notes on using your computer; Communications with your computer; Для закрытия встроенной помощи
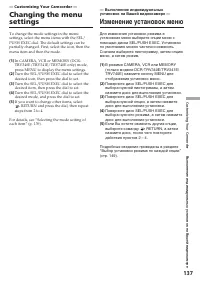
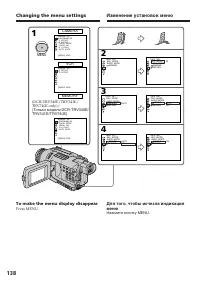
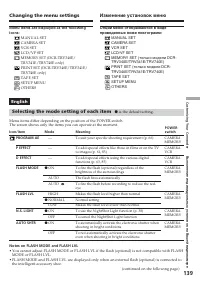
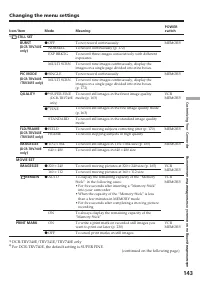
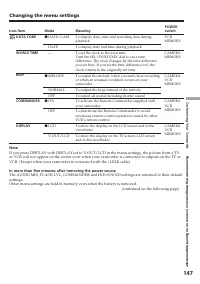
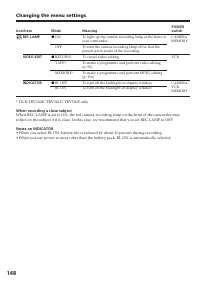
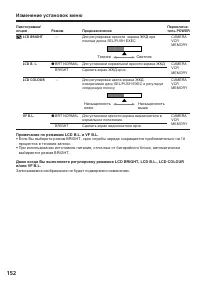
- 137 — Customizing Your Camcorder —; Выполнение индивидуальных; Изменение установок меню
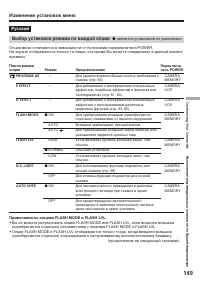
- 149 Выбор установок режима по каждой опции; является установкой по умолчанию.; Примечания по опциям FLASH MODE и FLASH LVL
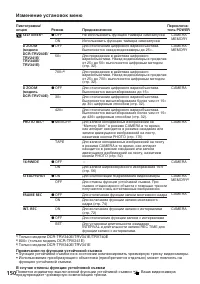
- 150 Режим; Примечания по функции устойчивой съемки; функцию устойчивой съемки.; В случае отмены функции устойчивой съемки; Появится индикатор выключенной функции устойчивой съемки
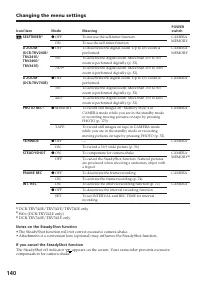
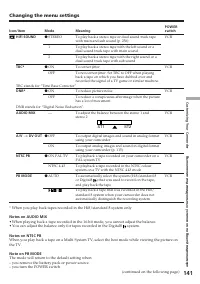
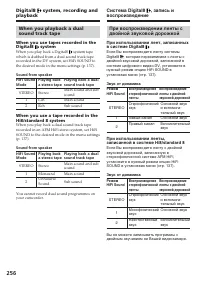
- 151 HiFi SOUND; Примечания по опции AUDIO MIX
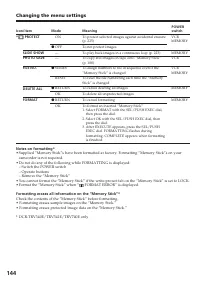
- 154 PROTECT; Примечания о форматировании; Stick” установлен в положение LOCK.; Форматирование стирает всю информацию на “Memory Stick”*
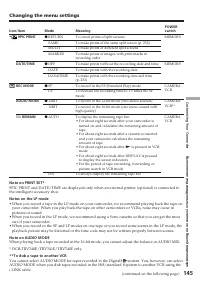
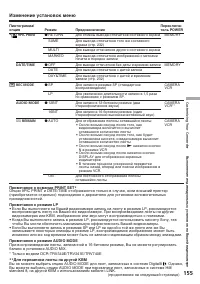
- 155 PIC PRINT; Примечание о команде PRINT SET
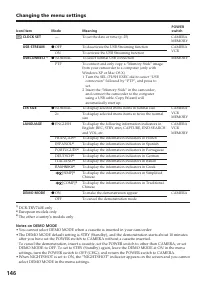
- 156 Примечания о режиме DEMO MODE; FRANÇAIS; Предназначение
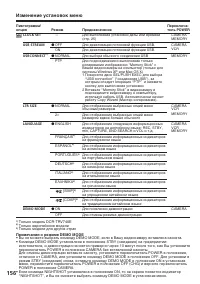
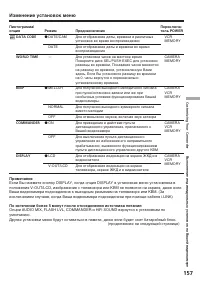
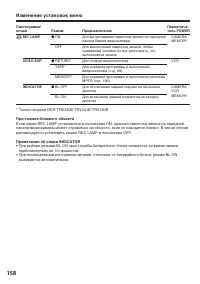
- 157 DATA CODE
- 158 При съемке близкого объекта; приблизительно на 10 процентов.
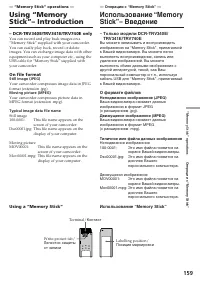
- 159 On file format; Typical image data file name; Dsc00001.jpg: This file name appears on the; Using a “Memory Stick”; — “Memory Stick” operations —; Операции с “Memory Stick”; О формате файлов; Типичное имя файла данных изображения; Использование “Memory Stick”
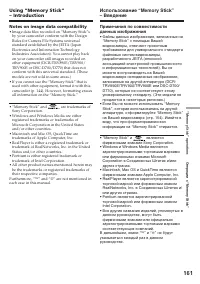
- 161 Notes on image data compatibility
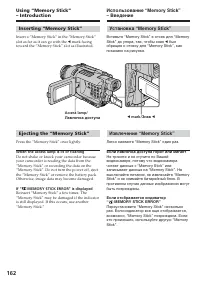
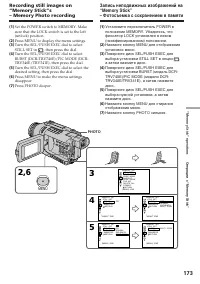
- 162 Inserting “Memory Stick”; mark facing; Ejecting the “Memory Stick”; Press the “Memory Stick” once lightly.; When the access lamp is lit or flashing; Установка “Memory Stick”; был; Извлечение “Memory Stick”; Легко нажмите “Memory Stick” один раз.; Если лампочка доступа горит или мигает
- 163 а затем нажмите диск.
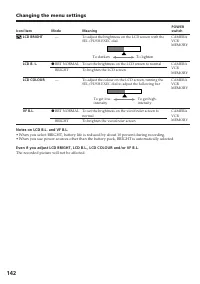
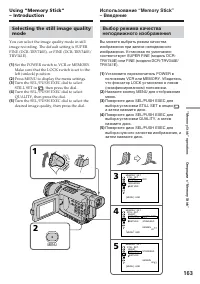
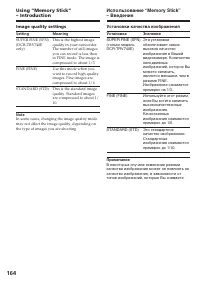
- 164 Image quality settings; Setting; quality in your camcorder.; Установки качества изображения; Установка; обеспечивает самое
- 165 Selecting the image size; Выбор размера изображения
- 166 Движущиеся изображения:
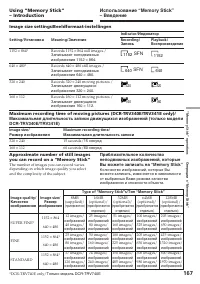
- 167 Image size settings/Beeldformaat-instellingen; SFN; Maximum recording time/; FINE
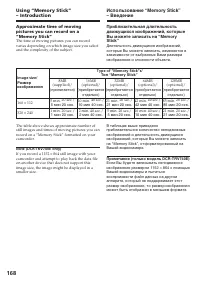
- 168 64 still image with your; Type of “Memory Stick”s/
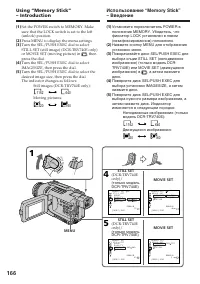
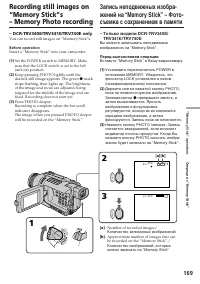
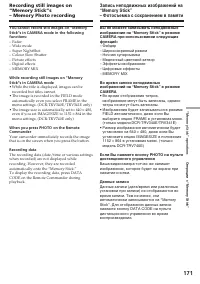
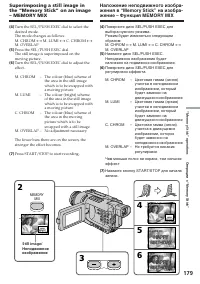
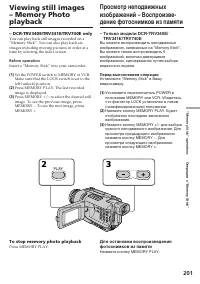
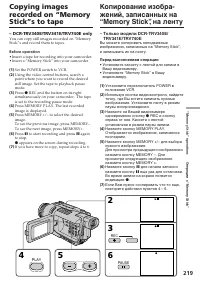
- 169 You can record still images on “Memory Stick”s.; Insert a “Memory Stick” into your camcorder.; Вставьте “Memory Stick” в Вашу видеокамеру.; съемка с сохранением в памяти
- 170 • When recording fast-moving subjects in the; When the POWER switch is set to MEMORY; • При записи быстро движущихся объектов в
- 171 • While the title is displayed, images can be; • Во время отображения титров,
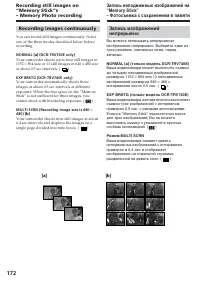
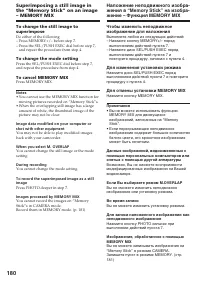
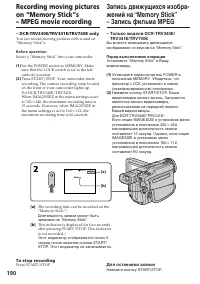
- 172 Recording images continuously; MULTI SCRN (Recording image size is 640; изображений размером 640; Режим MULTI SCRN
- 174 FULL” appears on the screen and you; When recording in the multi screen mode; 80, even if you set; During recording still images continuously; Если емкость “Memory Stick” заполнена; На экране появится индикация “; При записи в мульти-экранном режиме; 64 в установках меню (только модель
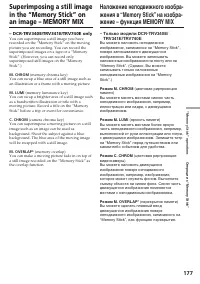
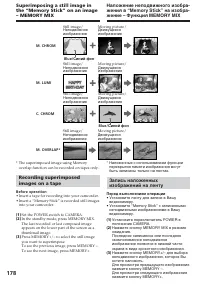
- 177 (цветовая рирпроекция
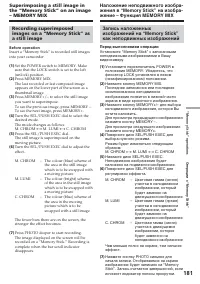
- 178 Set the POWER switch to CAMERA.; Синий фон
- 179 M. OVERLAP – No adjustment necessary; MEMORY; M. OVERLAP – Не требуется никаких
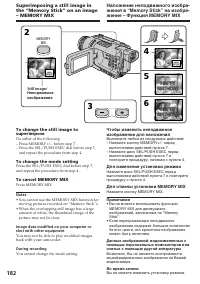
- 180 Для изменения установки режима
- 182 and repeat the procedure from step 4.; To change the mode setting; • You cannot use the MEMORY MIX function for; During recording; You cannot change the mode setting.
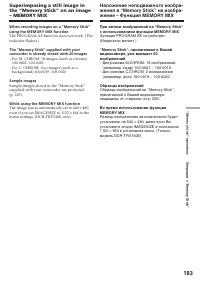
- 183 Sample images; The image size is automatically set to 640; Образцы изображений
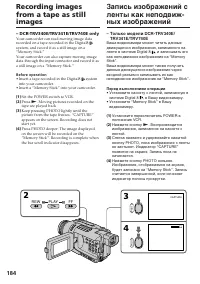
- 184 • Установите кассету с лентой, записанную в
- 185 Your camcorder stops momentarily.; Вы не можете записывать звук с ленты.; Титры, наложенные на лентах; • Изображение будет записываться в режиме
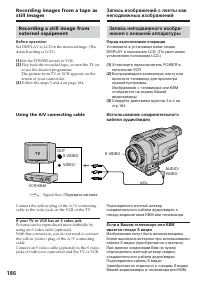
- 186 If your TV or VCR has an S video jack; S VIDEO; КВМ
- 187 In the following instances, “; REC ERROR”, и запись будет
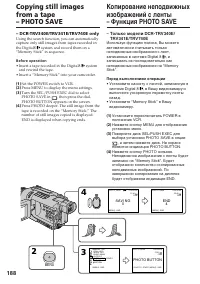
- 188 • Insert a tape recorded in the Digital8 system; SAV I NG; END; PHOTO BUTTON
- 189 To stop copying; • The image is recorded in the FIELD mode; Для остановки копирования
- 190 To stop recording; Для остановки записи; : The recording time can be recorded on the
- 191 Sound is recorded in monaural.
- 192 • Установите записанную кассету с лентой в; Нажмите кнопку START/STOP или; PAUSE
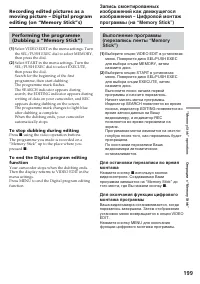
- 195 – Between scenes or in the various playback; When “
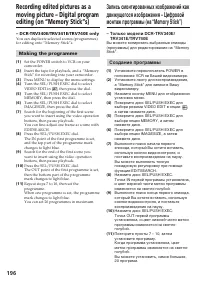
- 196 Making the programme; Создание программы
- 200 NOT READY appears on the LCD screen when:; – The programme to operate Digital program; If you set over the maximum recording time; – Не создана программа для выполнения
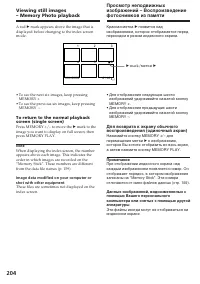
- 201 To stop memory photo playback; Нажмите кнопку MEMORY PLAY.
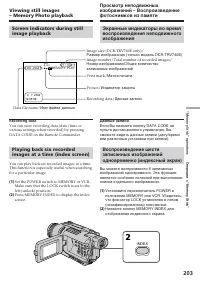
- 203 INDEX; Имя файла данных
- 204 Красная метка; метка
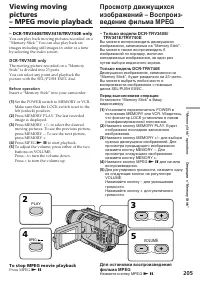
- 205 Нажмите кнопку MPEG; To stop MPEG movie playback; Press MPEG
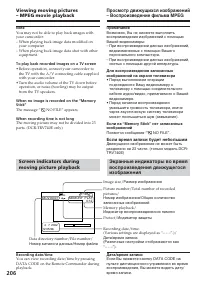
- 206 – When playing back image data shot with other; To play back recorded images on a TV screen; • Before operation, connect your camcorder to; When recording time is not long; Если время записи будет небольшим
- 207 JPEG format; Viewing images using computer
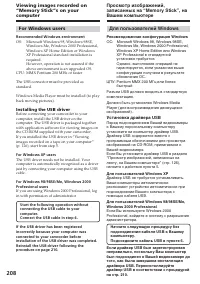
- 208 For Windows users; Recommended Windows environment; CPU: MMX Pentium 200 MHz or faster; For Windows XP users; Для пользователей Windows; Рекомендованная конфигурация Windows; ЦПУ: Pentium MMX 200 МГц или более; Для пользователей Windows XP
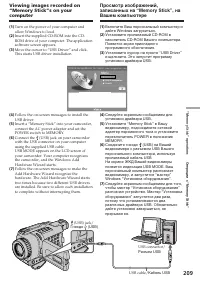
- 209 Разъем USB
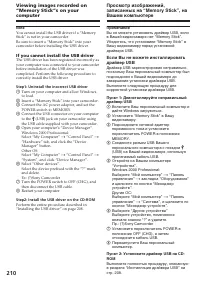
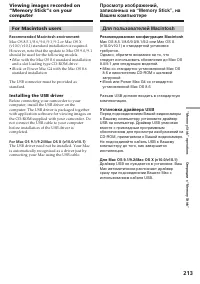
- 210 Step1: Uninstall the incorrect USB driver; Step2: Install the USB driver on the CD-ROM
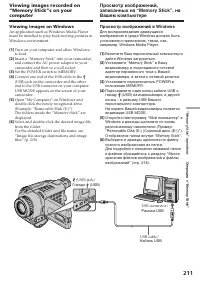
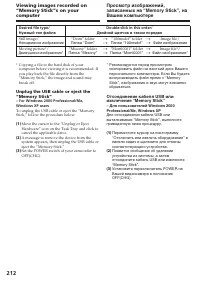
- 211 Viewing images on Windows; Set the POWER switch to MEMORY.; Просмотр изображений в Windows
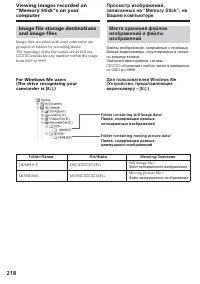
- 212 * Copying a file to the hard disk of your; Нужный тип файла; “Dcim” folder
- 213 For Macintosh users; Recommended Macintosh environment; and a slot loading type CD-ROM drive; Для пользователей Macintosh; Рекомендованная конфигурация Macintosh; • iBook или Power Mac G4 со стандартно
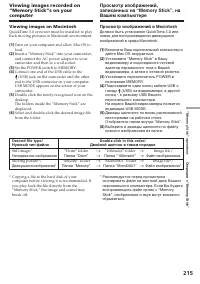
- 215 Viewing images on Macintosh; Просмотр изображений в Macintosh
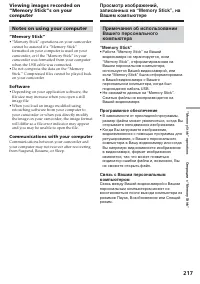
- 217 • “Memory Stick” operations on your camcorder; Software; • Depending on your application software, the; “Memory Stick”; • Работа “Memory Stick” на Вашей; Программное обеспечение; • В зависимости от прикладной программы,
- 218 Папка; ssss
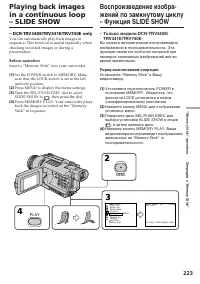
- 220 During copying; You cannot record the index screen.; If you press EDITSEARCH during pause mode; Memory playback stops.; Во время копирования; Вы не можете записать индексный экран.
- 221 Опция
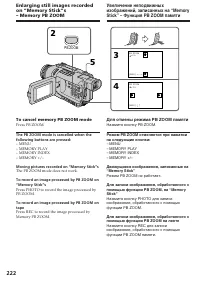
- 222 To cancel memory PB ZOOM mode; Moving pictures recorded on “Memory Stick”s; The PB ZOOM mode does not work.; Для отмены режима PB ZOOM памяти; Нажмите кнопку PB ZOOM.
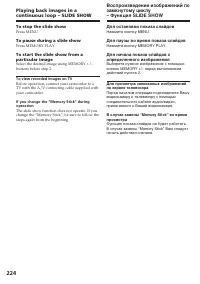
- 224 To view recorded images on TV; Для остановки показа слайдов
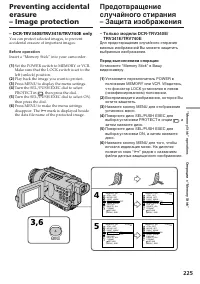
- 225 ” рядом с названием
- 226 To cancel image protection; You cannot protect images.; Для отмены защиты изображения
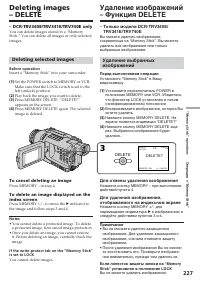
- 227 Deleting selected images; To cancel deleting an image; DELETE; Для отмены удаления изображения; к изображению и; • Вы не сможете удалить защищенное
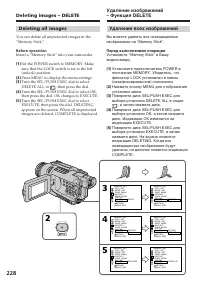
- 228 Удаление всех изображений
- 229 Deleting images – DELETE; While DELETING appears; You cannot delete images.
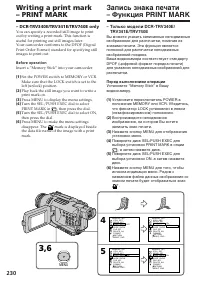
- 231 To cancel writing of print marks; You cannot write print marks on still images.; Moving pictures; Для отмены записи знаков печати; Движущиеся изображения
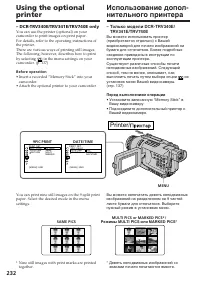
- 232 in the menu settings on your; • Insert a recorded “Memory Stick” into your; из; • Установите записанную “Memory Stick” в; Режимы MULTI PICS или MARKED PICS*
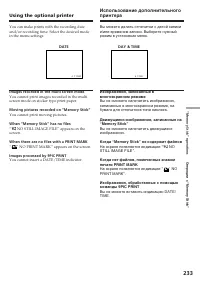
- 233 Using the optional printer; You cannot print moving pictures.; Когда “Memory Stick” не содержит файлов; На экране появляется индикация “
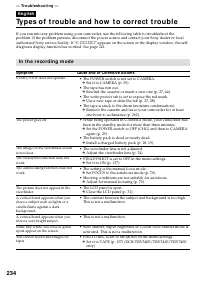
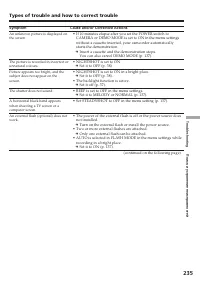
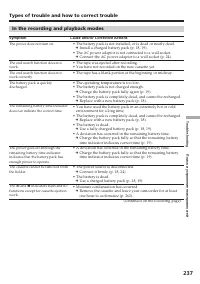
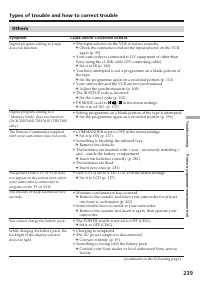
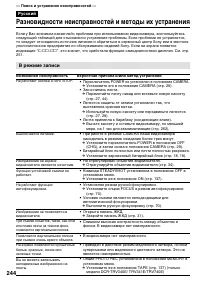
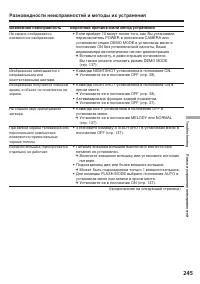
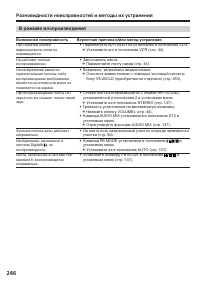
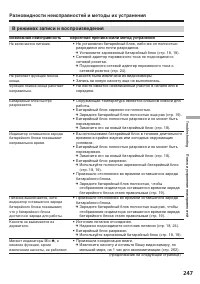
- 244 В режиме записи; Возможная неисправность; Разновидности неисправностей и методы их устранения
- 247 Не включается питание.
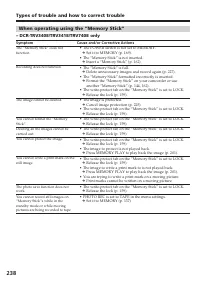
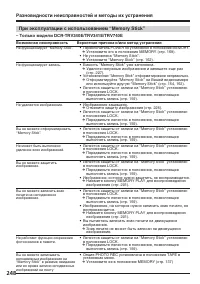
- 248 Не функционирует “Memory Stick”.
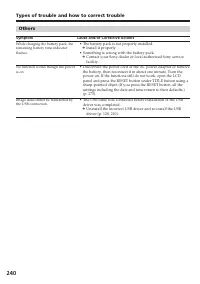
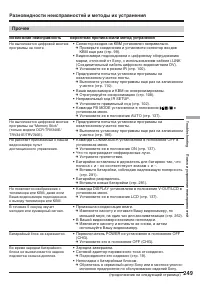
- 249 Батарейный блок не заряжается.
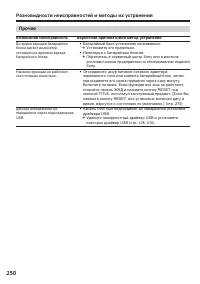
- 250 • Батарейный блок установлен неправильно.
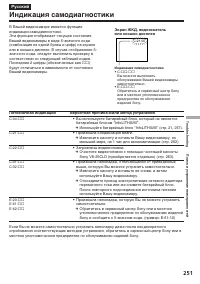
- 251 Пятизначная индикация; Индикация самодиагностики
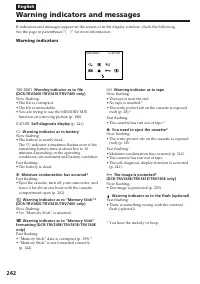
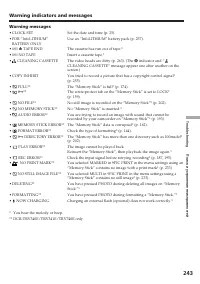
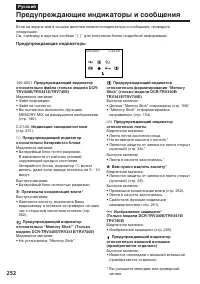
- 252 Предупреждающие индикаторы и сообщения; может
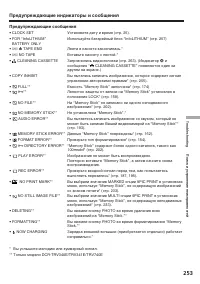
- 253 Предупреждающие сообщения
- 254 — Additional Information —; What is the “Digital8 system”?; Playback system; The Digital8 system or Hi8; Что такое “Система Digital8 ”?; , обязательно воспроизводите ее на; является фирменным знаком.; Система воспроизведения; Система Digital8 или Hi8
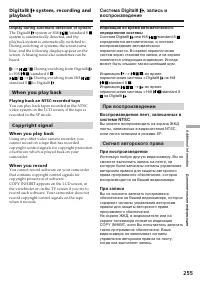
- 255 Display during automatic detection of system; Playing back an NTSC-recorded tape; Copyright signal; When you play back; При воспроизведении
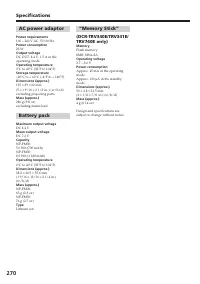
- 258 О батарейном блоке “InfoLITHIUM”; Как хранить батарейный блок
- 259 About the name “i.LINK”
- 260 Функции i.LINK на этом аппарате
- 261 Using your camcorder abroad; PAL system; Brazil; NTSC system; Бразилия; Система NTSC
- 262 Moisture condensation; Note on moisture condensation; Конденсация влаги; Если произошла конденсация влаги; Примечание по конденсации влаги
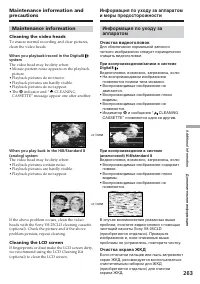
- 263 Maintenance information; Cleaning the video heads; indicator and “; Cleaning the LCD screen; Очистка видеоголовок
- 264 Charging the built-in rechargeable battery:; • Connect your camcorder to wall socket using
- 265 Precautions; Camcorder operation; Меры предосторожности; Эксплуатация видеокамеры
- 266 Camcorder care; • Remove the tape, and periodically turn on the; Connection to your computer; Уход за видеокамерой; • Вынимайте кассету с лентой и; Подсоединение к Вашему компьютеру
- 267 AC power adaptor; Сетевой адаптер переменного тока
- 268 If batteries are leaking
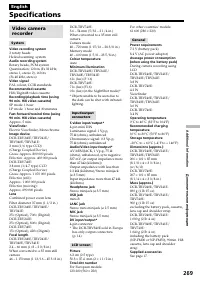
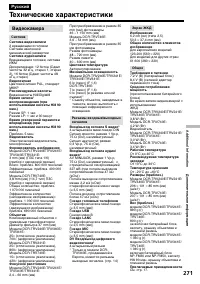
- 271 Технические характеристики; Видеокамера
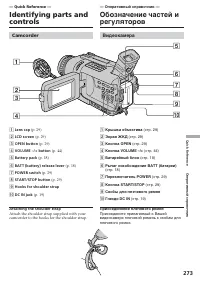
- 273 — Quick Reference —; Camcorder
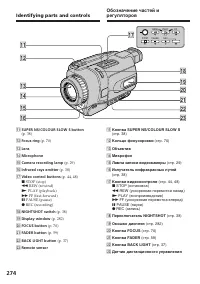
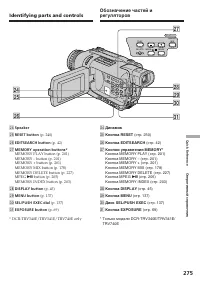
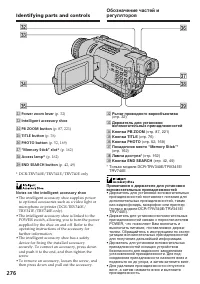
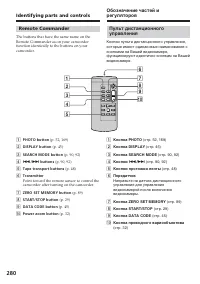
- 274 Identifying parts and controls
- 276 • The intelligent accessory shoe supplies power
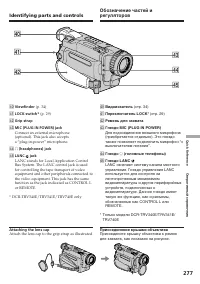
- 277 rs; Attach the lens cap to the grip strap as illustrated.; Видоискатель
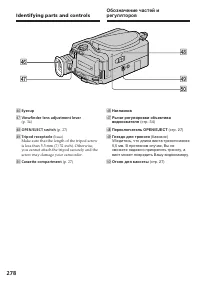
- 278 Eyecup; Наглазник
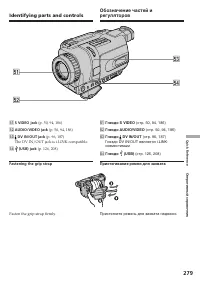
- 279 S VIDEO jack; Fasten the grip strap firmly.; ts; Гнездо S VIDEO; Пристегните ремень для захвата надежно.
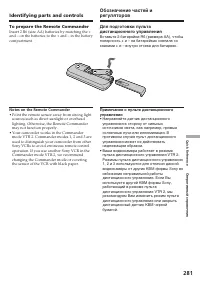
- 281 To prepare the Remote Commander; Notes on the Remote Commander; • Point the remote sensor away from strong light; • Направляйте датчик дистанционного
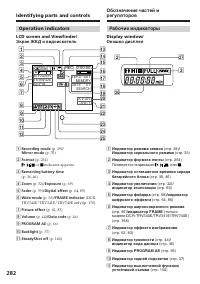
- 282 LCD screen and Viewfinder/; Экран ЖКД и видоискатель; wh; or indicator appears.; Рабочие индикаторы; Окошко дисплея; Появляется индикация ,
- 283 This indicator appears in the viewfinder.
- 285 Алфавитный указатель; У – Я


