
Триммеры VERTO 550 Вт, 2в1 52G552 - инструкция пользователя по применению, эксплуатации и установке на русском языке. Мы надеемся, она поможет вам решить возникшие у вас вопросы при эксплуатации техники.
Если остались вопросы, задайте их в комментариях после инструкции.
"Загружаем инструкцию", означает, что нужно подождать пока файл загрузится и можно будет его читать онлайн. Некоторые инструкции очень большие и время их появления зависит от вашей скорости интернета.


12
PREPARATION FOR WORK
UNPACKING
1.
Unpack all parts and make sure the delivery contents are
complete and free from damage. If you find that any parts are
missing or damaged, do not use the product, but contact your
dealer. Do not use the product if missing parts have been
additionally supplied or defective parts have been replaced. The
use of an incomplete or damaged product poses a risk to people .
2.
Make sure you have all the accessories and tools needed for
assembly and operation.
ASSEMBLY
WARNING! Use the garden tool only after it is completely
assembled and adjusted.
ATTENTION: Always remove the plug from the socket before
starting work .
•
Before use, please completely assemble the product and make all
required adjustments before use.
•
Follow the installation and operating instructions carefully. Use
the drawings as a visual guide.
•
Pay attention to small parts such as bolts and nuts, which are
loose y ane or removed during installation or during adjustment .
With outrage them in a safe place so they do not get lost.
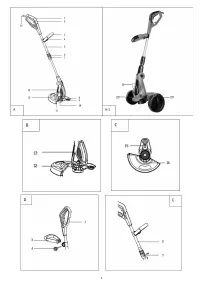
FITTING THE PROTECTIVE SHIELD (FIG. B)
WARNING! Do not remove cover (12) after connection.
Before use, check that the cover screws (12) are seated securely.
1.
Place the protective cover ( 12 ) on the head of the device ( 13 )
and fix it with the supplied screws ( 16 )
2.
Check and fit protective cover ( 12 ) in place.
EDGE ROLL ASSEMBLY (FIG. C) (52G552)
1.
Place the edge roller ( 9 ) on the machine head ( 13 )
2.
Secure the edge roller ( 9 ) with the included screws ( 15 )
ADJUSTABLE HANDLE MOUNT (FIG. D)
1.
Align the auxiliary handle ( 3 ) with the Upright and put it in
place.
2.
Tighten the screw on the adjustable handle ( 4 ) and make sure
the auxiliary handle ( 3 ) is in place.
TELESCOPIC TUBE LENGTH ADJUSTMENT (FIG. E)
1.
Loosen the locking ring ( 7 ).
2.
Set the telescopic tube ( 5 ) to the desired length.
3.
Then tighten the sleeve with the locking ring ( 7 )
ADJUSTING THE AUXILIARY HANDLE (FIG. F)
1.
Remove the auxiliary handle screw ( 4 )
2.
Lift and detach the auxiliary handle screw ( 3 ).
3.
Turn the auxiliary handle ( 3 ) up or down to the desired
position.
4.
Snap on
ękojeść
auxiliary ( 3 ) to secure it in the desired
position.
5.
Tighten the auxiliary handle screw ( 4 ).
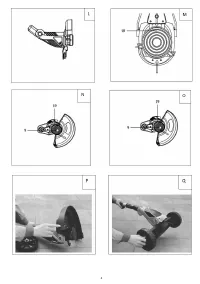
ADJUSTING THE ANGLE OF THE MACHINE HEAD (FIG. G) FOR
TRIMMING THE EDGES
1.
Unscrew the telescopic tube lock ( 6 ) and hold it in place.
2.
Turn the rear handle ( 1 )
180º
to the right or left, then release
the telescopic tube lock ( 6 ).
ADJUSTING THE TILT OF THE MACHINE HEAD (FIG. G)
1.
Press and hold the incline button (17).
2.
Turn the device head ( 13 ) to the desired position until the
button ( 17 ) clicks into place.
INSTALLATION OF THE EDGE GUIDE
WARNING! Install / adjust the edge guide only when the
product is turned off and the cutting device is completely
stopped.
Using your vay edge guide to keep a distance from obstacles,
which may hit the cutting device.
1.
Fold in the edge guide ( 8 ) for trimming.
2.
Fold up the edge guide ( 8 ) for transport and storage.
HELP WHEEL INSTALLATION (FIG. P & Q) (52G552)
As shown in the picture, insert the wheel cover bolt into any hole in
the protective cover (you can choose according to your own cutting
height), and then align the bolt holes on the wheel to tighten the
wheel. Do the same with the other wheel.
Just install the support wheels on the other side in the same way.
OPERATION / SETTINGS
POWER ON / OFF (FIG. H)
1.
Hold the product with one hand on the rear handle ( 1 ) and
with the other hand on the auxiliary handle ( 3 ).
2.
Press the on / off switch ( 2 ) to turn on the product.
3.
Release the ON / OFF switch ( 2 ) to turn off the product.
WARNING! The trimmer spool will continue to rotate for some
time after the engine is turned off. Wait until it stops
completely before putting the product down.
EXTENSION OF THE CUTTING LINE WHILE CUTTING
WARNING! Worn Line cutting is rolled. Danger of injury,
especially for bystanders.
During use, the end of the line will shorten as a result of wear.
Regularly check the condition of the trimming line and adjust if
necessary.
1.
Turn on the ON / OFF switch ( 2 ) and the trimmer spool ( 19 )
will release the trimmer line.
2.
The excess line will be cut with a knife ( 11 ) and should remain
within the radius of the cover ( 12 ).
CAUTION !
•
The line feeding system only works when the product is
turned on.
•
The line will wear faster and require longer feed if cutting
along sidewalks, other rough surfaces, or harder weeds that
are cut .
TRIMMING (FIG. I, JIK)
1.
Asume edge guide ( 8 ).
2.
Set ll of the angle of the head device ( 13 ) to 0
°
to trimming.
3.
Hold the product firmly between the trimmer and the right side.
4.
Stand up straight, do not lean forward and pay attention to your
posture, place both feet apart to maintain balance.
5.
Hold the device head ( 13 ) just above the ground at an angle of
approx. 30
°.

