
Шлифмашины Bosch 0.601.214.300 - инструкция пользователя по применению, эксплуатации и установке на русском языке. Мы надеемся, она поможет вам решить возникшие у вас вопросы при эксплуатации техники.
Если остались вопросы, задайте их в комментариях после инструкции.
"Загружаем инструкцию", означает, что нужно подождать пока файл загрузится и можно будет его читать онлайн. Некоторые инструкции очень большие и время их появления зависит от вашей скорости интернета.


English |
17
Bosch Power Tools
1 609 92A 1FC | (1.12.15)
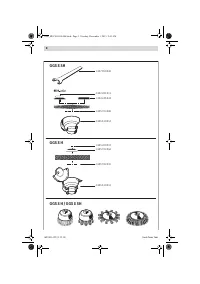
Mounting the Grinding Tools
The grinding tools must run completely concentrically. Do not
continue to use damaged grinding tools that are out of bal-
ance. If the grinding tools are out of balance they should be re-
placed. Treat with a whetstone (accessory) or change.
Using a whetstone, any particular special shape can be pro-
duced out of the basic forms of the grinding accessory.
When using grinding tools with a threaded insert, pay atten-
tion that the end of the grinder spindle
3
does not touch the
hole base of the grinding tool.
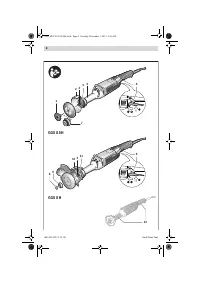
GGS 8 SH (see figure B)
– Turn the grinder spindle
3
until the hole in the grinder spin-
dle
3
and the openings of the housing are aligned. Insert
the holding rod
14
through the openings of the housing
and the hole of the grinder spindle
3
.
– Loosen and remove the clamping nut
1
with the two-pin
spanner
15
provided.
– Clean the grinder spindle
3
and all parts to be mounted.
– Mount the grinding accessory and tighten clamping nut
1
with two-pin spanner
15
. Pay attention that the grinding
accessory can rotate freely in protection guard
2
.
Use tapered grinding accessories only in conjunction
with the open protection guard 2 and the matching
clamping system (clamping nut 1 or quick-clamping
nut 7 and mounting flange 4).
GGS 8 H (see figure F)
– Turn the grinder spindle
3
until the hole in the grinder spin-
dle
3
and the openings of the housing are aligned. Insert
the holding rod
14
through the openings of the housing
and the hole of the grinder spindle
3
.
– Loosen the clamping nut
8
with the open-end spanner
19
(size 24 mm) by turning in anticlockwise direction.
– Remove the clamping flange
9
.
– Clean the grinder spindle
3
and all parts to be mounted.
– Mount the grinding accessory and clamping flange
9
and
tighten clamping nut
8
with open-end spanner
19
(size
24 mm). Pay attention that the grinding accessory can ro-
tate freely in protection guard
10
.
Use straight grinding accessories only in conjunction
with the enclosed protection guard 10 and the match-
ing clamping system (clamping nut 8, clamping flange
9 and mounting flange 11).
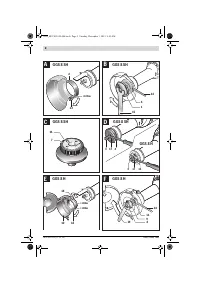
Changing the Mounting Flange (see figure D)
GGS 8 SH
To fasten tapered grinding accessories, use mounting flange
4
, clamping nut
1
and the open protection guard
2
.
Lever snap ring
17
out of the groove in grinder spindle
3
using
a screwdriver and remove mounting flange
4
. Mount the fit-
ting mounting flange
4
analogously.
GGS 8 H
To fasten straight grinding accessories, use mounting flange
11
, clamping nut
8
, clamping flange
9
and the enclosed pro-
tection guard
10
.
Lever snap ring
17
out of the groove in grinder spindle
3
using
a screwdriver and remove mounting flange
11
. Mount the fit-
ting mounting flange
11
analogously.
Quick-clamping Nut
(GGS 8 SH)
(see figure C)
For convenient changing of grinding tools without the use of
additional tools, you can use the quick-clamping nut
7
instead
of the clamping nut
1
.
Quick-clamping nut 7 may not be used for brushing.
Use only a flawless, undamaged quick-clamping nut 7.
When screwing on, pay attention that the side of the
quick-clamping nut 7 with printing does not face the
grinding disc; the arrow must point to the index mark 16.
A properly attached, undamaged quick-clamping nut can be
loosened by hand when turning the knurled ring in anticlock-
wise direction.
Never loosen a tight quick-clamping nut
with pliers. Always use the two-pin spanner 15.
Dust/Chip Extraction
Dust from materials such as lead-containing coatings,
some wood types, minerals and metal can be harmful to
one’s health. Touching or breathing-in the dust can cause
allergic reactions and/or lead to respiratory infections of
the user or bystanders.
Certain dust, such as oak or beech dust, is considered car-
cinogenic, especially in connection with wood-treatment
additives (chromate, wood preservative). Materials con-
taining asbestos may only be worked by specialists.
– Provide for good ventilation of the working place.
– It is recommended to wear a P2 filter-class respirator.
Observe the relevant regulations in your country for the
materials to be worked.
Prevent dust accumulation at the workplace.
Dust can
easily ignite.
Operation
Starting Operation
Observe the mains voltage! The voltage of the power
source must correspond with the data on the type plate
of the machine.
Switching On and Off
To
start
the power tool,
first
slide the On/Off switch
6
for-
ward,
then
press it and keep it pressed.
To
lock-on
the pressed On/Off switch
6
, push the On/Off
switch
6
further forward.
To
switch off
the power tool, release the On/Off switch
6
, or
when it is locked, briefly press the On/Off switch
6
and then
release it.
Check grinding tools before using. The grinding tool
must be mounted properly and be able to move freely.
Carry out a test run for at least one minute with no load.
Do not use damaged, out-of-centre or vibrating grind-
ing tools.
Damaged grinding tools can burst and cause in-
juries.
To save energy, only switch the power tool on when using it.
OBJ_BUCH-1050-006.book Page 17 Tuesday, December 1, 2015 9:45 AM
Содержание
- 120 Описание продукта и услуг; Применение по назначению; Технические данные
- 121 Заявление о соответствии; Сборка; Установка защитных устройств
- 122 Быстрозажимная гайка; Работа с инструментом; Включение электроинструмента
- 123 Указания по применению; Техобслуживание и сервис; Техобслуживание и очистка; Утилизация
Характеристики

Остались вопросы?Не нашли свой ответ в руководстве или возникли другие проблемы? Задайте свой вопрос в форме ниже с подробным описанием вашей ситуации, чтобы другие люди и специалисты смогли дать на него ответ. Если вы знаете как решить проблему другого человека, пожалуйста, подскажите ему :)


