Пылесос VITEK VT-1888 - инструкция пользователя по применению, эксплуатации и установке на русском языке. Мы надеемся, она поможет вам решить возникшие у вас вопросы при эксплуатации техники.
Если остались вопросы, задайте их в комментариях после инструкции.
"Загружаем инструкцию", означает, что нужно подождать пока файл загрузится и можно будет его читать онлайн. Некоторые инструкции очень большие и время их появления зависит от вашей скорости интернета.


9
ENGLISH
a wet cloth on the floors, they can get soaked and dete-
riorate.
Steam mop usage tips
Before cleaning the floor, it is recommended to sweep or
vacuum it to remove dust and dirt particles.
When washing the floor, move the unit in an even back and
forth motion, pushing it away from you and pulling it back.
Move back to avoid stepping on the already washed floor.
The microfiber cloth collects water when washing the floor.
However, depending on the characteristics of the floor
surface and the set steam intensity, some moisture may
remain on the floor. In this case, it is recommended to let
the floor dry naturally. Drying can be accelerated by using
a fan directed to the desired area.
To make the floor less damp after washing, select the mini-
mum steam supply with the “Steam” button.
Remove the mop nozzle from the universal brush after
cleaning.
Then the floor under the unit will not get soaked from a
damp cloth.
The handheld steam cleaner usage tips
Surface cleaning
The material to be cleaned must withstand moisture and
high temperature. Make sure of this before starting the
cleaning.
Some types of floors (like tile) have grooves or cemented
surfaces. For a more thorough cleaning, we recommend
using the round nylon brush.
Use the concentrator nozzle to clean the gaps (slots) be-
tween the tiles.
It is not recommended to use pile brushes for these pur-
poses, because they can remove grout.
Bring the concentrator nozzle at an angle of 30-60° up to
the slot, turn the steam supply on and slowly move it for-
ward along the slot. After cleaning, remove any dirt from
the surrounding surface with a cloth. In the same way,
clean the gaps between the floor tiles, as well as any other
crevices and narrow spaces.
The closer the steam nozzle is to the dirty area, the better
the cleaning effect, since the highest steam temperature is
obtained at the outlet of the steam nozzle. Therefore, when
cleaning, try to position the steam nozzle of the nozzles as
close as possible to the surface to be cleaned.
When cleaning with steam, wipe the steam-treated surface
with a cloth or sponge to remove loose dirt. It is recom-
mended to wipe the surface while it is still wet. Be careful
when wiping metal surfaces as they can be hot after steam
treatment.
To remove stubborn dirt, the force of the steam jet alone
may not be enough; use the bristle brush or brass brush to
enhance the mechanical effect. When using the brushes,
do not use excessive force to avoid breaking off the tip of
the concentrator nozzle.
Heavy scale can be sprinkled with vinegar before steam
cleaning. Let the vinegar work for about 5 minutes, and
then steam the surface.
When cleaning clothes or upholstered furniture, put a rag
on the steaming nozzle, then the dirt will be absorbed into
the rag, and not into clothes or upholstery.
You can use the steaming nozzle to remove old wallpaper
from the walls.
The steam will swell the wallpaper glue and make the wall-
paper easier to remove.
Cleaning of windows and mirrors
When using the window cleaning nozzle, first thoroughly
clean the entire window or mirror with steam, then turn
the steam off. Then press the rubber scraper of the nozzle
against the top of the window or mirror and gradually lower
the nozzle downward. Move from one side of the surface to
the other to clean the entire window or mirror. Place a rag
or tissue underneath the window frame or mirror stand to
collect the scraped water.
Dealing with negative temperatures outside (in winter), be-
fore cleaning the window glass, warm it up so that it does
not crack from a sharp temperature drop.
After warming it up, you can easily steam the entire sur-
face.
Steaming of clothes
To steam your clothes, hang them on a stainless steel
hanger. Connect the steaming nozzle to the handheld
steam cleaner. Take the steam cleaner in one hand, with
the other hand, hold the bottom of the garment, creating a
slight tension. Bring the nozzle to the surface of the fabric,
lightly pressing the working part to it, and start steaming in a
reciprocating motion (from top to bottom). We recommend
starting with the areas with the most wrinkles, as well as with
items of clothing that are denser (collar and sleeve cuffs).
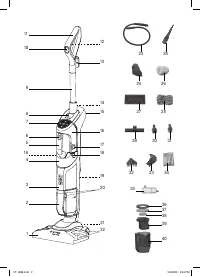
12. WATER LEVEL
The water level is always visible thanks to the transparent
water tank (4).
When the water is used up, steam will no longer be gener-
ated.
To resume operation, refill the water tank with water as de-
scribed in section 3.
WARNING: this operation should always be performed af-
ter disconnecting the unit from the mains.
13. REPLACING OF THE DESCALING FILTER
The unit has a filter containing special resins that can stop
the lime scale and extend the life of your product.
It is recommended to change the filter once a year.
13.1. Disconnect the unit from the mains.
13.2. Remove the water tank (4) from the handheld steam
cleaner (16) by pressing the side release buttons (18)
and pulling it out (fig. 8).
13.3. Remove the old filter (fig. 25) by pulling it down.
13.4. Insert a new filter (35), press gently and make sure it
is perfectly seated (fig. 26), then fit the water tank.
NOTE: The filter may darken, become brown or rusty dur-
ing use, this is normal and not a malfunction.
14. CLEANING OF THE DUST CONTAINER
AND FILTERS
14.1. Turn the unit off completely, to do this, move the
power switch (10) located on the handle of the vac-
uum cleaner (11) to position (0) and press the power
switch (I /0) of the steam cleaner (fig. 10), then re-
move the power cord plug from an electrical outlet.
14.2. Remove the dust container (2) from the unit body (4)
by pressing the two lock buttons of the dust contain-
er (20) (fig. 27).
14.3. Remove the HEPA filter (36) with the inserted foam
filter (37) from the dust container, by the side guides
VT-1888.indd 9
10/20/20 3:24 PM
Содержание
- 13 Не загораживайте отверстия и решетки на изделии.
- 14 Сохраните заводскую упаковку.
- 15 Минимальный уровень (
- 16 ет легко очищать углы и края мебели и стен.
- 17 Подсоедините наиболее подходящий аксессуар
- 19 чтобы избежать протечек.; ДИАГНОСТИКА НЕСИПРАВНОСТЕЙ
- 20 Проблема; Пылесборник не снимается.; УТИЛИЗАЦИЯ; Срок службы устройства – 3 года


