Пылесос VITEK VT-1888 - инструкция пользователя по применению, эксплуатации и установке на русском языке. Мы надеемся, она поможет вам решить возникшие у вас вопросы при эксплуатации техники.
Если остались вопросы, задайте их в комментариях после инструкции.
"Загружаем инструкцию", означает, что нужно подождать пока файл загрузится и можно будет его читать онлайн. Некоторые инструкции очень большие и время их появления зависит от вашей скорости интернета.


7
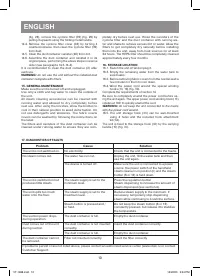
ENGLISH
4. ADJUSTING THE STEAM OUTPUT INTENSITY
The unit has 3 levels of steam output intensity. By suc-
cessively pressing the button (
) of the steam regula-
tor (fig. 13) located on the control panel (7) set the in-
tensity of the steam output depending on the intended
use. The indicator of the selected intensity level will glow
constantly.
Here are some guidelines for choosing the level of steam
output intensity:
•
Maximum level ( ): for removing scale, stains, grease;
•
Medium level ( ): for washing windows and floors.
•
Minimum level ( ): for cleaning parquet and laminate,
delicate fabrics, upholstery, sofas, mattresses, etc.
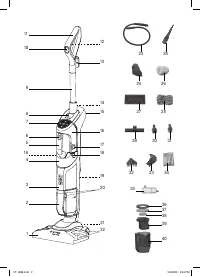
5. CONNECTING THE ACCESSORIES
Accessories can be connected directly to the handheld
steam cleaner (16) or to the flexible hose (23) for more
freedom of movement.
5.1. Flexible hose (23)
Connect the flexible hose (23) to the portable steam clean-
er (16) until you hear the clamp click (fig. 14). To remove
the flexible hose, press on the release button located at the
base of the flexible hose and pull it out (fig. 14).
5.2. Concentrator nozzle (24)
The concentrator nozzle (24) can be connected directly
to the handheld steam cleaner (16) or to the flexible hose
(23). To remove the nozzle, press the release button locat-
ed on the base of the nozzle and pull it out.
Connect the flexible hose (23) to the handheld steam
cleaner (16) until you hear the clamp click (fig. 15).
The brushes (30, 31) and the grouting nozzle (32) can be
attached to the concentrator nozzle (24). Insert them at the
end of the concentrator nozzle (24) all the way in (fig. 16).
Pull them out to remove.
5.3. Steaming accessories (25, 26)
Connect the steaming nozzle (25) directly to the handheld
steam cleaner (16) by pressing lightly until it snaps into
place. For greater freedom of movement, the nozzle can
be connected using the flexible hose (23) (fig. 15).
To clean sofas, cushions, armchairs and mattresses, slide
the fabric cover (26) over the nozzle (25) (fig. 19).
5.4. Window cleaning nozzle (29)
Attach the window cleaning nozzle (29) to the steam-
ing nozzle (25) by inserting hook A (fig. 17) under slot B
(fig. 18, 20), then turn the nozzle (fig. 21) so that hook C
(fig. 17) fits into slot D (fig. 18, 22).
Before attaching the window cleaning nozzle to the
steaming nozzle, put the fabric cover over the nozzle.
Do not install the nozzle without the cover!
6. CLEANING OF THE FLOORS
Before using the unit on delicate or glossy sur-
faces, make sure that the surface of contact
area is free from foreign bodies that could cause
scratches.
The steam vacuum cleaner is a combined product, it can
be used as a vacuum cleaner or a steam vertical cleaner,
for washing and disinfecting floors, or in combination with
a suction action to save cleaning time.
SUCTION ONLY
Ensure that the requirements of section 1 are met and pro-
ceed as described in section 2.
STEAM ONLY
Ensure that the requirements of section 1-3 are met.
6.1. Adjust the intensity of the steam output depending on
the type of the floor (fig. 13);
•
for hard floors (tiles, porcelain stoneware, etc.), a
medium steam level is recommended;
•
for delicate floors (parquet, laminate, ceramic tiles,
etc.) a low steam level is recommended.
6.2. Move the universal brush (1) to the working position
from the parking position, for this place your foot on
the brush and tilt the unit by the carrying handle (15)
(fig. 6). Vacuum cleaner is ready for operation.
Then press the steam button (12) (fig. 23) located on
the handle (11) and start cleaning by moving the brush
back and forth. To stop dispensing steam, release the
button (12).
6.3. The brush (1) has a flexible connection making it easy
to clean corners and edges of furniture and walls.
COMBINED MODE: STEAM / SUCTION
The combined use of steam and suction allows you to
remove dust and disinfect the floor at the same time.
Proceed as described in sections 1-2-3.
To keep the power cord out of the way during cleaning,
pass it through the upper hook (13) (fig. 7).
During cleaning operations, the use of the fabric
cover (28) allows the floors to be washed and disin-
fected so that the steam softened dirt is collected by
the cloth.
Wait a few minutes to allow the fabric to cool before re-
moving the mop nozzle (27) with the fabric cover (28)
from the universal brush (1). Then place your foot on
one of the two side pedals (22) of the mop nozzle (27)
and pull the unit straight up using the handle (15).
WARNING: for steam cleaning, do not use the mop
nozzle without the fabric cover.
WARNING: for added safety, before using test for ex-
posure to steam on a hidden part, wait to be sure that
there is no discoloration or deformation.
7. CLEANING OF WINDOWS, MIRRORS
AND TILE WALLS
WARNING: to clean windows in cold weather, preheat the
glass, starting steaming at a distance of about 50 cm from
the surface.
Use only the handheld steam cleaner (16).
Verify that section 3 requirements are met.
7.1. Connect the flexible hose (23) to the handheld steam
cleaner (16), then attach the steam nozzle (25), and to
it, the window cleaning nozzle (29) (follow the require-
ments of paragraphs 5.3-5.4).
7.2. Adjust the steam output intensity as described in sec-
tion 4 (fig. 13).
A medium steam output is recommended for this type of
surface.
7.3. To clean windows and mirrors, press the steam button
(6) on the portable steam cleaner to thoroughly steam
the surface and dissolve the dirt (fig. 24). Then treat
across the surface again, holding the nozzle down-
ward to remove dirt and moisture.
7.4. To clean the tiles, use the steaming nozzle (25) with
the fabric cover (26) attached to the flexible hose
(23). Work the steam evenly over the tile surface while
VT-1888.indd 7
10/20/20 3:24 PM
Содержание
- 13 Не загораживайте отверстия и решетки на изделии.
- 14 Сохраните заводскую упаковку.
- 15 Минимальный уровень (
- 16 ет легко очищать углы и края мебели и стен.
- 17 Подсоедините наиболее подходящий аксессуар
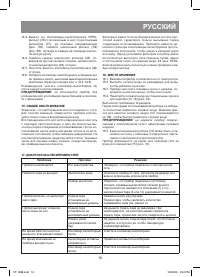
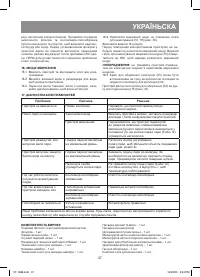
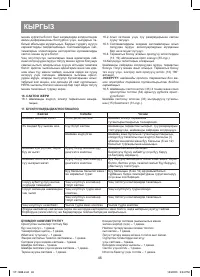
- 19 чтобы избежать протечек.; ДИАГНОСТИКА НЕСИПРАВНОСТЕЙ
- 20 Проблема; Пылесборник не снимается.; УТИЛИЗАЦИЯ; Срок службы устройства – 3 года


