Квадрокоптеры Yuneec H520E (YUNH520EEU) - инструкция пользователя по применению, эксплуатации и установке на русском языке. Мы надеемся, она поможет вам решить возникшие у вас вопросы при эксплуатации техники.
Если остались вопросы, задайте их в комментариях после инструкции.
"Загружаем инструкцию", означает, что нужно подождать пока файл загрузится и можно будет его читать онлайн. Некоторые инструкции очень большие и время их появления зависит от вашей скорости интернета.

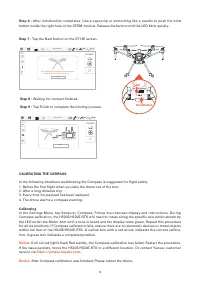
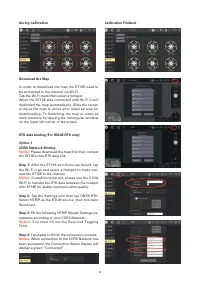
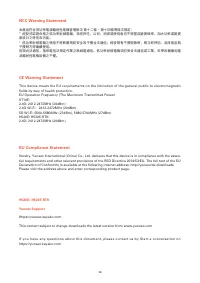

Step 6 : After initialization completes, Use a paperclip or something like a needle to push the bind
button inside the right hole of the OFDM module. Release the button until the LED blink quickly.
Step 7 :
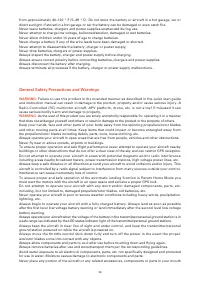
Tap the Next button on the ST16E screen.
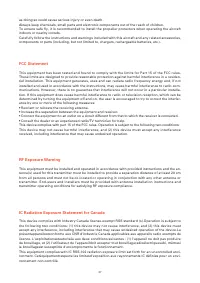
Step 8 : Waiting for connect finished.
Step 9 : Tap Finish to complete the binding process.
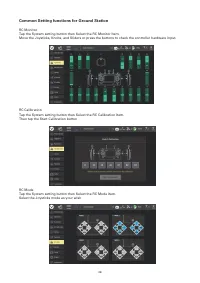
CALIBRATING THE COMPASS
In the following situations recalibrating the Compass is suggested for flight safety:
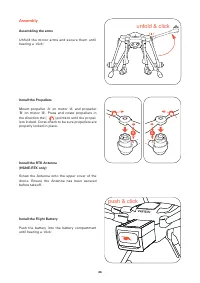
1. Before the first flight when you take the drone out of the box;
2. After a long distance trip;
3. Every time the payload has been replaced;
4. The drone alarms a compass warning.
Calibrating
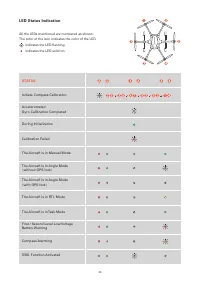
In the Settings Menu, tap Sensors | Compass. Follow the onscreen display and instructions. During
Compass calibration, the H520E/H520E-RTK will need to rotate along the specific axis which shown by
the LED under the Motor Arm until a tone is heard and the display turns green. Repeat this procedure
for all six positions. If Compass calibration fails, ensure there are no electronic devices or metal objects
within ten feet of the H520E/H520E-RTK. A yellow box with a red arrow indicates the current calibra-
tion. A green box indicates a completed position.
Notice:
If all six led lights flash Red rapidly, the Compass calibration has failed. Restart the procedure.
If the issue persists, move the H520E/H520E-RTK to a different location. Or contact Yuneec customer
service via
https://yuneec.kayako.com
.
Notice:
After Compass calibration was finished, Please reboot the drone.
13
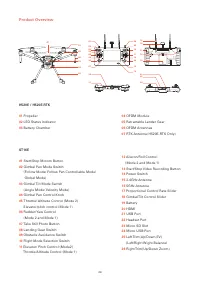
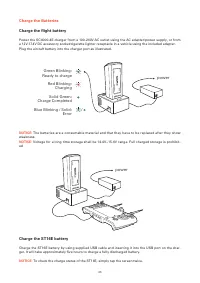
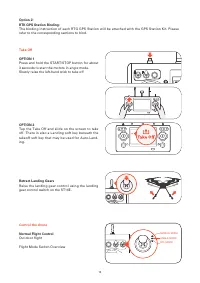
LED
Bind Button
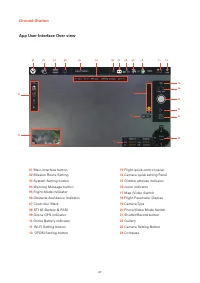
NO CAMERA
Fly
Takeoff
RTL
Pause
Action
Not Connected
N/A
75%
GPS
OFDM USB WIFI
Next
Use a paperclip to set the Vehicle into Autobind mode
Click Next to proceed once LED starts blinking
Finish
NO CAMERA
Fly
Takeoff
RTL
Pause
Action
Not Connected
N/A
75%
GPS
OFDM USB WIFI
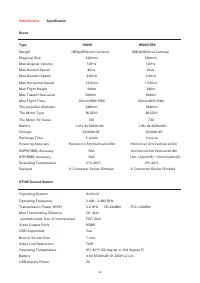
Характеристики

Остались вопросы?Не нашли свой ответ в руководстве или возникли другие проблемы? Задайте свой вопрос в форме ниже с подробным описанием вашей ситуации, чтобы другие люди и специалисты смогли дать на него ответ. Если вы знаете как решить проблему другого человека, пожалуйста, подскажите ему :)


