Измерительные приборы Bosch GMS 120 - инструкция пользователя по применению, эксплуатации и установке на русском языке. Мы надеемся, она поможет вам решить возникшие у вас вопросы при эксплуатации техники.
Если остались вопросы, задайте их в комментариях после инструкции.
"Загружаем инструкцию", означает, что нужно подождать пока файл загрузится и можно будет его читать онлайн. Некоторые инструкции очень большие и время их появления зависит от вашей скорости интернета.


English |
13
Bosch Power Tools
2 609 140 939 | (8.3.12)
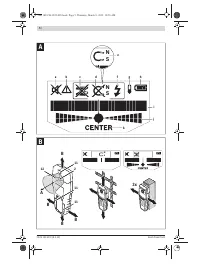
Power Cable
The operating mode
“Power cable”
is suitable only for de-
tecting "live" conductors (110 – 230 V).
Press button
8
to activate the operating mode
“Power cable”
.
The illuminated ring
1
and indication
4
above button
8
light up
green.
When a “live” conductor is detected, indication
f
appears on
the display
3
. Move the measuring tool repeatedly over the ar-
ea to localise the “live” conductor more precisely. After mov-
ing over the “live” conductor several times, it can be indicated
very accurately. When the measuring tool is very close to the
conductor, the illuminated ring
1
flashes red and the audio
signal beeps swiftly.
Notes:
– “Live” conductors are indicated in any operating mode.
– “Live” conductors can be detected easier when power con-
sumers (e. g. lamps, machines) are connected to the
sought conductor and switched on.
–
Under certain conditions (such as below metal surfaces
or behind surfaces with high water content), “live” con-
ductors cannot be securely detected.
The signal
strength of a “live” conductor depends on the position of
the cable. Therefore, apply further measurements in close
proximity or use other information sources to check if a
“live” conductor exists.
– Voltage-free conductors can be detected as metal objects
in the operation mode
“Metal”
. This does not apply for
stranded conductors (contrary to solid conductors or
cable).
– Static electricity can lead to inaccurate indication of elec-
tric lines, e. g., over a large range. To improve the indica-
tion, place your free hand flat on the wall next to the meas-
uring tool, in order to remove the static electricity.
Working Advice
f
Measuring values can be impaired through certain am-
bient conditions. These include, e. g., the proximity of
other equipment that produce strong magnetic or elec-
tromagnetic fields, moisture, metallic building materi-
als, foil-laminated insulation materials or conductive
wallpaper or tiles.
Therefore, please also observe other
information sources (e. g. construction plans) before drill-
ing, sawing or routing into walls, ceilings or floors.
Marking Objects
If required, detected objects can be marked. Perform a meas-
urement as usual. Once you have found the boundaries or the
centre of an object, mark the sought location through the
marking hole
2
.
Temperature Control
The measuring tool is equipped with a temperature control indi-
cator, as accurate measurements are only possible as long as
the temperature within the measuring tool remains constant.
When the temperature control indicator
g
lights up, the meas-
uring tool is not within the operating temperature range or
was subject to large variations in temperature.
Switch the
measuring tool off and allow it to adjust to the ambient
temperature before switching it on again.
Warning Function
When indicator
b
lights up on display
3
and indication
4
flash-
es above button
10
, the measurement must be restarted. Re-
move the measuring tool from the wall and place it on the base
material at a different location.
When indicator
b
flashes on display
3
, send the measuring
tool in the provided protective pouch to an authorised cus-
tomer services agent.
Recalibration
When measuring indicator
i
indicates a continuously high am-
plitude in the operating mode
“Metal”
, even though there is
no metal object near the measuring tool, the measuring tool
can be manually recalibrated.
– Switch the measuring tool off.
– Remove all objects near the measuring tool that could be
detected, including your wrist watch or rings made of
metal, and hold the measuring tool up.
Pay attention that battery indicator
h
indicates at least 1/3
capacity:
Hold the measuring tool in such a manner that the type
plate
13
faces toward the ground. Avoid bright light sourc-
es or direct sunlight from shining on the area
12
and
13
,
without covering off this area.
– Press and hold buttons
5
and
7
until the illuminated ring
1
lights up red. Then release both buttons.
– When the calibration was successful, the measuring tool
will automatically start after a few seconds, and will be
ready for operation again.
Note:
If the measuring tool does not automatically start,
repeat the recalibration. If the measuring tool still does not
start, send it in the provided protective pouch to an author-
ised customer services agent.
Maintenance and Service
Maintenance and Cleaning
f
Check the measuring tool each time before use.
In case
of visible damage or loose components inside the measur-
ing tool, safe function can no longer be ensured.
Keep the measuring tool clean and dry at all times to ensure
proper and safe working.
Do not immerse the measuring tool in water or other fluids.
Wipe away debris or contamination with a dry, soft cloth. Do
not use cleaning agents or solvents.
In order not to affect the measuring function, decals/stickers or
name plates, especially metal ones, may not be attached in the
sensor area
12
on the front or back side of the measuring tool.
Do not remove the contact pads
11
on the backside of the
measuring tool.
If the measuring tool should fail despite the care taken in
manufacturing and testing procedures, repair should be
carried out by an authorised after-sales service centre for
Bosch power tools. Do not open the measuring tool yourself.
In all correspondence and spare parts orders, please always
include the 10-digit article number given on the type plate of
the measuring tool.
OBJ_BUCH-1222-005.book Page 13 Thursday, March 8, 2012 11:26 AM
Характеристики

Остались вопросы?Не нашли свой ответ в руководстве или возникли другие проблемы? Задайте свой вопрос в форме ниже с подробным описанием вашей ситуации, чтобы другие люди и специалисты смогли дать на него ответ. Если вы знаете как решить проблему другого человека, пожалуйста, подскажите ему :)


