
Газонокосилки STIGA Twinclip 950 V 294513048/ST1 - инструкция пользователя по применению, эксплуатации и установке на русском языке. Мы надеемся, она поможет вам решить возникшие у вас вопросы при эксплуатации техники.
Если остались вопросы, задайте их в комментариях после инструкции.
"Загружаем инструкцию", означает, что нужно подождать пока файл загрузится и можно будет его читать онлайн. Некоторые инструкции очень большие и время их появления зависит от вашей скорости интернета.


EN - 8
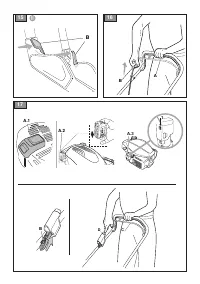
1.
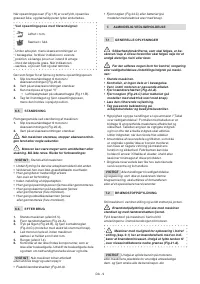
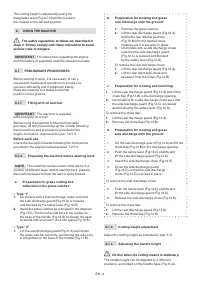
Insert the supplied battery in the relative engine
compartment (Fig.17.A.1 / 17.A.2). (follow the
instructions provided in the engine manual).
A motor with non-removable built-in battery
is included on some models (Fig.17.A.3).
2.
Insert the key as far as possible (if fitted) (Fig.17.B).
3.
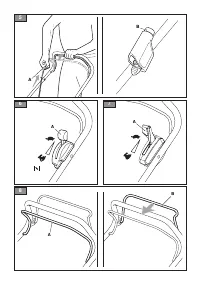
Pull the engine cutting means brake
lever towards the handle (Fig.17.C).
In (Fig.17.A.3) motors, the battery charge in
-
dicator (1) turns on or flashes for 5 seconds to
indicate:
•
Indicator on = the battery is charged
•
Indicator flashing = the battery is low
•
Indicator off = the battery is dead Follow
the instructions in the motor instruction
manual for emergency charging using the
external USB charging device (not sup
-
plied with the machine).
NOTE
Keep pulling the engine / cutting
means brake or the engine will stop.
4.
Press and hold the starter button
until the engine switches on.
(Fig.17.D).
The battery charge status indicator (1) turns off in
(Fig.17.A.3) motors.
Follow the instructions in the engine manual for further
details on the engine.
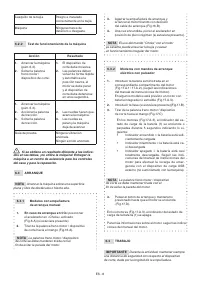
6.4 OPERATION
IMPORTANT
When working, always keep
a safe distance from the cutting means,
given by the length of the handle.
6.4.1 Grass cutting
1.
Start moving forward and mowing in the grass area.
2.
Regulate the forward speed and the cutting
height (par. 5.7) considering the conditions of
the lawn (the height, density and dampness of
the grass) and the amount of grass collected.
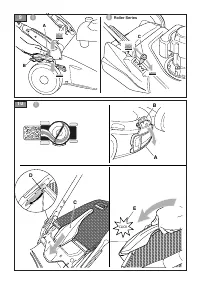
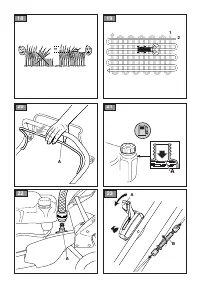
3.
The appearance of the lawn will improve
if you alternate cutting in both directions
at the same height (Fig.19.0).
For mulching or rear grass discharge:
•
Always avoid removing a large quantity of
grass. Never cut more than one third of the
total grass height per single pass (Fig.18.0).
•
Keep the chassis perfectly clean (par. 7.4.2).
For side discharge:
it is best to mow in a pattern where
cut grass is not discharged on the grass still to be cut.
6.4.2
Suggestions for maintaining a nice lawn
•
To keep a lawn green and soft with a good appearance,
it should be cut regularly. A lawn can be composed of
different types of grass. If the lawn is cut frequently,
grass and roots grow more vigorously, forming a solid
grassy bed. If the lawn is cut is less frequently, higher
grass and weeds start growing (clover and daisies,
etc.). The frequency of mowing should be in relation
to the rate of growth of the grass, which should not be
left to grow too much between one cut and the next.
•
The best height of the grass on a well-kept lawn
is approx. 4-5 cm. and with one mowing, you do
not need to remove more than a third of the total
height. If the grass is very tall, it should be cut
twice in a twenty-four hour period. The first time
with the cutting means at maximum cutting height
and the second cut at the height desired.
•
Cutting too low tears and uproots the grass,
giving it a “spotted” appearance.
•
During hot and dry periods, the grass should be cut a
little higher to prevent the ground from drying out.
•
It is always better to cut the grass when dry. Do
not cut wet grass; this could reduce cutting means
efficiency due to sticky grass and tear the lawn.
•
The cutting means must be in good condition and well
sharpened so that the grass is cut straight without a
ragged edge that leads to yellowing at the ends.
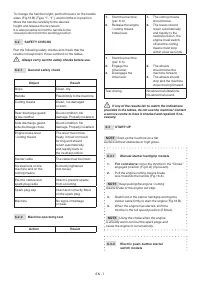
6.4.3 Emptying the grass catcher
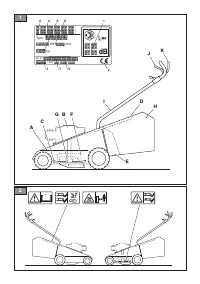
When the grass catcher (Fig.1.H) is too full,
grass collection is no longer efficient and
the sound of the lawnmower changes.
For a grass catcher with contents indicator device:
Up = empty
Down = full
While working with the cutting means running, the
indicator remains raised for as long as the grass catcher
is able to hold cut grass; when it lowers, it means
that the grass catcher is full and must be emptied.
To remove and empty the grass catcher:
1.
Release the engine / cutting means
brake lever (Fig.20.A).
2.
Wait until the cutting means stops.
3.
With “II” type grass catcher only
•
Lift the rear discharge guard (Fig.11.B).
4.
Grasp the handle and remove the grass
catcher keeping it in an erect position.
6.5 STOP
To stop the machine:
1.
Release the engine / cutting means
brake lever (Fig.20.A).
2.
Wait until the cutting means stops.
When you have stopped the machine, it will take a
few seconds for the cutting means to stop.


