
Водонагреватели Clage SX 50 4100-43050 - инструкция пользователя по применению, эксплуатации и установке на русском языке. Мы надеемся, она поможет вам решить возникшие у вас вопросы при эксплуатации техники.
Если остались вопросы, задайте их в комментариях после инструкции.
"Загружаем инструкцию", означает, что нужно подождать пока файл загрузится и можно будет его читать онлайн. Некоторые инструкции очень большие и время их появления зависит от вашей скорости интернета.


CLAGE
4. Installation
19
The following regulations must be observed:
• VDE 0100
• EN 806
• Installation must comply with all statutory regulations, as well as those of the local electricity and water
supply companies.
• The rating plate and technical specifications
• Only intact and appropriate tools must be used
• The appliance must be connected to water supply first and be filled with water before connecting it to the
power supply.
• The appliance must be installed and commissioned by a qualified technician in accordance with estab-
lished regulations and local health and safety regulations
• The appliance must not be exposed to direct sunrays, even in the presence of windows
• Do not use or connect the appliance to a circulation line
CAUTION! For those nations that have taken on European norm EN 1487, the pressure safety device provided
with the product does not comply with that norms. According to the norm, the device must have a maximum
pressure of 0.7 MPa (7 bar) and have at least: a cut-off valve, a non-return valve, a control mechanism for the
non-return valve, a safety valve and a water pressure shut-off device.
This appliance was designed to be installed only inside buildings in compliance with the applicable norms in force.
Furthermore, installers are requested to keep to the following advice in the presence of:
In the case of walls made of bricks or perforated blocks, partition walls featuring limited static, or masonry dif-
ferent in some way from those stated, you first need to carry out a preliminary static check of the supporting
system.
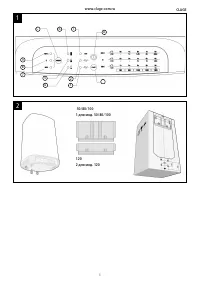
Installing the appliance
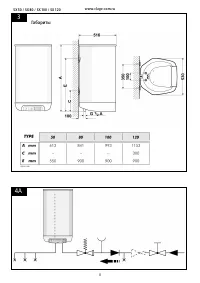
The wall-mounting fastening screws must be designed to support a weight that is three times higher than the weight
of the water heater filled with water. Fastening screws with a diameter of at least 12 mm are recommended.
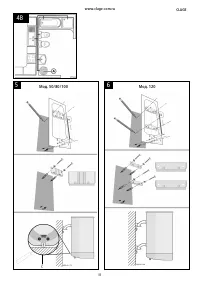
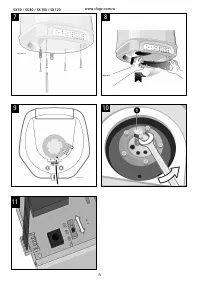
An assembly template is supplied with the appliance for easier assembly (fig. 2 to 6).
1. Remove the assembly template from the packaging. Rest the assembly template on the connection pipes.
2. Trace the water heater fixing points and drill the holes.
3. Fasten the bracket to the wall (two brackets for model 120).
4. Hook the water heater onto the bracket.
5. For model SX 50/80/100: Ensure the water heater is plumb using the adjustable wall spacer C (fig.5).
Local norms could set forth restrictions regarding the installation in a bathroom environment. Therefore keep to the
minimum distances foreseen by the applicable norms in force. The appliance should be installed as close as possible
to the point of use to limit heat dispersion along the piping (“
A
” in fig. 4B).
Allow for a clearance of at least 50 cm under the appliance to provide access to the electrical components, this facili-
tating the maintenance activities.
Water connection
Before making the plumbing connection, you must flush the piping to be cleaned thoroughly to eliminate any residue
or dirt that could compromise the proper operation of the water heater.
Connect the water heater inlet and outlet to resistant pipes or pipe fittings, as well as to the operating pressure, the
temperature of the hot water that could at times reach well over 85 °C. We advise against the use of materials that
cannot withstand such high temperatures.
If the safety valve outlet is not placed immediately above the overflow funnel, then it should be connected to a pipe
with a continuous slope in a site protected against frost.
In the presence of particularly hard waters, there will be a considerable and rapid formation of limescale inside the
www.clage
-
com.ru
Содержание
- 2 Оглавление
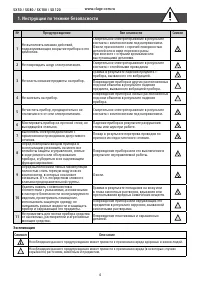
- 3 CLAGE; Инструкции по технике безопасности; инструкцию так, чтобы всегда иметь её под рукой.
- 5 Рекомендации, основанные на европейском стандарте CEN/TR 16355; необходима дезинфекция воды путем тепловой обработки.; Тип водонагревательной системы
- 6 Технические данные; подключения к прибору подводки.
- 7 Монтаж прибора; поставки входит монтажный шаблон (рис. 2; Подключение подводки
- 8 Напорный вариант монтажа; работу в напорных системах.; Безнапорный вариант монтажа; установить обратный клапан.; Электроподключение; Конструктивные требования; быть прямого доступа к электропроводке.
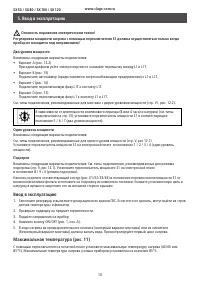
- 9 Ввод в эксплуатацию; теплоёмкости. После чего устройство автоматически отключается.; Переключатель мощности
- 10 Два уровня мощности; Подключите переключаемую фазу L1T к контакту L1T.; Один уровень мощности; нагрузку в ярлыке и закрепите его на внешней стороне крышки.; Ввод в эксплуатацию; датчик температуры и фиксатор.; Опасность поражения электрическим током!
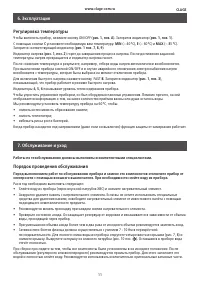
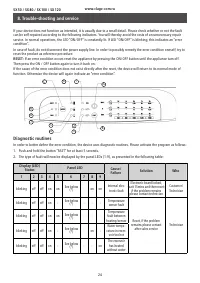
- 11 Обслуживание и уход; MIN; Порядок проведения обслуживания
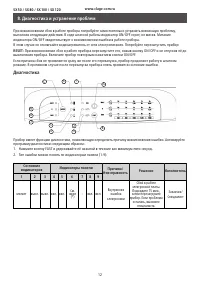
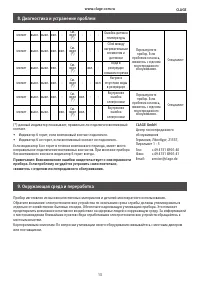
- 13 Диагностика и устранение проблем; прибора. Если проблему не удаётся устранить самостоятельно,; Окружающая среда и переработка
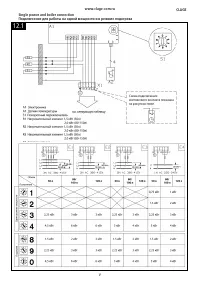
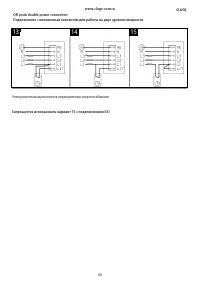
- 33 VII; Запрещается использовать вариант 15 с подключением E4!; Электромонтаж выполняется предприятием энергоснабжения
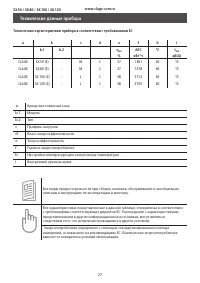
- 34 AEC; Технические данные прибора


