Страница 2 - English; Русский; WARNING; or; For the customers in Europe; ПРЕДУПРЕЖДЕНИЕ; Для покупателей в Европе
2 English Welcome! Русский Добро пожаловать! Congratulations on your purchase of this SonyHandycam. With your Handycam you cancapture life’s precious moments with superiorpicture and sound quality.Your Handycam is loaded with advancedfeatures, but at the same time it is very easy touse. You will soo...
Страница 3 - ATTENTION; Только для модели DCR-IP55E
3 ATTENTION The electromagnetic fields at the specificfrequencies may influence the picture and soundof this Handycam. This product has been tested and foundcompliant with the limits set out in the EMCDirective for using connection cables shorter than3 meters (9.8 feet). DCR-IP55E only Hereby, Sony ...
Страница 6 - Основные функции
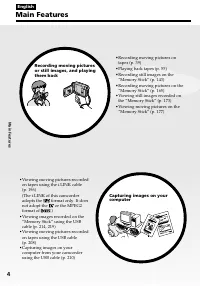
6 Русский Основные функции 6 Съемка движущихся илинеподвижных изображенийи их воспроизведение • Запись движущихся изображений на ленты (стр. 39) • Воспроизведение лент (стр. 55)• Запись неподвижных изображений на “Memory Stick” (стр. 143) • Запись движущихся изображений на “Memory Stick” (стр. 165) ...
Страница 7 - Прочие применения; Функции для регулировки экспозиции в режиме записи; Функции для придания изображениям большего эффекта; OFF; Функции для придания Вашим записям естественного вида
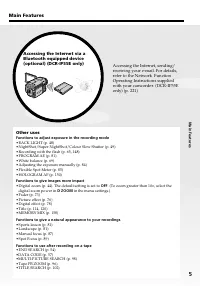
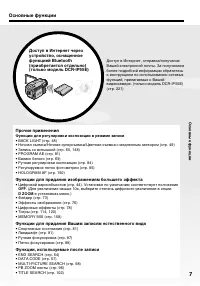
7 7 Доступ в Интернет черезустройство, оснащенноефункцией Bluetooth(приобретается отдельно)(только модель DCR-IP55E) Доступ в Интернет, отправка/получениеВашей электронной почты. За получениемболее подробной информации обратитеськ инструкциям по использованию сетевыхфункций, прилагаемых к Вашейвидео...
Страница 10 - Оглавление
10 Русский Оглавление Основные функции ........................ 6 Введение– Oсновные операции ................. 12 Руководство по быстромузапуску – Запись на ленту ................................ 18– Запись на “Memory Stick” ................. 20 Подготовка к эксплуатации Использование данного руков...
Страница 11 - Операции с “Memory Stick”
11 Оглавление Операции с “Memory Stick” Использование “Memory Stick” – Введение ................................... 127 Запись неподвижных изображений на “Memory Stick” – Фотосъемка ссохранением в памяти ................ 143 Запись изображения с ленты как неподвижного изображения ...... 154 Наложени...
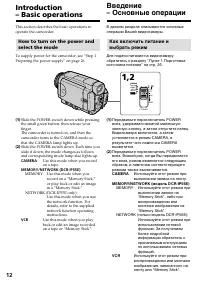
Страница 12 - MEMORY: Use this mode when you; VCR; CAMERA; MEMORY: Используйте этот режим при; VCR
12 Introduction– Basic operations This section describes the basic operations tooperate the camcorder. How to turn on the power andselect the mode To supply power for the camcorder, see “Step 1Preparing the power supply” on page 26. ( 1 ) Slide the POWER switch down while pressingthe small green but...
Страница 13 - Grip position; Storing position; Introduction – Basic operations; Введение – Oсновные операции
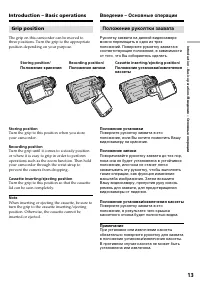
13 Introduction – Basic operations / Введение – O сновные операции Grip position The grip on this camcorder can be moved tothree positions. Turn the grip to the appropriateposition depending on your purpose. Storing position Turn the grip to this position when you storeyour camcorder. Recording posi...
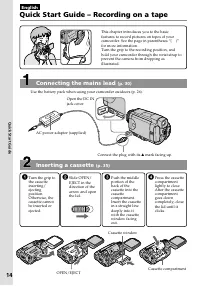
Страница 18 - Руководство по быстрому запуску – Запись на ленту; Подсоединение провода электропитания; Руководство по быстрому запуску
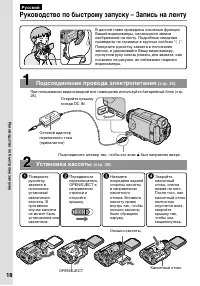
18 Русский Руководство по быстрому запуску – Запись на ленту В данной главе приведены основные функцииВашей видеокамеры, касающиеся записиизображений на ленту. Подробные сведенияприведены на странице в круглых скобках “( )”.Поверните рукоятку захвата в положениезаписи, и удерживайте Вашу видеокамеру...
Страница 19 - Запись изображения; Примечание
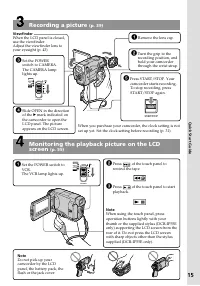
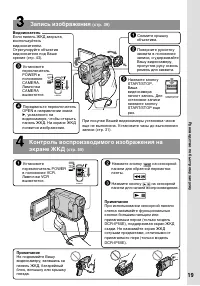
19 MEMORY/ NET-WORK CAMERA (CHG) POWER OFF ON MODE VCR START/STOP MEMORY/ NET-WORK CAMERA (CHG) POWER OFF ON MODE VCR Запись изображения (стр. 39) При покупке Вашей видеокамеры установка часовеще не выполнена. Установите часы до выполнениязаписи (стр. 31). Примечание Не поднимайте Вашувидеокамеру, в...
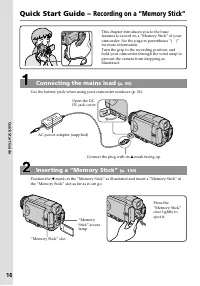
Страница 20 - Руководство по быстрому запуску – Запись на “Memory Stick”; Подсоедините штекер так, чтобы его метка; Установка “Memory Stick”; Поверните “Memory Stick”, направив ее метку; Слот “Memory Stick”
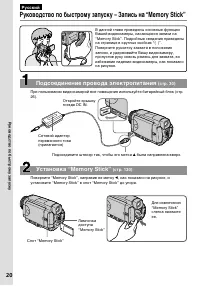
20 Русский Руководство по быстрому запуску – Запись на “Memory Stick” В данной главе приведены основные функцииВашей видеокамеры, касающиеся записи на“Memory Stick”. Подробные сведения приведенына странице в круглых скобках “( )”.Поверните рукоятку захвата в положениезаписи, и удерживайте Вашу видео...
Страница 21 - ПРИМЕЧАНИЕ; Просмотр неподвижных изображений на экране ЖКД; Видоискатель
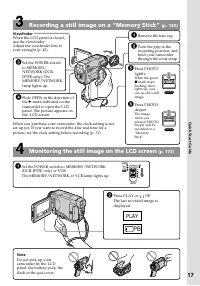
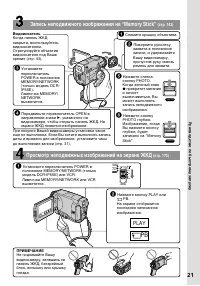
21 PHOTO MEMORY/ NET-WORK CAMERA (CHG) POWER OFF ON MODE VCR PLAY При покупке Вашей видеокамеры установка часовеще не выполнена. Если Вы хотите выполнить записьдаты и времени для изображения, установите часыдо выполнения записи (стр. 31). ПРИМЕЧАНИЕ Не поднимайте Вашувидеокамеру, взявшись запанель Ж...
Страница 22 - — Getting started —; Using this manual; Types of differences; Provided; – Подготовка к эксплуатации –; Предусмотрено
22 — Getting started — Using this manual The instructions in this manual are for the twomodels listed in the table below. Before you startreading this manual and operating yourcamcorder, check the model number by lookingat the bottom of your camcorder. The DCR-IP55Eis the model used for illustration...
Страница 23 - Подготовка к эксплуатации; Your camcorder is based on the; Note on TV colour systems
23 Getting started/ Подготовка к эксплуатации Using this manual Note on the MICROMV format Your camcorder is based on the MICROMV format. You can only use MICROMVcassettes with your camcorder.• Records and plays back for about 60 minutes with equal quality when compared to DV(digital video). • The M...
Страница 24 - Precautions on camcorder care; Lens and LCD screen/finder; • Do not let your camcorder get wet. Keep your; Объектив и экран ЖКД/видоискатель; • Не допускайте, чтобы видеокамера
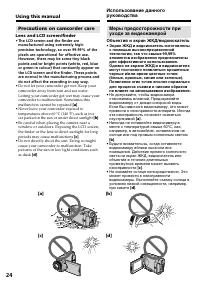
24 Precautions on camcorder care Lens and LCD screen/finder • The LCD screen and the finder aremanufactured using extremely high-precision technology, so over 99.99% of thepixels are operational for effective use.However, there may be some tiny blackpoints and/or bright points (white, red, blueor gr...
Страница 25 - European models only
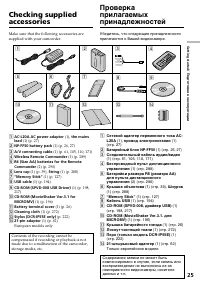
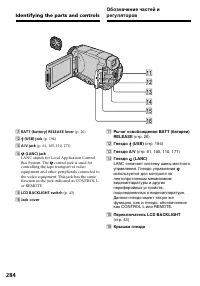
25 Getting started/ Подготовка к эксплуатации Checking suppliedaccessories 1 AC-L20A AC power adaptor (1), the mains lead (1) (p. 27) 2 NP-FF50 battery pack (1) (p. 26, 27) 3 A/V connecting cable (1) (p. 61, 105, 110, 171) 4 Wireless Remote Commander (1) (p. 289) 5 R6 (Size AA) batteries for the Rem...
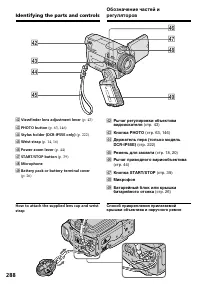
Страница 26 - Installing the battery pack; Step 1 Preparing the; To remove the battery pack; Battery terminal cover; Пункт 1 Подготовка; Установка батарейного блока; Для снятия батарейного блока; Крышка батарейного отсека
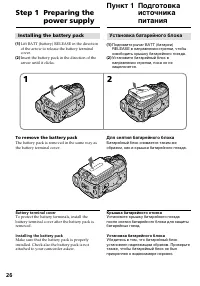
26 Installing the battery pack ( 1 ) Lift BATT (battery) RELEASE in the directionof the arrow to release the battery terminalcover. ( 2 ) Insert the battery pack in the direction of thearrow until it clicks. Step 1 Preparing the power supply 1 2 To remove the battery pack The battery pack is removed...
Страница 27 - Charging the battery pack; mark; Step 1 Preparing the power; Лампочка CHG батареи; Пункт 1 Подготовка источника; штекера был направлен вверх.; После зарядки батарейного блока; After charging the battery pack
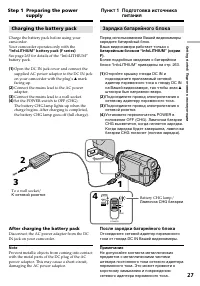
Getting started/ Подготовка к эксплуатации 27 2 3 1 4 MEMORY/ NET-WORK CAMERA (CHG) POWER OFF ON MODE VCR Charging the battery pack Charge the battery pack before using yourcamcorder.Your camcorder operates only with the “InfoLITHIUM” battery pack (F series) . See page 263 for details of the “InfoLI...
Страница 28 - * Приблизительное время в минутах при; When you use the AC power adaptor; Время зарядки; * Approximate recording time when you repeat; Recording with the viewfinder/; прилагается
28 Приблизительное время в минутах притемпературе 25°C для зарядки полностьюразряженного батарейного блока Приблизительное время в минутах прииспользовании полностью заряженногобатарейного блока * Приблизительное время в минутах при записи с неоднократным пуском/остановкойзаписи, наездом видеокамеры...
Страница 29 - Время воспроизведения; Playing time on LCD screen/; Время воспроизведения на
Getting started/ Подготовка к эксплуатации 29 Приблизительное время в минутах прииспользовании полностью заряженногобатарейного блока Примечание Приблизительное время записи инепрерывного воспроизведения указано при25°C. Срок службы батарейного блока будеткороче при использовании видеокамеры вхолодн...
Страница 30 - был направлен вверх.; PRECAUTION; Connecting to a wall socket; К сетевой розетке; ПРЕДОСТЕРЕЖЕНИЕ; • Питание от сетевого адаптера переменного; Автомобильный аккумулятор
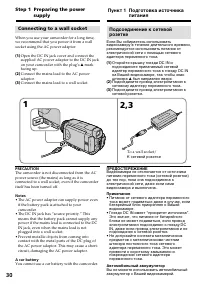
30 Подсоединение к сетевойрозетке Если Вы собираетесь использоватьвидеокамеру в течение длительного времени,рекомендуется использовать питание отэлектрической сети с помощью сетевогоадаптера переменного тока. ( 1 ) Откройте крышку гнезда DC IN иподсоедините прилагаемый сетевойадаптер переменного ток...
Страница 31 - Step 2 Setting the; about; Пункт 2 Установка; около трех месяцев
31 Getting started/ Подготовка к эксплуатации Step 2 Setting the date and time Set the date and time when you use yourcamcorder for the first time. “CLOCK SET” willbe displayed each time you set the POWERswitch to CAMERA or MEMORY/NETWORK(DCR-IP55E only) unless you set the date andtime settings.If y...
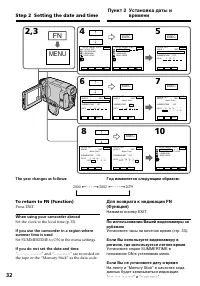
Страница 32 - Set SUMMERTIME to ON in the menu settings.; If you do not set the date and time; Step 2 Setting the date and time; FN; MENU; Год изменяется следующим образом:; Пункт 2 Установка даты и
32 The year changes as follows: To return to FN (Function) Press EXIT. When using your camcorder abroad Set the clock to the local time (p.33). If you use the camcorder in a region wheresummer time is used Set SUMMERTIME to ON in the menu settings. If you do not set the date and time “– – – – – – – ...
Страница 33 - Note on the time indicator; Area; Примечание по индикатору времени; GMT; Установка региона
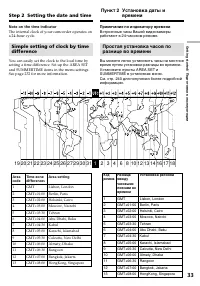
Getting started/ Подготовка к эксплуатации 33 19 20 21 22 23 24 25 26 27 29 30 31 1 2 3 4 6 8 10 12 13 14 16 17 18 Note on the time indicator The internal clock of your camcorder operates ona 24-hour cycle. Simple setting of clock by timedifference You can easily set the clock to the local time byse...
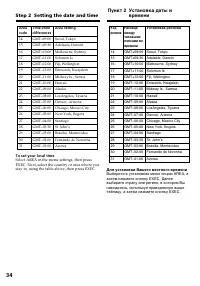
Страница 34 - To set your local time; Hawaii; Для установки Вашего местного времени
34 Area Time-zone Area setting code differences 14 GMT+09:00 Seoul, Tokyo 15 GMT+09:30 Adelaide, Darwin 16 GMT+10:00 Melbourne, Sydney 17 GMT+11:00 Solomon Is 18 GMT+12:00 Fiji, Wellington 19 GMT–12:00 Eniwetok, Kwajalein 20 GMT–11:00 Midway Is., Samoa 21 GMT–10:00 Hawaii 22 GMT–09:00 Alaska 23 GMT–...
Страница 35 - Подготовьте источник питания.; Для извлечения кассеты; Prepare the power source.; To eject a cassette; Step 3 Inserting a; Cassette compartment/; Пункт 3 Установка
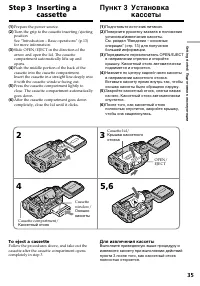
Getting started/ Подготовка к эксплуатации 35 ( 1 ) Подготовьте источник питания. ( 2 ) Поверните рукоятку захвата в положениеустановки/извлечения кассеты.См. раздел “Введение – основныеоперации” (стр. 13) для получениябольшей информации. ( 3 ) Передвиньте переключатель OPEN/EJECTв направлении стрел...
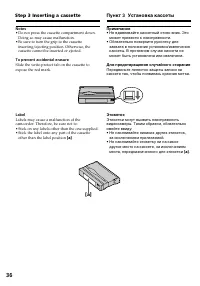
Страница 36 - Notes; • Do not press the cassette compartment down.; To prevent accidental erasure; other than the label position; Step 3 Inserting a cassette; Пункт 3 Установка кассеты; Примечания; • Не вдавливайте кассетный отсек вниз. Это; Для предотвращения случайного стирания; за исключением прилагаемой.
36 Notes • Do not press the cassette compartment down. Doing so may cause malfunction. • Be sure to turn the grip to the cassette inserting/ejecting position. Otherwise, thecassette cannot be inserted or ejected. To prevent accidental erasure Slide the write-protect tab on the cassette toexpose the ...
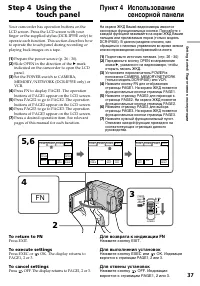
Страница 37 - Slide OPEN in the direction of the; Step 4 Using the; To return to FN; Press EXEC or; To cancel settings; Press; Пункт 4 Использование; Передвиньте кнопку OPEN в направлении; Для возврата к индикации FN; Нажмите кнопку EXEC или; Для отмены установок; Нажмите кнопку
Getting started/ Подготовка к эксплуатации 37 Your camcorder has operation buttons on theLCD screen. Press the LCD screen with yourfinger or the supplied stylus (DCR-IP55E only) tooperate each function. This section describes howto operate the touch panel during recording orplaying back images on a ...
Страница 38 - Step 4 Using the touch panel
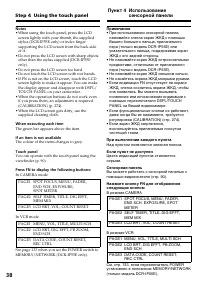
38 Step 4 Using the touch panel Notes • When using the touch panel, press the LCD screen lightly with your thumb, the suppliedstylus (DCR-IP55E only) or index fingersupporting the LCD screen from the back sideof it. • Do not press the LCD screen with sharp objects other than the stylus supplied (DCR...
Страница 39 - — Recording – Basics —; Recording a picture; Your camcorder automatically focuses for you.; Микрофон
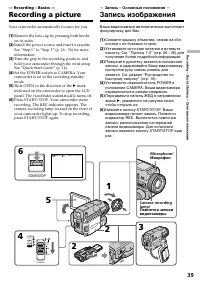
39 Recording – Basics/ Запись – Основные положения — Recording – Basics — Recording a picture Your camcorder automatically focuses for you. ( 1 ) Remove the lens cap by pressing both knobson its sides. ( 2 ) Install the power source and insert a cassette.See “Step 1” to “Step 3” (p. 26 - 36) for mor...
Страница 40 - After recording; Turn the grip to the storing position.; После выполнения записи; Удалите источник питания.
40 After recording ( 1 ) Set the POWER switch to OFF (CHG). ( 2 ) Close the LCD panel and turn the grip to thecassette inserting/ejecting position. ( 3 ) Eject the cassette. ( 4 ) Turn the grip to the storing position. ( 5 ) Remove the power source. Note Do not touch the built-in microphone duringre...
Страница 41 - Adjusting the LCD screen
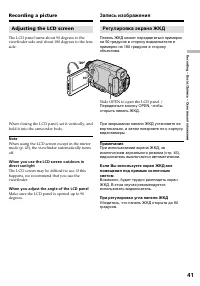
41 Recording – Basics/ Запись – Основные положения Adjusting the LCD screen The LCD panel turns about 90 degrees to theviewfinder side and about 180 degrees to the lensside. When closing the LCD panel, set it vertically, andhold it into the camcorder body. Note When using the LCD screen except in th...
Страница 42 - OPEN; Полоса индикатора
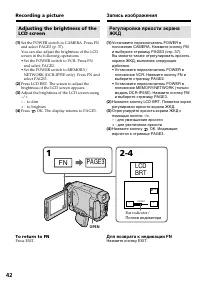
42 Adjusting the brightness of theLCD screen ( 1 ) Set the POWER switch to CAMERA. Press FNand select PAGE3 (p. 37).You can also adjust the brightness of the LCDscreen in the following operations.• Set the POWER switch to VCR. Press FN and select PAGE2. • Set the POWER switch to MEMORY/ NETWORK (DCR...
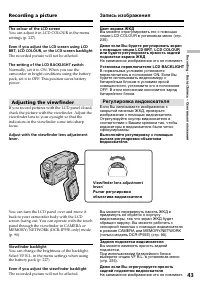
Страница 43 - The colour of the LCD screen; The setting of the LCD BACKLIGHT switch; Adjusting the viewfinder; Цвет экрана ЖКД; На записанное изображение это не повлияет.; The recorded picture will not be affected.; Регулировка видоискателя; Задняя подсветка видоискателя; На записанное изображение это не повлияет.
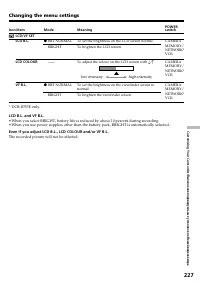
43 Recording – Basics/ Запись – Основные положения The colour of the LCD screen You can adjust it in LCD COLOUR in the menusettings (p. 227). Even if you adjust the LCD screen using LCDBRT, LCD COLOUR, or the LCD screen backlight The recorded picture will not be affected. The setting of the LCD BACK...
Страница 44 - Using the zoom feature; To zoom greater than 10; Zoom greater than 10; Для использования наезда более 10; Наезд видеокамеры более 10
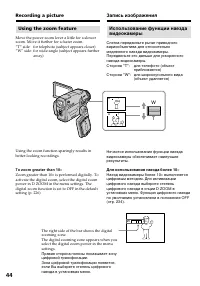
44 Using the zoom feature Move the power zoom lever a little for a slowerzoom. Move it further for a faster zoom.“T” side: for telephoto (subject appears closer)“W” side: for wide-angle (subject appears further away) Using the zoom function sparingly results inbetter-looking recordings. To zoom grea...
Страница 45 - When you shoot close to a subject; Shooting with the mirror mode; Xz
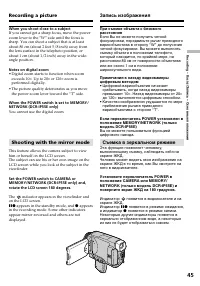
45 Recording – Basics/ Запись – Основные положения When you shoot close to a subject If you cannot get a sharp focus, move the powerzoom lever to the “W” side until the focus issharp. You can shoot a subject that is at leastabout 80 cm (about 2 feet 5/8 inch) away fromthe lens surface in the telepho...
Страница 46 - Micro Cassette Memory/; Индикатор времени оставшегося заряда батарейного блока; Оставшаяся лента; Счетчик ленты; Press this button to display operation buttons on the LCD screen./; Время; Picture in the mirror mode; FN appears mirror-reversed in the viewfinder.; When you press FN; The; Изображение в зеркальном режиме.; Индикатор
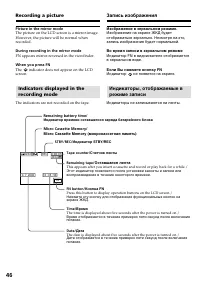
46 0:00:01 45min 40 min REC FN 4 7 2002 12 : 05 : 56 Micro Cassette Memory/ Micro Cassette Memory (микрокассетная память) Remaining battery time/ Индикатор времени оставшегося заряда батарейного блока STBY/REC/ Индикатор STBY/REC Remaining tape/ Оставшаяся лента This appears after you insert a casse...
Страница 47 - Tape counter
47 Recording – Basics/ Запись – Основные положения Remaining battery time indicator duringrecording The remaining battery time indicator shows theapproximate recording time. The indicator maynot be correct, depending on the conditions inwhich you are recording. When you close theLCD panel and open i...
Страница 48 - During back light function; BACK LIGHT; На экране появится индикатор
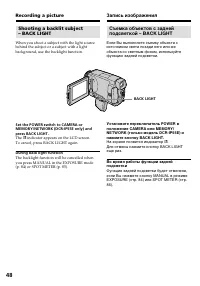
48 Shooting a backlit subject– BACK LIGHT When you shoot a subject with the light sourcebehind the subject or a subject with a lightbackground, use the backlight function. Set the POWER switch to CAMERA orMEMORY/NETWORK (DCR-IP55E only) andpress BACK LIGHT. The . indicator appears on the LCD screen....
Страница 49 - Using NightShot; and “NIGHTSHOT” indicators flash on the; и “SUPER NIGHTSHOT”.; Using Super NightShot; Set the POWER switch to CAMERA.; Using the NightShot Light; Индикаторы
49 Recording – Basics/ Запись – Основные положения OFF ON NIGHTSHOT NIGHTSHOT SUPER SLOW S COLOUR Съемка в темноте– Ночная съемка/Ночнаясуперсъемка/Цветная съемка смедленным затвором Использование режима ночнойсъемки Режим ночной съемки позволяет Вамвыполнять съемку объектов в темном месте.Например,...
Страница 50 - Using Colour Slow Shutter; • Не используйте функцию ночной съемки в
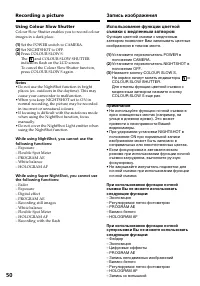
50 Recording a picture Using Colour Slow Shutter Colour Slow Shutter enables you to record colourimages in a dark place. ( 1 ) Set the POWER switch to CAMERA. ( 2 ) Set NIGHTSHOT to OFF. ( 3 ) Press COLOUR SLOW S.The and COLOUR SLOW SHUTTER indicators flash on the LCD screen.To cancel the Colour Slo...
Страница 51 - NightShot Light; Colour slow shutter may not work properly.; затвором; Подсветка ночной съемки
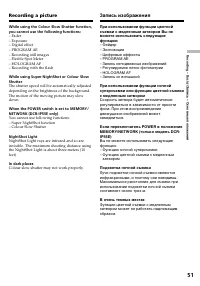
51 Recording – Basics/ Запись – Основные положения Recording a picture While using the Colour Slow Shutter function,you cannot use the following functions: – Fader– Exposure– Digital effect– PROGRAM AE– Recording still images– Flexble Spot Meter– HOLOGRAM AF– Recording with the flash While using Sup...
Страница 52 - Press SELFTIMER so that the; появится на экране ЖКД.; Для остановки обратного отсчета
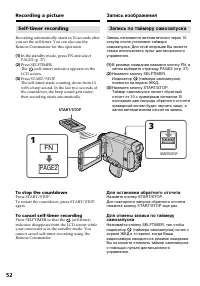
52 Self-timer recording Recording automatically starts in 10 seconds afteryou set the self-timer. You can also use theRemote Commander for this operation. ( 1 ) In the standby mode, press FN and selectPAGE2 (p. 37). ( 2 ) Press SELFTIMER.The (self-timer) indicator appears on the LCD screen. ( 3 ) Pr...
Страница 54 - Even once you eject the cassette; The end search function works.; Нажмите кнопку END SCH еще раз.; Даже если Вы извлечете кассету; Функция поиска конца не работает.
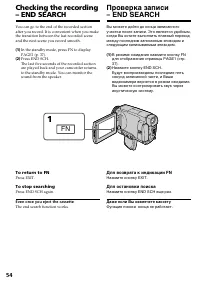
54 You can go to the end of the recorded sectionafter you record. It is convenient when you makethe transition between the last recorded sceneand the next scene you record smooth. ( 1 ) In the standby mode, press FN to displayPAGE1 (p. 37). ( 2 ) Press END SCH.The last five seconds of the recorded s...
Страница 55 - — Playback – Basics —; Playing back a tape; — Воспроизведение – Основные положения —; Воспроизведение ленты
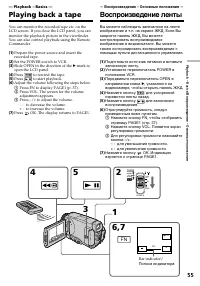
Playback – Basics/ Воспроизведение – Основные положения 55 — Playback – Basics — Playing back a tape You can monitor the recorded tape etc. on theLCD screen. If you close the LCD panel, you canmonitor the playback picture in the viewfinder.You can also control playback using the RemoteCommander. ( 1...
Страница 56 - Во время контроля на экране ЖКД; Make sure that the LCD panel is set vertically.
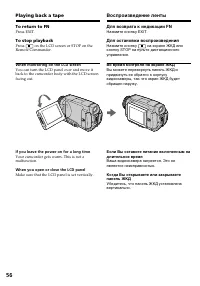
56 To return to FN Press EXIT. To stop playback Press on the LCD screen or STOP on the Remote Commander. Playing back a tape Воспроизведение ленты Для возврата к индикации FN Нажмите кнопку EXIT. Для остановки воспроизведения Нажмите кнопку на экране ЖКД или кнопку STOP на пульте дистанционногоуправ...
Страница 57 - Использование функции кода данных; Использование сенсорной панели; Нажмите кнопку DATA CODE.; Using the data code function; Using the Remote Commander; Not to display various settings; no indicator
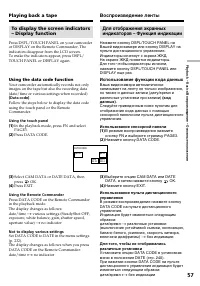
Playback – Basics/ Воспроизведение – Основные положения 57 DATACODE CAMDATA DATEDATA OFF OK Playing back a tape To display the screen indicators– Display function Press DSPL/TOUCH PANEL on your camcorderor DISPLAY on the Remote Commander. Theindicators disappear from the LCD screen.To make the indic...
Страница 58 - Various settings; Различные установки
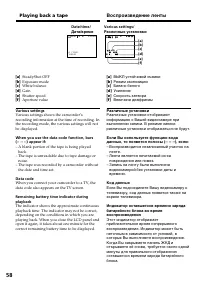
58 Playing back a tape [ a ] SteadyShot OFF [ b ] Exposure mode [ c ] White balance [ d ] Gain [ e ] Shutter speed [ f ] Aperture value Various settings Various settings shows the camcorder’srecording information at the time of recording. Inthe recording mode, the various settings will notbe display...
Страница 59 - Для ускоренной перемотки ленты вперед; Various playback modes; To fastforward the tape
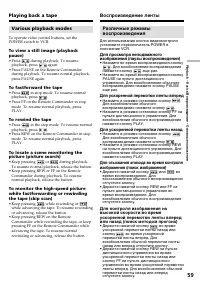
Playback – Basics/ Воспроизведение – Основные положения 59 Playing back a tape Воспроизведение ленты Различные режимывоспроизведения Для использования кнопок видеоконтроляустановите переключатель POWER вположение VCR. Для просмотра неподвижногоизображения (паузы воспроизведения) • Нажмите во время в...
Страница 60 - Video control buttons on the LCD screen; or PLAY; Кнопки видеоконтроля на экране ЖКД; или
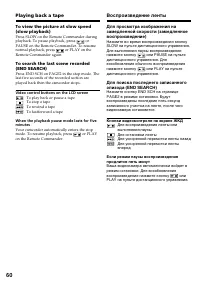
60 Playing back a tape Воспроизведение ленты To view the picture at slow speed(slow playback) Press SLOW on the Remote Commander duringplayback. To pause playback, press or PAUSE on the Remote Commander. To resumenormal playback, press or PLAY on the Remote Commander again. To search the last scene ...
Страница 61 - Красный
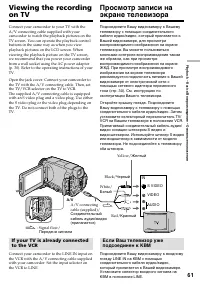
Playback – Basics/ Воспроизведение – Основные положения 61 Подсоедините Вашу видеокамеру к Вашемутелевизору с помощью соединительногокабеля аудио/видео, который прилагается кВашей видеокамере, для просмотравоспроизводимого изображения на экранетелевизора. Вы можете пользоватьсякнопками контроля восп...
Страница 62 - Viewing the recording on TV; – European models only; If your TV has an S video jack; TV; – Только европейские модели
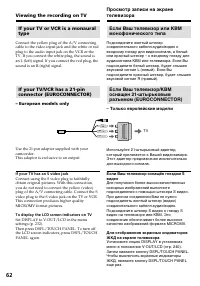
62 Viewing the recording on TV If your TV or VCR is a monauraltype Connect the yellow plug of the A/V connectingcable to the video input jack and the white or redplug to the audio input jack on the VCR or theTV. If you connect the white plug, the sound isan L (left) signal. If you connect the red pl...
Страница 63 - — Advanced Recording Operations —; – Усовершенствованные операции записи –
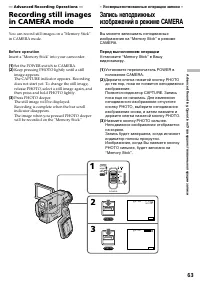
Advanced Recording Operations/ Усовершенствованные операции записи 63 — Advanced Recording Operations — Recording still imagesin CAMERA mode You can record still images on a "Memory Stick"in CAMERA mode. 2 3 1 / 12 FN CAPTURE SFN 640 FN SFN 640 PHOTO PHOTO 1 MEMORY/ NET-WORK CAMERA (CHG) POW...
Страница 64 - “Memory Stick”; For details, see 127 for more information.; Image size of still images; Image size is automatically set to 640; When POWER switch is set to CAMERA; • Do not shake or strike your camcorder when; To record images with higher quality; Подробные сведения приведены на стр. 127.; Размер неподвижных изображений; • Не трясите и не стучите по Вашей; Вы не можете записывать титр.
64 Recording still images inCAMERA mode “Memory Stick” For details, see 127 for more information. Image size of still images Image size is automatically set to 640 × 480. When you want to record still images in differentsizes, use the Memory Photo recording function(p. 143). When POWER switch is set...
Страница 65 - Автоматическое уменьшение эффекта; вспышка; Forced flash: The flash fires regardless of
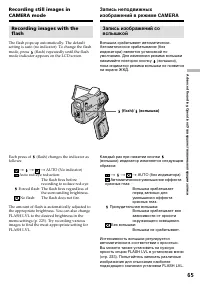
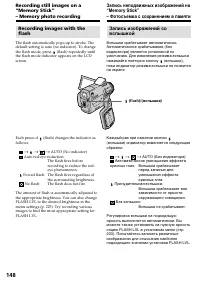
Advanced Recording Operations/ Усовершенствованные операции записи 65 Запись изображений совспышкой Вспышка срабатывает автоматически.Автоматическое срабатывание (безиндикатора) является установкой поумолчанию. Для изменения режима вспышкинажимайте повторно кнопку (вспышки),пока индикатор режима всп...
Страница 67 - during the following operations:
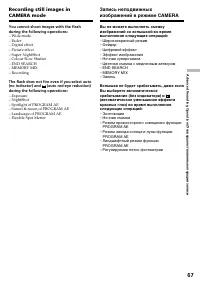
Advanced Recording Operations/ Усовершенствованные операции записи 67 You cannot shoot images with the flashduring the following operations: – Wide mode– Fader– Digital effect– Picture effect– Super NightShot– Colour Slow Shutter– END SEARCH– MEMORY MIX– Recording The flash does not fire even if you...
Страница 68 - Запись по таймеру самозапуска; Перед выполнением операции; To cancel self-timer recording; Press SELFTIMER so that the
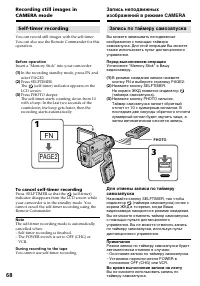
68 Recording still images inCAMERA mode 1 FN 3 PAGE2 PHOTO PHOTO Self-timer recording You can record still images with the self-timer.You can also use the Remote Commander for thisoperation. Запись неподвижныхизображений в режиме CAMERA Запись по таймеру самозапуска Вы можете записывать неподвижныеи...
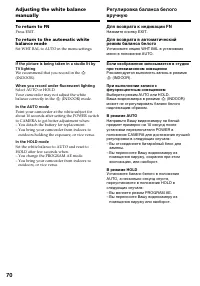
Страница 70 - Set WHT BAL to AUTO in the menu settings.; When you record under fluorescent lighting; outdoors holding the exposure, or vice versa.; In the HOLD mode; Рекомендуется выполнять запись в режиме; В режиме AUTO; – Вы переносите Вашу видеокамеру из; В режиме HOLD; помещения наружу или наоборот.
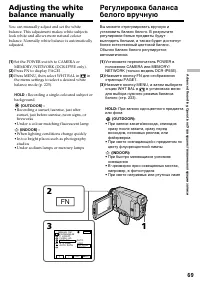
70 Adjusting the white balancemanually To return to FN Press EXIT. To return to the automatic whitebalance mode Set WHT BAL to AUTO in the menu settings. If the picture is being taken in a studio lit byTV lighting We recommend that you record in the n (INDOOR). When you record under fluorescent ligh...
Страница 71 - Using the wide mode; или на
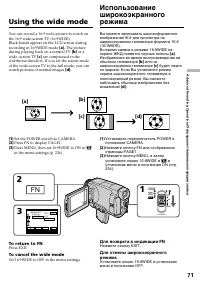
Advanced Recording Operations/ Усовершенствованные операции записи 71 You can record a 16:9 wide picture to watch onthe 16:9 wide-screen TV (16:9WIDE).Black bands appear on the LCD screen duringrecording in 16:9WIDE mode [ a ]. The picture during playing back on a normal TV [ b ] or a wide -screen T...
Страница 72 - During recording
72 Using the wide mode In the wide mode, you cannot select thefollowing functions: – Recording still images– OLD MOVIE– BOUNCE During recording You cannot select or cancel the wide mode. Whenyou cancel the wide mode, set your camcorder tothe recording standby mode and then set16:9WIDE to OFF in the ...
Страница 73 - MONOTONE; Только введение изображения
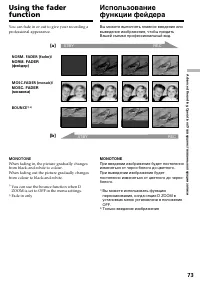
Advanced Recording Operations/ Усовершенствованные операции записи 73 You can fade in or out to give your recording aprofessional appearance. MONOTONE When fading in, the picture gradually changesfrom black-and-white to colour.When fading out the picture gradually changesfrom colour to black-and-whi...
Страница 74 - To cancel the fader function; OFF in; Using the fader function; FADER; Использование функции фейдера; Для введения изображения; Выберите нужный режим фейдера.; Для отмены функции фейдера
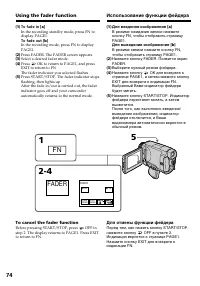
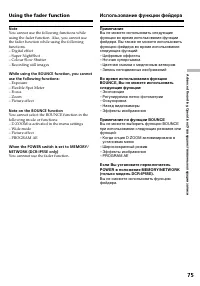
74 ( 1 ) To fade in [ a ] In the recording standby mode, press FN todisplay PAGE1. To fade out [ b ] In the recording mode, press FN to displayPAGE1. ( 2 ) Press FADER. The FADER screen appears. ( 3 ) Select a desired fader mode. ( 4 ) Press OK to return to PAGE1, and press EXIT to return to FN.The ...
Страница 75 - You cannnot use the fader function.; установках меню
Advanced Recording Operations/ Усовершенствованные операции записи 75 Using the fader function Использование функции фейдера Note You cannot use the following functions whileusing the fader function. Also, you cannot usethe fader function while using the followingfunctions:– Digital effect– Super Ni...
Страница 76 - SOLARIZE; в установках меню; SEPIA
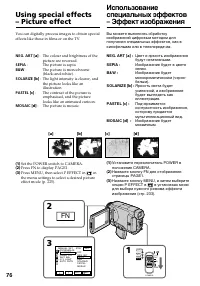
76 You can digitally process images to obtain specialeffects like those in films or on the TV. Using special effects– Picture effect [a] [b] [c] [d] 2 FN 3 MANUAL SET STBY PROGRAM AEP EFFECTFLASH LVLWHT BALN. S. LIGHTAUTO SHTR EXIT RET. EXEC OFFNEG. ARTSEPIAB&WSOLARIZEPASTELMOSAIC 1 MEMORY/ NET-...
Страница 77 - Select OFF in P EFFECT in the menu settings.; When you set the POWER switch to OFF (CHG); The picture effect is automatically cancelled.
Advanced Recording Operations/ Усовершенствованные операции записи 77 To return to FN Press EXIT. To turn the picture effect function off Select OFF in P EFFECT in the menu settings. While using the picture effect function, youcannot use following functions: – OLD MOVIE– BOUNCE– Recording still imag...
Страница 78 - Неподвижное изображение; STILL
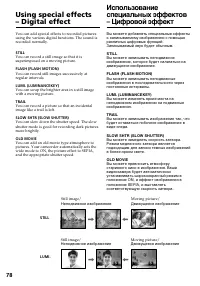
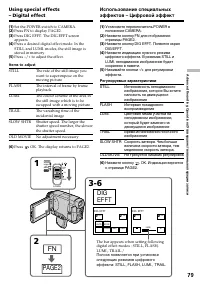
78 Using special effects– Digital effect You can add special effects to recorded picturesusing the various digital functions. The sound isrecorded normally. STILL LUMI. Still image/ Moving picture/ Неподвижное изображение Движущееся изображение Still image/ Moving picture/ Неподвижное изображение Дв...
Страница 79 - Items to adjust
Advanced Recording Operations/ Усовершенствованные операции записи 79 1 3-6 2 FN LUMI. + OK OFF DIGEFFT DIG EFFT DIG EFFT STILL SLOW SHTR OLD MOVIE OFF OK LUMI. FLASH TRAIL PAGE2 MEMORY/ NET-WORK CAMERA (CHG) POWER OFF ON MODE VCR Using special effects– Digital effect ( 1 ) Set the POWER switch to C...
Страница 81 - Spotlight
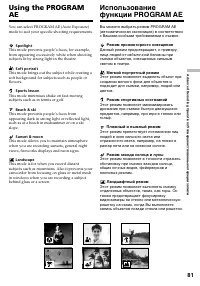
Advanced Recording Operations/ Усовершенствованные операции записи 81 Using the PROGRAMAE You can select PROGRAM AE (Auto Exposure)mode to suit your specific shooting requirements. Использованиефункции PROGRAM AE Вы можете выбрать режим PROGRAM AE(автоматическая экспозиция) в соответствиис Вашими ос...
Страница 82 - Using the PROGRAM AE; в установках; • Поскольку Ваша видеокамера настроена
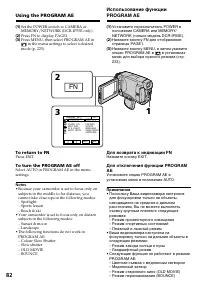
82 ( 1 ) Set the POWER switch to CAMERA orMEMORY/NETWORK (DCR-IP55E only). ( 2 ) Press FN to display PAGE1. ( 3 ) Press MENU, then select PROGRAM AE in in the menu settings to select a desired mode (p. 225). To return to FN Press EXIT. To turn the PROGRAM AE off Select AUTO in PROGRAM AE in the menu...
Страница 83 - • The PROGRAM AE does not work in the
Advanced Recording Operations/ Усовершенствованные операции записи 83 Using the PROGRAM AE • The PROGRAM AE does not work in the following cases (The indicator flashes):– To set the NIGHTSHOT to ON.– To record images on a “Memory Stick” using the MEMORY MIX. • When you set the POWER switch to MEMORY...
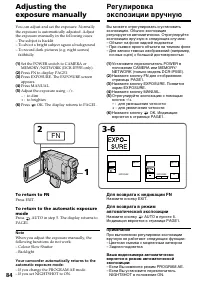
Страница 84 - faithfully
84 2 1 3-6 FN AUTO AUTO EXPOSURE OK + EXPOSURE + OK You can adjust and set the exposure. Normallythe exposure is automatically adjusted. Adjustthe exposure manually in the following cases:– The subject is backlit– To shoot a bright subject agaist a background– To record dark pictures (e.g. night sce...
Страница 85 - Press FN to display PAGE1.; SPOT
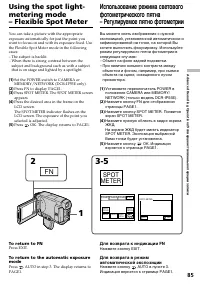
Advanced Recording Operations/ Усовершенствованные операции записи 85 You can take a picture with the appropriateexposure automatically for just the point youwant to focus on and with its exposure fixed. Usethe Flexible Spot Meter mode in the followingcases:– The subject is backlit.– When there is s...
Страница 86 - NIGHTSHOT в положение ON
86 Using the spot light-meteringmode – Flexible Spot Meter Note The following functions do not work during theFlexible Spot Meter:– Colour Slow Shutter– Backlight Your camcorder automatically returns fromthe Flexible Spot Meter to the automaticexposure: – If you change the PROGRAM AE mode– If you se...
Страница 87 - Focusing manually; Ручная фокусировка; таком фоне, как стены или небо
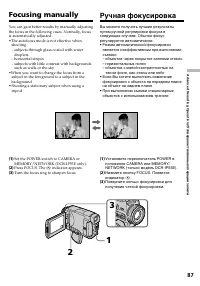
Advanced Recording Operations/ Усовершенствованные операции записи 87 Focusing manually 1 2 3 Ручная фокусировка Вы можете получить лучшие результатыпутем ручной регулировки фокуса вследующих случаях. Обычно фокусрегулируется автоматически.• Режим автоматической фокусировки является неэффективным пр...
Страница 88 - To return to the autofocus mode; To focus precisely; Для точной фокусировки
88 Focusing manually To return to the autofocus mode Press FOCUS to turn off 9 , or indicator. To focus precisely It is easier to focus on the subject if you adjust thezoom to shoot at the “W” (wide-angle) positionafter focusing at the “T” (telephoto) position. When you shoot close to the subject Fo...
Страница 89 - В пункте 4 нажмите кнопку; Она не отображается на экране.
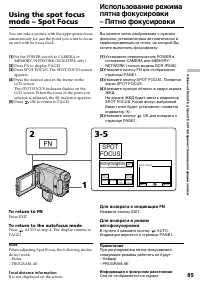
Advanced Recording Operations/ Усовершенствованные операции записи 89 2 1 3-5 FN SPOT FOCUS OK AUTO MENU FADER ENDSCH EXPO– SURE SPOT FOCUS SPOT METER PAGE1 PAGE2 PAGE3 EXIT SPOT FOCUS You can take a picture with the appropriate focusautomatically for just the point you want to focuson and with its ...
Страница 90 - Using the viewfinder; В режиме CAMERA
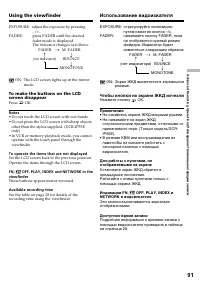
90 3,4 1 OFF FN 5,6 ON OK OK OK ON FADER PANEL OFF Turn the LCD panel over and move it back toyour camcorder body with the LCD screen facingout. You can operate with the touch panel usingthe viewfinder.Use the viewfinder in the following case:When operating camera brightness and the fader(only in CA...
Страница 91 - Использование видоискателя; Чтобы кнопки на экране ЖКД исчезли
Advanced Recording Operations/ Усовершенствованные операции записи 91 Using the viewfinder EXPOSURE: adjust the exposure by pressing –/+. FADER: press FADER until the desiredfader mode is displayed.The indicator changes as follows: FADER t M. FADER R r (no indicator) BOUNCE r MONOTONE ON: The LCD sc...
Страница 92 - — Advanced Playback Operations —; Set P EFFECT to OFF in the menu settings.; — Усовершенствованные операции воспроизведения —
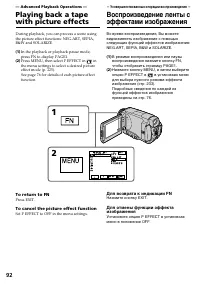
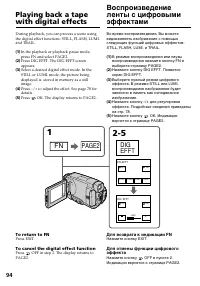
92 1 FN 2 MENU MANUAL SET P EFFECT OFF NEG. ART SEPIA B&W SOLARIZE EXEC EXIT RET. — Advanced Playback Operations — Playing back a tapewith picture effects During playback, you can process a scene usingthe picture effect functions: NEG.ART, SEPIA,B&W and SOLARIZE. ( 1 ) In the playback or pla...
Страница 93 - • Вы не можете видоизменять изображения; • You cannot process externally input scenes
Advanced Playback Operations/ Усовершенствованные операции воспроизведения 93 Playing back a tape with pictureeffects Воспроизведение ленты сэффектами изображения Примечания • Вы не можете видоизменять изображения от внешних источников с помощью функцииэффекта изображения. • Вы не можете записывать ...
Страница 96 - Increase the zoom ratio.; To cancel the PB ZOOM function; Для отмены функции PB ZOOM
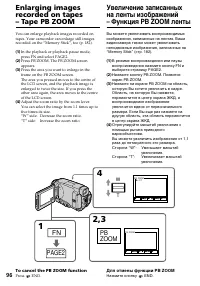
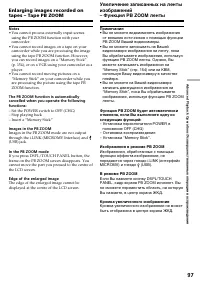
96 1 2,3 4 FN PBZOOM END END PB ZOOM W T PAGE2 × 2.1 PB ZOOM You can enlarge playback images recorded ontapes. Your camcorder can enlarge still imagesrecorded on the “Memory Stick”, too (p. 182). ( 1 ) In the playback or playback pause mode,press FN and select PAGE2. ( 2 ) Press PB ZOOM. The PB ZOOM...
Страница 97 - Images in the PB ZOOM; Изображения в режиме PB ZOOM
Advanced Playback Operations/ Усовершенствованные операции воспроизведения 97 Enlarging images recorded ontapes – Tape PB ZOOM Notes • You cannot process externally input scenes using the PB ZOOM function with yourcamcorder. • You cannot record images on a tape on your camcorder while you are proces...
Страница 98 - MULTI; SELECT; MULTI SRCH; Set the POWER switch to VCR.
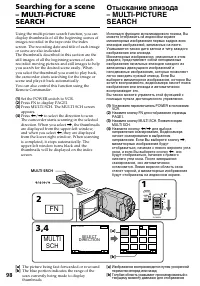
98 3,4 2 FN 1 MEMORY/ NET-WORK CAMERA (CHG) POWER OFF ON MODE VCR MULTI SCH MULTI SCH END SELECT DIRECTION END EXEC DATE [a] [b] MULTI SRCH X / x / C / c Searching for a scene– MULTI-PICTURESEARCH Using the multi-picture search function, you candisplay thumbnails of all the beginning scenes ofimages...
Страница 99 - When you want to change the thumbnail; Кнопки
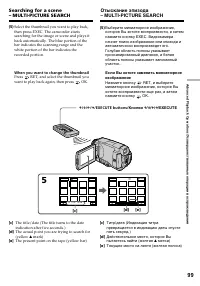
Advanced Playback Operations/ Усовершенствованные операции воспроизведения 99 ( 5 ) Выберите миниатюрное изображение,которое Вы хотите воспроизвести, а затемнажмите кнопку EXEC. Видеокамераначнет поиск изображения или эпизода иавтоматически воспроизведет его.Голубая область полосы указываетпросканир...
Страница 100 - Для остановки поиска; To stop searching; Press STOP on the Remote Commander.
100 Для возврата от воспроизведения кэкрану MULTI SCH Нажмите кнопку RET. Для остановки поиска Нажмите кнопку STOP на пультедистанционного управления. Для завершения работы функциимультикадрового поиска Нажмите кнопку END. Индикация вернется к странице PAGE1. Для завершения работы функциимультикадро...
Страница 101 - Во время поиска
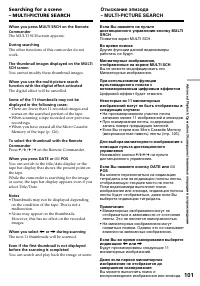
Advanced Playback Operations/ Усовершенствованные операции воспроизведения 101 Searching for a scene– MULTI-PICTURE SEARCH When you press MULTI SRCH on the RemoteCommander The MULTI SCH screen appears. During searching The other functions of this camcorder do notwork. The thumbnail images displayed ...
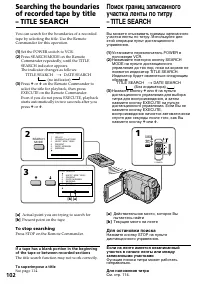
Страница 102 - To superimpose a title; Для наложения титра
102 You can search for the boundaries of a recordedtape by selecting the title. Use the RemoteCommander for this operation. ( 1 ) Set the POWER switch to VCR. ( 2 ) Press SEARCH MODE on the RemoteCommander repeatedly, until the TITLESEARCH indicator appears.The indicator changes as follows: TITLE SE...
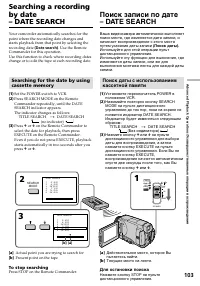
Страница 104 - The date search function may not work correctly.; Micro Cassette Memory
104 Searching a recording by date– DATE SEARCH If a tape has a blank in the beginning of thetape or a portion between recorded sections The date search function may not work correctly. Micro Cassette Memory The tape cassette memory can hold 20 recordingdate data. Поиск записи по дате– DATE SEARCH Ес...
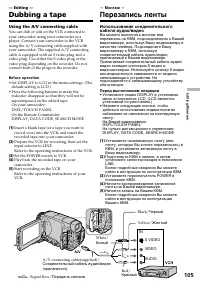
Страница 105 - Монтаж; — Editing —; Dubbing a tape; S VIDEO; Using the A/V connecting cable; Before operation; • Set DISPLAY to LCD in the menu settings. (The; — Монтаж —; Перезапись ленты
Editing/ Монтаж 105 — Editing — Dubbing a tape S VIDEO VIDEO AUDIO IN A/V connecting cable(supplied)/ Соединительный кабель аудио/видео(прилагается) Yellow/ Желтый White/ Белый Red/ Красный : Signal flow/ Передача сигнала Black/ Черный Using the A/V connecting cable You can dub or edit on the VCR co...
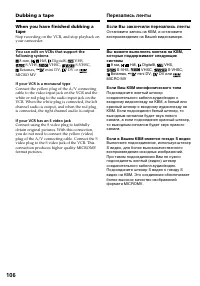
Страница 106 - DV or; If your VCR is a monaural type; Если Вы закончили перезапись ленты; DV или; Если Ваш КВМ монофонического типа
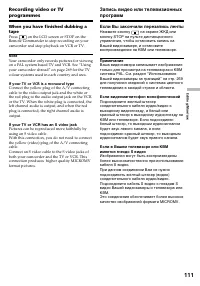
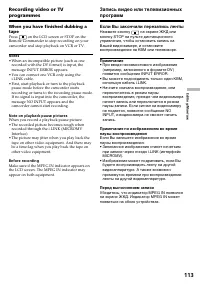
106 Dubbing a tape When you have finished dubbing atape Stop recording on the VCR, and stop playback onyour camcorder. You can edit on VCRs that support thefollowing systems 8 mm, Hi8, Digital8, VHS, S-VHS, VHSC, S-VHSC, Betamax, mini DV, DV or MICRO MV If your VCR is a monaural type Connect the yel...
Страница 107 - Using the i.LINK cable; Prepare the VCR for recording.; Использование кабеля i.LINK; Подготовьте КВМ для записи.; DV IN
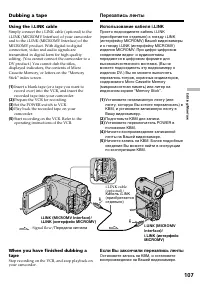
Editing/ Монтаж 107 Using the i.LINK cable Simply connect the i.LINK cable (optional) to thei.LINK (MICROMV Interface) of your camcorderand to the i.LINK (MICROMV Interface) of theMICROMV product. With digital-to-digitalconnection, video and audio signals aretransmitted in digital form for high-qual...
Страница 108 - See page 266 for more information about i.LINK.; Note on playback pause pictures; • The picture may jitter when you play back the; • Изображение может подрагивать, если Вы
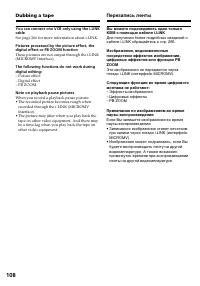
108 Dubbing a tape You can connect one VCR only using the i.LINKcable See page 266 for more information about i.LINK. Pictures processed by the picture effect, thedigital effect or PB ZOOM function These pictures are not output through the i.LINK(MICROMV Interface). The following functions do not wo...
Страница 109 - Making a recording” on; Переключение входного
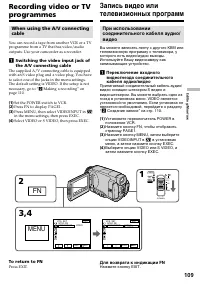
Editing/ Монтаж 109 Recording video or TVprogrammes When using the A/V connectingcable You can record a tape from another VCR or a TVprogramme from a TV that has video/audiooutputs. Use your camcorder as a recorder. 1 Switching the video input jack ofthe A/V connecting cable The supplied A/V connect...
Страница 110 - Making a recording; Set DISPLAY to LCD in; Создание записи
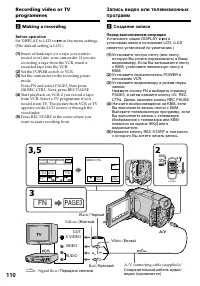
110 2 Making a recording Before operation Set DISPLAY to LCD in in the menu settings. (The default setting is LCD.) ( 1 ) Insert a blank tape (or a tape you want torecord over) into your camcorder. If you arerecording a tape from the VCR, insert arecorded tape into the VCR. ( 2 ) Set the POWER switc...
Страница 112 - When using the i.LINK cable
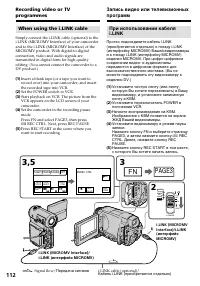
112 When using the i.LINK cable Simply connect the i.LINK cable (optional) to thei.LINK (MICROMV Interface) of your camcorderand to the i.LINK (MICROMV Interface) of theMICROMV product. With digital-to-digitalconnection, video and audio signals aretransmitted in digital form for high-qualityediting....
Страница 114 - Superimposing a title; VACATION; Наложение титра
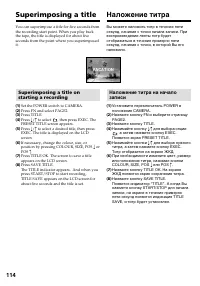
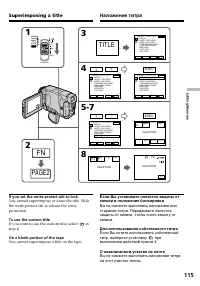
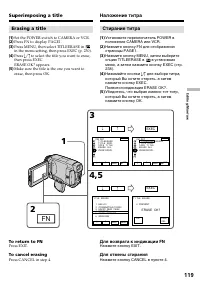
114 Superimposing a title VACATION You can superimpose a title for five seconds fromthe recording start point. When you play backthe tape, the title is displayed for about fiveseconds from the point where you superimposedit. Superimposing a title onstarting a recording ( 1 ) Set the POWER switch to ...
Страница 115 - TITLE; If you set the write-protect tab to lock; If you want to use the custom title, select; On a blank portion of the tape; You cannot superimpose a title on the tape.; Для использования собственного титра; при; О незаписанном участке на ленте
Editing/ Монтаж 115 Superimposing a title 3 4 5-7 8 VACATION COLOUR RET. POS r SIZE TITLEOK EXIT POS R PRESET TITLE STBY HELLO!HAPPY BIRTHDAYHAPPY HOLIDAYSCONGRATULATIONS!OUR SWEET BABYWEDDINGVACATIONTHE END EXIT RET. EXEC R r PRESET TITLE STBY HELLO!HAPPY BIRTHDAYHAPPY HOLIDAYSCONGRATULATIONS!OUR S...
Страница 116 - Настройка титра
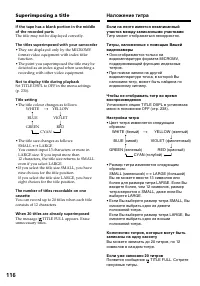
116 If the tape has a blank portion in the middleof the recorded parts The title may not be displayed correctly. The titles superimposed with your camcorder • They are displayed only by the MICROMV format video equipment with index titlerfunction. • The point you superimposed the title may be detect...
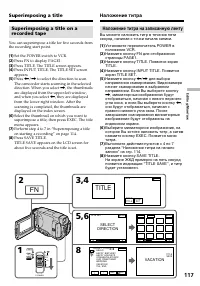
Страница 118 - • миниатюрные изображения могут не
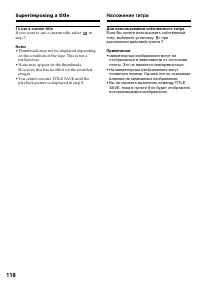
118 To use a custom title If you want to use a custom title, select in step 7. Notes • Thumbnails may not be displayed depending on the condition of the tape. This is not amalfunction. • Noise may appear on the thumbnails. However, this has no effect on the recordedimages. • You cannot execute TITLE...
Страница 119 - Press CANCEL in step 4.; Erasing a title; Set the POWER switch to CAMERA or VCR.; Нажмите кнопку CANCEL в пункте 4.
Editing/ Монтаж 119 Superimposing a title 3 4,5 2 FN r R EXEC r R EXEC 1 CM SET T I TLEERASET I TLE DSPLTAPE T I TLEERASE ALL q INFODSPL CM SET T I TLEERASET I TLE DSPLTAPE T I TLEERASE ALL q INFODSPL READY T I TLE ERASE 1 HELLO !2 CONGRATULAT I ONS !3 HAPPY NEW YEAR !4 PRESENT5 GOOD MORN I NG6 WEDD...
Страница 120 - Making a title in CAMERA mode
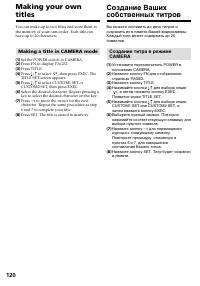
120 You can make up to two titles and store them inthe memory of your camcorder. Each title canhave up to 20 characters. Making a title in CAMERA mode ( 1 ) Set the POWER switch to CAMERA. ( 2 ) Press FN to display PAGE2. ( 3 ) Press TITLE. ( 4 ) Press r / R to select , then press EXEC. The TITLE SE...
Страница 121 - Making your own titles
Editing/ Монтаж 121 Making your own titles 5 4 3 6-8 TITLE SET CUSTOM1 SETCUSTOM2 SET TITLE SET CUSTOM1 SETCUSTOM2 SET TITLE SET CUSTOM1 SETCUSTOM2 SET 2 FN EXIT RET. EXEC R r EXIT RET. EXEC R r EXIT RET. EXEC R r &? ! ABC DEF T t 678 90 123 45 MNO JKL GH I SET WXY Z TUV PQR S EXIT TITLE SET &am...
Страница 122 - To erase the character; To enter a space; Для стирания символа; Для ввода пробела
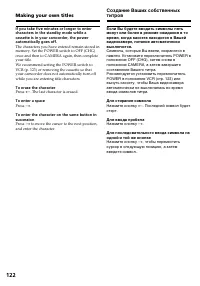
122 Making your own titles If you take five minutes or longer to entercharacters in the standby mode while acassette is in your camcorder, the powerautomatically goes off. The characters you have entered remain stored inmemory. Set the POWER switch to OFF (CHG)once and then to CAMERA again, then com...
Страница 123 - Making a title in VCR mode; Создание титра в режиме VCR; Нажимайте кнопки
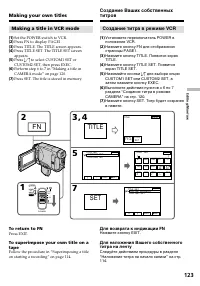
Editing/ Монтаж 123 5 7 3 , 4 TITLE SET TITLE END INPUT TITLE TITLE SET TITLE SET CUSTOM1 SETCUSTOM2 SET TITLE SET CUSTOM1”BASEBALL”CUSTOM2 SET &? ! ABC DEF T t 678 90 123 45 MNO JKL GH I SET ’ . , / – WXY Z TUV PQR S [ _ _ _ _ _ _ _ _ _ _ _ _ _ _ _ _ _ _ _ ] EXIT TITLE SET 2 FN 1 EXIT RET. EXEC...
Страница 124 - The cassette information; The first-recorded date in this cassette.; Recorded areas; INFODSPL item in; When “ ” is flashing; Информация о кассете; Записанные участки
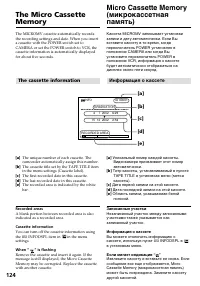
124 The MICROMV cassette automatically recordsthe recording settings and date. When you inserta cassette with the POWER switch set toCAMERA or set the POWER switch to VCR, thecassette information is automatically displayedfor about five seconds. The cassette information [ a ] The unique number of ea...
Страница 125 - Labelling a cassette; Маркировка кассеты; в установках меню, а; Для изменения созданной Вами метки
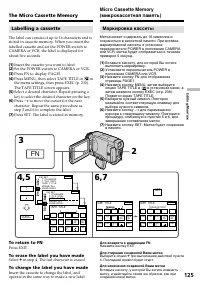
Editing/ Монтаж 125 4,5 3 FN r R EXEC 2 6,7 &? ! ABC DEF T t 678 90 123 45 MNO JKL GH I SET WXY Z TUV PQR S EXIT TAPE TITLE &? ! ABC DEF T t 678 90 123 45 MNO JKL GH I SET WXY Z TUV PQR S [ G R A D U A T I O N ] EXIT TAPE TITLE SET CM SET T I TLEERASET I TLE DSPLTAPE T I TLEERASE ALL q INFOD...
Страница 126 - The Micro Cassette Memory
126 The Micro Cassette Memory If you set the write-protect tab of the tape tolock You cannot label the tape. Slide the write-protecttab to release the write protection. To erase the character Press T . The last character is erased. To enter a space Press t . To enter the character on the same button...
Страница 127 - — “Memory Stick” Operations —; File format; Still image; Mov10001.mpg: This file name appears on the; Формат файлов
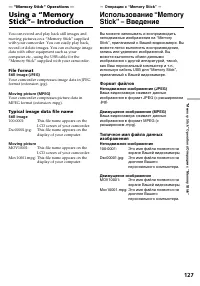
“ Memory Stick ” Operations/ Операции с “Memory Stick” 127 — “Memory Stick” Operations — Using a “MemoryStick”– Introduction You can record and play back still images andmoving pictures on a “Memory Stick” suppliedwith your camcorder. You can easily play back,record or delete images. You can exchang...
Страница 128 - Using a “Memory Stick”; Использование “Memory Stick”
128 Using a “Memory Stick”– Introduction Using a “Memory Stick” • You cannot record or erase images when the write-protect tab on the “Memory Stick” is setto LOCK. • The position and shape of the write protect tab may be different depending on the model. • We recommend backing up important data on t...
Страница 129 - Notes on image data compatibility; • Image data files recorded on the “Memory
“ Memory Stick ” Operations/ Операции с “Memory Stick” 129 “Memory Stick” formatted by acomputer “Memory Stick” formatted by Windows OS orMacintosh computers do not have a guaranteedcompatibility with this camcorder. Notes on image data compatibility • Image data files recorded on the “Memory Stick”...
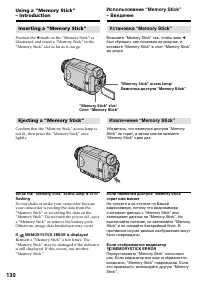
Страница 130 - Ejecting a “Memory Stick”; If; Возьмите “Memory Stick” так, чтобы знак; Извлечение “Memory Stick”; Если отображается индикатор
130 Inserting a “Memory Stick” Position the b mark on the “Memory Stick” as illustrated, and insert a “Memory Stick” in the“Memory Stick” slot as far as it can go. Ejecting a “Memory Stick” Confirm that the “Memory Stick” access lamp isnot lit, then press the “Memory Stick” oncelightly. While the “M...
Страница 131 - Using a touch panel
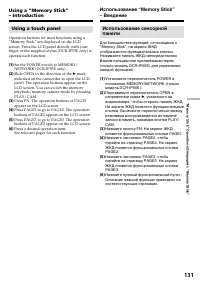
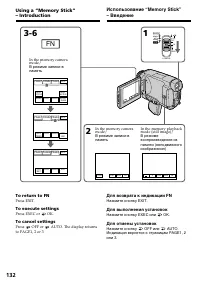
“ Memory Stick ” Operations/ Операции с “Memory Stick” 131 Using a touch panel Operation buttons for most functions using a“Memory Stick” are displayed on the LCDscreen. Press the LCD panel directly with yourfinger or the supplied stylus (DCR-IP55E only) tooperate each function. ( 1 ) Set the POWER ...
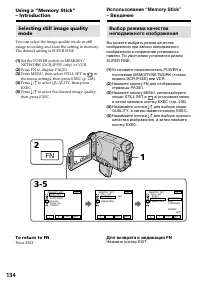
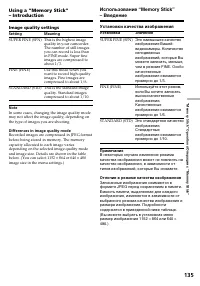
Страница 135 - Установки качества изображения; Установка; Количество; Image quality settings; Setting; SUPER FINE (SFN) This is the highest image
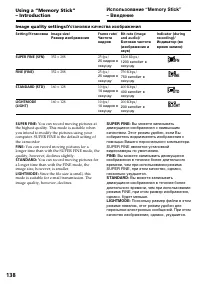
“ Memory Stick ” Operations/ Операции с “Memory Stick” 135 Using a “Memory Stick”– Introduction Использование “Memory Stick”– Введение Установки качества изображения Установка Значение SUPER FINE (SFN) Это наивысшее качествоизображения Вашейвидеокамеры. Количество неподвижныхизображений, которые Вым...
Страница 138 - Image quality settings/; SFN; Вы можете записывать
138 Image quality settings/ Установки качества изображения Setting/ Установка SUPER FINE (SFN) FINE (FINE) STANDARD (STD) LIGHTMODE(LIGHT) Image size/ Размер изображения 352 × 288 352 × 288 160 × 128 160 × 128 Frame rate/ Частотакадров 25 fps/ 25 кадров всекунду 25 fps/ 25 кадров всекунду 10 fps/ 10...
Страница 139 - Frame rate; Image quality mode; Частота кадров; Режим качества
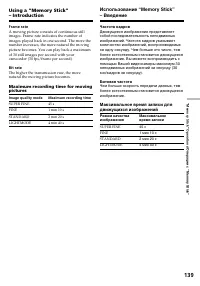
“ Memory Stick ” Operations/ Операции с “Memory Stick” 139 Using a “Memory Stick”– Introduction Frame rate A moving picture consists of continuous stillimages. Frame rate indicates the number ofimages played back in one second. The more thenumber increases, the more natural the movingpicture becomes...
Страница 140 - Selecting the size of still image
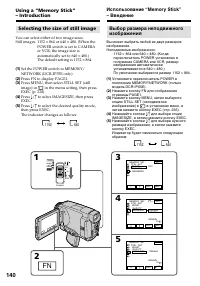
140 2 FN 3 4 5 1 MEMORY/ NET-WORK CAMERA (CHG) POWER OFF ON MODE VCR EXIT RET. EXEC 1152x864 REMAIN 23 MEMORY SET STILL SET BURST QUALITY IMAGESIZE EXIT RET. EXEC OFF MEMORY SET STILL SET BURST QUALITY IMAGE SIZE EXIT RET. EXEC 1152x864640x480 REMAIN 23 MEMORY SET STILL SET BURST QUALITY IMAGESIZE 1...
Страница 141 - 64 size are played back on other; Image size settings; Значение; Capacity of “Memory Stick”/; SUPER FINE; FINE; STANDARD; 64, изображение может быть; Установки размера изображения
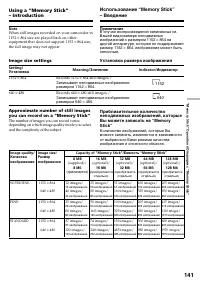
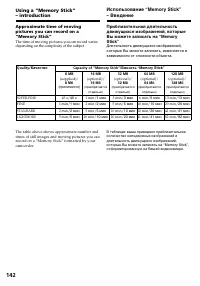
“ Memory Stick ” Operations/ Операции с “Memory Stick” 141 Note When still images recorded on your camcorder in1152 × 864 size are played back on other equipment that does not support 1152 × 864 size, the full image may not appear. Using a “Memory Stick”– Introduction Image size settings Setting/ Me...
Страница 143 - Insert a “Memory Stick” into your camcorder.; Approximate number of images can be; Вставьте “Memory Stick” в Вашу видеокамеру.
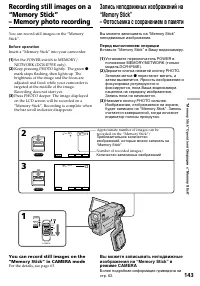
“ Memory Stick ” Operations/ Операции с “Memory Stick” 143 Recording still images on a“Memory Stick”– Memory photo recording You can record still images on the “MemoryStick”. Before operation Insert a “Memory Stick” into your camcorder. ( 1 ) Set the POWER switch to MEMORY/NETWORK (DCR-IP55E only). ...
Страница 144 - While you are recording a still image; You cannot turn off the power or press PHOTO.; When you press PHOTO lightly in step 2
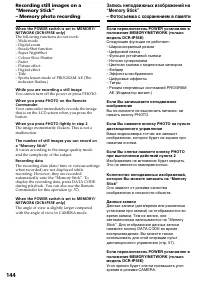
144 When the POWER switch is set to MEMORY/NETWORK (DCR-IP55E only) The following functions do not work:– Wide mode– Digital zoom– SteadyShot function– Super NightShot– Colour Slow Shutter– Fader– Picture effect– Digital effect– Title– Sports lesson mode of PROGRAM AE (The indicator flashes.) While ...
Страница 145 - Recording images continuously; EXP BRKTG; 80 с интервалом примерно в; Режим EXP BRKTG
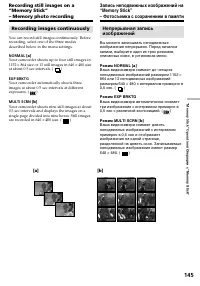
“ Memory Stick ” Operations/ Операции с “Memory Stick” 145 [a] [b] Recording images continuously You can record still images continuously. Beforerecording, select one of the three modesdescribed below in the menu settings. NORMAL [ a ] Your camcorder shoots up to four still images in1152 × 864 size ...
Страница 146 - If the “Memory Stick” becomes full
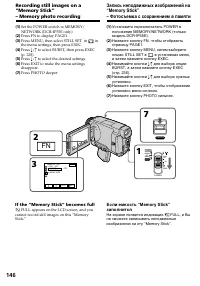
146 1 3 2 FN 7 PHOTO MEMORY/ NET-WORK CAMERA (CHG) POWER OFF ON MODE VCR MEMORY SET STILL SET BURST QUALITY IMAGE SIZE EXIT RET. EXEC OFF ( 1 ) Set the POWER switch to MEMORY/NETWORK (DCR-IP55E only). ( 2 ) Press FN to display PAGE1. ( 3 ) Press MENU, then select STILL SET in in the menu settings, t...
Страница 147 - During recording still images continuously; The flash does not work.; When selecting NORMAL
“ Memory Stick ” Operations/ Операции с “Memory Stick” 147 Recording still images on a“Memory Stick”– Memory photo recording The number of still images in continuousshooting The number of still images you can shootcontinuously varies depending on the image sizeand the capacity of the “Memory Stick.”...
Страница 150 - About HOLOGRAM AF; * HOLOGRAM AF satisfies Class 1(time base
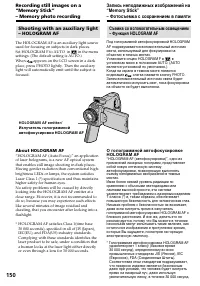
150 Recording still images on a“Memory Stick”– Memory photo recording Shooting with an auxiliary light– HOLOGRAM AF The HOLOGRAM AF is an auxiliary light sourceused for focusing on subjects in dark places.Set HOLOGRAM F to AUTO in in the menu settings. (The default setting is AUTO.)When appears on t...
Страница 152 - Press FN and select PAGE2.
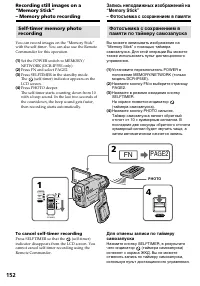
152 Self-timer memory photorecording You can record images on the “Memory Stick”with the self-timer. You can also use the RemoteCommander for this operation. ( 1 ) Set the POWER switch to MEMORY/NETWORK (DCR-IP55E only). ( 2 ) Press FN and select PAGE2. ( 3 ) Press SELFTIMER in the standby mode.The ...
Страница 154 - • Установите записанную кассету с лентой в
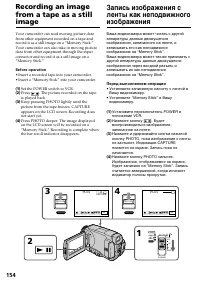
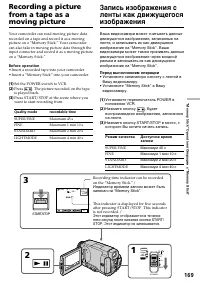
154 Recording an imagefrom a tape as a stillimage Your camcorder can read moving picture datafrom other equipment recorded on a tape andrecord it as a still image on a “Memory Stick.”Your camcorder can also take in moving picturedata from other equipment through the inputconnector and record it as a...
Страница 155 - Your camcorder stops momentarily.; Sound recorded on a tape; You cannot record audio from a tape.; Вы не можете записывать звук с ленты.; Титры, уже записанные на кассетах
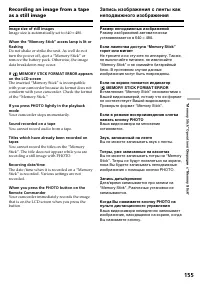
“ Memory Stick ” Operations/ Операции с “Memory Stick” 155 Recording an image from a tapeas a still image Image size of still images Image size is automatically set to 640 × 480. When the “Memory Stick” access lamp is lit orflashing Do not shake or strike the unit. As well do notturn the power off, ...
Страница 156 - Set DISPLAY in; Установите опцию DISPLAY в
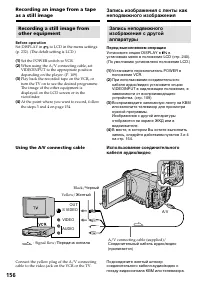
156 Recording an image from a tapeas a still image Recording a still image fromother equipment Before operation Set DISPLAY in to LCD in the menu settings (p. 232). (The defalt setting is LCD.) ( 1 ) Set the POWER switch to VCR. ( 2 ) When using the A/V connecting cable, setVIDEOINPUT to the appropr...
Страница 157 - If your TV or VCR has an S video jack; REC ERROR appears and recording cannot; REC ERROR, и запись не
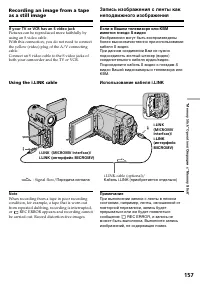
“ Memory Stick ” Operations/ Операции с “Memory Stick” 157 Recording an image from a tapeas a still image If your TV or VCR has an S video jack Pictures can be reproduced more faithfully byusing an S video cable.With this connection, you do not need to connectthe yellow (video) plug of the A/V conne...
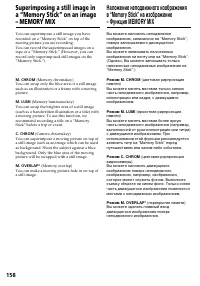
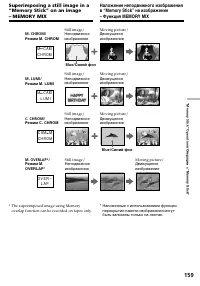
Страница 159 - Синий фон; * The superimposed image using Memory
“ Memory Stick ” Operations/ Операции с “Memory Stick” 159 M. CHROM/ Режим M. CHROM M C A M C H R O M C. CHROM/ Режим C. CHROM C A M M C H R O M M. LUMI/ Режим M. LUMI M C A M L U M I Still image/ Moving picture/ Неподвижное Движущееся изображение изображение Blue/ Синий фон Blue/ Синий фон * The su...
Страница 160 - images into your camcorder.
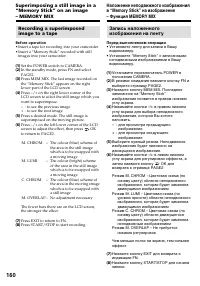
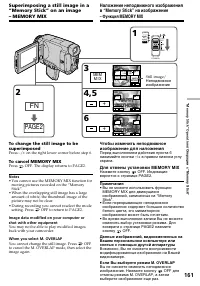
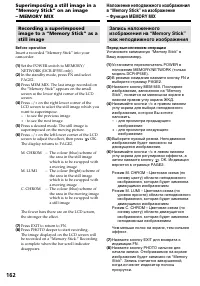
160 Recording a superimposedimage to a tape Before operation • Insert a tape for recording into your camcorder.• Insert a “Memory Stick” recorded with still images into your camcorder. ( 1 ) Set the POWER switch to CAMERA. ( 2 ) In the standby mode, press FN and selectPAGE2. ( 3 ) Press MEM MIX. The...
Страница 161 - MEM; To cancel MEMORY MIX; Для отмены установки MEMORY MIX
“ Memory Stick ” Operations/ Операции с “Memory Stick” 161 1 2 3 4,5 6 FN MEM M I X + + PAGE2 MEMORY/ NET-WORK CAMERA (CHG) POWER OFF ON MODE VCR + MEM MIX M C CAM LUMI OFF OK M C CAM CHROM CAM C M CHROM M. LUMI + MEM MIX OFF OK + M. LUMI + MEM MIX OFF OK + Still image/ Неподвижноеизображение Superi...
Страница 162 - изображения; The display returns to PAGE2.
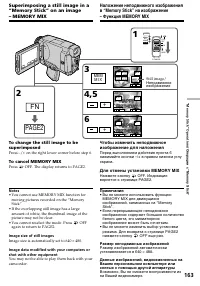
162 Superimposing a still image in a“Memory Stick” on an image– MEMORY MIX Наложение неподвижного изображенияв “Memory Stick” на изображение– Функция MEMORY MIX Запись наложенногоизображения на “Memory Stick”как неподвижного изображения Перед выполнением операции Установите записанную “Memory Stick”...
Страница 163 - • Вы не можете использовать функцию
“ Memory Stick ” Operations/ Операции с “Memory Stick” 163 1 2 3 4,5 6 FN MEM M I X + + PAGE2 MEMORY/ NET-WORK CAMERA (CHG) POWER OFF ON MODE VCR + MEM MIX M C CAM LUMI OFF OK M C CAM CHROM CAM C M CHROM M. LUMI + MEM MIX OFF OK + M. LUMI + MEM MIX OFF OK + Still image/ Неподвижноеизображение Superi...
Страница 164 - The PROGRAM AE does not work.; Sample images; Функция PROGRAM AE не работает.; Образцы изображений
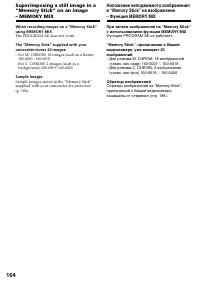
164 When recording images on a “Memory Stick”using MEMORY MIX The PROGRAM AE does not work. The “Memory Stick” supplied with yourcamcorder stores 20 images: – For M. CHROM: 18 images (such as a frame) 100-0001~100-0018 – For C. CHROM: 2 images (such as a background) 100-0019~100-0020 Sample images S...
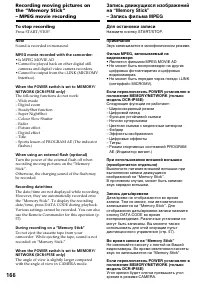
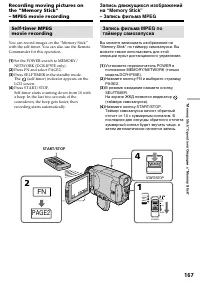
Страница 166 - To stop recording; Sound is recorded in monaural.; MPEG movie recorded with the camcorder:; cameras and digital video camera recorders.; During recording on a “Memory Stick”; Для остановки записи; Звук записывается в монофоническом режиме.; Во время записи на “Memory Stick”
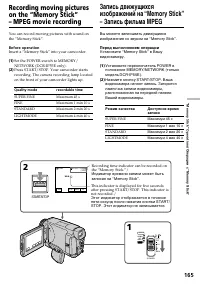
166 Recording moving pictures onthe “Memory Stick”– MPEG movie recording To stop recording Press START/STOP. Note Sound is recorded in monaural. MPEG movie recorded with the camcorder: • Is MPEG MOVIE AD• Cannot be played back on other digital still cameras and digital video camera recorders. • Cann...
Страница 171 - Желтый; Передача сигнала
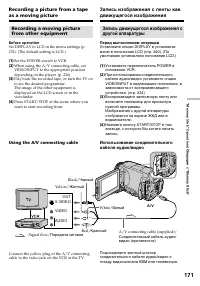
“ Memory Stick ” Operations/ Операции с “Memory Stick” 171 S VIDEO VIDEO AUDIO OUT A/V Recording a picture from a tapeas a moving picture Recording a moving picturefrom other equipment Before operation Set DISPLAY to LCD in the menu settings (p.232). (The default setting is LCD.) ( 1 ) Set the POWER...
Страница 173 - To stop memory photo playback; – when playing back image data shot with other; Нажмите кнопку PLAY или; – при воспроизведении данных изображений,
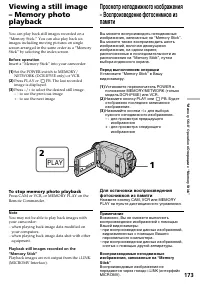
173 “ Memory Stick ” Operations/ Операции с “Memory Stick” Viewing a still image– Memory photoplayback You can play back still images recorded on a“Memory Stick.” You can also play back siximages including moving pictures on singlescreen arranged in the same order as a “MemoryStick” by selecting the...
Страница 175 - Recording data; Image number/Total number of recorded images/; is
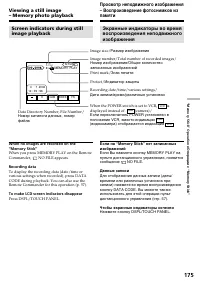
175 “ Memory Stick ” Operations/ Операции с “Memory Stick” 6/100 MEMORY PLAY 1152 4 7 2002 12 : 05 : 56 FN INDEX CAM + Screen indicators during stillimage playback When no images are recorded on the“Memory Stick” When you press MEMORY PLAY on the RemoteCommander, NO FILE appears. Recording data To d...
Страница 176 - Press the image you want to display.
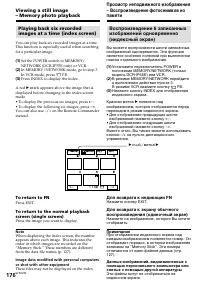
176 Viewing a still image– Memory photo playback Playing back six recordedimages at a time (index screen) You can play back six recorded images at a time.This function is especially useful when searchingfor a particular image. ( 1 ) Set the POWER switch to MEMORY/NETWORK (DCR-IP55E only) or VCR. ( 2...
Страница 177 - To pause MPEG movie playback
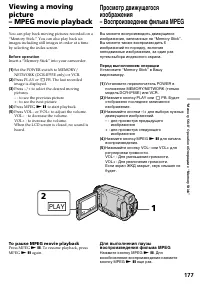
177 “ Memory Stick ” Operations/ Операции с “Memory Stick” You can play back moving pictures recorded on a“Memory Stick.” You can also play back siximages including still images in order at a timeby selecting the index screen. Before operation Insert a “Memory Stick” into your camcorder. ( 1 ) Set t...
Страница 178 - To change the screen size; Notes on the screen size; Для изменения размера экрана; Примечания по размеру экрана
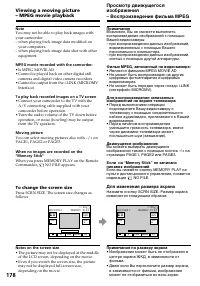
178 Viewing a moving picture– MPEG movie playback FN VOL + MPEG SCRN SIZE N X VOL INDEX CAM + MO V 1 0 0 0 1 M E MO R Y P L A Y 1 / 2 0 FN VOL + MPEG SCRN SIZE N X VOL INDEX CAM + MO V 1 0 0 0 1 M E MO R Y P L A Y 1 / 2 0 Note You may not be able to play back images withyour camcorder:– when playing...
Страница 179 - To make screen indicators disappear; Picture number/Total number of recorded pictures/
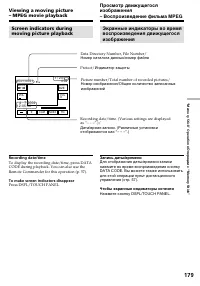
179 “ Memory Stick ” Operations/ Операции с “Memory Stick” Screen indicators duringmoving picture playback Recording date/time To display the recording date/time, press DATACODE during playback. You can also use theRemote Commander for this operation (p. 57). To make screen indicators disappear Pres...
Страница 181 - To stop copying in the middle; • Вы не можете копировать файлы фильмов; Во время копирования
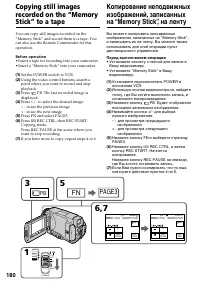
181 “ Memory Stick ” Operations/ Операции с “Memory Stick” Copying still images recorded onthe “Memory Stick” to a tape To stop copying in the middle Press on the LCD screen or STOP on the Remote Commander. Notes • You cannot copy MPEG movie files to the tape.• You cannot copy the index screen to th...
Страница 182 - Сторона “T”: Увеличивает масштаб
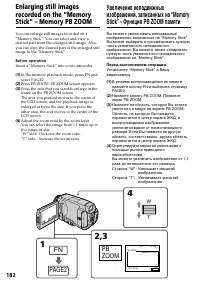
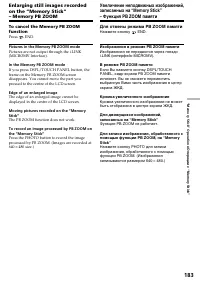
182 1 2,3 4 FN PBZOOM MEMORY PLAY 3/14 END 1 0 0 – 0 0 0 3 PB ZOOM W T PAGE2 1152 You can enlarge still images recorded on a“Memory Stick”. You can select and view adesired part from the enlarged still image. Also,you can copy the desired part of the enlarged stillimage to the “Memory Stick”. Before...
Страница 183 - Pictures in the Memory PB ZOOM mode; The PB ZOOM function does not work.; Для отмены режима PB ZOOM памяти; Изображения в режиме PB ZOOM памяти; Функция PB ZOOM не работает.
183 “ Memory Stick ” Operations/ Операции с “Memory Stick” Enlarging still images recordedon the “Memory Stick”– Memory PB ZOOM To cancel the Memory PB ZOOMfunction Press END. Pictures in the Memory PB ZOOM mode Pictures are not output through the i.LINK(MICROMV Interface). In the Memory PB ZOOM mod...
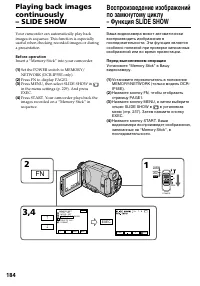
Страница 185 - To stop the slide show; To pause during a slide show; To view the recorded images on TV; Для остановки показа слайдов; Для паузы во время показа слайдов; Нажмите кнопку PAUSE.; Если на “Memory Stick” нет изображений; Появится индикация
185 “ Memory Stick ” Operations/ Операции с “Memory Stick” Playing back imagescontinuously – SLIDE SHOW To stop the slide show Press END. To pause during a slide show Press PAUSE. To return to FN Press END, then EXIT. To start the slide show from aparticular image Select the desired image using –/+ ...
Страница 186 - INDEX; MARK
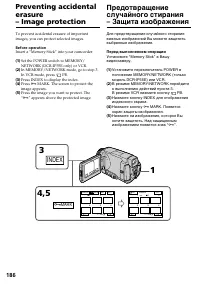
186 To prevent accidental erasure of importantimages, you can protect selected images. Before operation Insert a “Memory Stick” into your camcorder. ( 1 ) Set the POWER switch to MEMORY/NETWORK (DCR-IP55E only) or VCR. ( 2 ) In MEMORY/NETWORK mode, go to step 3.In VCR mode, press PB. ( 3 ) Press IND...
Страница 187 - You cannot carry out image protection.
187 “ Memory Stick ” Operations/ Операции с “Memory Stick” To return to FN Press EXIT. To cancel image protection Press the image you want to cancel imageprotection in step 5 again. The “ - ” disappears. Note Formatting erases all information on the“Memory Stick,” including the protected imagedata. ...
Страница 188 - Deleting selected images
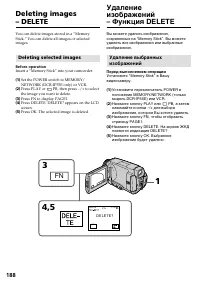
188 You can delete images stored in a “MemoryStick.” You can delete all images or selectedimages. Deleting selected images Before operation Insert a “Memory Stick” into your camcorder. ( 1 ) Set the POWER switch to MEMORY/NETWORK (DCR-IP55E only) or VCR. ( 2 ) Press PLAY or PB, then press –/+ to sel...
Страница 189 - Deleting images – DELETE; Press CANCEL in step 5.; • To delete a protected image, first cancel image; • Для удаления защищенного изображения
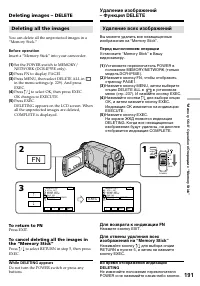
189 “ Memory Stick ” Operations/ Операции с “Memory Stick” Deleting images – DELETE To return to FN Press EXIT. To cancel deleting an image Press CANCEL in step 5. Notes • To delete a protected image, first cancel image protection. • Once you delete an image, you cannot restore it. Check the images ...
Страница 190 - DEL; Press CANCEL in step 6.
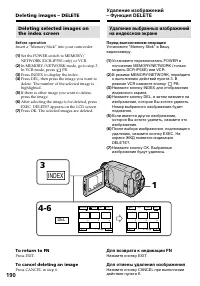
190 Deleting selected images onthe index screen Before operation Insert a “Memory Stick” into your camcorder. ( 1 ) Set the POWER switch to MEMORY/NETWORK (DCR-IP55E only) or VCR. ( 2 ) In MEMORY/NETWORK mode, go to step 3.In VCR mode, press PB. ( 3 ) Press INDEX to display the index. ( 4 ) Press DE...
Страница 191 - Deleting all the images; While DELETING appears; Удаление всех изображений; Нажимайте кнопку
191 “ Memory Stick ” Operations/ Операции с “Memory Stick” Deleting all the images You can delete all the unprotected images in a“Memory Stick.” Before operation Insert a “Memory Stick” into your camcorder. ( 1 ) Set the POWER switch to MEMORY/NETWORK (DCR-IP55E only). ( 2 ) Press FN to display PAGE...
Страница 193 - You cannot write print marks on still images.; Moving pictures; Движущиеся изображения
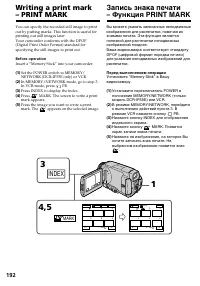
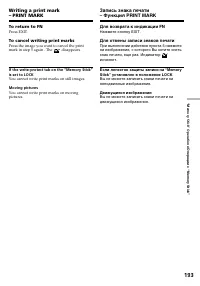
193 “ Memory Stick ” Operations/ Операции с “Memory Stick” To return to FN Press EXIT. To cancel writing print marks Press the image you want to cancel the printmark in step 5 again . The disappears. If the write-protect tab on the “Memory Stick”is set to LOCK You cannot write print marks on still i...
Страница 195 - Notes on using your computer; • “Memory Stick” operations on your camcorder; Software; • Depending on your application software, the; Communications with your computer; • Надлежащее функционирование “Memory; Программное обеспечение; • В зависимости от Вашего программного
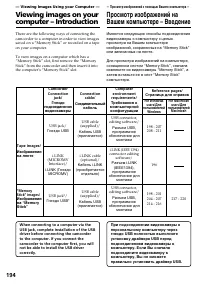
195 Viewing images using your computer/ Просмотр изображений с помощью Вашего компьютера Viewing images on yourcomputer – Introduction For details about your computer’s connectorsand editing software, contact the computermanufacturer. *When connecting to a computerwithout a USB jack Use an optional ...
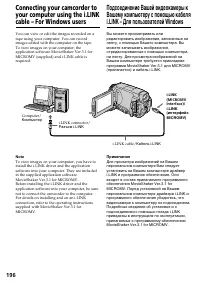
Страница 196 - Компьютер
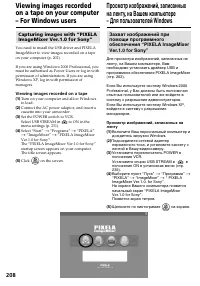
196 You can view or edit the images recorded on atape using your computer. You can recordimages edited with the computer on the tape.To view images on your computer, theapplication software MovieShaker Ver.3.1 forMICROMV (supplied) and i.LINK cable isrequired. Note To view images on your computer, y...
Страница 197 - Recommended Windows environment; 00 or larger screen size/; Центральный процессор:
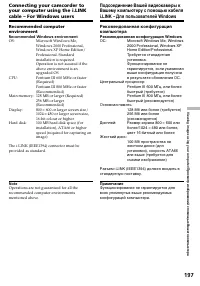
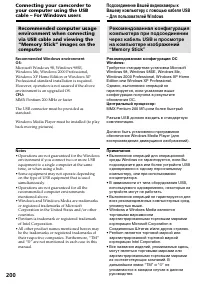
197 Viewing images using your computer/ Просмотр изображений с помощью Вашего компьютера Recommended computerenvironment Recommended Windows environment OS: Microsoft Windows Me,Windows 2000 Professional,Windows XP Home Edition/Professional. Standardinstallation is required.Operation is not assured ...
Страница 198 - You must; install a USB driver; onto your; установить драйвер USB; на Вашем
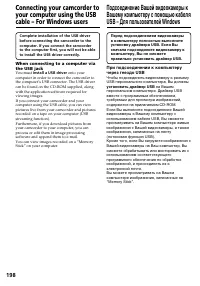
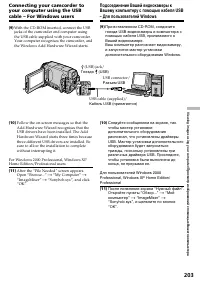
198 Connecting your camcorder toyour computer using the USBcable – For Windows users Complete installation of the USB driverbefore connecting the camcorder to thecomputer. If you connect the camcorderto the computer first, you will not be ableto install the USB driver correctly. When connecting to a...
Страница 199 - DirectX 8.0a or later; DirectX 8.0a или более поздняя версия; Акустическая система:; Видеокарта 4 Мб VRAM, минимум 800
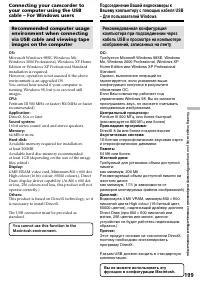
199 Viewing images using your computer/ Просмотр изображений с помощью Вашего компьютера Recommended computer usageenvironment when connectingvia USB cable and viewing tapeimages on the computer OS: Microsoft Windows 98SE, Windows Me,Windows 2000 Professional, Windows XP HomeEdition or Windows XP Pr...
Страница 201 - Installing the USB driver; Установка драйвера USB
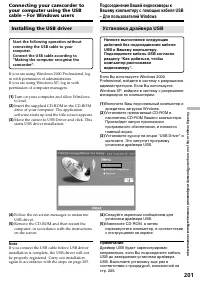
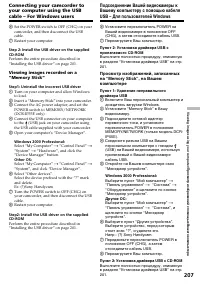
201 Viewing images using your computer/ Просмотр изображений с помощью Вашего компьютера Installing the USB driver Start the following operation withoutconnecting the USB cable to yourcomputer.Connect the USB cable according to“Making the computer recognise thecamcorder”. If you are using Windows 20...
Страница 203 - “My Computer”
203 Viewing images using your computer/ Просмотр изображений с помощью Вашего компьютера ( 9 ) With the CD-ROM inserted, connect the USBjacks of the camcorder and computer usingthe USB cable supplied with your camcorder.Your computer recognises the camcorder, andthe Windows Add Hardware Wizard start...
Страница 205 - Viewing images recorded on a tape; Step 1: Uninstall the incorrect USB driver
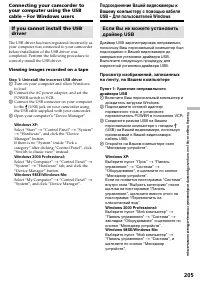
205 Viewing images using your computer/ Просмотр изображений с помощью Вашего компьютера If you cannot install the USBdriver The USB driver has been registered incorrectly asyour computer was connected to your camcorderbefore installation of the USB driver wascompleted. Perform the following procedu...
Страница 206 - Выберите и удалите подчеркнутые ниже
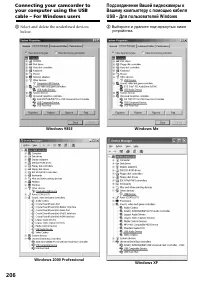
206 5 Select and delete the underlined devicesbelow. Windows 98SE Windows 2000 Professional Connecting your camcorder toyour computer using the USBcable – For Windows users Windows Me Windows XP Подсоединение Вашей видеокамеры кВашему компьютеру с помощью кабеляUSB – Для пользователей Windows 5 Выбе...
Страница 207 - Step1: Uninstall the incorrect USB driver
207 Viewing images using your computer/ Просмотр изображений с помощью Вашего компьютера 6 Set the POWER switch to OFF (CHG) on yourcamcorder, and then disconnect the USBcable. 7 Restart your computer. Step 2: Install the USB driver on the suppliedCD-ROM Perform the entire procedure described in“Ins...
Страница 209 - Select
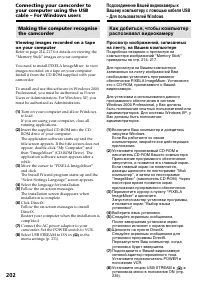
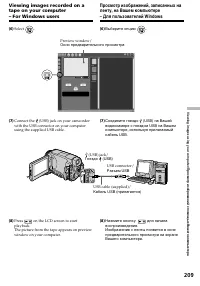
209 Viewing images using your computer/ Просмотр изображений с помощью Вашего компьютера ( 6 ) Select . ( 7 ) Connect the (USB) jack on your camcorderwith the USB connector on your computerusing the supplied USB cable. ( 8 ) Press on the LCD screen to start playback.The picture from the tape appears...
Страница 210 - to ON in the; Capturing still images; Ввод неподвижных изображений
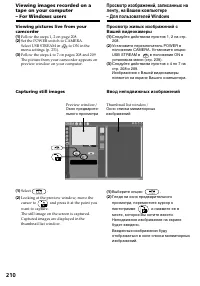
210 Viewing pictures live from yourcamcorder ( 1 ) Follow the steps 1, 2 on page 208. ( 2 ) Set the POWER switch to CAMERA.Select USB STREAM in to ON in the menu settings (p. 231). ( 3 ) Follow the steps 4 to 7 on pages 208 and 209.The picture from your camcorder appears onpreview window on your com...
Страница 211 - Capturing moving pictures; Ввод движущихся изображений
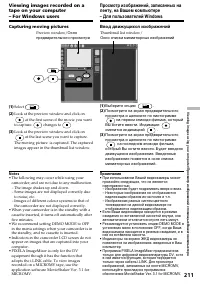
211 Viewing images using your computer/ Просмотр изображений с помощью Вашего компьютера Capturing moving pictures ( 1 ) Select . ( 2 ) Look at the preview window and click on at the first scene of the movie you want to capture. changes to . ( 3 ) Look at the preview window and click on at the last ...
Страница 213 - To close on-line help; Click; Note on using your computer; Щелкните на кнопке
213 Viewing images using your computer/ Просмотр изображений с помощью Вашего компьютера Seeing the on-line help (operatinginstructions) of “PIXELAImageMixer Ver.1.0 for Sony” A “PIXELA ImageMixer Ver.1.0 for Sony” on-linehelp site is available where you can find thedetailed operating method of “PIX...
Страница 214 - Viewing images; •You need to install the USB driver to view the; Просмотр изображений; • Для просмотра изображений “Memory Stick”
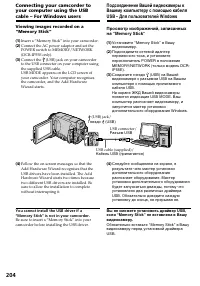
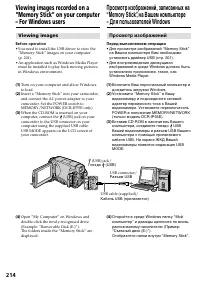
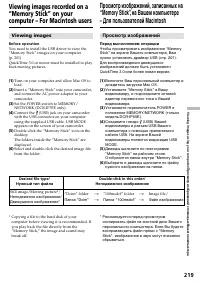
214 Viewing images Before operation •You need to install the USB driver to view the “Memory Stick” images on your computer(p. 201). • An application such as Windows Media Player must be installed to play back moving picturesin Windows environment. ( 1 ) Turn on your computer and allow Windowsto load...
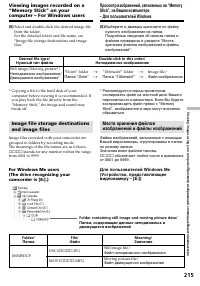
Страница 215 - Folder containing still image and moving picture data/; * Copying a file to the hard disk of your; Нужный тип файла; “Dcim” folder; Папка; ssss
215 Viewing images using your computer/ Просмотр изображений с помощью Вашего компьютера Folder containing still image and moving picture data/ Папка, содержащая данные неподвижных идвижущихся изображений Viewing images recorded on a“Memory Stick” on yourcomputer – For Windows users ( 5 ) Select and...
Страница 218 - Restart your computer.
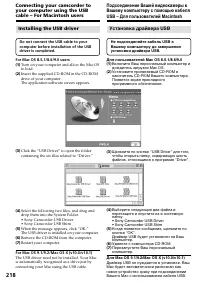
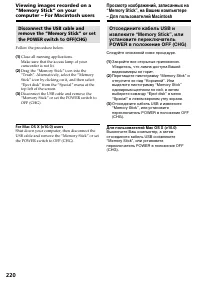
218 Installing the USB driver Do not connect the USB cable to yourcomputer before installation of the USBdriver is completed. For Mac OS 8.5.1/8.6/9.0 users( 1 ) Turn on your computer and allow the Mac OSto load. ( 2 ) Insert the supplied CD-ROM in the CD-ROMdrive of your computer.The application so...
Страница 219 - * Рекомендуется перед просмотром; Неподвижное изображение/
219 Viewing images using your computer/ Просмотр изображений с помощью Вашего компьютера Viewing images Before operation You need to install the USB driver to view the“Memory Stick” images on your computer.(p. 201)QuickTime 3.0 or newer must be installed to playback moving pictures. ( 1 ) Turn on yo...
Страница 221 - — Using the Network function —; Accessing the network; NETWORK; Лампочка; • The Bluetooth trademarks are owned by their; – только модель DCR-IP55E; – Использование сетевой функции –; • Торговые марки Bluetooth являются
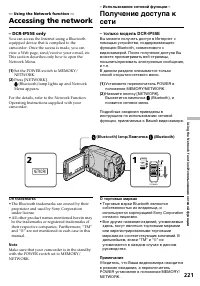
221 Using the Network function/ Использование сетевой функции – DCR-IP55E only You can access the Internet using a Bluetoothequipped device that is complied to thecamcorder. Once the access is made, you canview a Web page, send/receive your e-mail, etc.This section describes only how to open theNetw...
Страница 222 - After using the stylus; После использования пера; Получение доступа к сети
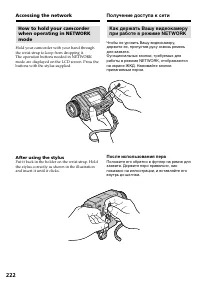
222 Accessing the network How to hold your camcorderwhen operating in NETWORKmode Hold your camcorder with your hand throughthe wrist strap to keep from dropping it.The operation buttons needed in NETWORKmode are displayed on the LCD screen. Press thebuttons with the stylus supplied. After using the...
Страница 223 - — Customising Your Camcorder —; — Выполнение индивидуальных установок на Вашей видеокамере —
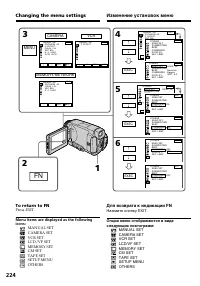
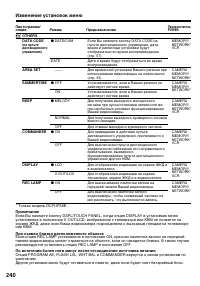
223 Customising Your Camcorder/ Выполнение индивидуальных установок на Вашей видеокамере — Customising Your Camcorder — Changing the menusettings To change the mode settings in the menusettings, press r / R to select the menu items. The default settings can be partially changed. First,select the ico...
Страница 233 - Выбор установок режима по каждой опции; является установкой по умолчанию.
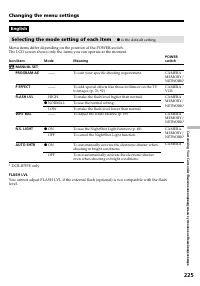
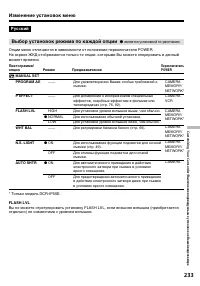
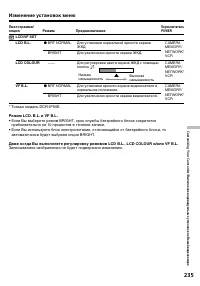
233 Customising Your Camcorder/ Выполнение индивидуальных установок на Вашей видеокамере Изменение установок меню Пиктограмма/опция MANUAL SET PROGRAM AE P EFFECT FLASH LVL WHT BAL N.S. LIGHT AUTO SHTR Режим —— —— HIGH z NORMAL LOW —— z ON OFF z ON OFF Предназначение Для удовлетворения Ваших особых ...
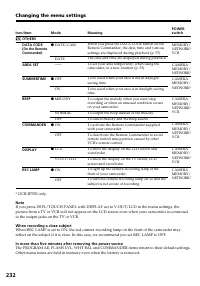
Страница 234 - Функция устойчивой съемки; Даже если опция STEADYSHOT установлена в положение ON.; В случае отмены функции устойчивой съемки; Появится индикатор выключенной функции устойчивой съемки; Функция NTSC PB
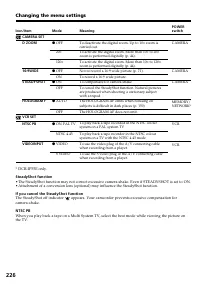
234 Изменение установок меню * Только модель DCR-IP55E. Функция устойчивой съемки • Функция устойчивой съемки может не компенсировать чрезмерную тряску видеокамеры. Даже если опция STEADYSHOT установлена в положение ON. • Присоединение преобразующего объектива (приобретается отдельно) может повлиять...
Страница 236 - Если Вы выберете опцию QUALITY
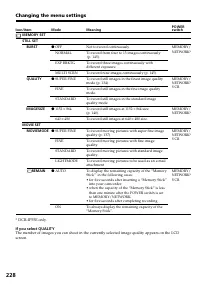
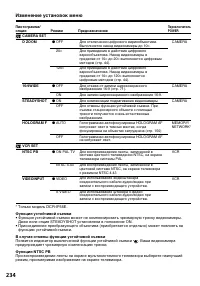
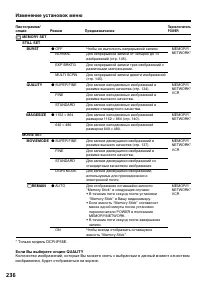
236 Изменение установок меню Пиктограмма/опция MEMORY SET STILL SET BURST QUALITY IMAGESIZE MOVIE SET MOVIEMODE REMAIN Режим z OFF NORMAL EXP BRKTG MULTI SCRN z SUPER FINE FINE STANDARD z 1152 × 864 640 × 480 z SUPER FINE FINE STANDARD LIGHTMODE z AUTO ON Предназначение Чтобы не выполнять непрерывно...
Страница 237 - Примечания о форматировании; отображении на дисплее индикации FORMATTING.
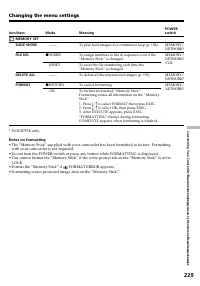
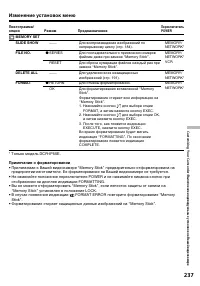
237 Customising Your Camcorder/ Выполнение индивидуальных установок на Вашей видеокамере Изменение установок меню Пиктограмма/опция MEMORY SET SLIDE SHOW FILE NO. DELETE ALL FORMAT Режим —— z SERIES RESET —— z RETURN OK Предназначение Для воспроизведения изображений понепрерывному циклу (стр. 184). ...
Страница 239 - FRANÇAIS; Только европейские модели; Примечания о режиме DEMO MODE; затем снова начнется примерно 10 минут спустя.
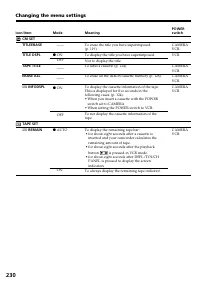
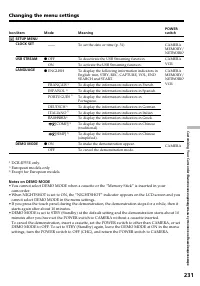
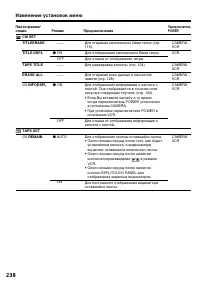
239 Customising Your Camcorder/ Выполнение индивидуальных установок на Вашей видеокамере Изменение установок меню Пиктограмма/опция SETUP MENUCLOCK SET USB STREAM LANGUAGE DEMO MODE Предназначение Для выполнения установки даты или времени(стр. 31). Для отключения потоковой функции USB. Для активизац...
Страница 251 - — Поиск и устранение неисправностей —; Разновидности неисправностей и методы их устранения; В режиме записи; Возможная неисправность
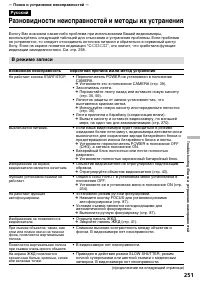
251 Troubleshooting/ Поиск и устранение неисправностей — Поиск и устранение неисправностей — Русский Разновидности неисправностей и методы их устранения Если у Вас возникла какая-либо проблема при использовании Вашей видеокамеры,воспользуйтесь следующей таблицей для отыскания и устранения проблемы. ...
Страница 253 - Титр не отображается.
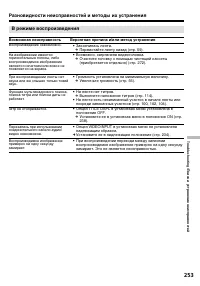
253 Troubleshooting/ Поиск и устранение неисправностей Разновидности неисправностей и методы их устранения В режиме воспроизведения Возможная неисправность Вероятная причина и/или метод устранения • Закончилась лента. c Перемотайте ленту назад (стр. 59). • Возможно, загрязнена видеоголовка. c Очисти...
Страница 254 - Мигают индикаторы
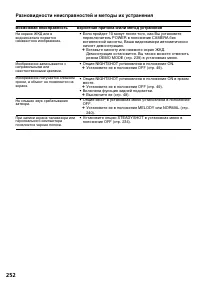
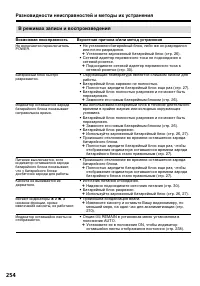
254 Разновидности неисправностей и методы их устранения В режимах записи и воспроизведения Возможная неисправность Вероятная причина и/или метод устранения • Не установлен батарейный блок, либо же он разрядился или почти разрядился. c Установите заряженный батарейный блок (стр. 26). • Сетевой адапте...
Страница 255 - Не функционирует запись.
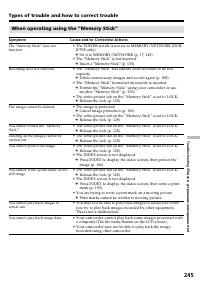
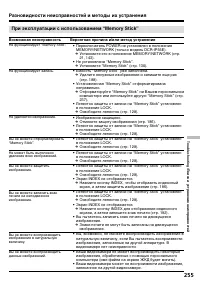
255 Troubleshooting/ Поиск и устранение неисправностей Разновидности неисправностей и методы их устранения При эксплуатации с использованием “Memory Stick” Возможная неисправность Вероятная причина и/или метод устранения • Переключатель POWER не установлен в положение MEMORY/NETWORK (только модель D...
Страница 256 - Не записывается титр.
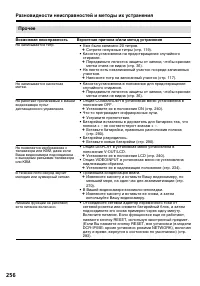
256 Разновидности неисправностей и методы их устранения Прочее Возможная неисправность Вероятная причина и/или метод устранения • Уже было записано 20 титров. c Сотрите ненужные титры (стр. 119). • Кассета установлена на предотвращение случайного стирания. c Передвиньте лепесток защиты от записи, чт...
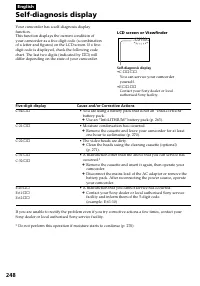
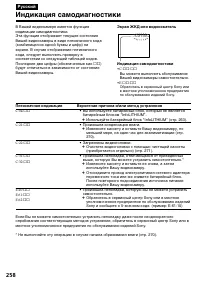
Страница 258 - Индикация самодиагностики; Пятизначная индикация; Экран ЖКД или видоискатель
258 C:21:00 Русский Индикация самодиагностики Пятизначная индикация Вероятная причина и/или метод устранения • Вы используете батарейный блок, который не является батарейным блоком “InfoLITHIUM”. c Используйте батарейный блок “InfoLITHIUM” (стр. 263). • Произошла конденсация влаги. c Извлеките кассе...
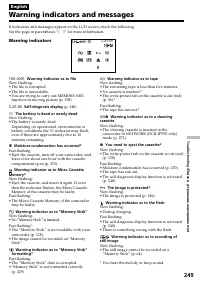
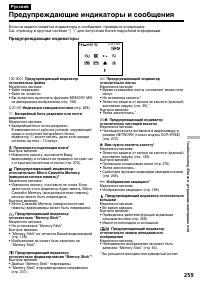
Страница 259 - Предупреждающие индикаторы и сообщения; Предупреждающие индикаторы
259 Troubleshooting/ Поиск и устранение неисправностей Русский Предупреждающие индикаторы и сообщения 100-0001 Предупреждающий индикатор относительно файла Медленное мигание:• Файл поврежден.• Файл не читается.• Вы пытаетесь выполнить функцию MEMORY MIX на движущемся изображении (стр. 158). C:21:00 ...
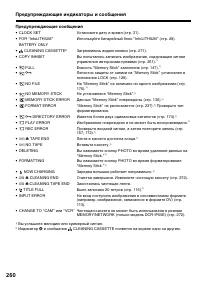
Страница 260 - Предупреждающие сообщения
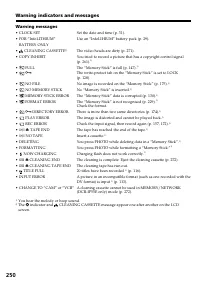
260 Предупреждающие индикаторы и сообщения Предупреждающие сообщения • CLOCK SET Установите дату и время (стр. 31). • FOR “InfoLITHIUM” Используйте батарейный блок “InfoLITHIUM” (стр. 29). BATTERY ONLY • CLEANING CASSETTE 2) Загрязнились видеоголовки (стр. 271). • COPY INHIBIT Вы попытались записать...
Страница 261 - — Additional Information —; Usable cassettes; Selecting cassette types; You can use; Playing back a NTSC-recorded tape; Copyright signal; When you play back; Выбор типов кассет; Сигнал авторского права; При воспроизведении; — Дополнительная информация —
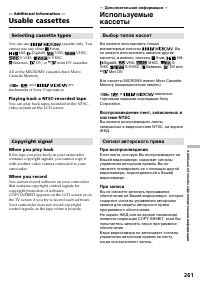
261 Additional Information/ Дополнительная информация — Additional Information — Usable cassettes Selecting cassette types You can use cassette only. You cannot use any other 8 mm, Hi8, Digital8, VHS, VHSC, S-VHS, S-VHSC, Betamax, DV, or mini DV cassettes. All of the MICROMV cassettes have MicroCass...
Страница 262 - so as not to cause; After using the MICROMV cassette; Reinsert the cassette.; Используемые кассеты; Вставьте кассету еще раз.
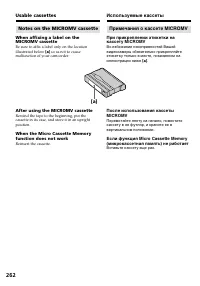
262 Usable cassettes [a] Notes on the MICROMV cassette When affixing a label on theMICROMV cassette Be sure to affix a label only on the locationillustrated below [ a ] so as not to cause malfunction of your camcorder. After using the MICROMV cassette Rewind the tape to the beginning, put thecassett...
Страница 263 - • Be sure to charge the battery pack before you; Effective use of the battery pack; • Battery pack performance decreases in low-; Зарядка батарейного блока; • Перед началом использования Вашей
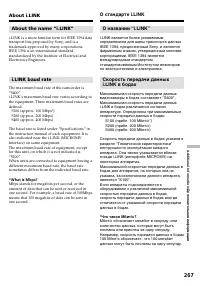
263 Additional Information/ Дополнительная информация About the“InfoLITHIUM” batterypack What is the “InfoLITHIUM” batterypack? The “InfoLITHIUM” battery pack is a lithium-ionbattery pack that has functions forcommunicating information related to operatingconditions between your camcorder.The “InfoL...
Страница 264 - Remaining battery time indicator; О батарейном блоке “InfoLITHIUM”
264 About the “InfoLITHIUM” batterypack • Frequently using the LCD panel or frequently operating playback, fast forward or rewindwears out the battery pack faster. Werecommend using the large capacity batterypack (NP-FF70, optional). • Be certain to turn the POWER switch to OFF (CHG) when not taking...
Страница 265 - How to store the battery pack; •If the battery pack is not used for a long time,; Battery life; • The battery life is limited. Battery capacity; Как хранить батарейный блок; • Если батарейный блок не используется; Срок службы батарейного блока; • Срок службы батарейного блока ограничен.
265 Additional Information/ Дополнительная информация About the “InfoLITHIUM” batterypack How to store the battery pack •If the battery pack is not used for a long time, do the following procedure once per year tomaintain proper function.1. Fully charge the battery.2. Discharge on your electronic eq...
Страница 267 - About the name “i.LINK”
267 Additional Information/ Дополнительная информация About i.LINK About the name “i.LINK” i.LINK is a more familiar term for IEEE 1394 datatransport bus proposed by Sony, and is atrademark approved by many corporations.IEEE 1394 is an international standardstandardized by the Institute of Electrica...
Страница 268 - Функции i.LINK на этом аппарате
268 i.LINK functions on this unit For details on how to dub when this unit isconnected to other video equipment havingi.LINK (MICROMV Interface), see pages 107 and112.This unit can also be connected to other i.LINK(MICROMV Interface) compatible equipmentmade by Sony (e.g. VAIO series personalcompute...
Страница 269 - Using your camcorder abroad; PAL system; Brazil; NTSC system; Бразилия; Система NTSC
269 Additional Information/ Дополнительная информация Using your camcorder abroad Countries and areas where you can use networkfunctions are restricted. For details, refer to theseparate network function operating instructions(DCR-IP55E only). You can use your camcorder in any country orarea with th...
Страница 270 - Moisture condensation; If moisture condensation occurred; Note on moisture condensation; Конденсация влаги; время будет мигать индикатор; Если произошла конденсация влаги; Примечание по конденсации влаги; – Вы вынесли Вашу видеокамеру из
270 Maintenanceinformation andprecautions Moisture condensation If your camcorder is brought directly from a coldplace to a warm place, moisture may condenseinside your camcorder, on the surface of the tape,or on the lens. In this condition, the tape maystick to the head drum and be damaged or yourc...
Страница 271 - How to prevent moisture condensation; Maintenance information; Cleaning the video head; indicator and; Как предотвратить конденсацию влаги; Очистка видеоголовок
271 Additional Information/ Дополнительная информация How to prevent moisture condensation When you bring your camcorder from a coldplace into a warm place, put your camcorder in aplastic bag and tightly seal it. Remove the bagwhen the air temperature inside the plastic baghas reached the surroundin...
Страница 272 - Using a cleaning cassette; To cancel cleaning; Cleaning the LCD screen; Использование чистящей кассеты; Видеоголовка; Очистка экрана ЖКД
272 Maintenance information andprecautions Using a cleaning cassette Follow the procedure below. ( 1 ) Set the POWER switch to CAMERA or VCR. ( 2 ) Insert the cleaning cassette. ( 3 ) Press OK. The message NOW CLEANINGappears.After the cleaning is finished, the message q Z CLEANING END appears. ( 4 ...
Страница 273 - about three months; if you do not use your; Charging the built-in rechargeable battery; • Connect your camcorder to the mains using the; примерно через три месяца; • Подсоедините Вашу видеокамеру к
273 Additional Information/ Дополнительная информация Maintenance information andprecautions Charging the built-inrechargeable battery Your camcorder is supplied with a built-inrechargeable battery installed so as to retain thedate and time, etc., regardless of the setting of thePOWER switch. The bu...
Страница 274 - Touch at the upper left corner.; • If you do not press the right spot, always
274 Maintenance information andprecautions CALIBRATE CALIBRATE CALIBRATE FN N X m M PB Ajusting the LCD screen(CALIBRATION) The buttons on the touch panel may not workcorrectly. If this happens, follow the procedurebelow. ( 1 ) Set the POWER switch to OFF (CHG). ( 2 ) Eject the tape from your camcor...
Страница 275 - Precautions; Camcorder operation; Меры предосторожности; Эксплуатация видеокамеры
275 Additional Information/ Дополнительная информация Precautions Camcorder operation • Operate your camcorder on 7.2 V (battery pack) or 8.4 V (AC adaptor). • For DC or AC operation, use the accessories recommended in this operating instructions. • If any solid object or liquid get inside the casin...
Страница 276 - Уход за видеокамерой
276 Camcorder care • Remove the tape, and periodically turn on the power, operate the CAMERA and VCR sectionsand play back a tape for about three minuteswhen your camcorder is not to be used for along time. • Clean the lens with a soft brush to remove dust. If there are fingerprints on the lens, rem...
Страница 277 - About care and storage of the lens; Батарейный блок
277 Additional Information/ Дополнительная информация About care and storage of the lens • Wipe the surface of the lens clean with a soft cloth in the following instance:– When there are fingerprints on the lens surface – In hot or humid locations– When the lens is used in environments such as the s...
Страница 278 - Notes on dry batteries; using them for a long time.; If batteries are leaking; • Wipe off the liquid in the battery compartment; Примечания о сухих батарейках; • Не используйте батарейки, в которых
278 Notes on dry batteries To avoid possible damage from battery leakageor corrosion, observe the following:• Be sure to insert the batteries with the + – polarities matched to the + – marks. • Dry batteries are not rechargeable.• Do not use a combination of new and old batteries. • Do not use diffe...
Страница 281 - Технические характеристики; Видеокамера
281 Additional Information/ Дополнительная информация Русский Технические характеристики Видеокамера Система Система видеозаписи 2 вращающиеся головкиСистема винтового сканирования Система аудиозаписи MPEG1 Audio Layer2 (частота48 кГц, стерео) Видеосигнал Цветовой сигнал PAL, стандартМККР Используем...
Страница 283 - Оперативный справочник; — Quick Reference —; Camcorder; — Оперативный справочник —
283 Quick Reference/ Оперативный справочник 1 2 89 4 3 5 67 q; — Quick Reference — Identifying the partsand controls 1 Lens cap (p. 39) 2 LCD screen/Touch panel (p. 37, 41, 131) 3 RESET button (p. 246) 4 DC IN jack (p. 27) 5 FOCUS button (p. 87) 6 BACK LIGHT button (p. 48) 7 DSPL (DISPLAY)/TOUCH PAN...
Страница 284 - Identifying the parts and controls; LCD BACKLIGHT switch; qd; Переключатель LCD BACKLIGHT
284 Identifying the parts and controls qa BATT (battery) RELEASE lever (p. 26) qs (USB) jack (p. 194) qd A/V jack (p. 61, 105, 110, 171) qf (LANC) jack LANC stands for Local Application ControlBus System. The control jack is used forcontrolling the tape transport of videoequipment and other peripher...
Страница 285 - * MTF is an abbreviation of Modulation; Примечание об объективе Карл Цейсс
285 Quick Reference/ Оперативный справочник qj Flash (p. 65, 148) qk Focus ring (p. 87) ql Lens w; Camera recording lamp (p. 39) wa Infrared rays (Nightshot Light) emitter (p. 49) ws Remote sensor wd OPEN button (p. 39) wf (Bluetooth) lamp (DCR-IP55E only) (p. 221) wg HOLOGRAM AF emitter (p. 150) qj...
Страница 286 - Переключатель NIGHTSHOT
286 wh es ed ef wj wk wl e; ea wh COLOUR SLOW S/SUPER NIGHTSHOTbutton (p. 49) wj NIGHTSHOT switch (p. 49) wk Battery or flash CHG (charge) lamp (p. 27, 65, 148) wl (flash) button (p. 65, 148) e; POWER switch (p. 12) ea CAMERA lamp (p. 12) es “Memory Stick” access lamp (p. 130) ed VCR lamp (p. 12) ef...
Страница 287 - eh; eg
287 Quick Reference/ Оперативный справочник Identifying the parts and controls eg “Memory Stick” slot (p. 130) eh Cassette lid (p. 35) ej Grip (p. 13) ek Tripod receptacle Make sure that the length of the tripod screwis less than 5.5 mm (7/32 inch). Otherwise,you cannot attach the tripod securely an...
Страница 288 - Кнопка PHOTO
288 rs rh rj rk rl rd rf rg rs Viewfinder lens adjustment lever (p. 43) rd PHOTO button (p. 63, 146) rf Stylus holder (DCR-IP55E only) (p. 222) rg Wrist strap (p. 14, 16) rh Power zoom lever (p. 44) rj START/STOP button (p. 39) rk Microphone rl Battery pack or battery terminal cover (p. 26) How to a...
Страница 289 - Remote Commander; qa; qa
289 Quick Reference/ Оперативный справочник Remote Commander The buttons that have the same name on theRemote Commander as on your camcorderfunction identically to the buttons on yourcamcorder. qa 4 3 2 1 9 q; 8 7 6 5 1 PHOTO button (p. 64, 68, 152) 2 DISPLAY button (p. 57) 3 MEMORY control buttons ...
Страница 290 - To prepare the Remote Commander; • Point the remote sensor away from strong light; Пульт дистанционного управления; • Направляйте датчик дистанционного
290 To prepare the Remote Commander Insert two R6 (size AA) batteries by matching the+ and – polarities on the batteries to the + –marks inside the battery compartment. Remote Commander • Point the remote sensor away from strong light sources such as direct sunlight or overheadlighting. Otherwise, t...
Страница 291 - Operation indicators; LCD screen and viewfinder; Рабочие индикаторы; Экран ЖКД и видоискатель
291 Quick Reference/ Оперативный справочник 1 2 0 m i n S T B Y 0 : 1 2 : 3 4 – + 1 2 m i n S T I L L E N D 1 6 : 9 W I D E S E A R C H N E G . A R T A U T O 5 0 A W B M P E G I N F 1. 8 9 d B 1 0 0 – 0 0 0 1 6 5 4 3 2 1 90qa w; ql qk qf 7 8 qgqh qd wa wd ws qj qs Operation indicators 1 Micro Casset...
Страница 294 - Алфавитный указатель
294 Русский Алфавитный указатель А, Б, В, Г Автоматическое уменьшение эффекта красных глаз .......... ..................................... 65, 148 Баланс белого. ...................... 69Батарейный блок. ................. 26Батарейный блок “InfoLITHIUM”. ............. 29, 263 Введение/выведение ......
Страница 296 - Sony Corporation
Sony Corporation Printed in Japan Изготовитель: Сони КорпорейшнАдрес: 6-7-35 Киташинагава,Шинагава-ку, Токио 141-0001, ЯпонияСтрана-производитель: Япония Printed on recycled paper.Printed using VOC (Volatile OrganicCompound)-free vegetable oil based ink. Напечатано на бумаге, изготовленнойпутем втор...