Страница 2 - En g l i sh; camcorder. With your Handycam; W ARNING; Русский; ПРЕДУПРЕЖДЕНИЕ
2 En g l i sh We l co m e ! Congratulations on your purchase of this SonyHandycam ® camcorder. With your Handycam you can capture life’s precious moments withsuperior picture and sound quality.Your Handycam is loaded with advancedfeatures, but at the same time it is very easy touse. You will soon be...
Страница 4 - Оглавление
4 Оглавление Перед начлом эксплуатации Использование данного руководства ........... 5Проверка прилагаемых принадлежностей .. 7 Подготовка к эксплуатации Зарядка и установка батарейного блока ..... 8Вставка кассеты ........................................... 12 Основные операции Запись с помощью вид...
Страница 5 - in the illustrations, you can; Type of dif f erences; M odel number; N o t e o n TV co l o u r sy st e m s; Типы различий; Usi n g t h i s m a n u a l
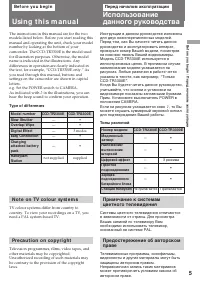
5 B efore you begin / Перед началом эксплуатации The instructions in this manual are for the twomodels listed below. Before you start reading thismanual and operating the unit, check your modelnumber by looking at the bottom of yourcamcorder. The CCD-TR3300E is the model usedfor illustration purpose...
Страница 6 - Pr e ca u t i o n s o n ca m co r d e r ca r e; • Do not let sand get int o t he camcorder.
6 Usi n g t h i s m a n u a l Pr e ca u t i o n s o n ca m co r d e r ca r e • Do not let sand get int o t he camcorder. W hen you use t he camcorder on a sandybeach or in a dust y place, prot ect it f rom t hesand or dust . Sand or dust may cause t heunit t o malf unct ion, and somet imes t hismalf...
Страница 7 - Батарейный блок NP-F530
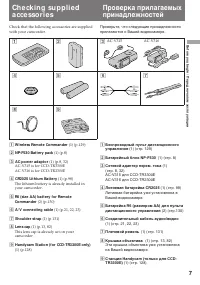
7 B efore you begin / Перед началом эксплуатации Check that the following accessories are suppliedwith your camcorder. 1 W ireless Remot e Commander (1) (p.129) 2 NP-F530 Bat t ery pack (1) (p.8) 3 AC pow er adapt or (1) (p.8, 32) AC-V315 is for CCD-TR3300EAC-V316 is for CCD-TR2300E 4 CR2025 Lit hiu...
Страница 8 - Ch a r g i n g t h e b a t t e r y p a ck; Connect the mains lead to mains.; normal charge; Ge t t i n g st a r t e d; Зарядка батарейного блока; нормальная зарядка
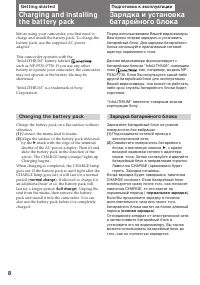
8 Before using your camcorder, you first need tocharge and install the battery pack. To charge thebattery pack, use the supplied AC poweradaptor. This camcorder operates with the“InfoLITHIUM” battery labeled such as NP-F530/F730. If you use any otherbattery to operate your camcorder, the camcorderma...
Страница 9 - Ch a r g i n g t i m e; Ba t t e r y l i f e; Bat t ery pack; Время зарядки; Батарейный блок; Срок службы заряда батарейного блока
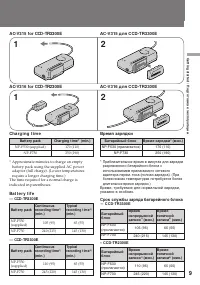
9 G etting s tarted / Подготовка к эксплуатации 2 1 Ch a r g i n g t i m e Bat t ery pack Charging t ime* (min.) NP-F530 (supplied) 170 (110) NP-F730 250 (190) * Approximate minutes to charge an empty battery pack using the supplied AC poweradaptor (full charge). (Lower temperaturesrequire a longer ...
Страница 10 - To r e m o v e t h e b a t t e r y p a ck; ) Приблизительное время в минутах при; Для снятия батарейного блока; Примечания к зарядке батарейного блока; • Лампочка CHARGE остается горящей на; Not es on charging t he bat t ery pack
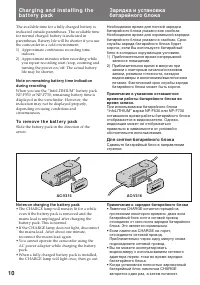
10 Ch a r g i n g a n d i n st a l l i n g t h eb a t t e r y p a ck The available time for a fully charged battery isindicated outside parentheses. The available timefor normal charged battery is indicated inparentheses. Battery life will be shorter if you usethe camcorder in a cold environment.1) ...
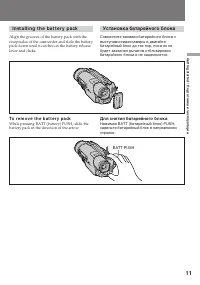
Страница 11 - I n st a l l i n g t h e b a t t e r y p a ck; Установка батарейного блока; BATT PUSH
11 G etting s tarted / Подготовка к эксплуатации I n st a l l i n g t h e b a t t e r y p a ck Align the grooves of the battery pack with thereceptacles of the camcorder and slide the batterypack down until it catches on the battery releaselever and clicks. To r e m o v e t h e b a t t e r y p a ck ...
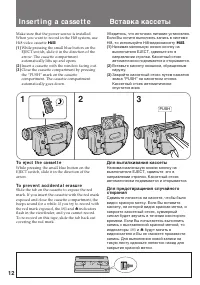
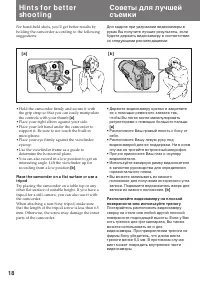
Страница 12 - I n se r t i n g a ca sse t t e; Insert a cassette with the window facing out.; To e j e ct t h e ca sse t t e; and; Вставка кассеты; Для выталкивания кассеты; будут мигать в
12 I n se r t i n g a ca sse t t e Make sure that the power source is installed.When you want to record in the Hi8 system, useHi8 video cassette H . (1 ) While pressing the small blue button on theEJECT switch, slide it in the direction of thearrow. The cassette compartmentautomatically lifts up and...
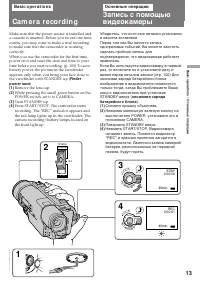
Страница 13 - Ca m e r a re co rd i n g; Finder; Основные операции; экономия заряда; Снимите крышку объектива.
13 B asic operat ions / Основные операции Ca m e r a re co rd i n g Make sure that the power source is installed anda cassette is inserted. Before you record one-timeevents, you may want to make a trial recordingto make sure that the camcorder is workingcorrectly.When you use the camcorder for the f...
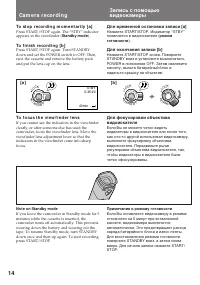
Страница 14 - To st o p r e co r d i n g m o m e n t a r i l y [ a ]; St andby mode; To f o cu s t h e v i e w f i n d e r l e n s; Not e on St andby mode; Ca m e r a r e co r d i n g; режим
14 To st o p r e co r d i n g m o m e n t a r i l y [ a ] Press START/STOP again. The “STBY” indicatorappears in the viewfinder ( St andby mode ). To f i n i sh r e co r d i n g [ b ] Press START/STOP again. Turn STANDBYdown and set the POWER switch to OFF. Then,eject the cassette and remove the bat...
Страница 15 - Not es on recording mode; • Данная видеокамера записывает и; Примечание к записи; • Счетчик ленты указывает время записи
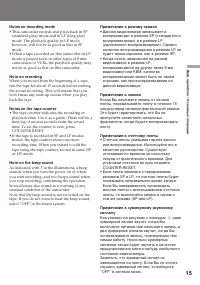
15 B asic operat ions / Основные операции Not es on recording mode • This camcorder records and plays back in SP (standard play) mode and in LP (long play)mode. The playback quality in LP mode,however, will not be as good as that in SPmode. • When a tape recorded on this camcorder in LP mode is play...
Страница 16 - Not es on f inder pow er save; • The recording continues even when the picture; Usi n g t h e zo o m f e a t u r e; • Запись продолжается, даже если
16 Ca m e r a r e co r d i n g Not es on f inder pow er save • The recording continues even when the picture in the viewfinder disappears during recording. • If you set VF PW-SAVE to OFF in the menu system, the picture in the viewfinder does notdisappear even when you turn your face awayfrom the vie...
Страница 17 - Not es on digit al zoom; • Трансфокатор более, чем 21х создан в
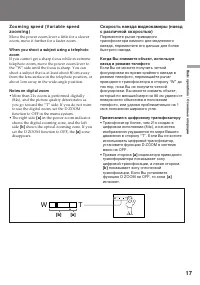
17 B asic operat ions / Основные операции Zo o m i n g sp e e d ( V a r i a b l e sp e e dzo o m i n g ) Move the power zoom lever a little for a slowerzoom, move it further for a faster zoom. W hen you shoot a subject using a t elephot ozoom If you cannot get a sharp focus while in extremetelephoto...
Страница 19 - If you w ear glasses
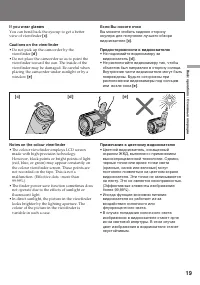
19 B asic operat ions / Основные операции [ c] [ e ] [ d ] If you w ear glasses You can bend back the eyecup to get a betterview of viewfinder [c] . Caut ions on t he view f inder • Do not pick up the camcorder by the viewfinder [d ] . • Do not place the camcorder so as to point the viewfinder towar...
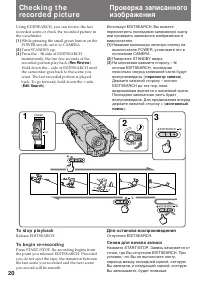
Страница 20 - Rec Review; To st o p p l a y b a ck; Поверните STANDBY вверх.; пересмотр записи; Для останова воспроизведения; Отпустите EDITSEARCH.; Снова для начала записи
20 Using EDITSEARCH, you can review the lastrecorded scene or check the recorded picture inthe viewfinder. (1 ) While pressing the small green button on thePOWER switch, set it to CAMERA. (2 ) Turn STANDBY up. (3 ) Press the РΠside of EDITSEARCH momentarily; the last few seconds of therecorded por...
Страница 21 - TV
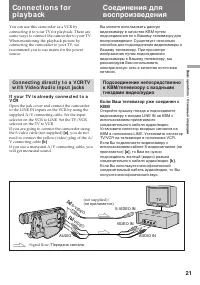
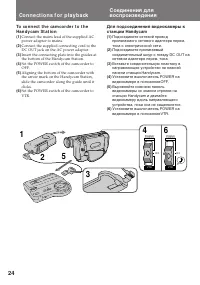
21 B asic operat ions / Основные операции Co n n e ct i o n s f o rp l a y b a ck You can use this camcorder as a VCR byconnecting it to your TV for playback. There aresome ways to connect the camcorder to your TV.When monitoring the playback picture byconnecting the camcorder to your TV, werecommen...
Страница 22 - Co n n e ct i o n s f o r p l a y b a ck; I f y o u co n n e ct d i r e ct l y t o TV
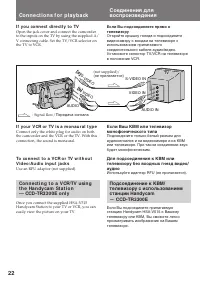
22 Co n n e ct i o n s f o r p l a y b a ck I f y o u co n n e ct d i r e ct l y t o TV Open the jack cover and connect the camcorderto the inputs on the TV by using the supplied A/V connecting cable. Set the TV/VCR selector onthe TV to VCR. I f y o u r V CR o r TV i s a m o n a u r a l t y p e Conn...
Страница 23 - D I O; Передача сигнала
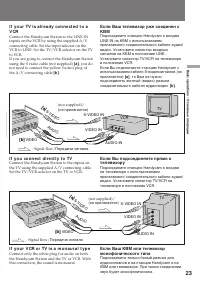
23 B asic operat ions / Основные операции I f y o u r TV i s a l r e a d y co n n e ct e d t o aV CR Connect the Handycam Station to the LINE INinputs on the VCR by using the supplied A/Vconnecting cable. Set the input selector on theVCR to LINE. Set the TV/VCR selector on the TVto VCR.If you are go...
Страница 25 - Caut ion; Press RELEASE on the Handycam Station.; Предостережение; Нажмите RELEASE на станции Handycam.
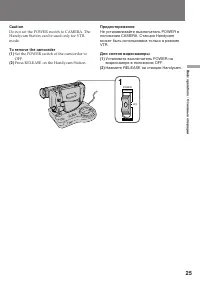
25 B asic operat ions / Основные операции Caut ion Do not set the POWER switch to CAMERA. TheHandycam Station can be used only for VTRmode. To remove t he camcorder(1 ) Set the POWER switch of the camcorder toOFF. (2 ) Press RELEASE on the Handycam Station. Предостережение Не устанавливайте выключат...
Страница 26 - Pl a y i n g b a ck a t a p e; Press; To st op playback; Usi n g t h e r e m o t e co m m a n d e r; Нажмите; Для останова воспроизведения,; Для ускоренной перемотки ленты назад,; нажмите; Для ускоренной перемотки ленты вперед,; нажмите
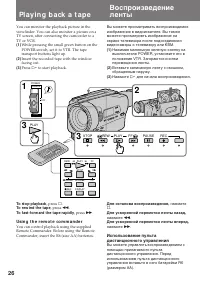
26 Pl a y i n g b a ck a t a p e You can monitor the playback picture in theviewfinder. You can also monitor a picture on aTV screen, after connecting the camcorder to aTV or VCR. (1) While pressing the small green button on thePOWER switch, set it to VTR. The tapetransport buttons light up. (2) Ins...
Страница 27 - V a r i o u s p l a y b a ck m o d e s; To l o ca t e a sce n e ( p i ct u r e se a r ch )
27 B asic operat ions / Основные операции Usi n g t h e Ha n d y ca m St a t i o n— CCD -TR3 3 0 0 E o n l y You can control playback using the buttons andshuttle ring on the Handycam Station. To use theshuttle ring, turn the shuttle ring clockwise orcounterclockwise to point the desired indicationa...
Страница 28 - To v i e w t h e p i ct u r e a t d o u b l e sp e e d; Not es on playback; Воспроизведение ленты; Для выбора воспроизводимого звука; Примечания к воспроизведению
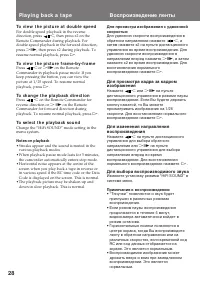
28 Pl a y i n g b a ck a t a p e To v i e w t h e p i ct u r e a t d o u b l e sp e e d For double speed playback in the reversedirection, press < , then press x2 on the Remote Commander during playback. Fordouble speed playback in the forward direction,press >7 , then press x2 during playback...
Страница 29 - Для отображения даты Вашей записи; DATA CODE
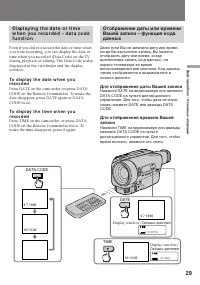
29 B asic operat ions / Основные операции Отображение даты или времениВашей записи – функция кодаданных Даже если Вы не записали дату или время,когда Вы выполняли запись, Вы можетеотобразить дату или время, когдавыполнялась запись (код данных), наэкране телевизора во времявоспроизведения или монтажа...
Страница 30 - Если появляются черточки
30 Если появляются черточки (––:––:––) • Воспроизводится незаписанная часть ленты. • Лента была записана на видеокамере без функции кода данных. • Лента была записана на видеокамере без установки даты и времени. • Лента не может быть воспроизведена из-за повреждения ленты или помех. • Лента была зап...
Страница 31 - Усовершенствованные операции; Place; Not e on pow er sources; A d v a n ce d o p e r a t i o n s; Место; Примечание по источникам питания; Accessory t o be used
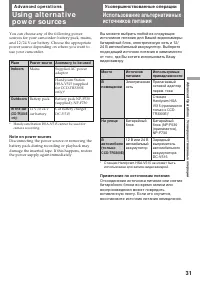
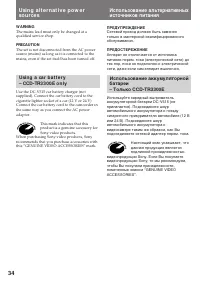
31 Advanc ed Operat ions / Усовершенствованные операции Усовершенствованные операции Usi n g a l t e r n a t i v ep o w e r so u rce s You can choose any of the following powersources for your camcorder: battery pack, mains,and 12/24 V car battery. Choose the appropriatepower source depending on whe...
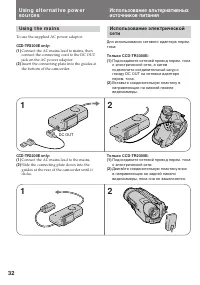
Страница 32 - Usi n g t h e m a i n s; To use the supplied AC power adaptor:
32 Использование электрическойсети Для использования сетевого адаптера перем.тока: Только CCD-TR3300E: (1) Подсоедините сетеовй провод перем. токак электрической сети, а затемподключите соединительный шнур кгнезду DC OUT на сетевом адаптереперем. тока. (2) Вставьте соединительную пластину внаправляю...
Страница 33 - • Charging two battery packs at the same time; Not es on t he VTR/ CAM ERA lamp; • The VTR/CAMERA lamp will remain lit for a; To remove t he connect ing plat e; • Зарядка двух батарейных блоков; Примечания к лампочке VTR/CAMERA; • Лампочка VTR/CAMERA будет оставаться; Для снятия соединительной пластины
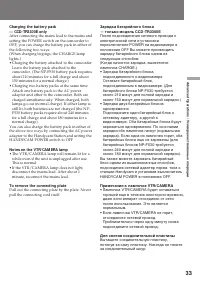
33 Advanc ed Operat ions / Усовершенствованные операции Charging t he bat t ery pack— CCD-TR3300E only After connecting the mains lead to the mains andsetting the POWER switch on the camcorder toOFF, you can charge the battery pack in either ofthe following two ways:(When charging begings, the CHARG...
Страница 35 - Press MENU to display the menu.
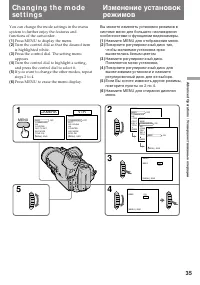
35 Advanc ed Operat ions / Усовершенствованные операции Ch a n g i n g t h e m o d ese t t i n g s You can change the mode settings in the menusystem to further enjoy the features andfunctions of the camcorder. (1 ) Press MENU to display the menu. (2 ) Turn the control dial so that the desired itemi...
Страница 36 - Ch a n g i n g t h e m o d e se t t i n g s; I t e m s f o r CA M ERA m o d e o n l y
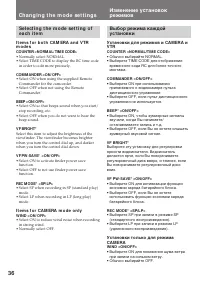
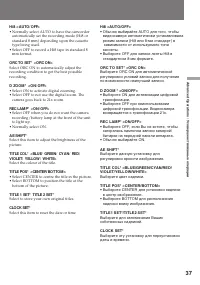
36 Ch a n g i n g t h e m o d e se t t i n g s Изменение установокрежимов Se l e ct i n g t h e m o d e se t t i n g o fe a ch i t e m I t e m s f o r b o t h CA M ERA a n d V TRm o d e s COUNTER <NORM AL/ TIM E CODE> • Normally select NORMAL.• Select TIME CODE to display the RC time code in o...
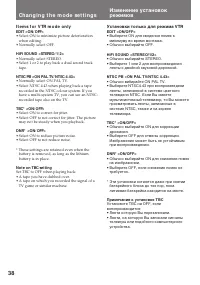
Страница 38 - I t e m s f o r V TR m o d e o n l y; • Select ON to minimize picture deterioration; Not e on TBC set t ing; TV game or similar machine.; Установки только для режима VTR; Примечания к установке ТВС
38 I t e m s f o r V TR m o d e o n l y EDIT <ON/ OFF> • Select ON to minimize picture deterioration when editing. • Normally select OFF. HiFi SOUND <STEREO/ 1/ 2> • Normally select STEREO.• Select 1 or 2 to play back a dual sound track tape. NTSC PB <ON PAL TV/ NTSC 4.43> • Normal...
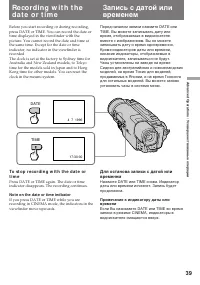
Страница 39 - Not e on t he dat e or t ime indicat or
39 Advanc ed Operat ions / Усовершенствованные операции Re co rd i n g w i t h t h ed a t e o r t i m e Before you start recording or during recording,press DATE or TIME. You can record the date ortime displayed in the viewfinder with thepicture. You cannot record the date and time atthe same time. ...
Страница 40 - FADER
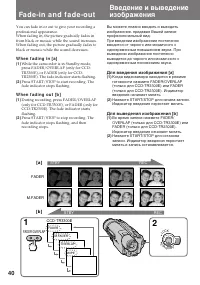
40 You can fade in or out to give your recording aprofessional appearance.When fading in, the picture gradually fades infrom black or mosaic while the sound increases.When fading out, the picture gradually fades toblack or mosaic while the sound decreases. W h e n f a d i n g i n [ a ] (1 ) While th...
Страница 41 - W hen t he dat e or t ime indicat or is displayed
41 Advanc ed Operat ions / Усовершенствованные операции Not e on f ade indicat or— CCD-TR2300E only Each time you press FADER, the fade indicatorchanges: FADER n M.FADER n no indicator, cyclically. To ca n ce l t h e f a d e -i n /f a d e -o u tf u n ct i o n Before pressing START/STOP, press FADER/...
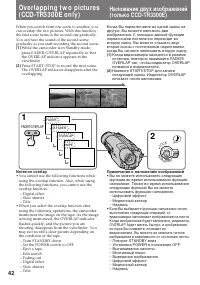
Страница 42 - Not es on overlap; • You cannot use the following functions while; Примечания к наложению изображений; • Вы не можете использовать следующие
42 Ov e r l a p p i n g t w o p i ct u re s( CCD -TR3 3 0 0 E o n l y ) When you switch from one scene to another, youcan overlap the two pictures. With this function,the first scene turns to the second one gradually.You can hear the sound of the second scenegradually as you start recording the seco...
Страница 43 - Вытеснение шторкой
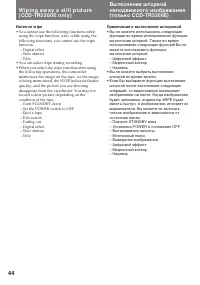
43 Advanc ed Operat ions / Усовершенствованные операции W i p i n g a w a y a st i l l p i ct u re( CCD -TR3 3 0 0 E o n l y ) When you switch from one scene to another, youcan wipe away the still picture. With this function,the first still picture is wiped away from the centreto reveal the moving p...
Страница 44 - Примечания к вытеснению штокрокой; Not es on w ipe
44 Примечания к вытеснению штокрокой • Вы не можете использовать следующие функции во время использования функциивытеснения шторкой. Также во времяиспользования следующих функций Вы неможете использовать функциювытеснения шторкой.– Цифровой эффект– Медленный затвор– Надпись • Вы не можете выбрать вы...
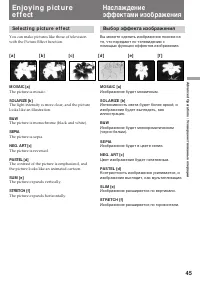
Страница 45 - Se l e ct i n g p i ct u r e e f f e ct; The picture is mosaic.; The picture is sepia.; Выбор эффекта изображения; Изображение будет мозаичным.; SEPIA; Изображение будет в цвете сепия.
45 Advanc ed Operat ions / Усовершенствованные операции En j o y i n g p i ct u ree f f e ct Se l e ct i n g p i ct u r e e f f e ct You can make pictures like those of televisionwith the Picture Effect function. M OSAIC [a] The picture is mosaic. SOLARIZE [b] The light intensity is more clear, and ...
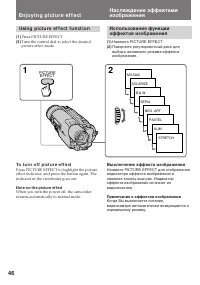
Страница 46 - Usi n g p i ct u r e e f f e ct f u n ct i o n; Press PICTURE EFFECT.; To t u r n o f f p i ct u r e e f f e ct; Not e on t he pict ure ef f ect; Нажмите PICTURE EFFECT.; Выключение эффекта изображения; Примечание к эффектам изображения; PICTURE; En j o y i n g p i ct u r e e f f e ct
46 Usi n g p i ct u r e e f f e ct f u n ct i o n (1 ) Press PICTURE EFFECT. (2 ) Turn the control dial to select the desiredpicture effect mode. To t u r n o f f p i ct u r e e f f e ct Press PICTURE EFFECT to highlight the pictureeffect indicator, and press the button again. Theindicator in the vi...
Страница 47 - Запись неподвижного
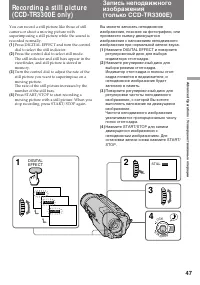
47 Advanc ed Operat ions / Усовершенствованные операции You can record a still picture like those of stillcamera or shoot a moving picture withsuperimposing a still picture while the sound isrecorded normally. (1 ) Press DIGITAL EFFECT and turn the controldial to select the still indicator. (2 ) Pre...
Страница 48 - To ca n ce l st i l l m o d e; Not es on st ill mode; Для отмены режима стоп-кадра; Примечания к режиму стоп-кадра
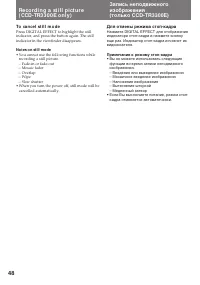
48 To ca n ce l st i l l m o d e Press DIGITAL EFFECT to highlight the stillindicator, and press the button again. The stillindicator in the viewfinder disappears. Not es on st ill mode • You cannot use the following functions while recording a still picture.– Fade-in or fade-out– Mosaic fader– Over...
Страница 49 - normal recording; Recording st ill pict ures; Нормальная запись
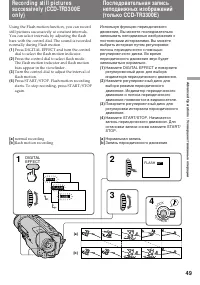
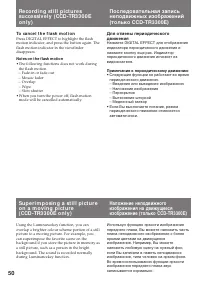
49 Advanc ed Operat ions / Усовершенствованные операции Using the Flash motion function, you can recordstill pictures successively at constant intervals.You can select intervals by adjusting the flashbars with the control dial. The sound is recordednormally during Flash motion. (1 ) Press DIGITAL EF...
Страница 50 - Примечания к периодическому движению; • Следующие функции не работают во время; To ca n ce l t h e f l a sh m o t i o n; Not es on t he f lash mot ion; • The following functions does not work during
50 Для отмены периодическогодвижения Нажмите DIGITAL EFFECT для отображенияиндикатора периодического движения инажмите кнопку еще раз. Индикаторпериодического движения исчезнет извидоискателя. Примечания к периодическому движению • Следующие функции не работают во время периодического движения.– Вве...
Страница 51 - Наложение движущегося; Примечания к яркости изображения переднего плана; To ca n ce l t h e l u m i n a n ce k e y; Not e on t he luminancekey
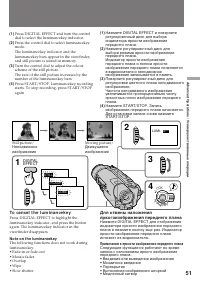
51 Advanc ed Operat ions / Усовершенствованные операции (1 ) Press DIGITAL EFFECT and turn the controldial to select the luminancekey indicator. (2 ) Press the control dial to select luminancekeymode.The luminancekey indicator and theluminancekey bars appear in the viewfinder,and still picture is st...
Страница 52 - . The camcorder enters Standby; ZERO MEM
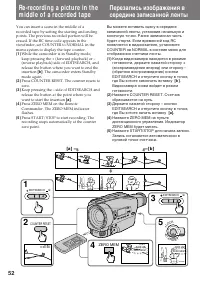
52 You can insert a scene in the middle of arecorded tape by setting the starting and endingpoints. The previous recorded portion will beerased. If the RC time code appears in theviewfinder, set COUNTER to NORMAL in themenu system to display the tape counter. (1 ) While the camcorder is in Standby m...
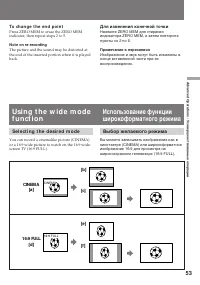
Страница 53 - To ch a n g e t h e e n d p o i n t; Not e on re-recording; Для изменения конечной точки; Примечание к перезаписи; CINEM A; Se l e ct i n g t h e d e si r e d m o d e
53 Advanc ed Operat ions / Усовершенствованные операции To ch a n g e t h e e n d p o i n t Press ZERO MEM to erase the ZERO MEMindicator, then repeat steps 2 to 5. Not e on re-recording The picture and the sound may be distorted atthe end of the inserted portion when it is playedback. Для изменения...
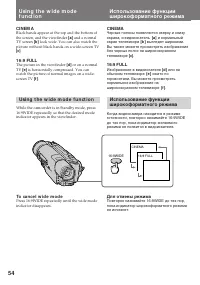
Страница 54 - Usi n g t h e w i d e m o d e f u n ct i o n; Для отмены режима
54 CI N EM A Black bands appear at the top and the bottom ofthe screen, and the viewfinder [a] and a normal TV screen [b ] look wide. You can also watch the picture without black bands on a wide-screen TV [c] . 1 6 :9 FULL The picture in the viewfinder [d ] or on a normal TV [e ] is horizontally com...
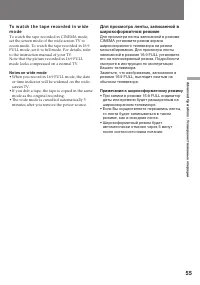
Страница 55 - Примечания к широкоформатному режиму; • При записи в режиме 16:9 FULL индикатор; Not es on w ide mode; • When you record in 16:9 FULL mode, the date
55 Advanc ed Operat ions / Усовершенствованные операции Для просмотра ленты, записанной вширокоформатном режиме Для просмотра ленты записанной в режимеCINEMA установите режим экранаширокоэкранного телевизора на режиммасштабирования. Для просмотра лентызаписанной в режиме 16:9 FULL установитеего на п...
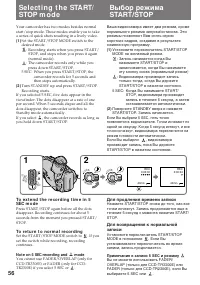
Страница 56 - To r e t u r n t o n o r m a l r e co r d i n g; Set the START/STOP MODE switch to; Not e on 5 SEC recording and; : Запись начинается когда Вы; Для продления времени записи; Примечание к записи 5 SEC и режиму
56 Your camcorder has two modes besides normalstart/stop mode. These modes enable you to takea series of quick shots resulting in a lively video. (1 ) Set the START/STOP MODE switch to thedesired mode. : Recording starts when you press START/ STOP, and stops when you press it again(normal mode). : T...
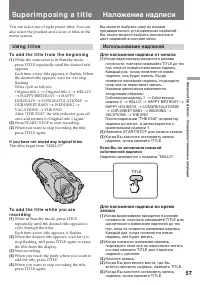
Страница 57 - Su p e r i m p o si n g a t i t l e; Использование надписей; Для наложения надписи от начала; Usi n g t i t l e s; To a d d t h e t i t l e f r o m t h e b e g i n n i n g; If you have not st ored any original t it les
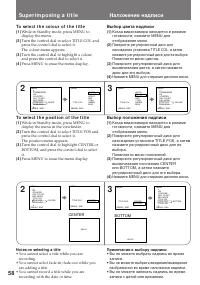
57 Advanc ed Operat ions / Усовершенствованные операции Su p e r i m p o si n g a t i t l e Наложение надписи Вы можете выбрать одну из восьмипредварительно установленных надписей.Вы также можете выбрать яоложение ицвет надписей в системе меню You can select one of eight preset titles. You canalso s...
Страница 58 - To se l e ct t h e co l o u r o f t h e t i t l e; To se l e ct t h e p o si t i o n o f t h e t i t l e; Press MENU to erase the menu display.; Not es on select ing a t it le; • You cannot select a title while you are; Выбор цвета надписи; Примечания к выбору надписи
58 To se l e ct t h e co l o u r o f t h e t i t l e (1 ) While in Standby mode, press MENU todisplay the menu. (2 ) Turn the control dial to select TITLE COL andpress the control dial to select it.The colour menu appears. (3 ) Turn the control dial to highlight a colour,and press the control dial t...
Страница 59 - Repeat step 3 until you finish the title.; To e d i t a t i t l e y o u h a v e st o r e d; Inst ead of select ing
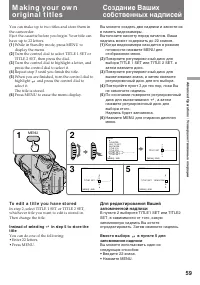
59 Advanc ed Operat ions / Усовершенствованные операции M a k i n g y o u r o w no r i g i n a l t i t l e s Создание Вашихсобственных надписей You can make up to two titles and store them inthe camcorder.Eject the cassette before you begin. Your title canhave up to 22 letters. (1 ) While in Standby...
Страница 60 - Для стирания надписи; и нажмите TITLE. Не стирайте; If you do not hing more t han 5 minut es; At the leftmost character position, select
60 Если Вы ничего не делаете в течение 5минут Питание выключится автоматически.Поверните STANDBY вниз, а затем сновавверх и продолжайте с пункта 3. Для стирания надписи В крайнем левом положении для знакавыберите S и нажмите TITLE. Не стирайте надпись путем выбора пустых пробелов.Если Вы так сделает...
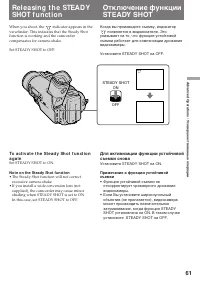
Страница 61 - indicator appears in the; Not e on t he St eady Shot f unct ion; • The Steady Shot function will not correct
61 Advanc ed Operat ions / Усовершенствованные операции Re l e a si n g t h e STEA D YSHOT f u n ct i o n When you shoot, the indicator appears in the viewfinder. This indicates that the Steady Shotfunction is working and the camcordercompensates for camera-shake. Set STEADY SHOT to OFF. Отключение ...
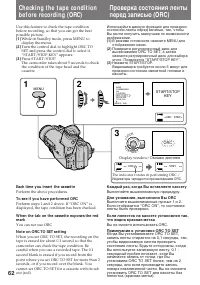
Страница 62 - Каждый раз, когда Вы вставляете кассету; Выполняйте вышеописанную процедуру.; Для узнавания, выполнили Вы ORC; Вы не сможте использовать ORC.; Примечания к установке ORC TO SET; Perform the above procedures.; To see if you have perf ormed ORC; Окошко дисплея; ORC
62 Checking t he t ape condit ionbef ore recording (ORC) Проверка состояния лентыперед записью (ORC) Используйьте данную функцию для проверкисостояния ленты перед записью, так, чтобыВы могли получить наилучшее по возможностиизображение. (1 ) В режиме готовности нажмите MENU дляотображения меню. (2 )...
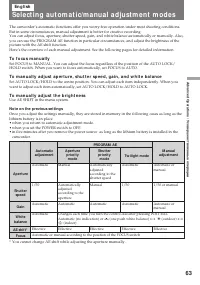
Страница 64 - Выбор режимов автоматической/ручной регулировки; Для ручной фокусировки; Используйте AE SHIFT в системе меню.; Примечание к вышеизложенным установкам; установлема в видеокамере.
64 Русский Выбор режимов автоматической/ручной регулировки Автоматические функции видеокамеры позволяют Вам осуществлять беззаботнуюэксплуатацию практически во всех условиях съемки. Но при некоторых обстоятельствахручная регулировка приводит к созданию лучшей записи.Вы можете отрегулировать фокусиро...
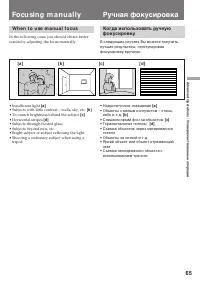
Страница 65 - Fo cu si n g m a n u a l l y; W h e n t o u se m a n u a l f o cu s; • Insufficient light; Ручная фокусировка
65 Advanc ed Operat ions / Усовершенствованные операции Fo cu si n g m a n u a l l y W h e n t o u se m a n u a l f o cu s In the following cases you should obtain betterresults by adjusting the focus manually. • Insufficient light [a ] • Subjects with little contrast – walls, sky, etc. [b ] • Too m...
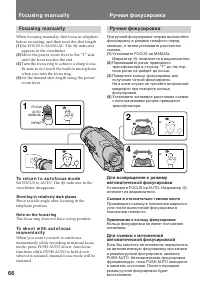
Страница 66 - To r e t u r n t o a u t o f o cu s m o d e; Shoot ing in relat ively dark places; появляется в видоискателе.; Съемка в относительно темном месте
66 Fo cu si n g m a n u a l l y When focusing manually, first focus in telephotobefore recording, and then reset the shot length. (1) Set FOCUS to MANUAL. The f indicator appears in the viewfinder. (2) Move the power zoom lever to the “T” sideuntil the lever reaches the end. (3) Turn the focus ring ...
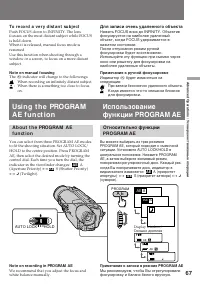
Страница 67 - To r e co r d a v e r y d i st a n t su b j e ct; Not e on manual f ocusing; The; Для записи очень удаленного объекта; Примечание к ручной фокусировке; Индикатор; Not e on recording in PROGRAM AE; Примечание к записи в режиме PROGRAM AE; A E
67 Advanc ed Operat ions / Усовершенствованные операции To r e co r d a v e r y d i st a n t su b j e ct Push FOCUS down to INFINITY. The lensfocuses on the most distant subject while FOCUSis held down.When it is released, manual focus mode isresumed.Use this function when shooting through awindow o...
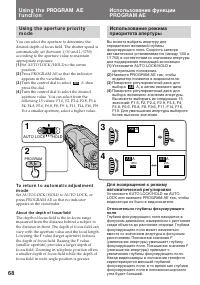
Страница 68 - About t he dept h of f ocus f ield
68 Usi n g t h e a p e r t u r e p r i o r i t ym o d e You can select the aperture to determine thedesired depth of focus field. The shutter speed isautomatically set (between 1/50 and 1/1750)according to the aperture value to maintainappropriate exposure. (1 ) Set AUTO LOCK/HOLD to the centreposit...
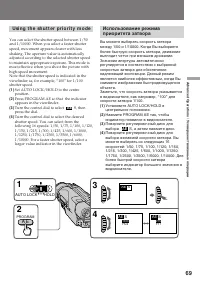
Страница 69 - Usi n g t h e sh u t t e r p r i o r i t y m o d e; Turn the control dial to select
69 Advanc ed Operat ions / Усовершенствованные операции Usi n g t h e sh u t t e r p r i o r i t y m o d e You can select the shutter speed between 1/50and 1/10000. When you select a faster shutterspeed, movement appears clearer with lessshaking. The aperture value is automaticallyadjusted according...
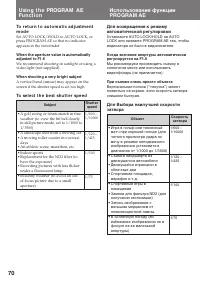
Страница 70 - W hen shoot ing a very bright subject; To se l e ct t h e b e st sh u t t e r sp e e d; При съемке очень яркого объекта; Shut t er
70 Usi n g t h e PROGRA M A EFu n ct i o n To r e t u r n t o a u t o m a t i c a d j u st m e n tm o d e Set AUTO LOCK/HOLD to AUTO LOCK, orpress PROGRAM AE so that no indicatorappears in the viewfinder. W hen t he apert ure value is aut omat icallyadjust ed t o F1.6 We recommend shooting in sunlig...
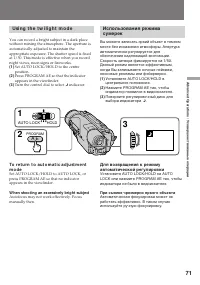
Страница 71 - Usi n g t h e t w i l i g h t m o d e; W hen shoot ing an excessively bright subject
71 Advanc ed Operat ions / Усовершенствованные операции Usi n g t h e t w i l i g h t m o d e You can record a bright subject in a dark placewithout ruining the atmosphere. The aperture isautomatically adjusted to maintain theappropriate exposure. The shutter speed is fixedat 1/50. This mode is effe...
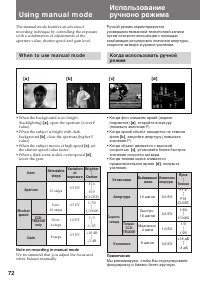
Страница 72 - W h e n t o u se m a n u a l m o d e; Usi n g m a n u a l m o d e; Not e on recording in manual mode
72 The manual mode features an advancedrecording technique by controlling the exposurewith a combination of adjustments of theaperture value, shutter speed and gain level. W h e n t o u se m a n u a l m o d e • When the background is too bright (backlighting) [a ] , open the aperture (lower F value)...
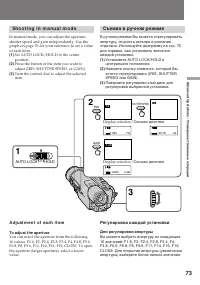
Страница 73 - Sh o o t i n g i n m a n u a l m o d e; A d j u st m e n t o f e a ch i t e m; To adjust t he apert ure; Съемка в ручном режиме; Регулировка каждой установки; Для регулировки апертуры
73 Advanc ed Operat ions / Усовершенствованные операции Sh o o t i n g i n m a n u a l m o d e In manual mode, you can adjust the aperture,shutter speed and gain independently. Use thegraph on page 76 for your reference to set a valueof each item. (1 ) Set AUTO LOCK/HOLD to the centreposition. (2 ) ...
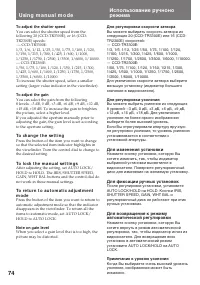
Страница 74 - To adjust t he shut t er speed; To ch a n g e t h e se t t i n g; Not e on gain level; Для изменения установки; Примечание к уровню усиления
74 Usi n g m a n u a l m o d e Использование ручнонорежима To adjust t he shut t er speed You can select the shutter speed from thefollowing 20 (CCD-TR3300E), or 16 (CCD-TR2300E) speeds: — CCD-TR3300E: 1/3, 1/6, 1/12, 1/25, 1/50, 1/75, 1/100, 1/120,1/150, 1/215, 1/300, 1/425, 1/600, 1/1000,1/1250, 1...
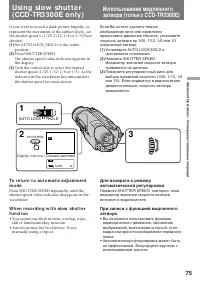
Страница 75 - still or luminauncekey function.; Использование медленног о; • Вы не можете использовать функцию
75 Advanc ed Operat ions / Усовершенствованные операции If you want to record a dark picture brightly, orrepresent the movement of the subject lively, setthe shutter speed to 1/25, 1/12, 1/6 or 1/3 (Slowshutter). (1 ) Set AUTO LOCK/HOLD to the centreposition. (2 ) Press SHUTTER SPEED.The shutter spe...
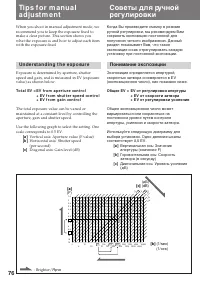
Страница 76 - Un d e r st a n d i n g t h e e x p o su r e; To t a l EV = EV f r o m a p e r t u r e co n t r o l; Понимание экспозиции; Общее EV = EV от регулировки апертуры; Вертикальная ось: Значение
76 When you shoot in manual adjustment mode, werecommend you to keep the exposure fixed tomake a clear picture. This section shows youwhat the exposure is and how to adjust each itemwith the exposure fixed. Un d e r st a n d i n g t h e e x p o su r e Exposure is determined by aperture, shutterspeed...
Страница 77 - Not es on manual adjust ment; • When recording outdoors, the brightness of a; Примечания к ручной регулировке; • Когда производится запись на улице, на
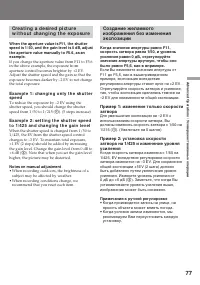
77 Advanc ed Operat ions / Усовершенствованные операции Cr e a t i n g a d e si r e d p i ct u r ew i t h o u t ch a n g i n g t h e e x p o su r e W hen t he apert ure value is F11, t he shut t erspeed is 1/ 50, and t he gain level is 0 dB, adjustt he apert ure value manually t o F5.6, as anexample...
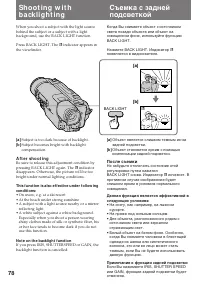
Страница 78 - A f t e r sh o o t i n g; Not e on t he backlight f unct ion; Нажмите BACK LIGHT. Индикатор; После съемки; Примечания к функции задней подсветки
78 When you shoot a subject with the light sourcebehind the subject or a subject with a lightbackground, use the BACK LIGHT function. Press BACK LIGHT. The c indicator appears in the viewfinder. [a ] Subject is too dark because of backlight. [b ] Subject becomes bright with backlightcompensation. A ...
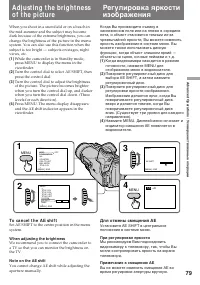
Страница 79 - To ca n ce l t h e A E sh i f t; W hen adjust ing t he bright ness; Для отмены смещения АЕ; При регулировке яркости
79 Advanc ed Operat ions / Усовершенствованные операции When you shoot in a snowfield or on a beach inthe mid-summer and the subject may becomedark because of the extreme brightness, you canchange the brightness of the picture in the menusystem. You can also use this function when thesubject is too ...
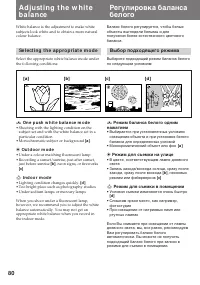
Страница 80 - Se l e ct i n g t h e a p p r o p r i a t e m o d e; On e p u sh w h i t e b a l a n ce m o d e; • Shooting with the lighting condition on the; Ou t d o o r m o d e; just before sunrise; I n d o o r m o d e; • Lighting condition changes quickly.; Выбор подходящего режима; Режим баланса белого одним
80 White balance is the adjustment to make whitesubjects look white and to obtain a more naturalcolour balance. Se l e ct i n g t h e a p p r o p r i a t e m o d e Select the appropriate white balance mode underthe following conditions: ∑ On e p u sh w h i t e b a l a n ce m o d e • Shooting with th...
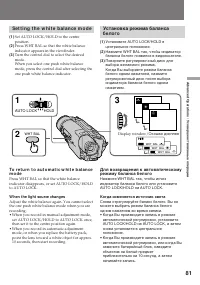
Страница 81 - Se t t i n g t h e w h i t e b a l a n ce m o d e; W hen t he light source changes; • When you record in automatic adjustment; Когда изменяется источник света; • Когда Вы производите запись в режиме
81 Advanc ed Operat ions / Усовершенствованные операции 3 1 2 WHT BAL WHT BAL e WHT BAL w WHT BAL ∑ e w ∑ AUTO LOCK HOLD Se t t i n g t h e w h i t e b a l a n ce m o d e (1 ) Set AUTO LOCK/HOLD to the centreposition. (2 ) Press WHT BAL so that the white balanceindicator appears in the viewfinder. (...
Страница 84 - To sca n t h e b e g i n n i n g o f a l l d a y s; поиск даты; Для поиска начала определенной даты
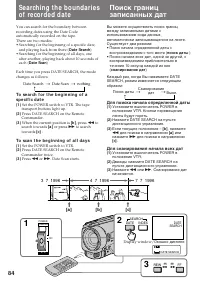
84 Se a rch i n g t h e b o u n d a r i e so f re co rd e d d a t e Date Search n Date Scan n nothing n You can search for the boundary betweenrecording dates using the Date Codeautomatically recorded on the tape.There are two modes:• Searching for the beginning of a specific date, and playing back ...
Страница 85 - To st op searching or scanning
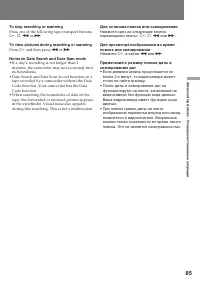
85 Advanc ed Operat ions / Усовершенствованные операции To st op searching or scanning Press one of the following tape transport buttons: · , π , 0 or ) . To view pict ures during searching or scanning Press · and then press 0 or ) . Not es on Dat e Search and Dat e Scan mode • If a day’s recording ...
Страница 86 - Примечания к счетчику ленты; Not es on t he t ape count er
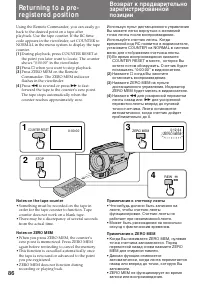
86 Re t u r n i n g t o a p re -re g i st e re d p o si t i o n Using the Remote Commander, you can easily goback to the desired point on a tape afterplayback. Use the tape counter. If the RC timecode appears in the viewfinder, set COUNTER toNORMAL in the menu system to display the tapecounter. (1 )...
Страница 87 - M a r k i n g a n i n d e x si g n a l
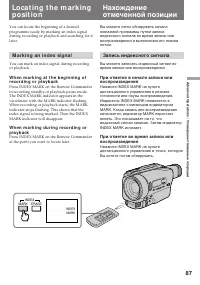
87 Advanc ed Operat ions / Усовершенствованные операции You can locate the beginning of a desiredprogramme easily by marking an index signalduring recording or playback and searching for itlater. M a r k i n g a n i n d e x si g n a l You can mark an index signal during recordingor playback. W h e n...
Страница 89 - To ca n ce l i n d e x sca n m o d e
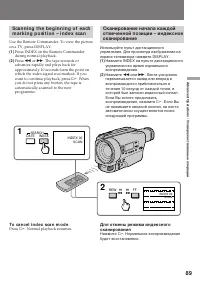
89 Advanc ed Operat ions / Усовершенствованные операции Sca n n i n g t h e b e g i n n i n g o f e a chm a r k i n g p o si t i o n – i n d e x sca n Use the Remote Commander. To view the pictureon a TV, press DISPLAY. (1 ) Press INDEX on the Remote Commanderduring normal playback. (2 ) Press 0 or ...
Страница 90 - To st o p i n d e x se a r ch m o d e; Not e on t he index number
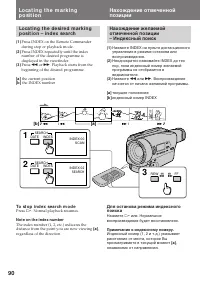
90 Lo ca t i n g t h e d e si r e d m a r k i n gp o si t i o n – i n d e x se a r ch (1 ) Press INDEX on the Remote Commanderduring stop or playback mode. (2 ) Press INDEX repeatedly until the indexnumber of the desired programme isdisplayed in the viewfinder. (3 ) Press 0 or ) . Playback starts fr...
Страница 91 - Er a si n g a n i n d e x si g n a l; Not es on erasing; Стирание индексного сигнала; Примечания к стиранию
91 Advanc ed Operat ions / Усовершенствованные операции Er a si n g a n i n d e x si g n a l (1 ) Locate the index signal to be erased using theindex scan or index search function. (2 ) Press INDEX ERASE on the RemoteCommander within 2 to 10 seconds while thedesired programme plays back. After thein...
Страница 92 - To st o p w r i t i n g t h e RC t i m e co d e
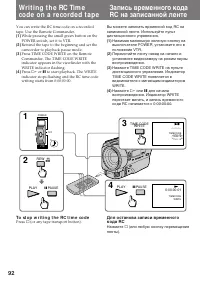
92 Wr i t i n g t h e RC Ti m eco d e o n a re co rd e d t a p e You can write the RC time code on a recordedtape. Use the Remote Commander. (1 ) While pressing the small green button on thePOWER switch, set it to VTR. (2 ) Rewind the tape to the beginning and set thecamcorder to playback pause mode...
Страница 93 - Not es on w rit ing t he RC t ime code
93 Advanc ed Operat ions / Усовершенствованные операции To w r i t e t h e RC t i m e co d e f r o m t h ee n d o f t h e RC t i m e co d e r e co r d e dp o r t i o n Rewind the tape to the portion on which the RCtime code has been written and set the camcorderto playback pause mode. Then follow st...
Страница 94 - Be f o r e e d i t i n g; Set EDIT to ON in the menu system.; Перед монтажем; Установите EDIT на ON в системе меню.
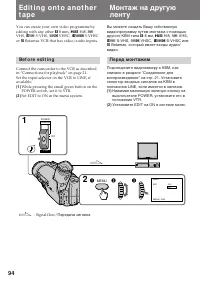
94 Ed i t i n g o n t o a n o t h e rt a p e You can create your own video programme byediting with any other h 8 mm, H Hi8, j VHS, k S-VHS, VHSC, K S-VHSC or l Betamax VCR that has video/audio inputs. Be f o r e e d i t i n g Connect the camcorder to the VCR as describedin “Connections for playba...
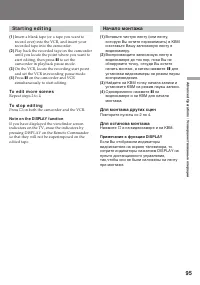
Страница 95 - Начало монтажа; Для монтажа других сцен; Примечание к функции DISPLAY; St a r t i n g e d i t i n g; To e d i t m o r e sce n e s; Not e on t he DISPLAY f unct ion
95 Advanc ed Operat ions / Усовершенствованные операции Начало монтажа (1 ) Вставьте чистую ленту (или ленту,которую Вы хотите перезаписать) в КВМи вставьте Вашу записанную ленту ввидеокамеру. (2 ) Воспроизводите записанную ленту ввидеокамере до тех пор, пока Вы необнаружите точку, откуда Вы хотитен...
Страница 96 - Для останова записи; To st o p r e co r d i n g
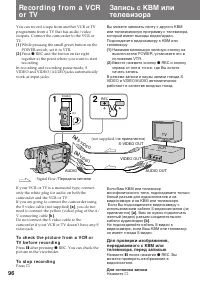
96 Re co rd i n g f ro m a V CRo r TV You can record a tape from another VCR or TVprogramme from a TV that has audio/videooutputs. Connect the camcorder to the VCR orTV. (1 ) While pressing the small green button on thePOWER switch, set it to VTR. (2 ) Press r REC and the button on far right togethe...
Страница 97 - Not e on t he insert ed pict ure; или; Примечание к вставленному изображению
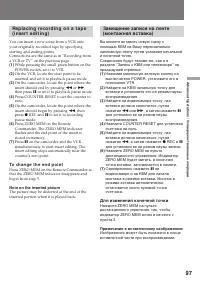
97 Advanc ed Operat ions / Усовершенствованные операции Re p l a ci n g r e co r d i n g o n a t a p e( i n se r t e d i t i n g ) You can insert a new scene from a VCR ontoyour originally recorded tape by specifyingstarting and ending points.Connections are the same as in “Recording froma VCR or TV...
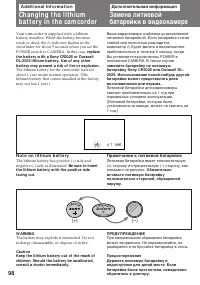
Страница 98 - indicator flashes in the; replace; N o t e o n l i t h i u m b a t t e r y; Be sure t o insert; A d d i t i o n a l I n f o r m a t i o n; будет мигать в видоискателе; Примечание к литиевой батарейке; Обязательно
98 Your camcorder is supplied with a lithiumbattery installed. When the battery becomesweak or dead, the I indicator flashes in the viewfinder for about 5 seconds when you set thePOWER switch to CAMERA. In this case, replace t he bat t ery w it h a Sony CR2025 or DuracellDL-2025 lit hium bat t ery. ...
Страница 99 - Ch a n g i n g t h e l i t h i u m b a t t e r y
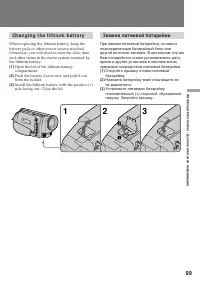
99 Addit ional Inf ormat ion / Дополнительная информация Ch a n g i n g t h e l i t h i u m b a t t e r y When replacing the lithium battery, keep thebattery pack or other power source attached.Otherwise, you will need to reset the date, timeand other items in the menu system retained bythe lithium ...
Страница 100 - To co r r e ct t h e d a t e a n d t i m e se t t i n g; Repeat the above procedure.
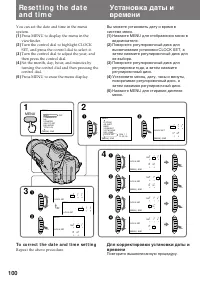
100 Re se t t i n g t h e d a t ea n d t i m e You can set the date and time in the menusystem. (1 ) Press MENU to display the menu in theviewfinder. (2 ) Turn the control dial to highlight CLOCKSET, and press the control dial to select it. (3 ) Turn the control dial to adjust the year, andthen pres...
Страница 101 - To ch e ck t h e p r e se t d a t e a n d t i m e; The year indicat or changes as f ollow s:; Se l e ct i n g ca sse t t e t y p e s; Выбор типа кассеты
101 Addit ional Inf ormat ion / Дополнительная информация To ch e ck t h e p r e se t d a t e a n d t i m e Press DATE to display the date indicator in theviewfinder.Press TIME to display the time indicator.When you press the same button again, theindicator goes off. The year indicat or changes as f...
Страница 102 - W h e n y o u p l a y b a ck; N o t e o n A FM Hi Fi st e r e o; • You record the tape on an AFM HiFi monaural; Re co r d i n g m o d e; Playing back an NTSC-recorded t ape; • Вы записали ленту на монофоническом; Режим записи
102 W h e n y o u p l a y b a ck The playback mode (SP/LP or Hi8/standard 8mm) is selected automatically according to theformat in which the tape has been recorded. Thequality of the recorded picture in LP mode,however, will not be as good as that in SP mode. N o t e o n A FM Hi Fi st e r e o When y...
Страница 103 - • If a tape has portions recorded in PAL and; Pr e p a r i n g t h e b a t t e r y p a ck; A l w a y s ca r r y a d d i t i o n a l b a t t e r i e s; Подготовка батарейного блока; Для экономии заряда батарейного блока
103 Addit ional Inf ormat ion / Дополнительная информация • If a tape has portions recorded in PAL and NTSC video systems, the tape counter readingis not correct. This discrepancy is due to thedifference between the counting cycle of thetwo video systems. • You cannot edit the NTSC-recorded tape ont...
Страница 104 - indicator appears and starts; Ca u t i o n
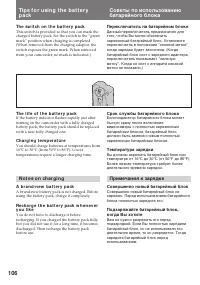
104 Ti p s f o r u si n g t h e b a t t e r yp a ck Советы по использованиюбатарейного блока Когда заменять батарейныйблок Когда Вы используете видеокамеру,индикатор оставшегося заряда батарейногоблока в видоискателе постепенноуменьшается по мере использования зарядабатарейного блока.Если Вы использ...
Страница 105 - A b o u t; and keep it in a cool; О батарейных блоках; , видеоаппаратура будет; Уход за батарейным блоком; • Батарейный блок всегда разряжается,
105 Addit ional Inf ormat ion / Дополнительная информация A b o u t b a t t e r i e s The “InfoLITHIUM” is a lithium ion battery packwhich can exchange data with compatible videoequipment about its battery consumption. Sonyrecommends that you use the “InfoLITHIUM”battery pack with video equipment ha...
Страница 106 - N o t e s o n ch a r g i n g; A b r a n d -n e w b a t t e r y p a ck; Примечания к зарядке; Совершенно новый батарейный блок
106 Ti p s f o r u si n g t h e b a t t e r yp a ck Советы по использованиюбатарейного блока Th e sw i t ch o n t h e b a t t e r y p a ck This switch is provided so that you can mark thecharged battery pack. Set the switch to the “greenmark” position when charging is completed.(When removed from th...
Страница 107 - Примечания к контактам; Обязательно соблюдайте следующее; • Храните батарейный блок подальше от; N o t e s o n t h e t e r m i n a l s; Be su r e t o o b se r v e t h e f o l l o w i n g; • Do not expose the battery pack to any
107 Addit ional Inf ormat ion / Дополнительная информация Примечания к контактам Если контакты (металлические части назадней стороне) загрязнены, топродолжительность действия батарейногоблока будет сокращена.Когда контакты загрязнены, или еслибатарейный блок не был использован втечение длительного в...
Страница 108 - M o i st u r e co n d e n sa t i o n; I n si d e t h e ca m co r d e r; indicator flashes. If this; On t h e l e n s; Информация по уходу за; Конденсация влаги; Внутри видеокамеры; будет; На объективе
108 M a i n t e n a n ce i n f o r m a t i o na n d p re ca u t i o n s M o i st u r e co n d e n sa t i o n If the camcorder is brought directly from a coldplace to a warm place, moisture may condenseinside the camcorder, on the surface of the tape,or on the lens. In this condition, the tape maysti...
Страница 109 - V i d e o h e a d cl e a n i n g; indicator and; Not e; Очистка видеоголовок; сообщение “; Примечание
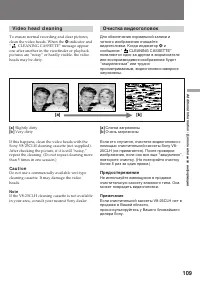
109 Addit ional Inf ormat ion / Дополнительная информация V i d e o h e a d cl e a n i n g To ensure normal recording and clear pictures,clean the video heads. When the v indicator and “ CLEANING CASSETTE” message appear one after another in the viewfinder or playbackpictures are “noisy” or hardly v...
Страница 110 - Pr e ca u t i o n s; Ca m co r d e r o p e r a t i o n; Предосторожности; Эксплуатация видеокамеры
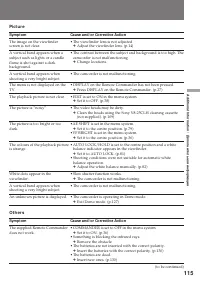
110 M a i n t e n a n ce i n f o r m a t i o na n d p r e ca u t i o n s Информация по уходу зааппаратом и предосторожности Pr e ca u t i o n s Ca m co r d e r o p e r a t i o n • Operate the camcorder on 7.2 V (battery pack) or 8.4 V (AC power adaptor). • For DC or AC operation, use the accessories...
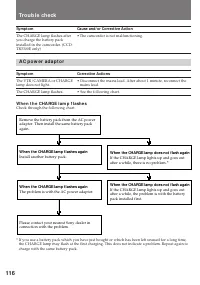
Страница 111 - A C p o w e r a d a p t o r; Charging; Зарядка; Прочее
111 Addit ional Inf ormat ion / Дополнительная информация A C p o w e r a d a p t o r Charging • Use only a lithium ion type battery pack.• Place the battery pack on a flat surface without vibration during charging. • The battery pack will get hot during charging. This is normal. Ot hers • Unplug th...
Страница 112 - PAL syst em count ries; Brazil; PAL-N syst em count ries; Источники питания; Страны с системой PAL; Бразилия; Страны с системой PAL-N
112 Usi n g y o u r ca m co rd e ra b ro a d Each country has its own electric and TV coloursystems. Before using your camcorder abroad,check the following points. Po w e r so u r ce s You can use your camcorder in any country withthe supplied AC power adaptor within 110 V to240 V AC, 50/60 Hz. D i ...
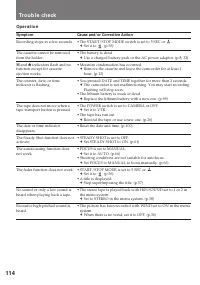
Страница 117 - Видеокамера; Питание; Признак; Проверка неисправностей; Причина и/или действия по исправлению
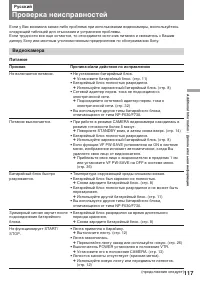
117 Addit ional Inf ormat ion / Дополнительная информация Если у Вас возникла какая-либо проблема при использовании видеокамеры, воспользуйтесьследующей таблицей для отыскания и устранения проблемы.Если трудности все еще остаются, то отсоедините источник питания и свяжитесь с Вашимдилеру Sony или ме...
Страница 118 - Работа
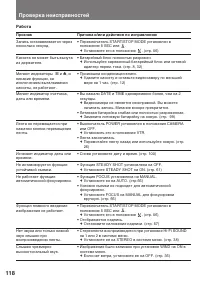
118 Проверка неисправностей Работа Признак Запись останавливается черезнесколько секунд. Кассета не может быть вынутаиз держателя. Мигают индикаторы { и 6 , и никакие функции, заисключением выталкиваниякассеты, не работают. Мигает индикатор счетчика,даты или времени. Лента не перемещается принажатии...
Страница 119 - Изображение
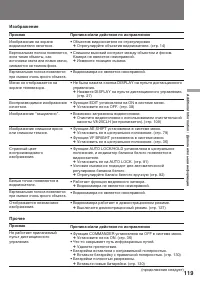
119 Addit ional Inf ormat ion / Дополнительная информация Изображение Признак Изображение на экраневидоискателя нечеткое. Вертикальная полоса появляется,если такие объекты, какисточники света или пламя свечи,синмаются на темном фоне. Вертикальная полоса появляетсяпри съемке очень яркого объекта. Мен...
Страница 120 - Сетевой адаптер перем. тока; Когда мигает лампочка CHARGE
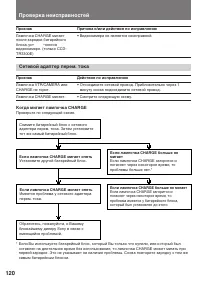
120 Признак Лампочка CHARGE мигаетпосле зарядки батарейногоблока, уст º нного в видеокамере. (только CCD- TR3300E) Сетевой адаптер перем. тока Признак Лампочка VTR/CAMERA илиCHARGE не горит. Лампочка CHARGE мигает. Когда мигает лампочка CHARGE Проверьте по следующей схеме. Причина и/или действия по ...
Страница 122 - Технические характеристики
122 Русский Технические характеристики Сетевой адаптер перем. тока Требования к питанию 110 – 240 В перем. тока, 50/60 Гц Потребляемая мощность 25 ВТ Выходное напряжение DC OUT: 8,4 В, 1,9 А в рабочемрежимеВыход для зарядки батарейногоблока: 8,4 В, 1,4 А в режиме зарядки Применение Батарейные блоки ...
Страница 123 - I d e n t i f y i n g t h e p a r t s
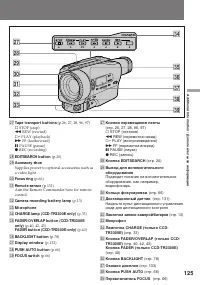
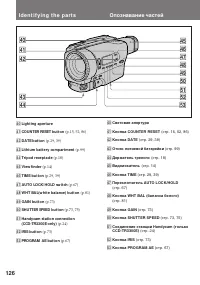
123 Addit ional Inf ormat ion / Дополнительная информация I d e n t i f y i n g t h e p a r t s 1 POW ER sw it ch (p.13) 2 STEADY SHOT sw it ch (p.61) 3 M ENU but t on (p.35) 4 Cont rol dial (p.35) 5 PICTURE EFFECT but t on (p.46) 6 DIGITAL EFFECT but t on (CCD-TR3300E only) (p.47) 7 TITLE but t on ...
Страница 124 - stands for Local Application Control Bus
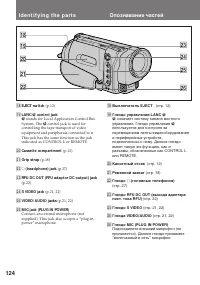
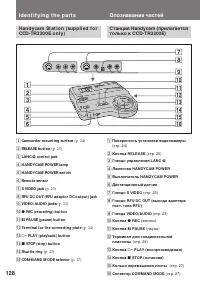
124 I d e n t i f y i n g t h e p a r t s Опознавание частей !• EJECT sw it ch (p.12) !ª LANC l cont rol jack l stands for Local Application Control Bus System. The l control jack is used for controlling the tape transport of videoequipment and peripherals connected to it.This jack has the same func...
Страница 127 - To W a t ch t h e d e m o n st r a t i o n; While holding down; Для просмотра демонстрации; Для ввода демонстрационного режима
127 Addit ional Inf ormat ion / Дополнительная информация To W a t ch t h e d e m o n st r a t i o n You can watch a brief demonstration of pictureswith special effects.If the demonstration appears when you turn onthe camcorder for the first time, exit the demomode to use your camcorder. For details...
Страница 129 - Re m o t e Co m m a n d e r
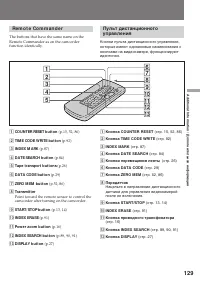
129 Addit ional Inf ormat ion / Дополнительная информация Re m o t e Co m m a n d e r The buttons that have the same name on theRemote Commander as on the camcorderfunction identically. 1 COUNTER RESET but t on (p.15, 52, 86) 2 TIM E CODE W RITE but t on (p.92) 3 INDEX M ARK (p.87) 4 DATE SEARCH but...
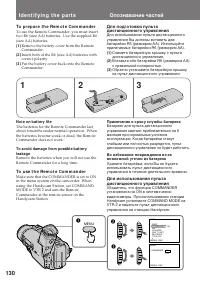
Страница 130 - To p r e p a r e t h e Re m o t e Co m m a n d e r; Not e on bat t ery lif e; To u se t h e Re m o t e Co m m a n d e r; Примечание к сроку службы батареек
130 I d e n t i f y i n g t h e p a r t s Опознавание частей To p r e p a r e t h e Re m o t e Co m m a n d e r To use the Remote Commander, you must inserttwo R6 (size AA) batteries. Use the supplied R6(size AA) batteries. (1 ) Remove the battery cover from the RemoteCommander. (2 ) Insert both of ...
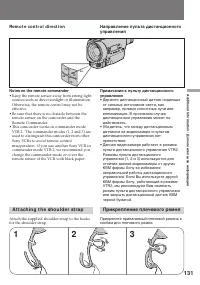
Страница 131 - Re m o t e co n t r o l d i r e ct i o n; Not es on t he remot e commander; • Keep the remote sensor away from strong light; A t t a ch i n g t h e sh o u l d e r st r a p; • Держите дистанционный датчик подальше; Прикрепление плечевого ремня
131 Addit ional Inf ormat ion / Дополнительная информация Re m o t e co n t r o l d i r e ct i o n Not es on t he remot e commander • Keep the remote sensor away from strong light sources such as direct sunlight or illumination.Otherwise, the remote control may not beeffective. • Be sure that there ...
Страница 133 - Опознавание частей; Рабочие индикаторы
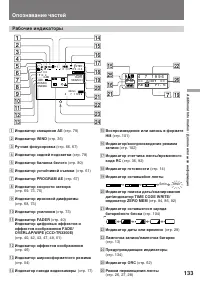
133 Addit ional Inf ormat ion / Дополнительная информация Опознавание частей Рабочие индикаторы 1 Индикатор смещения АЕ (стр. 79) 2 Индикатор WIND (стр. 36) 3 Ручная фокусировка (стр. 66, 67) 4 Индикатор задней подсветки (стр. 78) 5 Индикатор баланса белого (стр. 80) 6 Индикатор устойчивой съемки (с...
Страница 134 - Wa r n i n g i n d i ca t o r s; : you can hear the beep sound when the BEEP is; Лента приближается к концу.; Мигание становится быстрым.; Произошла конденсация влаги.
134 Wa r n i n g i n d i ca t o r s If indicators flash in the viewfinder or in thedisplay window, check the following: ≥ : you can hear the beep sound when the BEEP is set to ON. 1 The bat t ery is w eak or dead. Slow flashing: The battery is weak.Fast flashing: The battery is dead. 2 The t ape is ...
Страница 136 - Sony Corporation; Алфавинтый указатель; Ф – Я
Sony Corporation Printed in Japan Алфавинтый указатель А, Б, В Автоматическая фокусировка ....................... 66 Автомобильный аккумулятор ........................ 34 Апертура ................................ 73Введение/выведение изображения ............... 40 – 41 Воспроизведение на телевизоре ...