Утюги Philips GC4620 - инструкция пользователя по применению, эксплуатации и установке на русском языке. Мы надеемся, она поможет вам решить возникшие у вас вопросы при эксплуатации техники.
Если остались вопросы, задайте их в комментариях после инструкции.
"Загружаем инструкцию", означает, что нужно подождать пока файл загрузится и можно будет его читать онлайн. Некоторые инструкции очень большие и время их появления зависит от вашей скорости интернета.


3
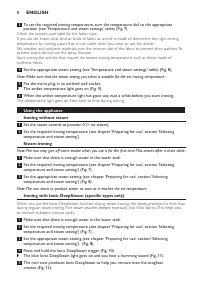
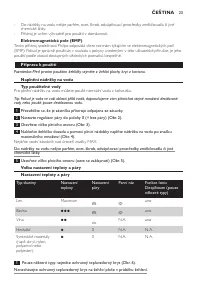
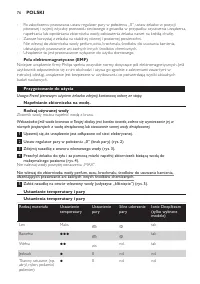
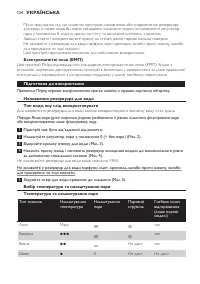
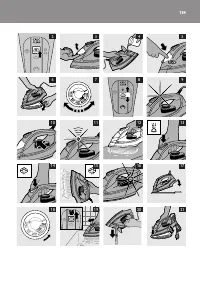
To set the required ironing temperature, turn the temperature dial to the appropriate
position (see ‘Temperature and steam settings’ table) (Fig. 7).
Check the laundr y care label for the fabric type.
If you do not know what kind or kinds of fabric an ar ticle is made of, determine the right ironing
temperature by ironing a par t that is not visible when you wear or use the ar ticle.
Silk, woollen and synthetic materials: iron the reverse side of the fabric to prevent shiny patches. To
prevent stains, do not use the spray function.
Star t ironing the ar ticles that require the lowest ironing temperature, such as those made of
synthetic ibres.
4
Set the appropriate steam setting (see ‘Temperature and steam settings’ table) (Fig. 8).
Note: Make sure that the steam setting you select is suitable for the set ironing temperature.
5
Put the mains plug in an earthed wall socket.
,
The amber temperature light goes on (Fig. 9).
6
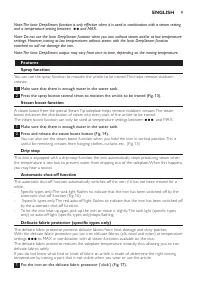
When the amber temperature light has gone out, wait a while before you start ironing.
The temperature light goes on from time to time during ironing.
using the appliance
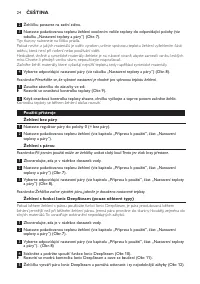
Ironing without steam
1
Set the steam control to position 0 (= no steam).
2
Set the required ironing temperature (see chapter ‘Preparing for use’, section ‘Selecting
temperature and steam setting’).
Steam ironing
Note: The iron may give off some smoke when you use it for the irst time. This ceases after a short while.
1
Make sure that there is enough water in the water tank.
2
Set the required ironing temperature (see chapter ‘Preparing for use’, section ‘Selecting
temperature and steam setting’) (Fig. 7).
3
Set the appropriate steam setting (see chapter ‘Preparing for use’, section ‘Selecting
temperature and steam setting’) (Fig. 8).
Note: The iron starts to produce steam as soon as it reaches the set temperature.
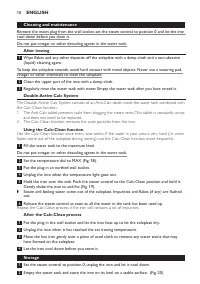
Ironing with Ionic DeepSteam (speciic types only)
When you use the Ionic DeepSteam function during steam ironing, the steam produced is iner than
during regular steam ironing. Fine steam reaches deeper, especially into thick fabrics. This helps you
to remove stubborn creases easily.
1
Make sure that there is enough water in the water tank.
2
Set the required ironing temperature (see chapter ‘Preparing for use’, section ‘Selecting
temperature and steam setting’) (Fig. 7).
3
Set the appropriate steam setting (see chapter ‘Preparing for use’, section ‘Selecting
temperature and steam setting’). (Fig. 8)
4
Press and hold the Ionic DeepSteam trigger (Fig. 10).
,
The blue Ionic DeepSteam light goes on and you hear a humming sound (Fig. 11).
5
The iron now produces Ionic DeepSteam to help you remove even the toughest
creases (Fig. 12).
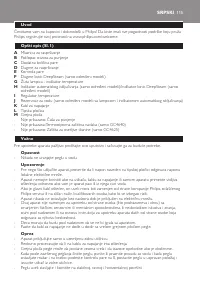
EnGlISh
8
Содержание
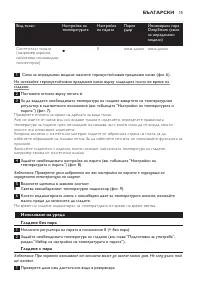
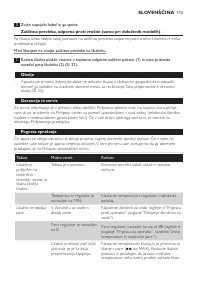
- 92 Подготовка прибора к работе; дистиллированную воду.
- 93 Эксплуатация прибора; работе”, раздел “Выбор температурного режима и режима подачи пара”).; глажение с паром; которое вскоре прекратится.
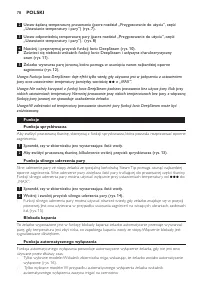
- 94 глажение с Ionic DeepSteam (только у некоторых моделей); Это облегчает разглаживание сильно замятых складок.; Функциональные особенности; облегчает разглаживание неподатливых складок.; Функция “Паровой удар”; от
- 95 Очищайте верхнюю часть утюга с помощью влажной ткани.
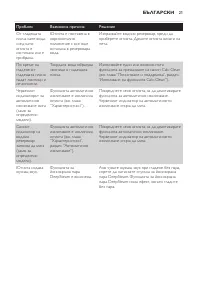
- 96 очистки от накипи необходимо использовать чаще.; После очистки от накипи; сразу после глажения. Не обязательно ждать, пока утюг остынет.
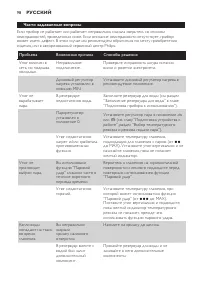
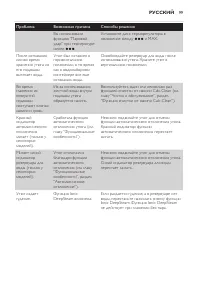
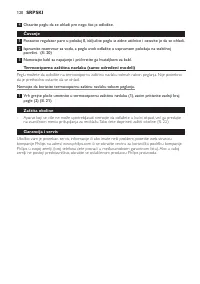
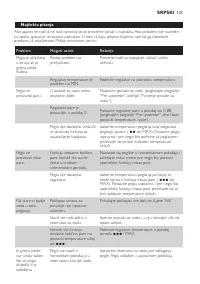
- 98 Часто задаваемые вопросы; Проблема


