
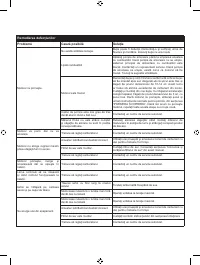
Триммеры Ryobi RBC42FSBO 5133002543 - инструкция пользователя по применению, эксплуатации и установке на русском языке. Мы надеемся, она поможет вам решить возникшие у вас вопросы при эксплуатации техники.
Если остались вопросы, задайте их в комментариях после инструкции.
"Загружаем инструкцию", означает, что нужно подождать пока файл загрузится и можно будет его читать онлайн. Некоторые инструкции очень большие и время их появления зависит от вашей скорости интернета.


26
English (Original instructions)
damage is detected.
■
For cutting ease and safety, approach the weeds
being cut from the right to the left.
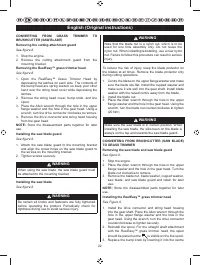
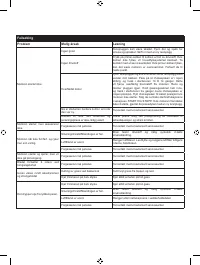
MAINTENANCE
WARNING
Use only original manufacturer's replacement parts
and accessories. Failure to do so may cause poor
performance, contribute to possible injury, and will void
your warranty.
■
The cutting attachment must not rotate in idle mode.
If this requirement is not satisfied, the clutch has to be
adjusted or the product needs an urgent maintenance
by a qualified technician.
■
You may make adjustments and repairs described in
this user manual. For other repairs, have the product
serviced by an authorised service centre.
■
Consequences of improper maintenance may
include excess carbon deposits resulting in loss of
performance and discharge of black oily residue
dripping from the silencer.
■
Make sure the cutting attachment guards, harness and
handles are properly and securely attached to avoid
the risk of personal injury.
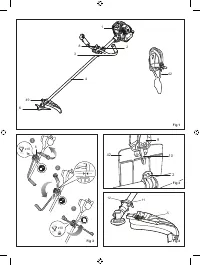
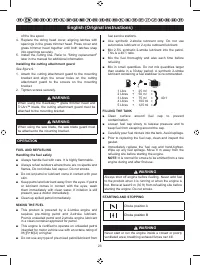
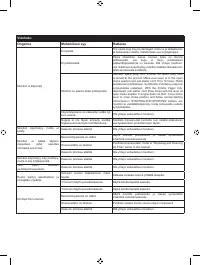
STRING REPLACEMENT
See
fi
gure 10.
■
Ensure the ignition switch is in the “off” position.
■
Use a 2.4 mm diameter monofilament string.
■
Cut one piece of string approximately 6 m in length.
■
Rotate the knob on the string head until the line on
knob aligns with the arrows on the top of string head.
■
Insert one end of the string into the eyelet located on
the side of the string head and push until string comes
out through eyelet on the other side. Continue to push
string through the string head until the middle section
of the string is inside the string head and string outside
the string head is evenly divided on each side.
■
Rotate the knob on the string head clockwise to wind
the string.
■
Wind the string until approximately 20 cm remains
protruding from the string head.
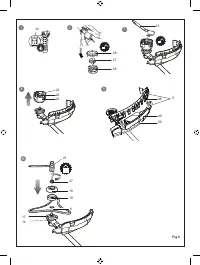
BLADE PROTECTOR
See
fi
gure 17 - 18.
Always place the blade protector on the blade when the
product is not in use. The blade protector has clips round
the edges to snap over the blade and keep it in place.
Wear gloves and be cautious when handling the blade.
NOTE
: Always remove the blade protector before using
the product. If not removed, the blade protector could
become a thrown object as the blade begins to turn.
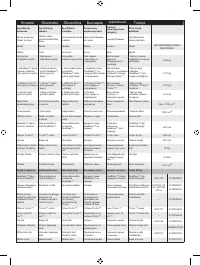
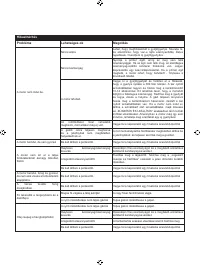
CLEANING THE EXHAUST PORT AND SILENCER
Depending on the type of fuel used, the type and amount
of oil used, and/or your operating conditions, the exhaust
port and silencer may become blocked with carbon
deposits. If you notice a power loss with your petrol-
powered tool, a quali
fi
ed service technician will need to
remove these deposits to restore performance.
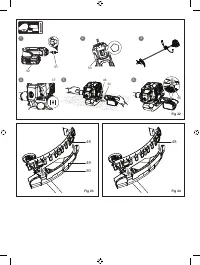
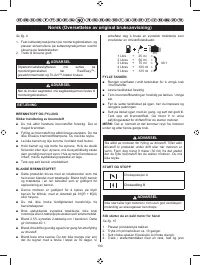
CLEANING AIR FILTER
See
fi
gure 19.
■
Ensure the ignition switch is in the “off” position.
■
Remove the air filter knob and air filter cover.
■
Remove the air filter and clean it with warm soapy
water.
■
Rinse, and let the air filter dry completely.
■
Replace the air filter.
NOTE:
If damaged, replace immediately.
■
Replace the air filter cover.
■
Tighten the air filter knob.
NOTE:
The air
fi
lter should be replaced annually for the
best performance.
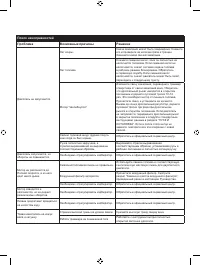
CHECKING THE FUEL CAP
WARNING
A leaking fuel cap is a
fi
re hazard and must be replaced
immediately.
The fuel cap contains a non-serviceable
fi
lter and a
check valve. A clogged fuel
fi
lter will cause poor engine
performance. If performance improves when the fuel cap
is loosened, the check valve may be faulty or the
fi
lter may
be clogged. Replace fuel cap if required.
SPARK PLUG
This engine uses an L8RTF/NHSP LD, or L8RTF/BOSCH
spark plug or equivalent with 0.5 mm electrode gap. Use
an exact replacement.
CAUTION
Be careful not to cross-thread the spark plug. Cross-
threading will damage the engine.


