
Сварочное оборудование BlueWeld Starmig 210 Dual Synergic - инструкция пользователя по применению, эксплуатации и установке на русском языке. Мы надеемся, она поможет вам решить возникшие у вас вопросы при эксплуатации техники.
Если остались вопросы, задайте их в комментариях после инструкции.
"Загружаем инструкцию", означает, что нужно подождать пока файл загрузится и можно будет его читать онлайн. Некоторые инструкции очень большие и время их появления зависит от вашей скорости интернета.

- 5 -
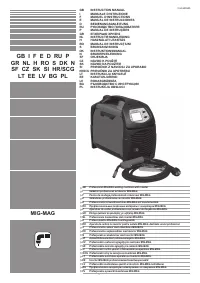
CONTINUOUS WIRE WELDING MACHINE FOR MIG/MAG AND FLUX ARC
WELDING DESIGNED FOR INDUSTRIAL AND PROFESSIONAL USE.
Note: In the following text the term “welding machine” will be used.
1. GENERAL SAFETY CONSIDERATIONS FOR ARC WELDING
The operator should be properly trained to use the welding machine safely
and should be informed about the risks related to arc welding procedures, the
associated protection measures and emergency procedures.
(Please refer to the applicable standard ”EN 60974-9: Arc welding equipment.
Part 9: Installation and Use).
- Avoid direct contact with the welding circuit: the no-load voltage supplied by
the welding machine can be dangerous under certain circumstances.
- When the welding cables are being connected or checks and repairs are
carried out the welding machine should be switched off and disconnected
from the power supply outlet.
- Switch off the welding machine and disconnect it from the power supply outlet
before replacing consumable torch parts.
- Make the electrical connections and installation according to the safety rules
and legislation in force.
- The welding machine should be connected only and exclusively to a power
source with the neutral lead connected to earth.
- Make sure that the power supply plug is correctly connected to the earth
protection outlet.
- Do not use the welding machine in damp or wet places and do not weld in the
rain.
- Do not use cables with worn insulation or loose connections.
- Do not weld on containers or piping that contains or has contained flammable
liquid or gaseous products.
- Do not operate on materials cleaned with chlorinated solvents or near such
substances.
- Do not weld on containers under pressure.
- Remove all flammable materials (e.g. wood, paper, rags etc.) from the working
area.
- Provide adequate ventilation or facilities for the removal of welding fumes near
the arc; a systematic approach is needed in evaluating the exposure limits for
the welding fumes, which will depend on their composition, concentration and
the length of exposure itself.
- Keep the gas bottle (if used) away from heat sources, including direct
sunlight.
- Use electric insulation that is suitable for the torch, the workpiece and any
metal parts that may be placed on the ground and nearby (accessible).
This can normally be done by wearing gloves, footwear, head protection and
clothing that are suitable for the purpose and by using insulating boards or
mats.
- Always protect your eyes with the relative filters, which must comply with UNI
EN 169 or UNI EN 379, mounted on masks or use helmets that comply with UNI
EN 175.
Use the relative fire-resistant clothing (compliant with UNI EN 11611) and
welding gloves (compliant with UNI EN 12477) without exposing the skin to the
ultraviolet and infrared rays produced by the arc; the protection must extend
to other people who are near the arc by way of screens or non-reflective
sheets.
- Noise: If the daily personal noise exposure (LEPd) is equal to or higher than 85
dB(A) because of particularly intensive welding operations, suitable personal
protective means must be used (Tab. 1).
- The flow of the welding current generates electromagnetic fields (EMF) around
the welding circuit.
Electromagnetic fields can interfere with certain medical equipment (e.g. Pace-
makers, respiratory equipment, metallic prostheses etc.).
Adequate protective measures must be adopted for persons with these types of
medical apparatus. For example, they must be forbidden access to the area in
which welding machines are in operation.
This welding machine conforms to technical product standards for exclusive
use in an industrial environment for professional purposes. It does not assure
compliance with the basic limits relative to human exposure to electromagnetic
fields in the domestic environment.
The operator must adopt the following procedures in order to reduce exposure
to electromagnetic fields:
- Fasten the two welding cables as close together as possible.
- Keep head and trunk as far away as possible from the welding circuit.
- Never wind welding cables around the body.
- Avoid welding with the body within the welding circuit. Keep both cables on
the same side of the body.
- Connect the welding current return cable to the piece being welded, as close
as possible to the welding joint.
- Do not weld while close to, sitting on or leaning against the welding machine
(keep at least 50 cm away from it).
- Do not leave objects in ferromagnetic material in proximity of the welding
circuit.
- Minimum distance d= 20 cm (Fig. H).
- Class A equipment:
This welding machine conforms to technical product standards for exclusive
use in an industrial environment and for professional purposes. It does not
assure compliance with electromagnetic compatibility in domestic dwellings
and in premises directly connected to a low-voltage power supply system
feeding buildings for domestic use.
EXTRA PRECAUTIONS
- WELDING OPERATIONS:
- In environments with increased riskof electric shock;
- In confined spaces;
- In the presence of flammable or explosive materials;
MUST BE evaluated in advance by an “Expert supervisor” and must always
be carried out in the presence of other people trained to intervene in
emergencies.
All protective technical measures MUST be taken as provided in 7.10; A.8;
A.10 of the applicable standard EN 60974-9: Arc welding equipment. Part 9:
Installation and Use”.
- Welding MUST NOT be allowed if the welding machine or wire feeder is
supported by the operator (e.g. using belts).
- The operator MUST NOT BE ALLOWED to weld in raised positions unless
safety platforms are used.
- VOLTAGE BETWEEN ELECTRODE HOLDERS OR TORCHES: working with
more than one welding machine on a single piece or on pieces that are
connected electrically may generate a dangerous accumulation of no-load
voltage between two different electrode holders or torches, the value of which
may reach double the allowed limit.
An expert coordinator must be designated to measuring the apparatus to
determine if any risks subsist and suitable protection measures can be
adopted, as foreseen by section 7.9 of the applicable standard ”EN 60974-9:
Arc welding equipment. Part 9: Installation and Use”.
ENGLISH
INDEX
1. GENERAL SAFETY CONSIDERATIONS FOR ARC WELDING .......................... 5
2. INTRODUCTION AND GENERAL DESCRIPTION ............................................... 6
2.1 MAIN CHARACTERISTICS ............................................................................. 6
2.2 STANDARD ACCESSORIES ........................................................................... 6
2.3 OPTIONAL ACCESSORIES ............................................................................ 6
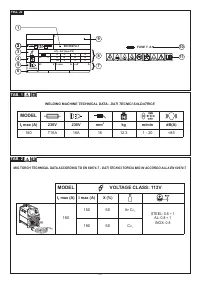
3. TECHNICAL DATA ................................................................................................ 6
3.1 DATA PLATE .................................................................................................... 6
3.2 OTHER TECHNICAL DATA.............................................................................. 6
4. DESCRIPTION OF THE WELDING MACHINE ..................................................... 6
4.1 CONTROL DEVICES: ADJUSTMENT AND CONNECTION. .......................... 6
4.1.1 WELDING MACHINE (Fig. B) ................................................................ 6
4.1.2 WELDING MACHINE CONTROL PANEL (Fig. C) ................................. 6
5. INSTALLATION ...................................................................................................... 6
5.1 POSITIONING THE WELDING MACHINE ...................................................... 6
5.2 CONNECTION TO THE MAIN POWER SUPPLY............................................ 6
5.2.1 Plug and outlet ........................................................................................ 6
5.3 WELDING CIRCUIT CONNECTIONS ............................................................. 6
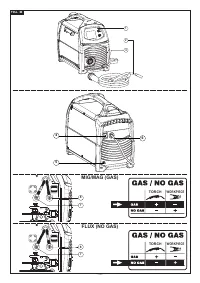
5.3.1 Connecting to the gas bottle (if used) ..................................................... 7
5.3.2 Connecting the welding current return cable .......................................... 7
5.3.3 Torch ....................................................................................................... 7
5.3.4 Polarity change ...................................................................................... 7
5.3.5 Recommendations: ................................................................................. 7
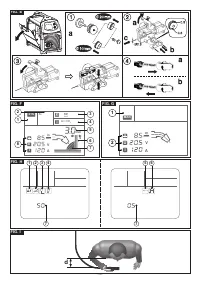
5.4 LOADING THE WIRE REEL (Fig. E) ............................................................... 7
6. WELDING: PROCESS DESCRIPTION ................................................................. 7
6.1 SHORT ARC .................................................................................................... 7
6.2 PROTECTIVE GAS .......................................................................................... 7
7. OPERATION MODE ............................................................................................... 7
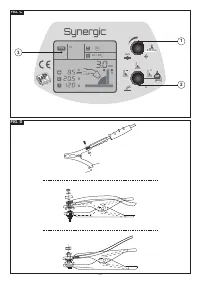
7.1 Operation in SYNERGIC mode
........................................................... 7
7.1.1 LCD display in SYNERGIC mode (Fig. F) .............................................. 7
7.1.2 Setting the parameters ........................................................................... 7
7.1.3 Adjusting the welding seam shape ......................................................... 7
7.2 Operation in MANUAL mode
............................................................... 7
7.2.1 LCD display in SYNERGIC mode (Fig. F) .............................................. 7
7.2.2 Setting the parameters ........................................................................... 7
8. CONTROLLING THE TORCH PUSH-BUTTON .................................................... 7
8.1 Torch push-button control mode ....................................................................... 7
8.2 Setting the torch push-button control mode ..................................................... 7
9. ADVANCED SETTINGS ......................................................................................... 8
9.1 Adjustable advanced parameters ..................................................................... 8
9.2 Setting the advanced parameters .................................................................... 8
10. RESTART DEFAULT ........................................................................................... 8
11. ALARM SIGNALS ................................................................................................ 8
12. MAINTENANCE .................................................................................................. 8
12.1. ROUTINE MAINTENANCE: .......................................................................... 8
12.1.1 Torch ..................................................................................................... 8
12.1.2 Wire feeder ........................................................................................... 8
12.2 EXTRAORDINARY MAINTENANCE ............................................................. 8
13. TROUBLESHOOTING ......................................................................................... 8
page
page
Характеристики

Остались вопросы?Не нашли свой ответ в руководстве или возникли другие проблемы? Задайте свой вопрос в форме ниже с подробным описанием вашей ситуации, чтобы другие люди и специалисты смогли дать на него ответ. Если вы знаете как решить проблему другого человека, пожалуйста, подскажите ему :)


