Страница 2 - English; VisionTM camcorder. With your; WARNING; or; ПРЕДУПРЕЖДЕНИЕ; Русский
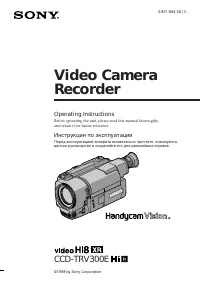
2 English Welcome! Congratulations on your purchase of this SonyHandycam Vision™ camcorder. With your Handycam Vision you can capture life’s preciousmoments with superior picture and soundquality.Your Handycam Vision is loaded with advancedfeatures, but at the same time it is very easy touse. You wi...
Страница 4 - Оглавление; Перед началом эксплуатации
4 Оглавление Русский Перед началом эксплуатации Использование данного руководства ........... 5Проверка прилагаемых принадлежностей ... 6 Подготовка к эксплуатации Установка и зарядка батарейного блока ..... 7Вставка кассеты ........................................... 12 Основные операции Запись с п...
Страница 5 - Note on TV colour systems; • Do not let the camcorder get wet. Keep the; Using this manual
5 Before you begin As you read through this manual, buttons andsettings on the camcorder are shown in capitalletters.e.g. Set the POWER switch to CAMERA.You can hear the beep sound to confirm youroperation. Note on TV colour systems TV colour systems differ from country tocountry. To view your recor...
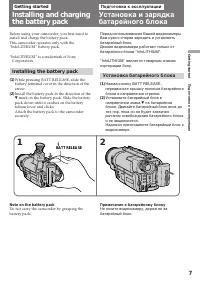
Страница 7 - BATT RELEASE; Installing the battery pack; Install the battery pack in the direction of the; Getting started; Note on the battery pack; Подготовка к эксплуатации; Установка батарейного блока; на батарейном; Примечание к батарейному блоку
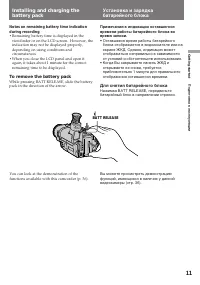
7 Getting started Подготовка к эксплуатации BATT RELEASE 1 2 Before using your camcorder, you first need toinstall and charge the battery pack.This camcorder operates only with the“InfoLITHIUM” battery pack. “InfoLITHIUM” is a trademark of Sony Corporation. Installing the battery pack ( 1 ) While pr...
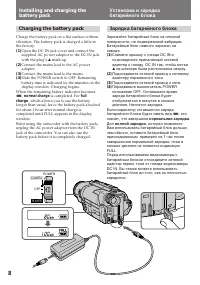
Страница 8 - Charging the battery pack; Connect the mains lead to the mains.; normal charge; , which allows you to use the battery; Зарядка батарейного блока; на штекере была расположена сверху.; нормальная зарядка; Для; полной зарядки
8 POWER CAMERA PLAYER OFF Installing and charging thebattery pack Charging the battery pack Charge the battery pack on a flat surface withoutvibration. The battery pack is charged a little inthe factory. ( 1 ) Open the DC IN jack cover and connect thesupplied AC power adaptor to the DC IN jackwith t...
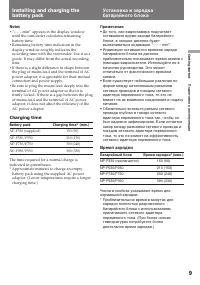
Страница 9 - Notes; • “– – – min” appears in the display window; Charging time; Battery pack; Примечания; • До того, как видеокамера подсчитает; Время зарядки; Батарейный блок
9 Getting started Подготовка к эксплуатации Notes • “– – – min” appears in the display window until the camcorder calculates remainingbattery time. • Remaining battery time indication in the display window roughly indicates therecording time with the viewfinder. Use it as aguide. It may differ from ...
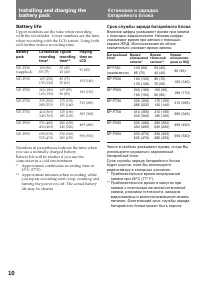
Страница 10 - Battery life; ** Approximate minutes when recording while; Срок службы заряда батарейного блока
10 Installing and charging thebattery pack Battery life Upper numbers are the time when recordingwith the viewfinder. Lower numbers are the timewhen recording with the LCD screen. Using bothwill further reduce recording time. Battery Continuous Typical Playing pack recording recording time on time* ...
Страница 11 - To remove the battery pack; • Оставшееся время работы батарейного; Для снятия батарейного блока
11 Getting started Подготовка к эксплуатации BATT RELEASE Installing and charging thebattery pack You can look at the demonstration of thefunctions available with this camcorder (p. 36). Уcтaнoвка и зарядкабатарейного блока Вы можете просмотреть демонстрациюфункций, имеющихся в наличие у даннойвидео...
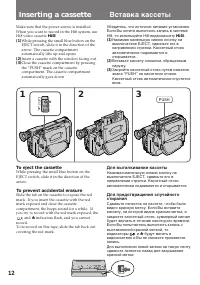
Страница 12 - Insert a cassette with the window facing out.; To eject the cassette; and; Inserting a cassette; Для выталкивания кассеты; будут мигать в
12 PUSH EJECT Make sure that the power source is installed.When you want to record in the Hi8 system, useHi8 video cassette H . ( 1 ) While pressing the small blue button on theEJECT switch, slide it in the direction of thearrow. The cassette compartmentautomatically lifts up and opens. ( 2 ) Insert...
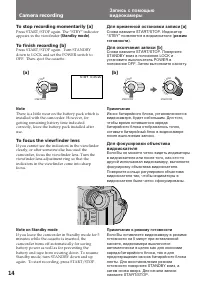
Страница 13 - Basic operations; Camera recording; Turn STANDBY up to STANDBY.; Основные операции; Запись с помощью видеокамеры; Снимите крышку объектива.
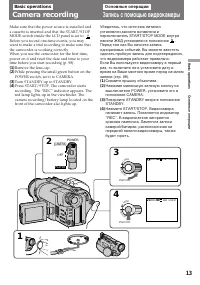
13 Basic operations Основные операции 3 4 2 LO CK START/STOP S TA N D B Y LO CK START/STOP S TA N D B Y 40min SP H STBY 0:00:00 40min SP H REC 0:00:01 POWER PLAYER OFF CAMERA 1 Basic operations Camera recording Make sure that the power source is installed anda cassette is inserted and that the START...
Страница 14 - Note; To focus the viewfinder lens; Note on Standby mode
14 LO CK START/STOP S TA N D B Y START/STOP LO CK S TA N D B Y STBY 0:35:20 LO CK START/STOP S TA N D B Y To stop recording momentarily [a] Press START/STOP again. The “STBY” indicatorappears in the viewfinder (Standby mode) . To finish recording [b] Press START/STOP again. Turn STANDBYdown to LOCK ...
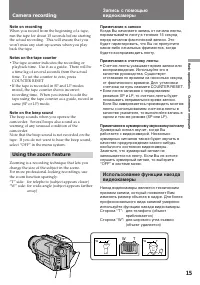
Страница 15 - Note on recording; • The tape counter indicates the recording or; Note on the beep sound; Using the zoom feature; Примечание к записи; • Счетчик ленты указывает время записи или; Примечание к эуммерному звуковому сигналу; Сторона “W”: для широкого угла съемки
15 Basic operations Основные операции Camera recording Note on recording When you record from the beginning of a tape,run the tape for about 15 seconds before startingthe actual recording. This will ensure that youwon’t miss any start-up scenes when you playback the tape. Notes on the tape counter •...
Страница 16 - Notes on digital zoom; • Правая сторона
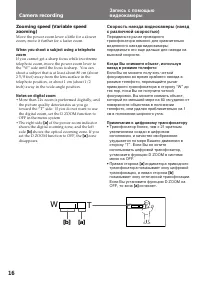
16 T W T W [a] [b] Camera recording Zooming speed (Variable speedzooming) Move the power zoom lever a little for a slowerzoom, move it further for a faster zoom. When you shoot a subject using a telephotozoom If you cannot get a sharp focus while in extremetelephoto zoom, move the power zoom lever t...
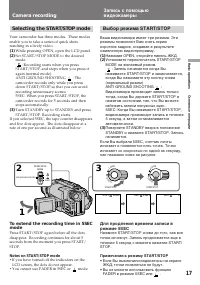
Страница 17 - Selecting the START/STOP mode; : Recording starts when you press; Notes on START/STOP mode; • If you have turned off the indicators on the; : Запись начинается когда Вы; Примечания к режиму START/STOP; • Если Вы выключили индикаторы на экране
17 Basic operations Основные операции STBY REC ••••• ••••• REC • 2 1 3 LO CK START/STOP S TA N D B Y LO CK START/STOP S TA N D B Y 5SEC ANTI GROUND SHOOTING START/STOP MODE Selecting the START/STOP mode Your camcorder has three modes. These modesenable you to take a series of quick shotsresulting in...
Страница 18 - Shooting with the LCD screen; Backlighting the LCD screen; Задняя подсветка экрана ЖКД
18 2 1 Shooting with the LCD screen You can also record the picture while looking atthe LCD screen.When using the LCD screen, the viewfinder turnsoff automatically. You cannot monitor the soundfrom the speaker during recording. ( 1 ) While pressing OPEN, open the LCD panel. ( 2 ) Adjust the angle of...
Страница 19 - Notes on the LCD panel; To cancel mirror mode; Notes on mirror mode; Примечания к панели ЖКД; Для отмены зеркального режима; Примечания к зеркальному режиму; Pr
19 Basic operations Основные операции Notes on the LCD panel • When closing the LCD panel, turn it vertically until it clicks [ a ] . • When turning the LCD panel, turn it always vertically; otherwise, the camcorder body maybe damaged or the LCD panel may not closeproperly [ b ] . • Close the LCD pa...
Страница 21 - Hints for better shooting; Cautions on the viewfinder and the LCD; • Do not pick up the camcorder by the; Советы для лучшей съемки; • Не поднимайте видеокамеру за
21 Basic operations Основные операции Hints for better shooting Place the camcorder on a flat surface or use atripod Try placing the camcorder on a table top or anyother flat surface of suitable height. If you have atripod for a still camera, you can also use it withthe camcorder.When attaching a no...
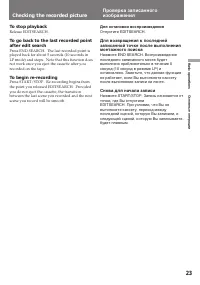
Страница 23 - To stop playback; Checking the recorded picture; Для остановки воспроизведения; Отпустите EDITSEARCH.; Снова для начала записи
23 Basic operations Основные операции To stop playback Release EDITSEARCH. To go back to the last recorded pointafter edit search Press END SEARCH. The last recorded point isplayed back for about 5 seconds (10 seconds inLP mode) and stops. Note that this function doesnot work once you eject the cass...
Страница 24 - Playing back a tape; Press; PLAY
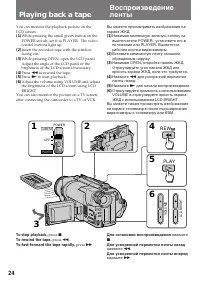
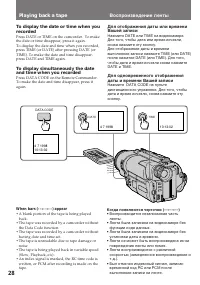
24 Playing back a tape You can monitor the playback picture on theLCD screen. ( 1 ) While pressing the small green button on thePOWER switch, set it to PLAYER. The videocontrol buttons light up. ( 2 ) Insert the recorded tape with the windowfacing out. ( 3 ) While pressing OPEN, open the LCD panel.A...
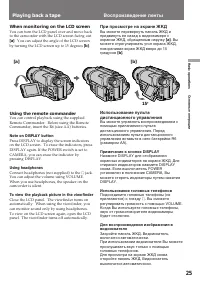
Страница 25 - When monitoring on the LCD screen; . You can adjust the angle of the LCD screen; Using the remote commander; Note on DISPLAY button; Connect headphones (not supplied) to the; To view the playback picture in the viewfinder; При просмотре на экране ЖКД; Примечание к кнопке DISPLAY
25 Basic operations Основные операции When monitoring on the LCD screen You can turn the LCD panel over and move backto the camcorder with the LCD screen facing out [ a ] . You can adjust the angle of the LCD screen by turning the LCD screen up to 15 degrees [ b ] . Using the remote commander You ca...
Страница 26 - Various playback modes; To view the picture at double speed
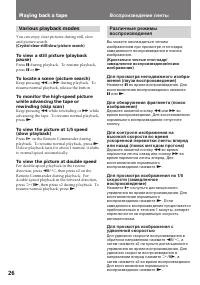
26 Various playback modes You can enjoy clear pictures during still, slowand picture search. (Crystal-clear still/slow/picture search) To view a still picture (playbackpause) Press P during playback. To resume playback, press P or ( . To locate a scene (picture search) Keep pressing 0 or ) during pl...
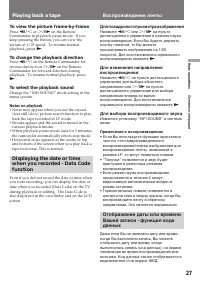
Страница 27 - To change the playback direction; Notes on playback; Для покадрового просмотра изображения; Примечания к воспроизведению
27 Basic operations Основные операции To view the picture frame-by-frame Press '/< or >/7 on the Remote Commander in playback pause mode. If youkeep pressing the button, you can view thepicture at 1/25 speed. To resume normalplayback, press ( . To change the playback direction Press '/< on ...
Страница 29 - While pressing OPEN, open the LCD panel.; If you start recording after using END SEARCH; END
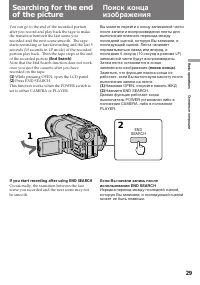
29 Basic operations Основные операции You can go to the end of the recorded portionafter you record and play back the tape to makethe transition between the last scene yourecorded and the next scene smooth. The tapestarts rewinding or fast-forwarding and the last 5seconds (10 seconds in LP mode) of ...
Страница 30 - Advanced operations; Notes on power sources; • Disconnecting the power source or removing; Using the mains; Усовершенствованные операции; Примечания по источникам питания; • Гнездо DC IN имеет приоритет источника; Использование электрической сети; Подсоедините сетевой провод к сети.
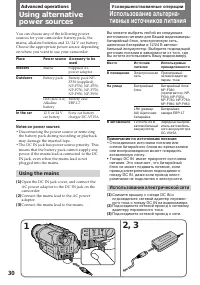
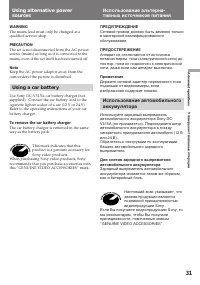
30 Advanced operations Using alternativepower sources You can choose any of the following powersources for your camcorder: battery pack, themains, alkaline batteries and 12/24 V car battery.Choose the appropriate power source dependingon where you want to use your camcorder. Place Power source Acces...
Страница 31 - Using a car battery; To remove the car battery charger
31 Advanced operations Усовершенствованные операции WARNING The mains lead must only be changed at aqualified service shop. PRECAUTION The set is not disconnected from the AC powersource (mains) as long as it is connected to themains, even if the set itself has been turned off. Note Keep the AC powe...
Страница 32 - CAMERA; PLAYER
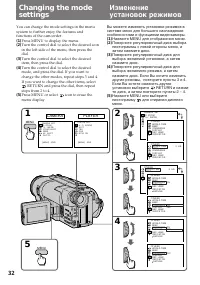
32 1 5 CAMERA 2 3 4 MENU MENU CAMERA SET D ZOOM16 : 9WIDESTEADYSHOTWINDAE SHIFT PHOTO [MENU] : END CAMERA SET D ZOOM16 : 9WIDE OTHERS WORLD TIMEBEEPCOMMANDERD I S P L A YREC LAMPI N D I C A T O R OTHERS WORLD TIMEBEEP OTHERS WORLD TIMEBEEPCOMMANDERD I S P L A YREC LAMPI N D I C A T O R RETURN ON OTH...
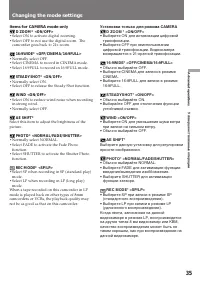
Страница 33 - Notes on changing the mode setting; Changing the mode settings; Примечания к изменению установок режимов
33 Advanced operations Усовершенствованные операции Notes on changing the mode setting • Menu items differ depending on the setting of the POWER switch to PLAYER or CAMERA. • When you let the subject monitor the shot (mirror mode), the menu display does notappear. Selecting the mode setting ofeach i...
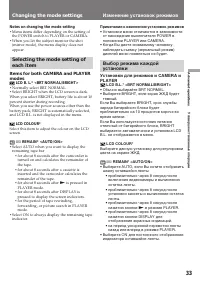
Страница 35 - Items for CAMERA mode only; Установки только для режима CAMERA
35 Advanced operations Усовершенствованные операции Items for CAMERA mode only D ZOOM* <ON/OFF> • Select ON to activate digital zooming.• Select OFF to not use the digital zoom. The camcorder goes back to 21x zoom. 16:9WIDE* <OFF/CINEMA/16:9FULL> • Normally select OFF.• Select CINEMA to ...
Страница 36 - Notes on DEMO MODE; Изменение установок режимов; Примечания к DEMO MODE; • DEMO MODE устанавливается на
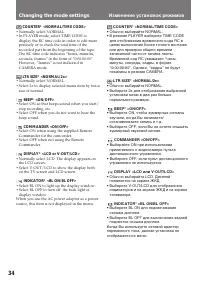
36 Changing the mode settings ORC TO SET* Select this item to automatically adjust therecording condition to get the best possiblerecording.If you have already performed this function,“ORC ON” is displayed. CLOCK SET* Reset the date or time. DEMO MODE* <ON/OFF> • Select ON to make the demonstr...
Страница 37 - Items for PLAYER mode only; Note on TBC setting; Установки только для режима PLAYER
37 Advanced operations Усовершенствованные операции Changing the mode settings Items for PLAYER mode only HiFi SOUND <STEREO/1/2> • Normally select STEREO.• Select 1 or 2 to play back a dual sound track tape. EDIT <ON/OFF> • Select ON to minimize picture deterioration when editing. • Nor...
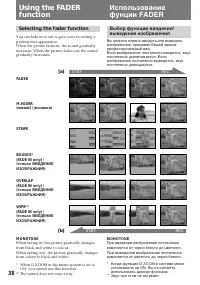
Страница 38 - Selecting the fader function; FADER; * When D ZOOM in the menu system is set to; MONOTONE; * Когда функция D ZOOM в системе меню
38 [a] REC STBY REC STBY [b] Selecting the fader function You can fade in or out to give your recording aprofessional appearance.When the picture fades in, the sound graduallyincreases. When the picture fades out, the soundgradually decreases. Using the FADERfunction FADER M.FADER(mosaic) / (мозаика...
Страница 39 - Using the fader function; When you use the bounce function; Set D ZOOM to OFF in the menu system.; Note on the bounce function; Использование фунции FADER; Установите D ZOOM на OFF в системе меню.
39 Advanced operations Усовершенствованные операции 1 2 LO CK START/STOP S TA N D B Y FADER FADER M.FADER STRIPE BOUNCE MONOTONE OVERLAP WIPE Using the fader function When fading in [a] ( 1 ) While the camcorder is in Standby mode,press FADER until the desired fade indicatorflashes. ( 2 ) Press STAR...
Страница 40 - To cancel the fader function; When the date, time or title is displayed; You cannot use the fader function.; Notes on the fader function; • While using the bounce function, you cannot; Using the FADER function; • При использовании функции перехода Вы
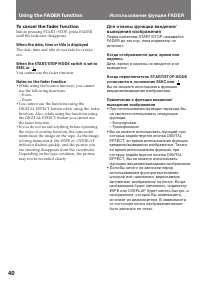
40 To cancel the fader function Before pressing START/STOP, press FADERuntil the indicator disappears. When the date, time or title is displayed The date, time and title do not fade in or fadeout. When the START/STOP MODE switch is set to5SEC or You cannot use the fader function. Notes on the fader ...
Страница 41 - Photo recording; FADE PHOTO; Запись фотографий; Нажмите PHOTO глубже.
41 Advanced operations Усовершенствованные операции 1 2 CAPTURE PHOTO ••••••• PHOTO You can record a still picture like a photographfor about seven seconds. This mode is usefulwhen you want to enjoy a picture such as aphotograph or when you print a picture using avideo printer (not supplied).We reco...
Страница 42 - Notes on photo recording; Примечания к записи фотографий
42 Notes on photo recording • During photo recording, you cannot change the mode or setting of following functions.– White balance– Shutter speed– Iris– Gain– Functions using the PROGRAM AE button • The PHOTO button does not work – while the DIGITAL EFFECT function is set or in use. – while the FADE...
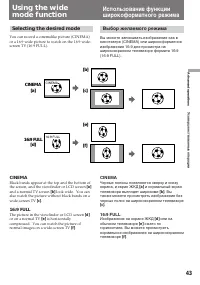
Страница 43 - Selecting the desired mode; CINEMA; and a normal TV screen; Выбор желаемого режима; CINEMA
43 Advanced operations Усовершенствованные операции [b] CINEMA [a] [c] [e] [f] CINEMA 16:9 FULL 16:9 FULL [d] Selecting the desired mode You can record a cinemalike picture (CINEMA)or a 16:9 wide picture to watch on the 16:9 wide-screen TV (16:9 FULL). CINEMA Black bands appear at the top and the bo...
Страница 44 - To cancel wide mode; Notes on wide mode; Using the wide mode function; Для отмены режима; Выберите OFF в системе меню.; Примечания к широкоформатному режиму; • В широкоформатном режиме Вы не можете
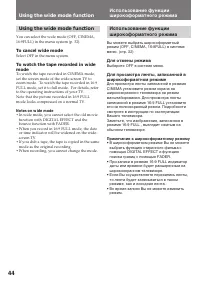
44 Using the wide mode function You can select the wide mode (OFF, CINEMA,16:9FULL) in the menu system (p. 32). To cancel wide mode Select OFF in the menu system. To watch the tape recorded in widemode To watch the tape recorded in CINEMA mode,set the screen mode of the wide-screen TV tozoom mode. T...
Страница 45 - To cancel the still function; Notes on the still function; DIGITAL; Наложение неподвижного; Для отмены функции стоп-кадра; Нажмите DIGITAL EFFECT.; Примечания к функции стоп-кадра; • Вы не можете использовать следующие
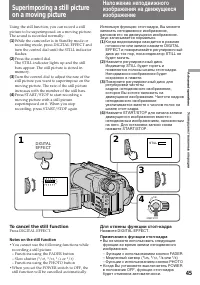
45 Advanced operations Усовершенствованные операции Superimposing a still pictureon a moving picture Using the still function, you can record a stillpicture to be superimposed on a moving picture.The sound is recorded normally. ( 1 ) While the camcorder is in Standby mode orrecording mode, press DIG...
Страница 46 - normal recording
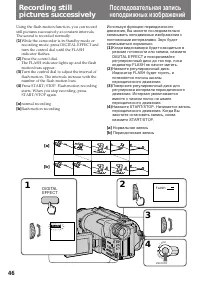
46 2 3 4 1 FLASH LO CK START/STOP S TA N D B Y DIGITAL EFFECT FLASH [a] [b] Recording stillpictures successively Using the flash motion function, you can recordstill pictures successively at constant intervals.The sound is recorded normally. ( 1 ) While the camcorder is in Standby mode orrecording m...
Страница 47 - To cancel the flash motion function; Press DIGITAL EFFECT.; Notes on the flash motion function; • You cannot use the following functions during
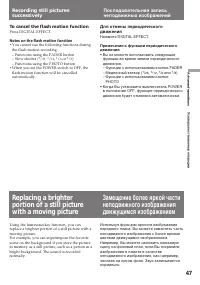
47 Advanced operations Усовершенствованные операции To cancel the flash motion function Press DIGITAL EFFECT. Notes on the flash motion function • You cannot use the following functions during the flash motion recording.– Functions using the FADER button– Slow shutter ( 1 / 25 , 1 / 12 , 1 / 6 or 1 ...
Страница 48 - To cancel the luminancekey function; Notes on the luminancekey function
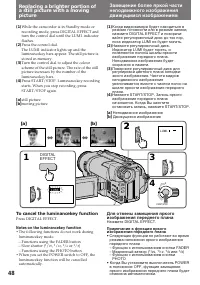
48 2 3 4 1 LUMI. [a] [b] DIGITAL EFFECT 2 LO CK START/STOP S TA N D B Y LUMI. ( 1 ) While the camcorder is in Standby mode orrecording mode, press DIGITAL EFFECT andturn the control dial until the LUMI. indicatorflashes. ( 2 ) Press the control dial.The LUMI. indicator lights up and theluminancekey ...
Страница 49 - To cancel the trail function; Notes on the trail function
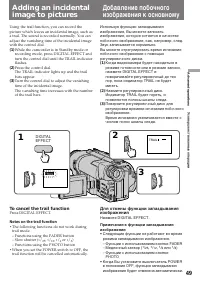
49 Advanced operations Усовершенствованные операции 2 3 1 TRAIL DIGITAL EFFECT TRAIL Using the trail function, you can record thepicture which leaves an incidental image, such asa trail. The sound is recorded normally. You canadjust the vanishing time of the incidental imagewith the control dial. ( ...
Страница 50 - To cancel the old movie function; Notes on the old movie function; • The following functions do not work during old
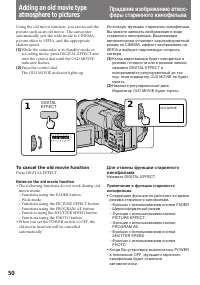
50 2 1 OLD MOVIE OLD MOVIE DIGITAL EFFECT Adding an old movie typeatmosphere to pictures Using the old movie function, you can record thepicture such as an old movie. The camcorderautomatically sets the wide mode to CINEMA,picture effect to SEPIA, and the appropriateshutter speed. ( 1 ) While the ca...
Страница 51 - Selecting picture effect; The picture is sepia.; Выбор эффекта изображения; SEPIA; Изображение будет в цвете сепия.
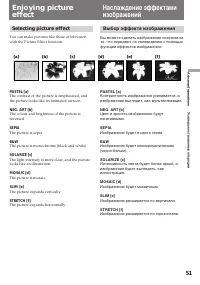
51 Advanced operations Усовершенствованные операции [a] [b] [c] [d] [e] [f] Enjoying pictureeffect Selecting picture effect You can make pictures like those of televisionwith the Picture Effect function. PASTEL [a] The contrast of the picture is emphasized, andthe picture looks like an animated cart...
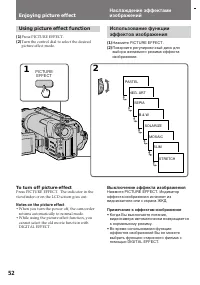
Страница 52 - Using picture effect function; Press PICTURE EFFECT.; Enjoying picture effect; To turn off picture effect; Notes on the picture effect; • When you turn the power off, the camcorder; Выключение эффекта изображения; Примечание к эффектам изображения; • Когда Вы выключаете питание,
52 1 2 PASTEL NEG. ART SEPIA B & W SOLARIZE MOSAIC SLIM STRETCH PICTURE EFFECT Using picture effect function ( 1 ) Press PICTURE EFFECT. ( 2 ) Turn the control dial to select the desiredpicture effect mode. Enjoying picture effect To turn off picture effect Press PICTURE EFFECT. The indicator in...
Страница 53 - Superimposing titles; Press TITLE to display the title menu.; Наложение надписи; Наложение надписей
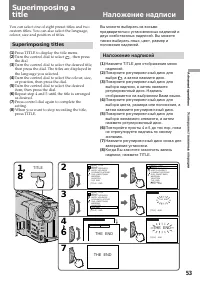
53 Advanced operations Усовершенствованные операции Superimposing atitle You can select one of eight preset titles and twocustom titles. You can also select the language,colour, size and position of titles. Superimposing titles ( 1 ) Press TITLE to display the title menu. ( 2 ) Turn the control dial...
Страница 54 - Notes on superimposing a title; Superimposing a title; Для наложения надписи от начала; Примечания к наложению надписи
54 To superimpose the title frombeginning After step 7, press START/STOP to startrecording. To superimpose the title while youare recording After pressing START/STOP to start recording,start from step 1. In this case, beep is not heard. To select the language of preset title When you want to select ...
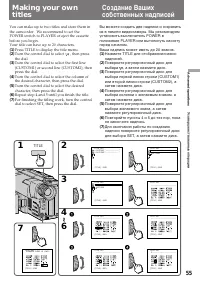
Страница 56 - To edit a title you have stored; You can not enter over 20 characters title.; To delete a title; In step 4, turn the control dial to select [; Making your own titles; Примечание; Вы не можете ввести больше, чем 20 знаков.; Для отмены надписи
56 To edit a title you have stored In step 3, select CUSTOM1 or CUSTOM2,depending on which title you want to edit, thenchange the title. Note You can not enter over 20 characters title. If you take 5 minutes or longer to entercharacters while a cassette is in the camcorder The power goes off automat...
Страница 57 - . The camcorder enters Standby; To change the end point
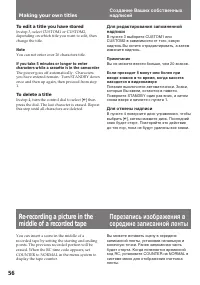
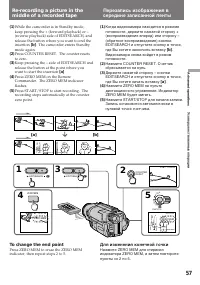
57 Advanced operations Усовершенствованные операции [a] [b] 4 ZERO MEM STBY –0:01:23 ZERO MEM 1 3 EDITSEARCH EDITSEARCH 5 –0:01:22 ZERO MEM LO CK START/STOP S TA N D B Y 2 STBY 0:00:00 COUNTERRESET Re-recording a picture in themiddle of a recorded tape ( 1 ) While the camcorder is in Standby mode,ke...
Страница 58 - Notes on re-recording; • The picture and the sound may be distorted at; Примечания к перезаписи; • Изображение и звук могут быть искажены в
58 Re-recording a picture in themiddle of a recorded tape Запись с датой/временем Notes on re-recording • The picture and the sound may be distorted at the end of the inserted portion when it isplayed back. • If you re-record on the portion which contains non-recorded section, the zero memoryfunctio...
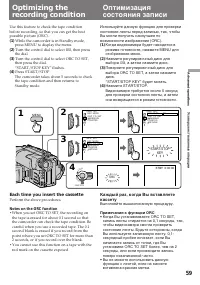
Страница 59 - Each time you insert the cassette; Notes on the ORC function; Выполняйте вышеописанную процедуру.; Примечания к функции ORC; • Когда Вы устанавливаете ORC TO SET,
59 Advanced operations Усовершенствованные операции 1 2 4 STBY 0:00:00 ORC LO CK START/STOP S TA N D B Y TAPE SET REC MODEORC TO SET REMAINCOUNTER START/STOP KEY 3 TAPE SET REC MODEORC TO SET REMAINCOUNTER RETURN SP TAPE SET REC MODEORC TO SET REMAINCOUNTER RETURN MENU Optimizing therecording condit...
Страница 60 - Notes on the Steady Shot function; • The Steady Shot function will not correct; Примечания к функции устойчивой съемки; • Функция устойчивой съемки не
60 When the Steady Shot function is working, thecamcorder compensates for camera-shake. You can release the Steady Shot function whenyou do not need to use it. The indicator appears in the viewfinder or on the LCD screen.When shooting with a tripod, you can get a morenatural picture by releasing the...
Страница 62 - Выбор режимов автоматической/ручной регулировки; Для ручной фокусировки; Используйте AE SHIFT в системе меню.; Примечание к вышеизложенным установкам; установлема в видеокамере.
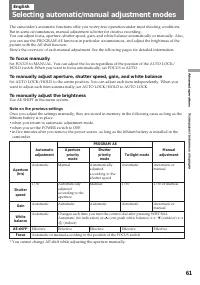
62 Русский Выбор режимов автоматической/ручной регулировки Автоматические функции видеокамеры позволяют Вам осуществлять беззаботнуюэксплуатацию практически во всех условиях съемки. Но при некоторых обстоятельствахручная регулировка приводит к созданию лучшей записи.Вы можете отрегулировать фокусиро...
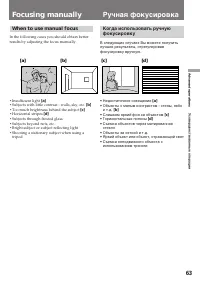
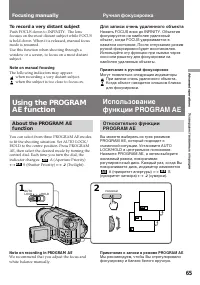
Страница 63 - When to use manual focus; • Insufficient light; Focusing manually
63 Advanced operations Усовершенствованные операции When to use manual focus In the following cases you should obtain betterresults by adjusting the focus manually. • Insufficient light [ a ] • Subjects with little contrast - walls, sky, etc. [ b ] • Too much brightness behind the subject [ c ] • Ho...
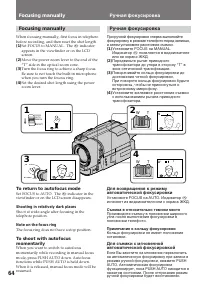
Страница 64 - To return to autofocus mode; Shooting in relatively dark places; Ручная фокусировка; появляется в видоискателе; Съемка в относительно темном месте
64 Focusing manually When focusing manually, first focus in telephotobefore recording, and then reset the shot length. ( 1 ) Set FOCUS to MANUAL. The f indicator appears in the viewfinder or on the LCDscreen. ( 2 ) Move the power zoom lever to the end of the“T” side in the optical zoom zone. ( 3 ) T...
Страница 65 - Примечание к записи в режиме PROGRAM AE; To record a very distant subject; Note on manual focusing; The following indicators may appear:; AE; Для записи очень удаленного объекта; Примечание к ручной фокусировке; Могут появляться следующие индикаторы; Note on recording in PROGRAM AE
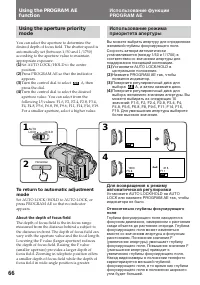
65 Advanced operations Усовершенствованные операции Относительно функцииPROGRAM AE Вы можете выбирать из трех режимовPROGRAM AE, который подходит ксъемочной ситуации. Установите AUTOLOCK/HOLD в центральное положение.Нажмите PROGRAM AE, а затем выберитежелаемый режим, поворачиваярегулировочный диск. ...
Страница 66 - Turn the control dial to select
66 Using the aperture prioritymode You can select the aperture to determine thedesired depth of focus field. The shutter speed isautomatically set (between 1/50 and 1/1750)according to the aperture value to maintainappropriate exposure. ( 1 ) Set AUTO LOCK/HOLD to the centreposition. ( 2 ) Press PRO...
Страница 67 - Using the shutter priority mode
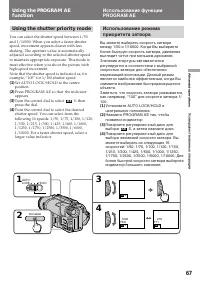
67 Advanced operations Усовершенствованные операции Using the PROGRAM AEfunction Using the shutter priority mode You can select the shutter speed between 1/50and 1/10000. When you select a faster shutterspeed, movement appears clearer with lessshaking. The aperture value is automaticallyadjusted acc...
Страница 68 - When shooting a very bright subject; To select the best shutter speed; Shutter; При съемке очень яркого объекта; Скорость
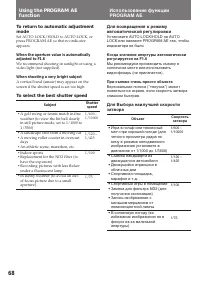
68 To return to automatic adjustmentmode Set AUTO LOCK/HOLD to AUTO LOCK, orpress PROGRAM AE so that no indicatorappears. When the aperture value is automaticallyadjusted to F1.6 We recommend shooting in sunlight or using avideo light (not supplied). When shooting a very bright subject A vertical ba...
Страница 69 - Using the twilight mode; When shooting an excessively bright subject; При съемке чрезмерно яркого объекта
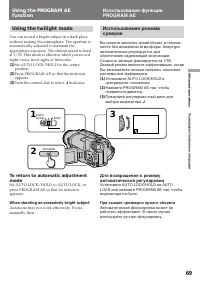
69 Advanced operations Усовершенствованные операции Using the twilight mode You can record a bright subject in a dark placewithout ruining the atmosphere. The aperture isautomatically adjusted to maintain theappropriate exposure. The shutter speed is fixedat 1/50. This mode is effective when you rec...
Страница 70 - When to use manual mode; Using manual mode; Note on recording in manual mode
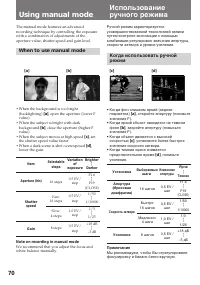
70 The manual mode features an advancedrecording technique by controlling the exposurewith a combination of adjustments of theaperture value, shutter speed and gain level. When to use manual mode • When the background is too bright (backlighting) [ a ] , open the aperture (lower F value). • When the...
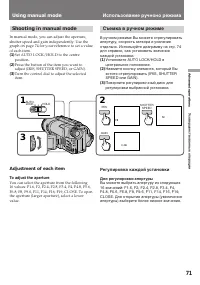
Страница 71 - Shooting in manual mode; Adjustment of each item; To adjust the aperture; Съемка в ручном режиме; Регулировка каждой установки; Для регулировки апертуры; Использование ручноно режима
71 Advanced operations Усовершенствованные операции Shooting in manual mode In manual mode, you can adjust the aperture,shutter speed and gain independently. Use thegraph on page 74 for your reference to set a valueof each item. ( 1 ) Set AUTO LOCK/HOLD to the centreposition. ( 2 ) Press the button ...
Страница 72 - To adjust the shutter speed; To change the setting; Note on gain level; Для регулировки скорости затвора; Для изменения установки; Примечание к уровню усиления
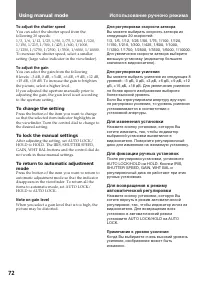
72 Using manual mode To adjust the shutter speed You can select the shutter speed from thefollowing 20 speeds:1/3, 1/6, 1/12, 1/25, 1/50, 1/75, 1/100, 1/120,1/150, 1/215, 1/300, 1/425, 1/600, 1/1000,1/1250, 1/1750, 1/2500, 1/3500, 1/6000, 1/10000.To increase the shutter speed, select a smallersettin...
Страница 73 - • You cannot use following functions.; Using slow shutter; Нажмите SHUTTER SPEED.
73 Advanced operations Усовершенствованные операции If you want to record a dark picture brightly, orrepresent the movement of the subject lively, setthe shutter speed to 1/25, 1/12, 1/6 or 1/3 (Slowshutter). ( 1 ) Set AUTO LOCK/HOLD to the centreposition. ( 2 ) Press SHUTTER SPEED.The shutter speed...
Страница 74 - Understanding the exposure; Total EV = EV from aperture control; Horizontal axis: Shutter speed; Понимание экспозиции; Общее EV = EV от регулировки апертуры; Вертикальная ось: Значение апертуры
74 [c] (dB) –3 1.6 2 2.4 2.8 3.4 4 4.8 5.6 6.8 8 9.6 14 16 19 3 6 12 25 50 75 100 150 215 300 425 600 1000 1250 1750 2500 3500 6000 10000 0 +3 +6 +9 1 (F) 2 +12 +15 +18 11 [b] (1/sec) [a] When you shoot in manual adjustment mode, werecommend you to keep the exposure fixed tomake a clear picture. Thi...
Страница 75 - Notes on manual adjustment; • When recording outdoors, the brightness of a; Tips for manual adjustment; Примечания к ручной регулировке; • Когда производится запись на улице, на; Советы по ручной регулировке
75 Advanced operations Усовершенствованные операции Creating a desired picturewithout changing the exposure When the aperture value is F11, the shutterspeed is 1/50, and the gain level is 0 dB, adjustthe aperture value manually to F5.6, as anexample. If you change the aperture value from F11 to F5.6...
Страница 76 - After shooting; Note on the backlight function; Нажмите BACK LIGHT. Индикатор; После съемки
76 When you shoot a subject with the light sourcebehind the subject or a subject with a lightbackground, use the BACK LIGHT function. Press BACK LIGHT. The c indicator appears in the viewfinder. [ a ] Subject is too dark because of backlight. [ b ] Subject becomes bright with backlightcompensation. ...
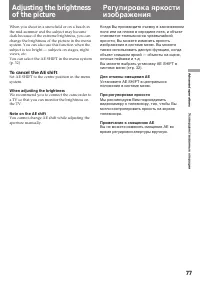
Страница 77 - To cancel the AE shift; When adjusting the brightness
77 Advanced operations Усовершенствованные операции When you shoot in a snowfield or on a beach inthe mid-summer and the subject may becomedark because of the extreme brightness, you canchange the brightness of the picture in the menusystem. You can also use this function when thesubject is too brig...
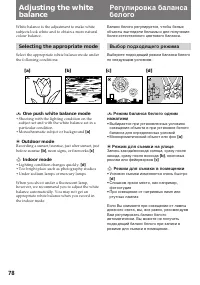
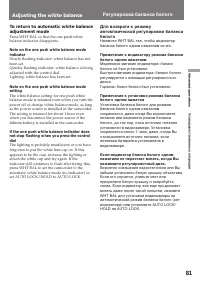
Страница 78 - Selecting the appropriate mode; One push white balance mode; • Shooting with the lighting condition on the; Outdoor mode; • Lighting condition changes quickly.; Выбор подходящего режима; Режим баланса белого одним
78 White balance is the adjustment to make whitesubjects look white and to obtain a more naturalcolour balance. Selecting the appropriate mode Select the appropriate white balance mode underthe following conditions: ∑ One push white balance mode • Shooting with the lighting condition on the subject ...
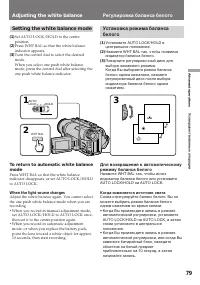
Страница 79 - Setting the white balance mode; When the light source changes; • When you record in automatic adjustment; Adjusting the white balance; Когда изменяется источник света; • Когда Вы производите запись в режиме; Регулировка баланса белого
79 Advanced operations Усовершенствованные операции Setting the white balance mode ( 1 ) Set AUTO LOCK/HOLD to the centreposition. ( 2 ) Press WHT BAL so that the white balanceindicator appears. ( 3 ) Turn the control dial to select the desiredmode.When you select one push white balancemode, press t...
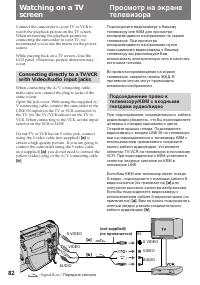
Страница 83 - If your TV or VCR is a monaural type; Watching on a TV screen
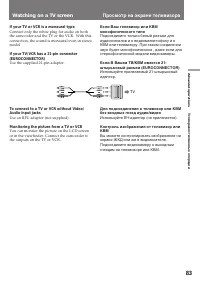
83 Advanced operations Усовершенствованные операции TV If your TV or VCR is a monaural type Connect only the white plug for audio on boththe camcorder and the TV or the VCR. With thisconnection, the sound is monaural even in stereomodel. If your TV/VCR has a 21-pin connector(EUROCONNECTOR) Use the s...
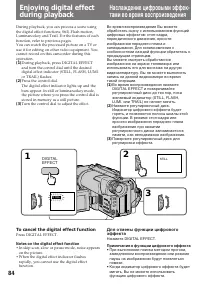
Страница 84 - Turn the control dial to adjust the effect.; Примечания к функции цифрового эффекта; • При выполнении поиска методом прогона,; To cancel the digital effect function; Notes on the digital effect function; • In skip scan, slow or pause mode, noise appears
84 2 3 1 STILL DIGITAL EFFECT STILL Enjoying digital effectduring playback During playback, you can process a scene usingthe digital effect functions; Still, Flash motion,Luminancekey and Trail. For the features of eachfunction, refer to previous pages.You can watch the processed picture on a TV oru...
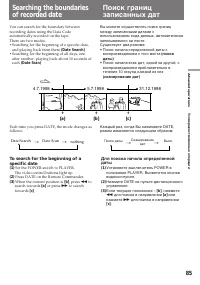
Страница 86 - To scan the beginning of all days; To stop searching or scanning; Поиск границ записанных дат; Для сканирования начала всех дат; Для останова поиска или сканирования
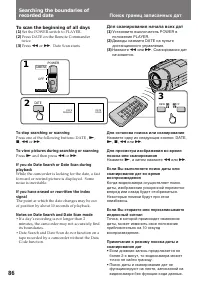
86 3 REW FF 2 DATE SEARCH DATE SCAN DATE 1 POWER PLAYER OFF CAMERA To scan the beginning of all days ( 1 ) Set the POWER switch to PLAYER. ( 2 ) Press DATE on the Remote Commander twice. ( 3 ) Press 0 or ) . Date Scan starts. Searching the boundaries ofrecorded date To stop searching or scanning Pre...
Страница 87 - Notes on the tape counter
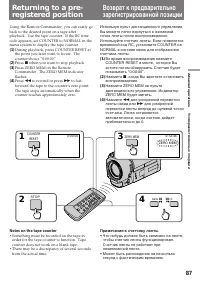
87 Advanced operations Усовершенствованные операции COUNTER RESET 0:00:00 1 ZERO MEM 3 0:12:34 ZERO MEM 2 STOP 4 REW FF Returning to a pre-registered position Using the Remote Commander, you can easily goback to the desired point on a tape afterplayback. Use the tape counter. If the RC timecode appe...
Страница 88 - Marking an index signal; Notes on ZERO MEM; • When you press ZERO MEM, the counter’s; Примечания к ZERO MEM; • Когда Вы нажимаете ZERO MEM, нулевая; Запись индексного сигнала
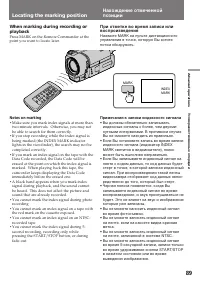
88 You can locate the beginning of a desiredprogramme easily by marking an index signalduring recording or playback and searching for itlater. Marking an index signal You can mark an index signal during recordingor playback. When marking at the beginning ofrecording or playback Press INDEX MARK on t...
Страница 89 - Notes on marking; Locating the marking position; Примечания к записи индексного сигнала
89 Advanced operations Усовершенствованные операции MARK INDEX MARK When marking during recording orplayback Press MARK on the Remote Commander at thepoint you want to locate later. Notes on marking • Make sure you mark index signals at more than two-minute intervals. Otherwise, you may notbe able t...
Страница 90 - To cancel index scan mode; Нажмите
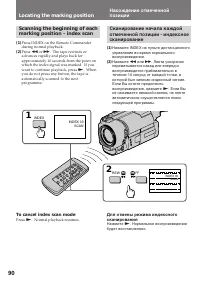
90 INDEX 00 SCAN INDEX 00 SCAN 1 2 INDEX REW FF Scanning the beginning of eachmarking position – index scan ( 1 ) Press INDEX on the Remote Commanderduring normal playback. ( 2 ) Press 0 or ) . The tape rewinds or advances rapidly and plays back forapproximately 10 seconds from the point onwhich the...
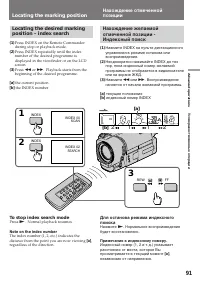
Страница 91 - To stop index search mode; Note on the index number
91 Advanced operations Усовершенствованные операции Locating the marking position Locating the desired markingposition – index search ( 1 ) Press INDEX on the Remote Commanderduring stop or playback mode. ( 2 ) Press INDEX repeatedly until the indexnumber of the desired programme isdisplayed in the ...
Страница 92 - Notes on erasing; Стирание индексного сигнала; Примечания к стиранию индексного сигнала
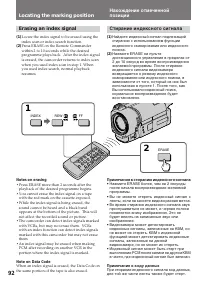
92 Locating the marking position Erasing an index signal ( 1 ) Locate the index signal to be erased using theindex scan or index search function. ( 2 ) Press ERASE on the Remote Commanderwithin 2 to 10 seconds while the desiredprogramme plays back. After the index signalis erased, the camcorder retu...
Страница 93 - To stop writing the RC time code; Writing the RC Time
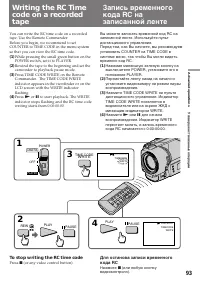
93 Advanced operations Усовершенствованные операции 0:00:00:01 TIMECODE WRITE 4 PLAY PAUSE TIME CODE WRITE - : - - : - - : - - TIMECODE WRITE 3 2 PLAY PAUSE REW 1 POWER PLAYER OFF CAMERA You can write the RC time code on a recordedtape. Use the Remote Commander.Before you begin, we recommend to setC...
Страница 95 - Before editing; To edit more scenes; Note on Fine Synchro Edit; Перед монтажем; Для монтажа других сцен
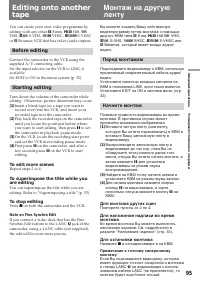
95 Advanced operations Усовершенствованные операции Editing onto anothertape You can create your own video programme byediting with any other h 8 mm, H Hi8, j VHS, k S-VHS, VHSC, K S-VHSC or l Betamax VCR that has video/audio inputs. Before editing Connect the camcorder to the VCR using thesupplie...
Страница 96 - Additional information; indicator flashes in the; Notes on lithium battery; • Wipe the battery with a dry cloth to assure a; Дополнительная информация
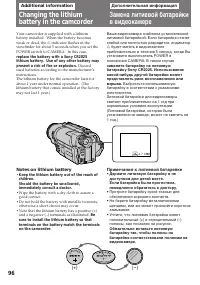
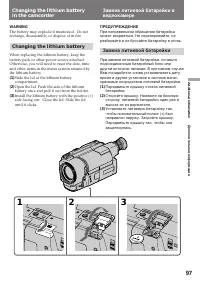
96 (+) (--) - Additional information Changing the lithiumbattery in the camcorder Your camcorder is supplied with a lithiumbattery installed. When the battery becomesweak or dead, the I indicator flashes in the viewfinder for about 5 seconds when you set thePOWER switch to CAMERA. In this case, repl...
Страница 97 - Changing the lithium battery; Замена литиевой батарейки
97 Additional information Дополнительная информация WARNING The battery may explode if mistreated. Do notrecharge, disassemble, or dispose of in fire. Changing the lithium battery When replacing the lithium battery, keep thebattery pack or other power source attached.Otherwise, you will need to rese...
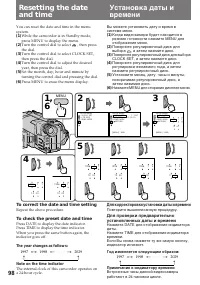
Страница 98 - To correct the date and time setting; Repeat the above procedure.; To check the preset date and time; The year changes as follows:; Для корректировки установки даты и времени; Повторите вышеописанную процедуру.; Год изменяется следующим образом:
98 I N I T I A L S E T CLOCK SETAUTO DATEAUTO TV ONT V I N S E LMENU DISPLANGUAGETV SYSTEMDEMO MODE RETURN [MENU] : END 1 9 9 8 7 4 1 7 3 0 I N I T I A L S E T CLOCK SETAUTO DATEAUTO TV ONT V I N S E LMENU DISPLANGUAGETV SYSTEMDEMO MODE RETURN [MENU] : END 1 9 9 8 7 4 1 7 0 0 I N I T I A L S E T CLO...
Страница 99 - Note on WORLD TIME; , а затем нажмите диск; Примечание к фукции WORLD TIME
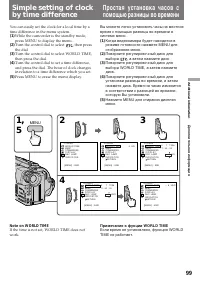
99 Additional information Дополнительная информация Simple setting of clockby time difference You can easily set the clock for a local time by atime difference in the menu system. ( 1 ) While the camcorder is the standby mode,press MENU to display the menu. ( 2 ) Turn the control dial to select , th...
Страница 100 - Selecting cassette types; What is video Hi8; Выбор типа кассеты; Что такое видео Hi8
100 Usable cassettes andplayback modes Selecting cassette types This Hi8 system is an extension of the standard 8mm system, and was developed to realize higherpicture quality.You can use either Hi8 or standard 8 mm videocassette for this camera. When you use a Hi8video cassette, the recording is mad...
Страница 101 - When you play back; Note on AFM HiFi stereo; Playing back an NTSC-recorded tape; Примечание к стереозвучанию AFM Hi-Fi
101 Additional information Дополнительная информация Usable cassettes and playbackmodes When you play back The playback mode (SP/LP) and system (Hi8/standard 8 mm) are selected automaticallyaccording to the format in which the tape hasbeen recorded. The quality of the recordedpicture in LP mode, how...
Страница 102 - Preparing the battery pack; Always carry additional batteries; indicator may appear and; Подготовка батарейного блока; Для экономии заряда батарейного блока; Когда заменять батарейный блок; появляется и начинает
102 Tips for using thebattery pack This section shows you how you can get the mostout of your battery pack. Preparing the battery pack Always carry additional batteries Have sufficient battery pack power to do 2 to 3times as much recording as you have planned. Battery life is shorter in a coldenviro...
Страница 103 - Caution; • Do not expose the battery pack to any; The life of the battery pack; Tips for using the battery pack; Предостережение; • Храните батарейный блок подальше от; Срок службы батарейного блока
103 Additional information Дополнительная информация Notes on the rechargeablebattery pack Caution Never leave the battery pack in temperaturesabove 60°C (140°F), such as in a car parked in thesun or under direct sunlight. The battery pack heats up During charging or recording, the battery packheats...
Страница 104 - What is “InfoLITHIUM”; How the battery consumption is displayed; indicator may also flash under; Что такое “InfoLITHIUM”; , видеоаппаратура будет
104 Tips for using the battery pack Notes on the “InfoLITHIUM”battery pack What is “InfoLITHIUM” The “InfoLITHIUM” is a lithium ion battery packwhich can exchange data with compatible videoequipment about its battery consumption.When you use this battery pack with videoequipment having the mark, the...
Страница 105 - • После использования батарейного блока
105 Additional information Дополнительная информация Tips for using the battery pack To obtain more accurate remaining batteryindication Set the camcorder to recording standby modeand point towards a stationary object. Do notmove the camcorder for 30 seconds or more.• If the indication seems incorre...
Страница 106 - Moisture condensation; Inside the camcorder; indicator flashes. If this; On the lens; Конденсация влаги; Внутри видеокамеры; будет; На объективе
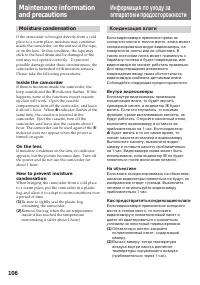
106 Maintenance informationand precautions Moisture condensation If the camcorder is brought directly from a coldplace to a warm place, moisture may condenseinside the camcorder, on the surface of the tape,or on the lens. In this condition, the tape maystick to the head drum and be damaged or theuni...
Страница 107 - Video head cleaning; indicator and; Очистка видеоголовок; сообщение “
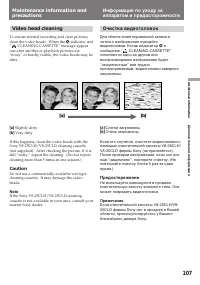
107 Additional information Дополнительная информация [a] [b] Maintenance information andprecautions Video head cleaning To ensure normal recording and clear pictures,clean the video heads. When the v indicator and “ CLEANING CASSETTE” message appear one after another or playback pictures are“noisy” ...
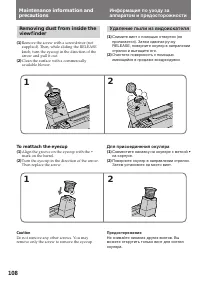
Страница 108 - To reattach the eyecup; Удаление пыли из видоискателя; Для присоединения окуляра
108 Maintenance information andprecautions Removing dust from inside theviewfinder ( 1 ) Remove the screw with a screwdriver (notsupplied). Then, while sliding the RELEASEknob, turn the eyecup in the direction of thearrow and pull it out. ( 2 ) Clean the surface with a commerciallyavailable blower. ...
Страница 109 - Precautions; Camcorder operation; Предосторожности; Эксплуатация видеокамеры
109 Additional information Дополнительная информация Precautions Camcorder operation • Operate the camcorder on 7.2 V (battery pack) or 8.4 V (AC power adaptor). • For DC or AC operation, use the accessories recommended in this manual. • Should any solid object or liquid get inside the casing, unplu...
Страница 111 - Notes on dry batteries; If battery leakage occurred; Примечания к сухим батарейкам; Если случится протечка батареек
111 Additional information Дополнительная информация • Do not apply mechanical shock or drop the unit. • While the unit is in use, particularly during charging, keep it away from AM receivers andvideo equipment because it will disturb AMreception and video operation. • The unit becomes warm while in...
Страница 112 - PAL system; Brazil; NTSC system; Источники питания; Система PAL; Бразилия; Система NTSC
112 Using yourcamcorder abroad Each country or area has its own electric and TVcolour systems. Before using your camcorderabroad, check the following points. Power sources You can use your camcorder in any country orarea with the supplied AC power adaptor within100 V to 240 V AC, 50/60 Hz. Differenc...
Страница 117 - Видеокамера; Проверка неисправностей
117 Additional information Дополнительная информация Признак Причина и/или действия по устранению • Не установлен батарейный блок. m Установите батарейный блок. (стр. 7) • Батарейный блок полностью разрядился. m Используйте заряженный батарейный блок. (стр. 8) • Сетевой адаптер перем. тока не подсое...
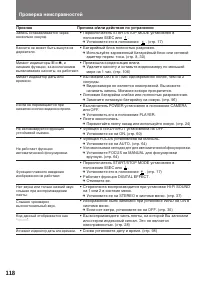
Страница 118 - Признак
118 Проверка неисправностей Признак Причина и/или действия по устранению • Переключатель START/STOP MODE установлен в положение 5SEC или . m Установите его в положение . (стр. 17) • Батарейный блок полностью разряжен. m Используйте заряженный батарейный блок или сетевойадаптер перем. тока. (стр. 8, ...
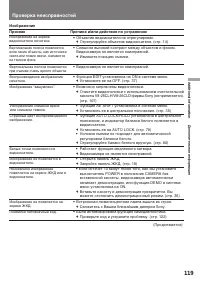
Страница 119 - Изображение
119 Additional information Дополнительная информация Появился пятизначный код. Изображение не появляется наэкране ЖКД. Незнакомое изображениепоявляется на экране ЖКД или ввидоискателе. Изображение не появляется ввидоискателе. Изображение слишком яркоеили слишком темное. Странный цвет воспроизводимог...
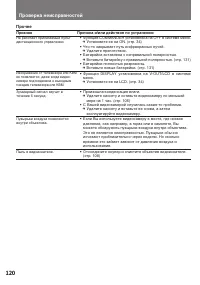
Страница 120 - Прочее
120 Не работает прилагаемый пультдистанционного управления. Изображение от телевизора или КВМне появляется, даже когда видео-камера подсоединена к выходнымгнездам телевизора или КВМ. Зуммерный сигнал звучит втечение 5 секунд. Прочее Признак Причина и/или действия по устранению • Функция COMMANDER ус...
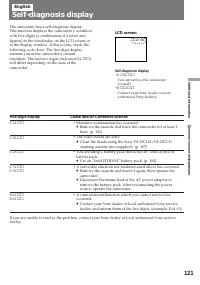
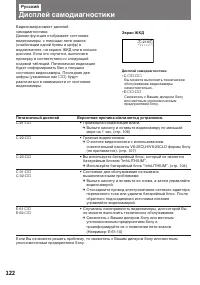
Страница 122 - ππ; Экран ЖКД
122 Пятизначный дисплей Вероятная причина и/или метод устранения. • Произошла конденсация влаги. m Выньте кассету и оставьте видеокамеру по меньшеймере на 1 час. (стр. 106) • Грязные видеоголовки. m Очистите видеоголовки с использованиемочистительной кассеты V8-25CLH/V8-25CLD фирмы Sony(не прилагает...
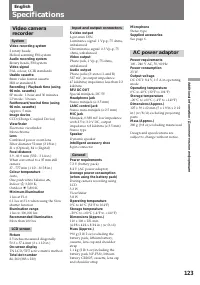
Страница 124 - Технические характеристики
124 Русский Технические характеристики Видеокамера Система Система видеозаписи 2 вращающиеся головкиСистема ЧМ наклонноймеханической развертки Система аудиозаписи Вращающиеся головки, системаЧМ Видеосигнал Цветовой сигнал PAL, стандартCCIR Используемые кассеты Кассеты 8-мм видеоформатаHi 8 или 8-мм ...
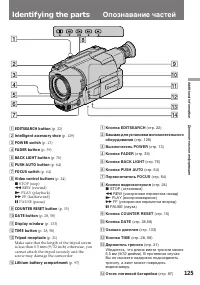
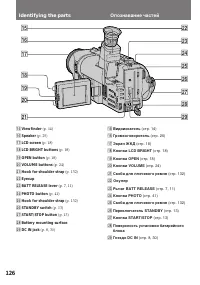
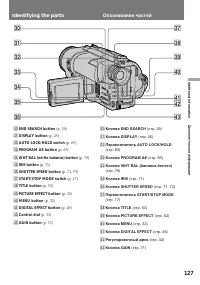
Страница 125 - Identifying the parts
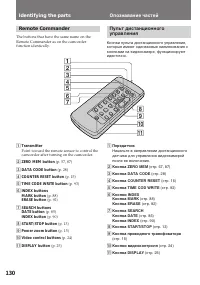
125 Additional information Дополнительная информация Identifying the parts 1 EDITSEARCH button (p. 22) 2 Intelligent accessory shoe (p. 129) 3 POWER switch (p. 13) 4 FADER button (p. 39) 5 BACK LIGHT button (p. 76) 6 PUSH AUTO button (p. 64) 7 FOCUS switch (p. 64) 8 Video control buttons (p. 24) p S...
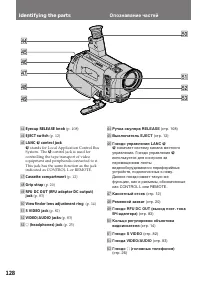
Страница 128 - stands for Local Application Control Bus; Опознавание частей; означает систему канала местного
128 $¢ $• $ª $∞ $§ $¶ %º %™ %£ %¡ Identifying the parts $¢ Eyecup RELEASE knob (p. 108) $∞ EJECT switch (p. 12) $§ LANC l control jack l stands for Local Application Control Bus System. The l control jack is used for controlling the tape transport of videoequipment and peripherals connected to it.Th...
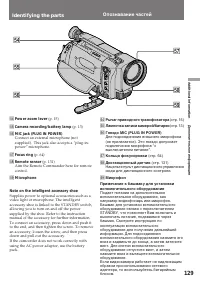
Страница 129 - Рычаг приводного трансфокатора
129 Additional information Дополнительная информация Identifying the parts %¢ Power zoom lever (p. 15) %∞ Camera recording/battery lamp (p. 13) %§ MIC jack (PLUG IN POWER) Connect an external microphone (notsupplied). This jack also accepts a “plug-in-power” microphone. %¶ Focus ring (p. 64) %• Remo...
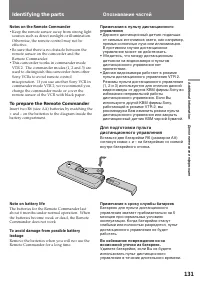
Страница 131 - Notes on the Remote Commander; • Keep the remote sensor away from strong light; To prepare the Remote Commander; Note on battery life; Примечание к сроку службы батареек; • Держите дистанционный датчик подальше
131 Additional information Дополнительная информация Notes on the Remote Commander • Keep the remote sensor away from strong light sources such as direct sunlight or illumination.Otherwise, the remote control may not beeffective. • Be sure that there is no obstacle between the remote sensor on the c...
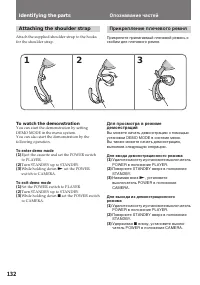
Страница 132 - Attaching the shoulder strap; To watch the demonstration; Для ввода демонстрационного режима; Нажимая вниз
132 Attaching the shoulder strap Attach the supplied shoulder strap to the hooksfor the shoulder strap. To watch the demonstration You can start the demonstration by settingDEMO MODE in the menu system.You can also start the demonstration by thefollowing operation. To enter demo mode( 1 ) Eject the ...
Страница 133 - min; Operation indicators; Видоискатель
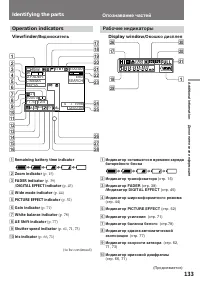
133 Additional information Дополнительная информация 40 min SP H STBY 0:00:00 M.FADERCINEMASEPIA END SEARCH 4 7 1998 12:00:00 c „ f T W +1 AS 1 0 0 0 0F 1 . 6 1 2 dB AE A 2 4567890 !¡!™!£ 3 1 @∞ @¶ !•!ª@º@¡@™@£ @¢ !¶ @§ !¢!∞!§ @• Operation indicators Identifying the parts Viewfinder/ Видоискатель Di...
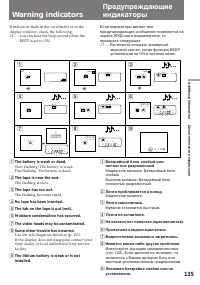
Страница 135 - Warning indicators; The flashing is slow.; Лента приближается к концу.; Мигание становится быстрым.; Произошла конденсация влаги.
135 Additional information Дополнительная информация Warning indicators If indicators flash in the viewfinder or in thedisplay window, check the following: ≥≥ ... : you can hear the beep sound when the BEEP is set to ON. 1 2 3 4 5 6 7 8 9 4 7 1998 5min 0min CLEANING CASSETTE C:31:10 C:21:00 1 The ba...
Страница 136 - Index; Алфавитный указатель; Sony Corporation
136 Index A, B Adjusting viewfinder ................ 14AE shift ........................................ 77AFM HiFi Sound ............... 37, 101ANTI GROUND SHOOTING ................................................... 17 Aperture ...................................... 71Aperture priority mode .........