
Шуруповерты Stanley SCH201D2K - инструкция пользователя по применению, эксплуатации и установке на русском языке. Мы надеемся, она поможет вам решить возникшие у вас вопросы при эксплуатации техники.
Если остались вопросы, задайте их в комментариях после инструкции.
"Загружаем инструкцию", означает, что нужно подождать пока файл загрузится и можно будет его читать онлайн. Некоторые инструкции очень большие и время их появления зависит от вашей скорости интернета.


ENGLISH
(Original instructions)
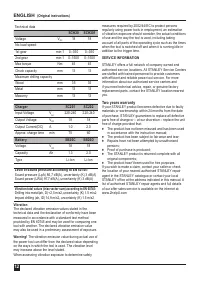
10
♦
Tighten the first screw.
♦
If the clutch ratchets before the desired result is
achieved, increase the collar setting and continue
tightening the screw. Repeat until you reach the correct
setting. Use this setting for the remaining screws.
Note:
When using the Hammer drill for drilling holes, be
sure that the function collar is set so the figure of the drill
is aligned with the center line on the top of the tool. Failure
to do this will allow the clutch to slip while attempting to drill.
Dual range switch (Fig. F)
♦
The dual range feature of your drill allows you to shift
gears for greater versatility.
♦
To select low speed, high torque setting (position 1),
turn tool off and permit to stop. Slide gear shifter button
(4)
away from the chuck.
♦
To select the high speed, low torque setting (position 2),
turn tool off and permit to stop. Slide gear shifter button
back toward the chuck.
♦
Note:
Do not change gears when tool is running. If you
are having trouble changing gears, make sure that the
dual range gear button is either completely pushed
forward or completely pushed back.
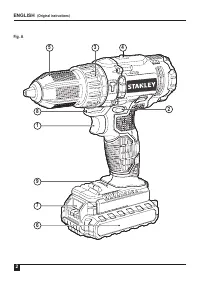
Keyless chuck (Fig. G)
Warning!
Make certain the battery pack is
removed to prevent tool actuation before installing
or removing accessories.
To insert a drill bit or other accessory:
1.
Grasp the chuck
(5)
and rotate it in the counterclockwise
direction, as viewed from the chuck end.
2.
Insert the bit or other accessory fully into the chuck,
and tighten securely by rotating the chuck in the clockwise
direction as viewed from the chuck end.
@
Warning!
Do not attempt to tighten or
loosen drill bits (or any other accessory)
by gripping the front part of the chuck
and turning the tool on. Damage to the
chuck and personal injury may occur when
changing accessories.
Screw driving
♦
For driving fasteners, the forward/reverse button should
be pushed to the left.
♦
Use reverse (button pushed to the right) for removing
fasteners.
N
ote:
When moving from forward to reverse, or vice
versa, always release the trigger switch first.
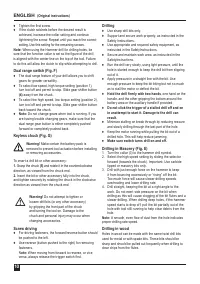
Drilling
♦
Use sharp drill bits only.
♦
Support and secure work properly, as instructed in the
Safety Instructions.
♦
Use appropriate and required safety equipment, as
instructed in the SafetyInstructions.
♦
Secure and maintain work area, as instructed in the
SafetyInstructions.
♦
Run the drill very slowly, using light pressure, until the
hole is started enough to keep the drill bit from slipping
out of it.
♦
Apply pressure in a straight line with the bit. Use
enough pressure to keep the bit biting but not so much
as to stall the motor or deflect the bit.
♦
Hold the drill firmly with two hands
, one hand on the
handle, and the other gripping the bottom around the
battery area or the auxillary handle if provided.
♦
Do not click the trigger of a stalled drill off and on
in anattempt to start it. Damage to the drill can
result.
♦
Minimize stalling on break through by reducing ressure
and slowly drilling through the last part of the hole.
♦
Keep the motor running while pulling the bit out of a
drilled hole. This will help reduce jamming.
♦
Make sure switch turns drill on and off.
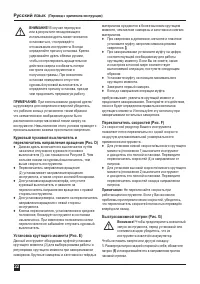
Drilling in Masonry (Fig. E)
1. Turn the collar (3) to the hammer drill symbol.
2. Select the high speed setting by sliding the selector
forward (towards the chuck). Important: Use carbide
tipped or masonry bits only.
3. Drill with just enough force on the hammer to keep
it from bouncing excessively or “rising” off the bit.
Too much force will cause slower drilling speeds,
overheating and lower drilling rate.
4. Drill straight, keeping the bit at a right angle to the
work. Do not exert side pressure on the bit when
drilling as this will cause clogging of the bit flutes and a
slower drilling. When drilling deep holes, if the hammer
speed starts to drop off, pull the bit partially out of the
hole with tool still running to help clear debris from the
hole.
Note:
A smooth, even flow of dust from the hole indicates
proper drilling rate speed.
Drilling in wood
Holes in wood can be made with the same twist drill bits
used for metal or with spade bits. These bits should be
sharp and should be pulled out frequently when drilling to
clear chips from the flutes.
Содержание
- 15 Русский язык
- 16 Год изготовления
- 19 Аккумулятор
- 20 «Технические; Комплект поставки; РЕКОМЕНДАЦИИ ПО ХРАНЕНИЮ
- 21 ИНСТРУКЦИИ ПО ЭКСПЛУАТАЦИИ
- 22 Курковый пусковой выключатель и
- 23 Заворачивание; The work light is for lighting the immediate work; Хранение насадок
- 24 безопасности; ДОПОЛНИТЕЛЬНЫЕ ПРИНАДЛЕЖНОСТИ; Аккумуляторы; ПРИМЕЧАНИЯ
- 25 Зарядное; Информация по техническому обслуживанию
- 27 Гарантийные условия


