
Шуруповерты Hilti UH 700 2091317 - инструкция пользователя по применению, эксплуатации и установке на русском языке. Мы надеемся, она поможет вам решить возникшие у вас вопросы при эксплуатации техники.
Если остались вопросы, задайте их в комментариях после инструкции.
"Загружаем инструкцию", означает, что нужно подождать пока файл загрузится и можно будет его читать онлайн. Некоторые инструкции очень большие и время их появления зависит от вашей скорости интернета.


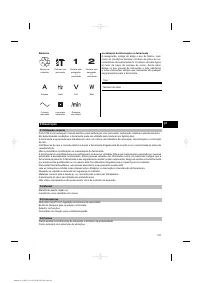


NOTE
Depending on the type of chuck fitted, either the broad
adjusting ring or the rear gripping ring on the chuck must
be held securely by hand.
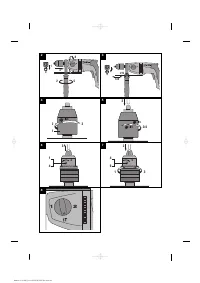
7.2.1.1 Opening the keyless chuck
4
1. Grip the rotatable sleeve.
2. Turn the sleeve counterclockwise.
NOTE
First, the locking mechanism will be released
automatically.
3. Continue turning the sleeve until the insert tool is
released.
7.2.1.2 Closing the keyless chuck
5
1. Open the keyless chuck far enough to allow the
shank of the tool to be inserted.
2. Insert the shank of the tool in the keyless chuck.
3. Tighten the chuck by turning the rotatable sleeve
firmly in a clockwise direction.
4. After the jaws of the chuck begin to grip the tool,
continue turning the rotatable sleeve in a clockwise
direction until the keyless chuck engages and locks
automatically.
NOTE
The chuck must be heard to engage (several
clicks).
7.2.2 Key chuck
CAUTION
Disconnect the mains plug from the power outlet.
NOTE
Use the key supplied to open the chuck and to tighten it
after inserting a tool.
7.2.2.1 Opening the key chuck
6
1. Insert the chuck key in one of the three holes
provided in the chuck.
2. Open the chuck by turning the key in a counter-
clockwise direction.
3. Remove the tool from the chuck.
4. Remove the chuck key.
7.2.2.2 Closing the key chuck
7
1. Open the key chuck far enough to allow the shank
of the tool to be inserted.
2. Insert the shank of the tool in the chuck.
3. Close the jaws by turning the rotatable toothed ring
until the tool is gripped by the chuck.
4. Insert the chuck key in one of the three holes
provided in the chuck.
5. Tighten the chuck by turning the chuck key in a
clockwise direction until the tool is held securely.
6. Remove the chuck key.
7.2.3 Possible applications
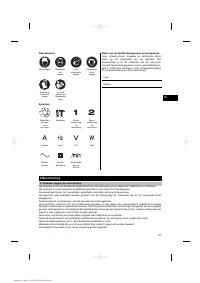
CAUTION
In accordance with the applications for which it is de-
signed, the power tool produces a high torque.
Always
use the side handle and hold the power tool with both
hands.
The user must be prepared for sudden sticking
and stalling of the insert tool.
CAUTION
If stalling occurs, switch off the motor immediately. The
power tool may suffer damage if stalled for longer than
2-3 seconds.
CAUTION
Do not operate the function selector switch while the
motor is running.
NOTE
The forward / reverse switch must be set to the “forward”
position.
7.2.3.1 Hammer drilling
8
1. Turn the function selector switch to the “Hammer
drilling” position until it engages. It may be necessary
to turn the drive spindle slightly.
2. Bring the side handle into the desired position and
check that it is fitted correctly and secured.
3. Plug the supply cord into the power outlet.
4. Position the power tool and drill bit at the point
where the hole is to be drilled.
NOTE
We recommend use of the dust shield for
overhead drilling. This will help to reduce the amount
of dust entering the chuck.
5. Press the control switch slowly (drill at a low speed
until the drill bit centers itself in the hole).
6. Press the control switch fully to continue working at
full power.
NOTE
With this hammer drill, drilling performance
depends on the amount of pressure applied to it.
7. To avoid material breaking away at the rear surface
when drilling through-holes, reduce drilling speed
and pressure shortly before breaking through.
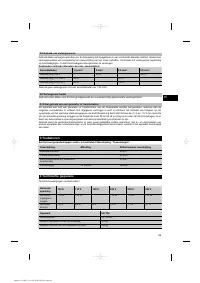
7.2.3.2 Dust removal (TE DRS‑S)
9
The DRS dust removal system is attached to the side
handle / depth gauge. Drilling dust and fragments can
then be removed by a vacuum cleaner. For further inform-
ation on operation and use of the dust removal system,
please refer to the separate operating instructions for the
TE DRS‑S.
7.2.3.3 Rotary drilling, 1st and 2nd gear
10
1. Turn the function selector switch to the 1st or 2nd
gear rotary drilling position until it engages. It may
be necessary to turn the drive spindle slightly.
2. Bring the side handle into the desired position and
check that it is fitted correctly and secured.
3. Plug the supply cord into the power outlet.
4. Position the power tool and drill bit at the point
where the hole is to be drilled.
5. Press the control switch slowly (drill at a low speed
until the drill bit centers itself in the hole).
6. Press the control switch fully to continue working at
full power.
en
22
Printed: 03.12.2015 | Doc-Nr: PUB / 5071288 / 000 / 02


