Перфораторы VERTO SDS - инструкция пользователя по применению, эксплуатации и установке на русском языке. Мы надеемся, она поможет вам решить возникшие у вас вопросы при эксплуатации техники.
Если остались вопросы, задайте их в комментариях после инструкции.
"Загружаем инструкцию", означает, что нужно подождать пока файл загрузится и можно будет его читать онлайн. Некоторые инструкции очень большие и время их появления зависит от вашей скорости интернета.


9
CONSTRUCTION AND USE
Rotary hammer is a hand-operated power tool with insulation class II.
The tool is driven by single-phase commutator motor with rotational
speed reduced with gear transmission. Rotary hammer can be used
for drilling holes in working modes: with impact, rotation only, digging
channels or surface processing of materials such as concrete, stone, brick
etc. Range of use covers repair and building works, woodworking and
any work from the scope of individual, amateur activities (tinkering).
Use the power tool according to the manufacturer’s instructions
only.
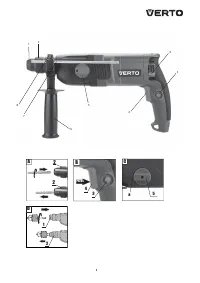
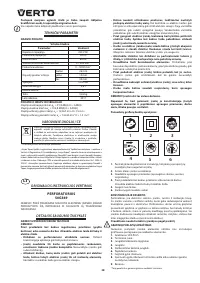
DESCRIPTION OF DRAWING PAGES
Below enumeration refers to the device elements depicted on the
drawing pages of this manual.
1.
SDS-PLUS chuck
2.
Fixing sleeve
3.
Switch lock button
4.
Switch
5.
Operation mode switch
6.
Additional handle
7.
Depth gauge rod
8.
Butterfly nut for fixing depth gauge rod
9.
Direction selector switch
* Differences may appear between the product and drawing
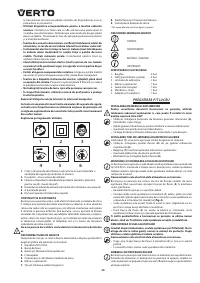
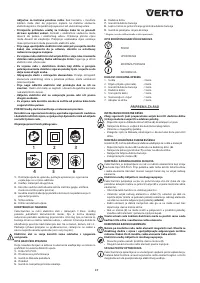
MEANING OF SYMBOLS
CAUTION
WARNING
ASSEMBLY/SETTINGS
INFORMATION
EQUIPMENT AND ACCESSORIES
1. Drills
- 3 pcs
2. Chisels (point and flat)
- 2 pcs
3. Depth gauge rod
- 1 pce
4. Additional handle
- 1 pce
5. Transport case
- 1 pce
6. Drill chuck + key
- 1 pce
7. Chuck adapter
- 1 pce
PREPARATION FOR OPERATION
INSTALLATION OF ADDITIONAL HANDLE
Due to safety issues, always use additional handle (6) when
operating the rotary hammer drill. It can be fixed in any position.
•
Turn left the wheel lock that locks handle collar (
6
) to loosen it.
•
Slide the handle collar over cylindrical part of the rotary hammer drill
body.
•
Turn for the most comfortable position.
•
Turn the wheel lock tight to the right to clamp the handle.
INSTALLATION OF DEPTH GAUGE ROD
Depth gauge (
7
) serves to limit the depth of drill penetration of material.
•
Loosen the butterfly nut (
8
) on the additional handle collar (
6
).
•
Slide depth gauge rod (
7
) into the hole in the additional handle collar.
•
Set desired drilling depth.
•
Tighten the butterfly nut (
8
).
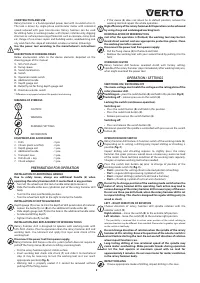
INSTALLATION AND REPLACEMENT OF WORKING TOOLS
Rotary hammer drill is designed to operate with working tools with
SDS-PLUS shanks. Prior to operation clean the rotary hammer drill and
working tools. Use lubricant and apply thin layer onto shank of the
working tool.
Disconnect the power tool from power supply.
Rotary hammer drill features clic-clic system (which does not require to
pull off the fixing sleeve (
2
) when installing a working tool).
•
Put the rotary hammer against stable surface.
•
Insert working tool shank into chuck (
1
) and slide it to mechanical
stop (it may be necessary to turn the working tool so it can reach
appropriate position) (
fig. A
).
•
Working tool is properly seated if it cannot be removed without
pulling off the fixing sleeve.
•
If the sleeve (
2
) does not return to its default position, remove the
working tool and repeat the whole operation.
High efficiency of the rotary hammer drill operation can be achieved
by using sharp and undamaged working tools.
DEINSTALLATION OF WORKING TOOL
Just after the operation is finished, the working tool may be hot.
Avoid direct contact and use appropriate protective gloves. Clean
the working tool after removal.
Disconnect the power tool from power supply.
•
Pull the fixing sleeve (
2
) to the back and hold.
•
Remove the working tool with your second hand by pulling it to the
front.
OVERLOAD CLUTCH
Rotary hammer drill features overload clutch with factory setting.
Spindle of the rotary hammer stops immediately after working tool jams,
what might overload the power tool.
OPERATION / SETTINGS
SWITCHING ON / SWITCHING OFF
The mains voltage must match the voltage on the rating plate of the
rotary hammer drill.
Switching on
– press the switch button (
4
) and hold in this position (
fig. B
).
Switching off
– release pressure on the switch (
4
).
Locking the switch (continuous operation)
Switching on:
•
Press the switch button (
4
) and hold in this position.
•
Press the switch lock button (
3
).
•
Release pressure on the switch button (
4
).
Switching off:
•
Press and release the switch button (
4
).
Rotational speed of the spindle is controlled with pressure on the switch
button (
4
).
OPERATION MODE SWITCH
Rotary hammer drill features 3-function switch of the working mode (
5
).
Depending on its setting, a drilling only, impact drilling or chiselling is
possible (
fig. C
).
Impact drilling and chiselling requires to slightly press the rotary
hammer. Too great pressure would cause unnecessary, excessive load
of the motor. Check technical condition of the working tools regularly.
Sharpen or replace working tools when needed.
Press the switch lock button (
a
) prior to change of position of the
working mode switch (
5
) (
fig. C
).
• Pos0
= position for setting chisel in desired position (chiselling)
• Pos1
= regular drilling/screwing (symbol of a drill)
• Pos2
= impact drilling (symbol of a drill and a hammer)
• Pos3
= chiselling (symbol of a chisel and a hammer)
Do not try to change position of the working mode switch when the
motor of rotary hammer drill is operating. Such action may lead to
serious damage of the rotary hammer drill or even injury of the user.
Do not use three-jaw drill chuck, when the rotary hammer drill is set
to impact drilling. This chuck is designed for regular drilling only (in
wood or steel).
LEFT – RIGHT DIRECTION OF ROTATION
Choose direction of rotary hammer drill spindle rotation with the
selector switch (
9
).
Right rotation
– move the switch (
9
) to the extreme left position
Left rotation
– move the switch (
9
) to the extreme right position.
* The possibility is reserved that in certain cases position of the switch relating to
rotation direction may be different than specified. Please refer to graphic signs placed
on the switch or tool body.
Do not change direction of rotation when the spindle of the rotary
hammer drill is rotating. Ensure the position of the selector switch is
correct before starting the tool. Do not use left direction of rotation
when impact function is on.
Long lasting drilling at low rotational speed of the spindle may
cause motor overheating. Make periodic breaks during operation
or let the tool operate at maximum speed with no load for
approximately 3 minutes. Do not cover holes for motor ventilation
in the rotary hammer body.
IMPACT DRILLING
•
Choose appropriate mode of drilling, impact drilling in this case.
Характеристики

Остались вопросы?Не нашли свой ответ в руководстве или возникли другие проблемы? Задайте свой вопрос в форме ниже с подробным описанием вашей ситуации, чтобы другие люди и специалисты смогли дать на него ответ. Если вы знаете как решить проблему другого человека, пожалуйста, подскажите ему :)
