
Осушители воздуха Black+Decker BXDH12E - инструкция пользователя по применению, эксплуатации и установке на русском языке. Мы надеемся, она поможет вам решить возникшие у вас вопросы при эксплуатации техники.
Если остались вопросы, задайте их в комментариях после инструкции.
"Загружаем инструкцию", означает, что нужно подождать пока файл загрузится и можно будет его читать онлайн. Некоторые инструкции очень большие и время их появления зависит от вашей скорости интернета.
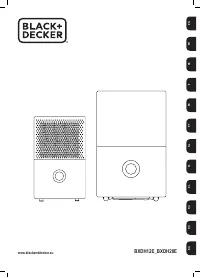


ENGLISH
(Original instructions)
5
♦ Place the appliance on a horizontal, flat, stable surface away from sources of heat and
possible splashing water.
♦
Do not use or store the appliance outdoors.
♦ Do not expose the appliance to rain or moisture. Water entering the appliance will
increase the risk of electric shock.
♦ WARNING: Do not use the appliance near water.
♦ Do not force the connecting cable. Never use the power cord to lift, carry or unplug the
appliance. Keep the device away from heat sources and sharp edges.
USE AND CARE:
♦ After each use, completely unplug the power cable from the power supply.
♦ Do not use the appliance if its start / stop device does not work. Do not remove the legs
from the appliance. Do not move the appliance while it is in use.
♦
Use the handles to take or transport the appliance.
♦ Do not turn the appliance over while it is in use or connected to the mains.
♦ Unplug the power supply from the mains when not in use and before performing any
cleaning operations.
♦ Keep this appliance out of the reach of children and / or persons with reduced physical,
sensory or mental abilities or who are unfamiliar with its use.
♦ Do not expose the appliance to extreme temperatures. Keep the device in a dry,
dustfree place protected from direct sunlight. Never leave the appliance unattended. It
will also save energy and prolong the life of the device.
♦ Any improper use, or in disagreement with the instructions for use, can be dangerous,
voiding the manufacturer’s warranty and liability.
♦ Remove and empty the water tank before moving the appliance. Water spill could
damage interal parts of this dehumidifier.
♦ Use the handle with the assistance of the casters* to take or transport the appliance in
order to avoid injuries and facilitate the transportation.
♦ *(Only for the BXDH20E model) To ensure the proper functioning of the air purifying
system, the HEPA filter must be replaced approximately every 2000h of use. You can
contact our Technical Assistance Service to purchase new HEPA filters.
SERVICE
♦ Make sure that the appliance is serviced only by specialist personnel, and that only
original spare parts or accessories are used to replace existing parts/ accessories.
♦ Any improper use, or in disagreement with the instructions for use, can be dangerous,
voiding the manufacturer’s warranty and liability.
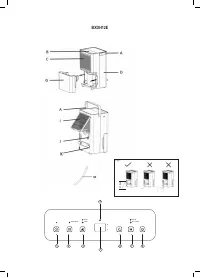
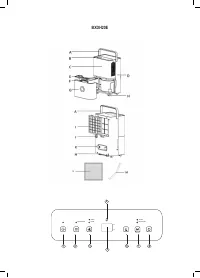
DESCRIPTION
A Handle
B Control Panel
C Front Panel
D Back Panel
E *Water Tank Cover
F
*Water Tank Handle
G Water Tank
H Casters
I
Filter Frame
J
Drainage Outlet
K Power Cord Storage Column
L
*HEPA 13 Filter
M Drainage Hose
*Only available for the BXDH20E model
If the model of your appliance does not have the accessories described above, they can
also be bought separately from the Technical Assistance Service.
CONTROL PANEL
1 Timer
2
Inside drying
3
Air speed
4
Full tank
5
LED display
6
Humidity control
7
Mode / Clothes drying
8
ON/OFF
Installation
♦ Be sure to remove all packaging material from inside the appliance.
♦ *(Only for the BXDH20E model) Remove the filter frame. Open the plastic bag contai
-
ning the HEPA filter and place it in the filter space. Place the filter frame back. Make
sure it is locked in the right position.
♦
It is recommended to insert pads or damping rubber sheets, etc. under this dehumidi-
fier to reduce vibration, noise and possible sinking of woodflors or carpets.
INSTRUCTIONS FOR USE
BEFORE USE:
♦ Make sure that all products’ packaging has been removed.
♦ Some parts of the appliance have been lightly greased. Consequently, the first time
the appliance is used a light smoke may be detected. After a short time, this smoke will
disappear.
♦ To eliminate the smell given off by the appliance when used for the first time, it is
recommended to have it on at full power for 2 hours in a well-ventilated room.
USE:
♦
Extend the cable completely before plugging in.
♦
Plug the appliance into the mains.
♦
Turn the appliance on, by using the on/off button.
♦
Select the desired function.
MODE:
♦ Press the mode button (7) to select auto mode or clothes drying mode.
♦ In auto mode, the appliance will run until the set humidity % is reached. The default hu
-
midity % is 50%. For more details, see the HUMIDITY SETTING FUNCTION section.
♦ The clothes drying function, allows to reduce the time of drying clothes by reducing the
humidity. To see more details about this mode, see the COTHES DRYING FUNCTION
section.
♦ The pilot light above indicates which mode is selected.
TIMER FUNCTION:
♦ Press the timer button (1) to initiate this function.
♦ The LED display screen (4) will show the time that is selected.
♦ Adjust the desired time by pressing the button as many times as hours desired (1-24h).
Every press adjusts one hour.
♦ Once you reach the desired time, stop pressing the button. After five seconds, the set
time is confirmed.
♦ The pilot light above will turn on.
♦ To cancel the timer setup, press twice continuously after confirming the time.
INSIDE DRYING FUNCTION:
♦ Press the inside drying button (2) to initiate this function.
♦ The pilot light above will turn on.
♦ This function dries the inside of the appliance to prevent mold in the interior. This
procedure lasts approximately 1 hour.
♦ The dehumidifier starts at high air speed and releases air continuously for 30 minutes.
Then it turns to low speed for approximately 20 more minutes.
♦
To cancel this function, press the button again.
♦ Activate this function before storing the dehumidifier to prevent mould inside the
appliance.
HUMIDITY SETTING FUNCTION:
♦ Note that this function is only available with the “auto mode”.
♦ Press the humidity setting button (6) to initiate this function.
♦ Once you press the button, a humidity percentage will be displayed.
♦ Every time you press the button the humidity % will increase by 5% until reaching the
maximum of 80%, and then it will go back to 30%.
♦ Once you have reached the desired humidity %, stop pressing the button. The
appliance will run until the room’s humidity reaches 5% lower than the one chosen. The
compressor will stop but the fan will keep running at the set speed.
♦ The LED display screen will show the humidity % selected.
CLOTHES DRYING FUNCTION:
♦ Press the mode button (7) to select this function. The pilot light above indicates the
mode selected.
♦ This function activates the compressor no matter the humidity in the room. This allows
clothes to dry quicker.
Характеристики

Остались вопросы?Не нашли свой ответ в руководстве или возникли другие проблемы? Задайте свой вопрос в форме ниже с подробным описанием вашей ситуации, чтобы другие люди и специалисты смогли дать на него ответ. Если вы знаете как решить проблему другого человека, пожалуйста, подскажите ему :)


