
Холодильник Liebherr CBNes 3957 Premium - инструкция пользователя по применению, эксплуатации и установке на русском языке. Мы надеемся, она поможет вам решить возникшие у вас вопросы при эксплуатации техники.
Если остались вопросы, задайте их в комментариях после инструкции.
"Загружаем инструкцию", означает, что нужно подождать пока файл загрузится и можно будет его читать онлайн. Некоторые инструкции очень большие и время их появления зависит от вашей скорости интернета.

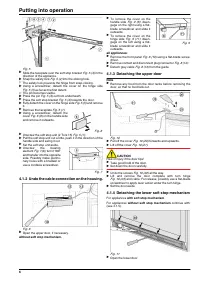


u
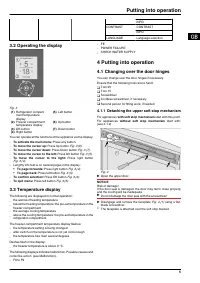
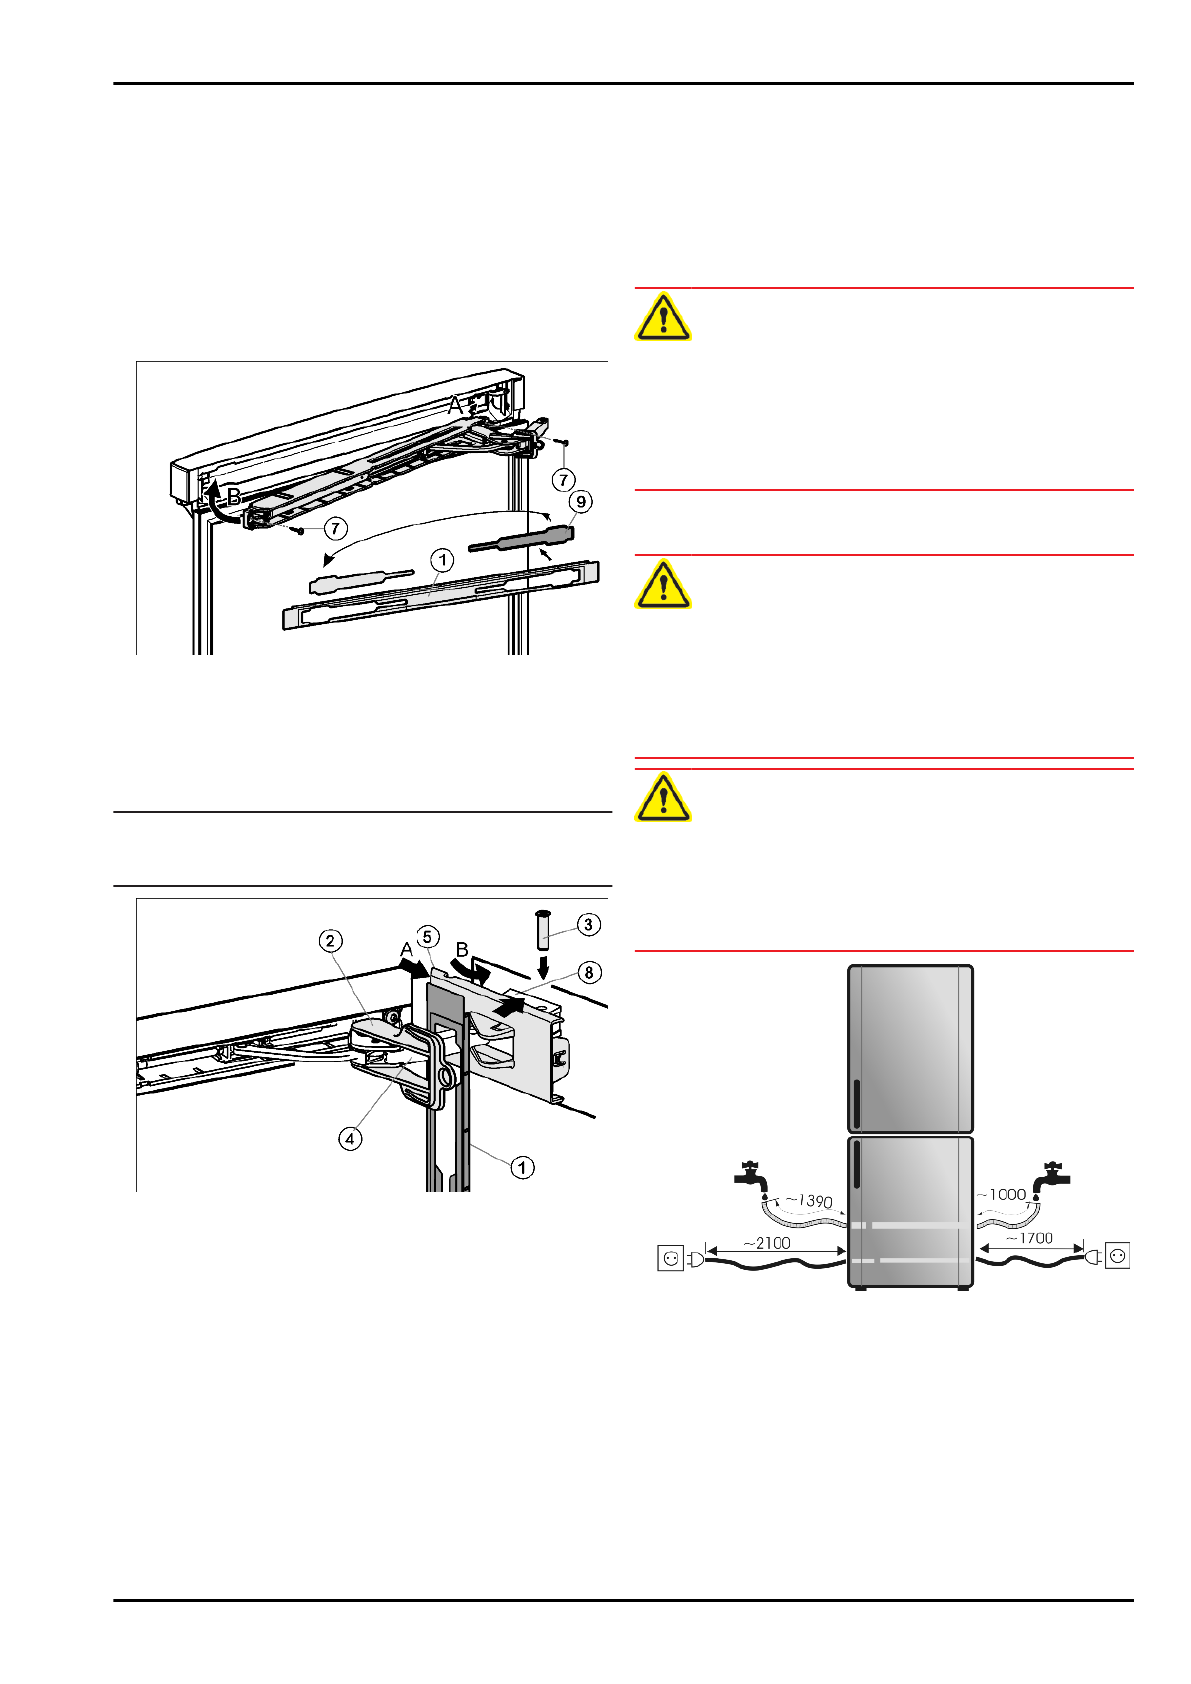
Turn the cover
Fig. 9 (6) 180°, attach and engage it on the
handle side.
u
Turn the cover
Fig. 9 (11) 180°, attach and engage it on the
hinge side.
with soft stop mechanism.
u
Leave the door open.
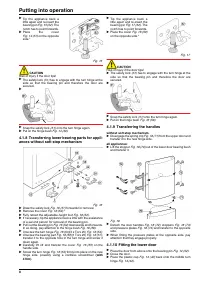
4.1.14 Fitting the upper soft stop mechanism
For appliances with soft stop mechanism.
For appliances without soft stop mechanism continue with:
Fig. 23
u
Remove the cover
Fig. 23 (9) from the faceplate Fig. 23 (1)
and re-insert it at the other side.
u
Engage the upper soft stop unit with the joint on the hinge side
(A) and swivel into place (B).
w
The screw holes at the left and right have to register.
u
Screw down the soft stop unit. (2 Torx 15)
Fig. 23 (7)
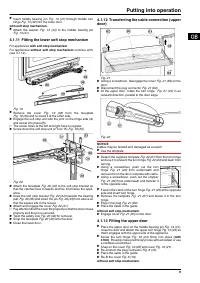
Note
u
Keep to the correct order. First attach the panel over the soft
stop bracket, then the cover.
Fig. 24
u
Attach the faceplate
Fig. 24 (1) to the soft stop bracket
Fig. 24 (4) so that the catches face inwards and the front faces
the appliance.
u
Slide on the cover
Fig. 24 (5) from the outside (A) and swivel
it over the bearing part
Fig. 24 (8) (B).
u
Attach the cover
Fig. 24 (5) and engage it as far as the first
detent.
w
The openings for the pin are on top of one another after the
soft stop bracket has been positioned.
u
Draw the soft stop bracket
Fig. 24 (4) towards the bearing
part
Fig. 24 (8) and insert the pin Fig. 24 (4) from above so that
the square sits in the recess.
u
Now completely snap the cover
Fig. 24 (5) onto the bearing
part
Fig. 24 (8).
w
Pay attention that the cover fits properly so that the door closes
properly and the pin is secured.
u
Twist the safety lock
Fig. 24 (2) for removal.
u
Snap the faceplate
Fig. 24 (1) onto the door.
u
Turn the cover
Fig. 6 (6) 180°, attach and engage it on the
handle side.
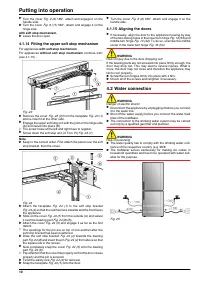
4.1.15 Aligning the doors
u
If necessary, align the door to the appliance housing by way
of the two oblong holes in the lower turn hinge
Fig. 16 (53) and
middle turn hinge
Fig. 13 (42). To do so, unscrew the middle
screw in the lower turn hinge
Fig. 16 (53).
WARNING
Risk of injury due to the door dropping out!
If the bearing parts are not screwed into place firmly enough, the
door may drop out. This may lead to severe injuries. What is
more, the door may not close and therefore the appliance may
fail to cool properly.
u
Screw the turn hinges firmly into place with 4 Nm.
u
Check all of the screws and retighten if necessary.
4.2 Water connection
WARNING
Danger of electric shock!
u
Disconnect the appliance by unplugging it before you connect
it to the water line.
u
Shut off the water supply before you connect the water feed
lines of the IceMaker.
u
The connection to the drinking water system may be carried
out only by a qualified gas fitter and plumber.
WARNING
Risk of poisoning!
u
The water quality has to comply with the drinking water ordi-
nance of the respective country (e.g. 98/8
u
The IceMaker serves exclusively for making ice cubes in
household quantities and has to be operated with water suit-
able for the purpose.
Fig. 25
Putting into operation
10
Характеристики

Остались вопросы?Не нашли свой ответ в руководстве или возникли другие проблемы? Задайте свой вопрос в форме ниже с подробным описанием вашей ситуации, чтобы другие люди и специалисты смогли дать на него ответ. Если вы знаете как решить проблему другого человека, пожалуйста, подскажите ему :)


