
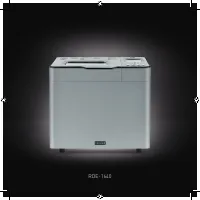
Хлебопечки Rondell RDE-1640 - инструкция пользователя по применению, эксплуатации и установке на русском языке. Мы надеемся, она поможет вам решить возникшие у вас вопросы при эксплуатации техники.
Если остались вопросы, задайте их в комментариях после инструкции.
"Загружаем инструкцию", означает, что нужно подождать пока файл загрузится и можно будет его читать онлайн. Некоторые инструкции очень большие и время их появления зависит от вашей скорости интернета.


7
ENGLISH
–
To cancel the delay press and hold down the «START/
STOP» button (15) for 3 seconds, you will hear a sound
signal.
Notes:
–
The delayed start function is not available for the fol-
lowing programs: «PIZZA DOUGH», «YEASTED DOUGH»,
«DOUGH RISING», «FERMENT», «YOGURT», «DEFROST-
ING», «DOUGH KNEADING», «JAM», «ITALIAN CAKE»,
«BISCUIT», «RICE VINEGAR», «ROASTED NUTS».
–
Do not use the delay function when using perishable foods
such as milk, eggs, fruit, etc.
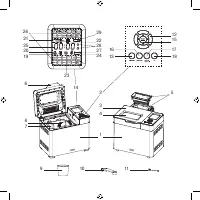
Loaf weight selection
You can select the loaf weight with the navigation buttons (12)
t
u
- 500 g, 750 g or 900 g. The selected weight is indicated
with the symbol (22) on the display (14). Confirm the selected
weight with the «OK» button (18).
Bread maker operations
The bread maker performs the following actions:
1. Kneading the dough to reach a homogeneous mass. The
kneading process is indicated with the symbol (20)
on
the display (14).
2. Dough proofing (rise) - the process is indicated with the
symbol (19)
on the display (14).
3. Baking - the process is indicated with the symbol (23)
on the display (14).
4. Keep warm - the symbol (24)
is shown on the display
(14). The ready bread shall be kept warm for 60 minutes
after the automatic baking program is over. If you need to
remove the bread, switch the keep warm function off by
pressing and holding the «START/STOP» button (15).
Notes:
–
Never open the lid (3) during bread making, at sudden change
of temperature the dough can collapse and it will not rise.
–
You can control the bread making process through the
viewing window (4) in the lid (3).
ADDITIONAL FUNCTIONS
Ingredients adding
–
The unit is equipped with the container (5) for automatic
ingredient adding (fruit pieces, nuts etc.) during the dough
kneading.
–
Load the ingredients in the container (5) before the auto-
matic program start.
–
During the automatic program operation the lower lid of the
container (5) will open and the ingredients will be added
to the dough.
Notes: the ingredients adding function is not available for the
following programs: «PIZZA DOUGH», «YEASTED DOUGH»,
«DOUGH RISING», «FERMENT», «YOGURT», «DEFROSTING»,
«DOUGH KNEADING», «JAM», «ITALIAN CAKE», «BISCUIT»,
«RICE VINEGAR», «ROASTED NUTS», «BAKING».
Memory
–
In case of emergency power cutoff during the bread maker
operation, the memory function with the duration of up to
10 minutes is activated.
–
If the power supply is restored within 10 minutes, the bread
maker will continue to perform the pre-set program from
the moment the program operation has been stopped at.
–
If there is no power for more than 10 minutes it is neces-
sary to load the ingredients, set and switch the automatic
program on again.
USING THE BREAD MAKER
Before plugging the bread maker in make sure that the oper-
ating voltage of the unit corresponds to the voltage of your
mains.
Notes: During the first operation some smell from the heating
element is possible, this is normal.
–
Open the lid (3) and make sure that the baking form (7) and
the paddle (8) are installed to their places.
Notes: before installing the paddle (8) grease it with some mar-
garine or vegetable oil for easy removal from the fresh bread.
–
Put the ingredients into the form (7) in the sequence
described in the recipe. Usually the ingredients are added
in the following order:
1. liquids;
2. dry ingredients (sugar, salt, flour);
3. yeast and leaven.
Notes: Yeast should not come in contact with the liquids or
salt before the dough kneading. Make a small cavity in the flour
and put the yeast there.
–
Wipe the crumbled ingredients or spilled liquids from the
form (7) outer surface.
–
Close the lid (3).
–
Put the ingredients into the container (5), that will be auto-
matically added during the dough kneading process (fruit
pieces, nuts etc.).
–
Insert the power plug into the socket, you will hear a sound
signal, the following symbols will appear on the display (14):
• medium crust (symbol 21);
• weight 750 g, symbol (22);
• name of the program «BASIC MODE», symbol (26);
• program operation time 2:54 hours (25).
–
Select the necessary automatic program by pressing the
«MENU» navigation buttons (12)t u repeatedly. Confirm it
by pressing the “OK” button (18).
–
Press the navigation buttons (12)t u repeatedly to select
the crust color . Confirm it by pressing the «OK»
button (18).


