
Хлебопечки Rondell RDE-1640 - инструкция пользователя по применению, эксплуатации и установке на русском языке. Мы надеемся, она поможет вам решить возникшие у вас вопросы при эксплуатации техники.
Если остались вопросы, задайте их в комментариях после инструкции.
"Загружаем инструкцию", означает, что нужно подождать пока файл загрузится и можно будет его читать онлайн. Некоторые инструкции очень большие и время их появления зависит от вашей скорости интернета.


6
ENGLISH
7. «RYE BREAD». Rye flour bread baking mode.
8. «FAST BAKING». Bread making takes less time than in the
«BASIC MODE», but the bread is usually smaller in size and has
denser crumb.
9. «ITALIAN BREAD». Bake bread with softer and denser
crumb.
10. «GLUTEN FREE». Gluten free bread baking mode.
11. «PIZZA DOUGH». Pizza dough cooking mode: knead-
ing and rising of the pizza dough. Use the prepared dough to
make pizza.
12. «YEASTED DOUGH». Yeasted dough cooking mode.
12. «DOUGH RISE». The bread maker kneads dough and
lets it rise. Use this dough to make home-baked pastry
(pies etc.).
14. «FERMENTING». Heating mode with low temperature,
you can set the desired time within the specified range.
15. «YOGURT». Low heating only. You can set the yogurt mak-
ing time.
16. «DEFROSTING». Vegetables defrosting mode.
17. «DOUGH KNEADING». Dough making mode: kneading
and rising of the dough without further cooking. Use the pre-
pared dough for making bread.
18. «JAM». Make savory homemade jam, marmalade or
confiture. Cut the fruit before making jam, marmalade or con-
fiture.
19. «BAKING». Bread maker works as an ordinary electric
oven. The program does not include dough kneading and ris-
ing modes. The program is used for baking from ready-made
dough or for baked bread additional browning.
20. «ROASTED NUTS». Operating mode for roasting nuts.
The program switches the heating on without stirring.
21. «MEAT FLOSS». Cooking mode for making meat floss.
22. «RICE VINEGAR». Rice vinegar cooking mode.
23. «BISCUIT». Cooking program for making sweet pastry.
You can add ingredients to improve the taste of pastry.
24. «ITALIAN CAKE». Cooking program for making biscuits of
your choice.
25. «MULTIBAKER». Baking mode with manual setting of
temperature and time.
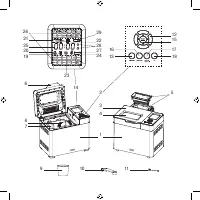
Operation time of automatic programs is shown directly on the
display with digital indications (25).
Crust color selection
You can select one of three ready bread crust colors :
light, medium, dark.
–
Select the required crust color with the navigation buttons
(12)
t
u
, the selected color will be shown on the display
(14) with the symbol (21).
Notes: This function is not available for the programs: «FAST
BAKING», «PIZZA DOUGH», «YEASTED DOUGH», «DOUGH
RISING», «FERMENT», «YOGURT», «DEFROSTING», «DOUGH
KNEADING», «JAM», «ITALIAN CAKE», «BISCUIT», «RICE VIN-
EGAR», «ROASTED NUTS», «MULTIBAKER».
Start/stop
–
Select the necessary operating program (26) with the navi-
gation buttons (12)
t
u
. The selected program (26) will be
flashing on the display (14). Press the «OK» button (18) to
confirm the selected program.
–
Select the desired crust color with the naviga-
tion buttons (12)
t
u
. One of the three symbols (21) will be
flashing on the display (14). Press the «OK» button (18) to
confirm the color.
–
Select the required weight of the loaf
(22) of three
options with the navigation buttons (12)
t
u
: 500 g, 700 g
and 900 g. Press the «OK» button (18) to confirm the
selected weight. One of the three symbols (22) will be flash-
ing on the display (14).
–
You can also use the navigation buttons (12)
t
u
to add the
required amount of raisin to the dough (29) and to set the
delayed start time (28). Confirm the selected settings with
the «OK» button (18).
–
Press the button (15) once more to resume operation.
–
Cancelling the automatic program. To cancel the auto-
matic program press and hold down the button (15) for
3 seconds, you will hear a sound signal and the program
will be cancelled.
–
During the automatic program operation other control panel
(2) buttons are locked.
Setting the delay time
You can pre-set the time when the automatic program is to
be finished.
–
Use the navigation buttons (12)
t
u
to select the required
automatic program (26), the crust color (21), the weight
(22) and the delayed start time symbol (28)
.
–
After that, set the delay time by pressing the buttons (12)
t
u
again (please, note, that you should take into account
the running time of the automatic program while setting the
delay time). The delay time will be shown on the display (14)
with digital indications (25).
Notes: the maximal time of delay is 13 hours, setting step is
10 minutes.
Example:
If it is 20:00 now, you have set the «BASIC MODE» automatic
program «1» and you want fresh bread to be ready by 7 o’clock
next morning, set the delay time of 8 hours with the buttons (12)
(the «BASIC MODE» program «1» operation time is 3 hours).
–
After the delay time has been set press the «OK» «START/
STOP» button (18), the digital symbols in the remaining
time indications (25) will be flashing on the display (2) and
the countdown to the automatic program launch will start.


