
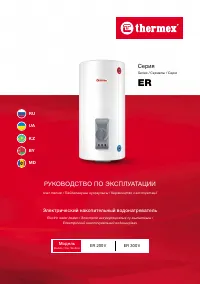
Водонагреватели Thermex Champion ER 300 V - инструкция пользователя по применению, эксплуатации и установке на русском языке. Мы надеемся, она поможет вам решить возникшие у вас вопросы при эксплуатации техники.
Если остались вопросы, задайте их в комментариях после инструкции.
"Загружаем инструкцию", означает, что нужно подождать пока файл загрузится и можно будет его читать онлайн. Некоторые инструкции очень большие и время их появления зависит от вашей скорости интернета.


6. Mounting and connection
ATTENTION!
All sanitary and electric assembly works should be performed by qualified personnel with
obligatory record in section
«
Note Abut Connection
»
(see section
«
Product Warranty
»
).
To avoid damage to the property of client or third party in case of the Heater failure, it is
necessary to mount the Heater in premises with floor waterproofing and drainage to
canalization. In no case one should place the items, exposed by water, under the Heater. While
placing the Heater in unprotected places one should put protective tray under it with drainage
to canalization.
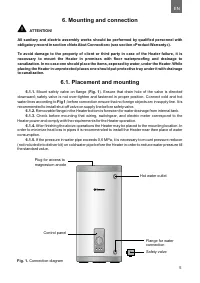
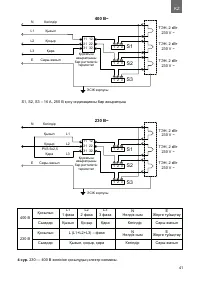
6.1. Placement and mounting
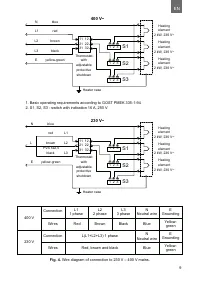
6.1.1.
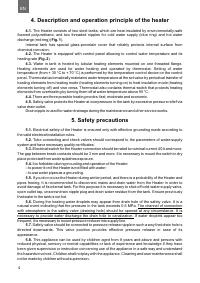
Mount safety valve on flange (
Fig. 1
). Ensure that drain hole of the valve is directed
downward; safety valve is not over-tighten and fastened in proper position. Connect cold and hot
water lines according to
Fig 1
; before connection ensure that no foreign objects arc in supply line. It is
recommended to install shut-off valve on supply line before safety valve.
6.1.2.
Removable flange in the Heater bottom is foreseen for water drainage from internal tank.
6.1.3.
Check before mounting that wiring, switchgear, and electric meter correspond to the
Heater power and comply with the requirements for the Heater operation.
6.1.4.
After finishing the above operations the Heater may be placed to the mounting location. In
order to minimize heat loss in pipes it is recommended to install the Heater near thee place of water
consumption.
6.1.5.
If the pressure in water pipe exceeds 0
,6
MPa, it is necessary to mount pressure reducer
(not included into deliver kit) on cold water pipe before the Heater in order to reduce water pressure till
the standard value.
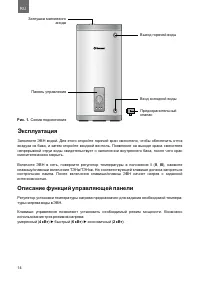
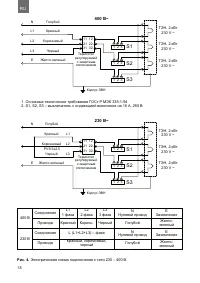
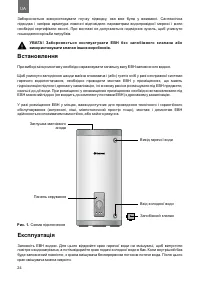
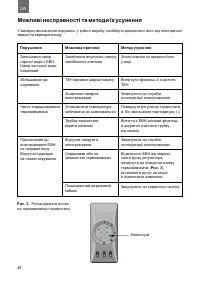
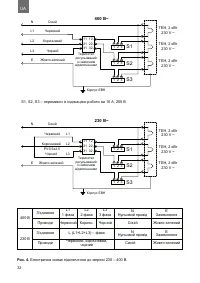
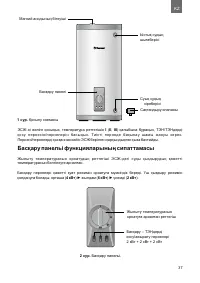
Fig. 1.
Connection diagram
Plug for access to
magnesium anode
Control panel
Safety valve
Flange for water
connection
Hot water outlet
4
EN
EN
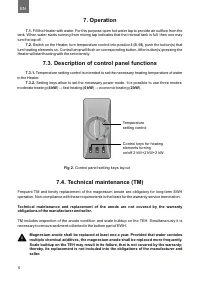
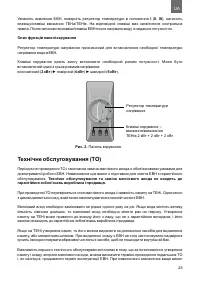
4. Description and operation principle of the heater
4.1.
The Heater consists of two steel tanks, which are heat-insulated by environmentally-safe
foamed polyurethane, and two threaded nipples for cold water supply (blue ring) and hot water
discharge (red ring) (
).
Fig. 1
Internal tank has special glass-porcelain cover that reliably protects internal surface from
chemical corrosion.
4.2.
The Heater is equipped with control panel allowing to control water temperature and its
heating rate (
).
Fig. 2
4.3.
Water in tank is heated by tubular heating elements mounted on one threaded flange.
Heating elements are used for water heating and operated by thermostat. Setting of water
temperature (from + 30 °C to + 70 °C) is performed by the temperature control device on the control
panel. Thermostat automatically maintains water temperature at the set value by periodical transfer of
heating elements from heating mode (heating elements turning on) to heat insulation mode (heating
elements turning off) and vise versa. Thermostat also contains thermal switch that protects heating
elements from overheating by turning them off at water temperature above 90 °C.
4.4.
There are three possible heating modes: fast, moderate and economic.
4.5.
Safety valve protects the Heater at overpressure in the tank by excessive pressure relief via
valve drain outlet.
Drain nipple is used for water drainage during the maintenance and other service works.
5. Safety precautions
Electrical safety of the Heater is ensured only with effective grounding made according to
5.1.
the valid electrical installation rules.
Tube connecting and check valves should correspond to the parameters of water-supply
5.2.
system and have necessary quality certificates.
Electrical switch for the Heater connection should be rated to nominal current 40 A and more.
5.3.
The gap between break contacts should be 3 mm and more. It is necessary to mount the switch in dry
place protected from water splashes exposure.
It is forbidden during mounting and operation of the Heater:
5.4.
– to power it on if the Heater is not filled with water;
– to use water pipes as a grounding.
If you do not use the Heater during winter period, and there is a probability of the Heater and
5.5.
pipes freeing, it is recommended to disconnect mains and drain water from the Heater in order to
avoid damage of its internal tank. For this purpose it is necessary to shut-off cold-water supply valve,
open outlet tap, unscrew drain nipple plug and drain water residue from the tank. Ensure previously
that water in the tank is not hot.
During the heating water droplets may appear from drain hole of the safety valve. It is a
5.6.
natural event indicating that the pressure in the tank exceeds 0,6 MPa.
The channel of connection
with atmosphere in the safety valve (draining hole) should be opened at any circumstance. It is
necessary to provide water discharge the drain hole to canalization.
If water droplets appear too
frequent, it is necessary to mount pressure reducer into supply line.
5.7.
Safety valve should be connected to pressure release nipple in such a way that drain hole is
directed downwards. This valve position provides effective pressure release in case of its
appearance.
5.8.
This appliance can be used by children aged from 8 years and above and persons with
reduced physical, sensory or mental capabilities or lack of experience and knowledge if they have
been given supervision or instruction concerning use of the appliance in a safe way and understand
the hazards involved. Children shall not play with the appliance. Cleaning and user maintenance shall
not be made by children without supervision.
5
Содержание
- 10 Назначение; начен для работы в непрерывно проточном режиме.; Основные технические характеристики; таблице 1; Комплект поставки; Таблица 1; Transportation and storage of electric water heaters; Heating Equipment LTD
- 12 Канал соединения с атмосферой предохрани-тельного клапана; Установка и подключение; Все сантехнические и электромонтажные работы должны прово-; Размещение и установка
- 14 ксплуатация; II; Описание функций управляющей панели; кВт
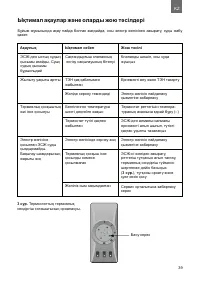
- 16 Гарантия изготовителя; комплекта поставки ЭВН; Возможные неисправности и способы их устранения
- 18 Рис
- 20 mail; Комплект постачання; Призначення
- 44 Warranty certificates /
- 46 Заполняется сервисным центром
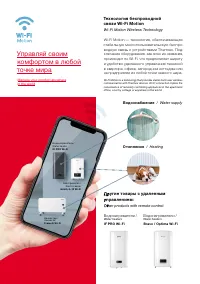
- 47 Отопление; Водоснабжение
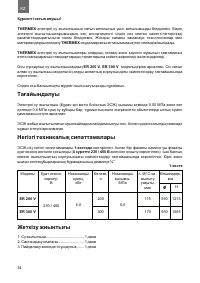
Характеристики

Остались вопросы?Не нашли свой ответ в руководстве или возникли другие проблемы? Задайте свой вопрос в форме ниже с подробным описанием вашей ситуации, чтобы другие люди и специалисты смогли дать на него ответ. Если вы знаете как решить проблему другого человека, пожалуйста, подскажите ему :)


