Страница 2 - or; WARNING; English; Русский; ПРЕДУПРЕЖДЕНИЕ
2 NOTICE ON THE SUPPLIED AC POWERADAPTOR FOR CUSTOMERS IN THEUNITED KINGDOM A moulded plug complying with BS1363 is fittedto this equipment for your safety andconvenience. Should the fuse in the plug supplied need tobe replaced, a 5 AMP fuse approved by ASTAor BSI to BS1362 (i.e., marked with or mar...
Страница 5 - Основные функции; Запись изображений на Вашем компьютере; положение
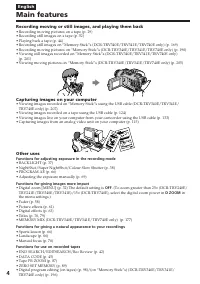
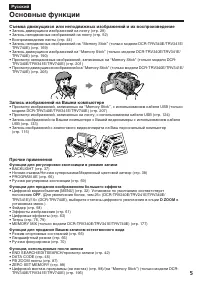
5 Русский Основные функции Съемка движущихся или неподвижных изображений и их воспроизведение • Запись движущихся изображений на ленту (стр. 29)• Запись неподвижных изображений на ленту (стр. 52)• Воспроизведение ленты (стр. 44)• Запись неподвижных изображений на “Memory Stick” (только модели DCR-TR...
Страница 8 - Оглавление; Подготовка к эксплуатации
8 Русский Оглавление Основные функции ............................... 5 Руководство по быстромузапуску ................................................... 12 Подготовка к эксплуатации Использование данного руководства .................................. 14 Проверка прилагаемых принадлежностей ..........
Страница 9 - Дополнительная информация
9 Оглавление Вставка эпизода с КВМ – Монтаж вставки ....................... 121 Просмотр изображений, записанных на ленту, на Вашем компьютере(только пользователи Windows) ...................................................... 124 Выполнение индивидуальныхустановок на Вашейвидеокамере Изменение уста...
Страница 12 - Установка кассеты; на кассетном; Руководство по быстрому запуску; Сетевой адаптер переменного тока (прилагается)
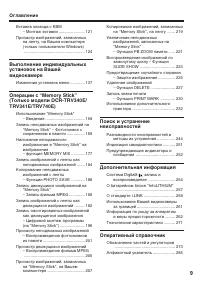
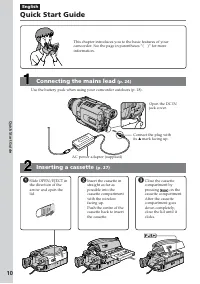
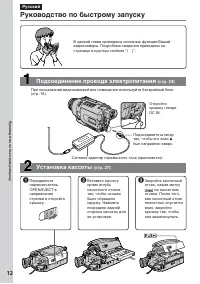
12 Руководство по быстрому запуску В данной главе приведены основные функции Вашейвидеокамеры. Подробные сведения приведены настранице в круглых скобках “( )”. Установка кассеты (стр. 27) Подсоединение провода электропитания (стр. 24) При пользовании видеокамерой вне помещения используйте батарейный...
Страница 13 - Запись изображения; Примечание
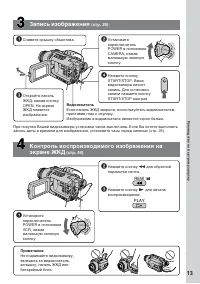
13 REW PLAY C AM ER A M EM ORY VC R O FF (C H G ) POWER C AM ER A M E MO RY VC R O FF (C H G ) POWER Руководство по быстрому запуску Запись изображения (стр. 29) 2 УстановитепереключательPOWER в положениеCAMERA, нажавмаленькую зеленуюкнопку. 1 Снимите крышку объектива. При покупке Вашей видеокамеры ...
Страница 14 - — Getting Started —; Using this manual; * The models with MEMORY marked on the; Таймер самозапуска
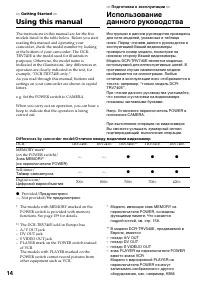
14 — Getting Started — Using this manual The instructions in this manual are for the fivemodels listed in the table below. Before you startreading this manual and operating yourcamcorder, check the model number by lookingat the bottom of your camcorder. The DCR-TRV740E is the model used for illustra...
Страница 15 - With your digital camcorder, you can use Hi8; Note on TV colour systems
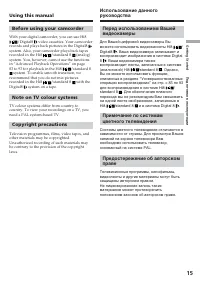
15 Getting Started Подготовка к эксплуатации Using this manual Before using your camcorder With your digital camcorder, you can use Hi8 /Digital8 video cassettes. Your camcorder records and plays back pictures in the Digital8 system. Also, your camcorder plays back tapesrecorded in the Hi8 /standard...
Страница 16 - Lens and LCD screen/finder; • The LCD screen and the finder are; • Do not let your camcorder become wet. Keep; Объектив и ЖКД экран/видоискатель; • Не допускайте, чтобы видеокамера
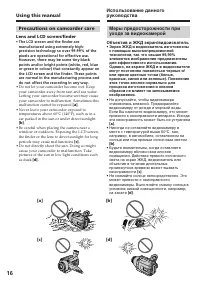
16 Using this manual Precautions on camcorder care Lens and LCD screen/finder • The LCD screen and the finder are manufactured using extremely high-precision technology so over 99.99% of thepixels are operational for effective use.However, there may be some tiny blackpoints and/or bright points (whi...
Страница 17 - * Differs from area to area. This is supplied with
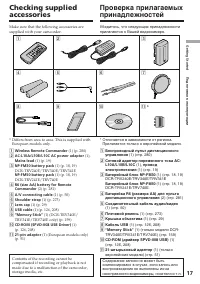
17 Getting Started Подготовка к эксплуатации Checking suppliedaccessories Make sure that the following accessories aresupplied with your camcorder. * Differs from area to area. This is supplied with European models only. 1 Wireless Remote Commander (1) (p. 280) 2 AC-L10A/L10B/L10C AC power adaptor (...
Страница 18 - Installing the battery pack; To remove the battery pack; Lift up the viewfinder.; If you install the large-capacity battery pack; Установка батарейного блока; Поднимите видоискатель.; Поднимите видоискатель.; Пункт 1 Подготовка
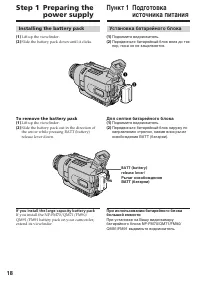
18 Step 1 Preparing the power supply Installing the battery pack ( 1 ) Lift up the viewfinder. ( 2 ) Slide the battery pack down until it clicks. To remove the battery pack ( 1 ) Lift up the viewfinder. ( 2 ) Slide the battery pack out in the direction ofthe arrow while pressing BATT (battery)releas...
Страница 19 - Charging the battery pack; Connect the mains lead to a wall socket.; normal charge; is completed. To fully charge; Step 1 Preparing the power; Зарядка батарейного блока; штекера был направлен вверх.; нормальная зарядка; Пункт 1 Подготовка источника
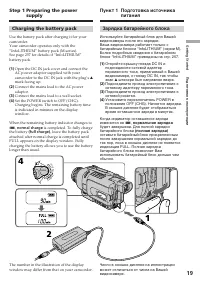
19 Getting Started Подготовка к эксплуатации Charging the battery pack Use the battery pack after charging it for yourcamcorder.Your camcorder operates only with the“InfoLITHIUM” battery pack (M series).See page 257 for details of “InfoLITHIUM”battery pack. ( 1 ) Open the DC IN jack cover and connec...
Страница 20 - After charging the battery pack; “– – – – min” appears in the display window.; While charging the battery pack; После зарядки батарейного блока
20 After charging the battery pack Disconnect the AC power adaptor from the DCIN jack on your camcorder. Note Prevent metallic objects from coming into contactwith the metal parts on the DC plug of the ACpower adaptor. This may cause a short-circuit,damaging the AC power adaptor. When the battery pa...
Страница 21 - Recommended charging temperature; C для зарядки полностью; Время зарядки; Батарейный блок
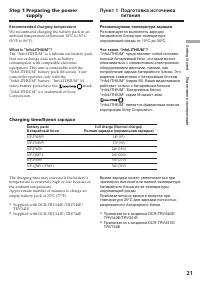
21 Getting Started Подготовка к эксплуатации Step 1 Preparing the power supply Recommended charging temperature We recommend charging the battery pack in anambient temperature of between 10°C to 30°C(50°F to 86°F). What is ”InfoLITHIUM”? The “InfoLITHIUM” is a lithium ion battery packthat can exchan...
Страница 22 - Время записи
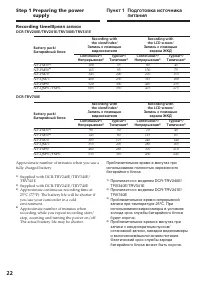
22 Step 1 Preparing the power supply Approximate number of minutes when you use afully charged battery 1) Supplied with DCR-TRV240E/TRV340E/TRV341E 2) Supplied with DCR-TRV241E/TRV740E 3) Approximate continuous recording time at25°C (77°F). The battery life will be shorter ifyou use your camcorder i...
Страница 23 - Время воспроизведения; Playing time
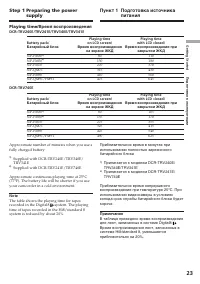
23 Getting Started Подготовка к эксплуатации Playing time/ Время воспроизведения DCR-TRV240E/TRV241E/TRV340E/TRV341E Playing time Playing time Battery pack/ on LCD screen/ with LCD closed/ Батарейный блок Время воспроизведения Время воспроизведения при на экране ЖКД закрытом ЖКД NP-FM30 1) 80 110 NP...
Страница 24 - Connecting to a wall socket; PRECAUTION; • The AC power adaptor can supply power even; Using a car battery; на; ПРЕДОСТЕРЕЖЕНИЕ; • Питание от сетевого адаптера переменного
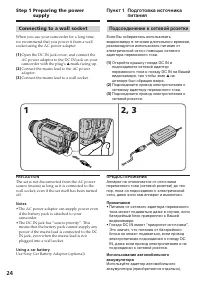
24 Connecting to a wall socket When you use your camcorder for a long time,we recommend that you power it from a wallsocket using the AC power adaptor. ( 1 ) Open the DC IN jack cover, and connect theAC power adaptor to the DC IN jack on yourcamcorder with the plug’s v mark facing up. ( 2 ) Connect ...
Страница 25 - Step 2 Setting the; Пункт 2 Установка даты
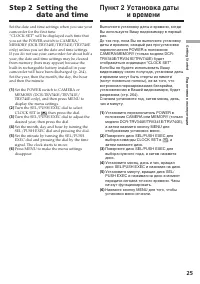
25 Getting Started Подготовка к эксплуатации Step 2 Setting the date and time Set the date and time settings when you use yourcamcorder for the first time.“CLOCK SET” will be displayed each time thatyou set the POWER switch to CAMERA/MEMORY (DCR-TRV340E/TRV341E/TRV740Eonly) unless you set the date a...
Страница 26 - Step 2 Setting the date and time; The year changes as follows:; MENU; Пункт 2 Установка даты и; Год изменяется следующим образом:
26 Step 2 Setting the date and time The year changes as follows: If you do not set the date and time “-- -- ----” “--:--:--” are recorded on the tape andthe “Memory Stick”. (DCR-TRV340E/TRV341E/TRV740E only) Note on the time indicator The internal clock of your camcorder operates ona 24-hour cycle. ...
Страница 27 - We recommend using Hi8; To eject a cassette; Step 3 Inserting a; Закройте кассетный отсек, нажав метку; Для извлечения кассеты; Пункт 3 Установка
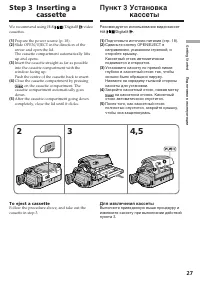
27 Getting Started Подготовка к эксплуатации We recommend using Hi8 /Digital8 video cassettes. ( 1 ) Prepare the power source (p. 18). ( 2 ) Slide OPEN/EJECT in the direction of thearrow and open the lid.The cassette compartment automatically liftsup and opens. ( 3 ) Insert the cassette straight as ...
Страница 28 - Step 3 Inserting a cassette; Notes; Пункт 3 Установка кассеты; Примечания
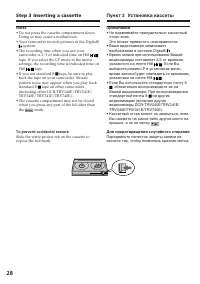
28 Step 3 Inserting a cassette Notes • Do not press the cassette compartment down. Doing so may cause a malfunction. • Your camcorder records pictures in the Digital8 system. • The recording time when you use your camcorder is 2/3 of indicated time on Hi8 tape. If you select the LP mode in the menus...
Страница 29 - Your camcorder automatically focuses for you.; Микрофон
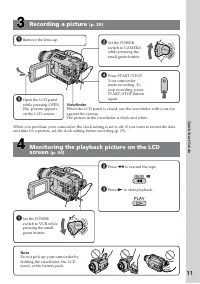
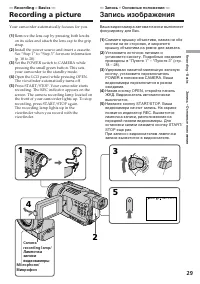
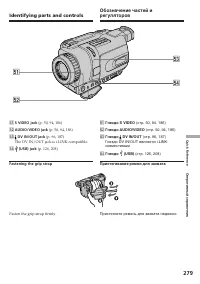
29 Recording – Basics Запись – Основные положения Your camcorder automatically focuses for you. ( 1 ) Remove the lens cap by pressing both knobson its sides and attach the lens cap to the gripstrap. ( 2 ) Install the power source and insert a cassette.See “Step 1” to “Step 3” for more information(p....
Страница 30 - the LP mode on one tape.; – При замене батарейного блока установите
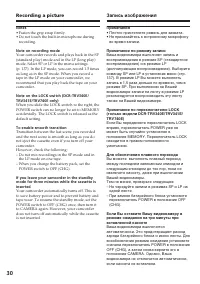
30 Recording a picture Notes • Fasten the grip strap firmly.• Do not touch the built-in microphone during recording. Note on recording mode Your camcorder records and plays back in the SP(standard play) mode and in the LP (long play)mode. Select SP or LP in the menu settings(p. 137). In the LP mode,...
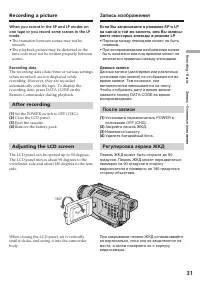
Страница 31 - • The transition between scenes may not be; Recording data; After recording; Remove the battery pack.; Adjusting the LCD screen; • Переход между эпизодами может не быть; Данные записи; После записи; Удалите батарейный блок.; Регулировка экрана ЖКД
31 Recording – Basics Запись – Основные положения When you record in the SP and LP modes onone tape or you record some scenes in the LPmode • The transition between scenes may not be smooth. • The playback picture may be distorted or the time code may not be written properly betweenscenes. Recording...
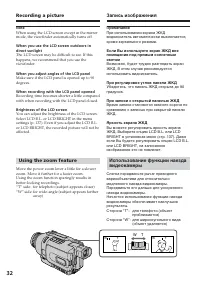
Страница 32 - Using the zoom feature; Сторона “W”: для широкоугольного вида
32 Note When using the LCD screen except in the mirrormode, the viewfinder automatically turns off. When you use the LCD screen outdoors indirect sunlight The LCD screen may be difficult to see. If thishappens, we recommend that you use theviewfinder. When you adjust angles of the LCD panel Make sur...
Страница 33 - To use zoom greater than 25; Zoom greater than 25; Notes on digital zoom; • Digital zoom starts to function when zoom; When you shoot close to a subject; You cannot use the digital zoom.; Для использования наезда более 25; Наезд видеокамеры более 25
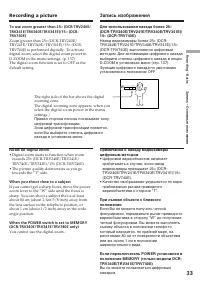
33 Recording – Basics Запись – Основные положения To use zoom greater than 25 × (DCR-TRV240E/ TRV241E/TRV340E/TRV341E)/15 × (DCR- TRV740E) Zoom greater than 25 × (DCR-TRV240E/ TRV241E/TRV340E/TRV341E)/15 × (DCR- TRV740E) is performed digitally. To activatedigital zoom, select the digital zoom power ...
Страница 34 - Adjusting the viewfinder; Viewfinder backlight; Задняя подсветка видоискателя
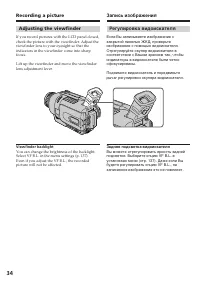
34 Adjusting the viewfinder If you record pictures with the LCD panel closed,check the picture with the viewfinder. Adjust theviewfinder lens to your eyesight so that theindicators in the viewfinder come into sharpfocus. Lift up the viewfinder and move the viewfinderlens adjustment lever. Viewfinder...
Страница 35 - Shooting with the Mirror Mode; Rotate the LCD screen 180 degrees.; The; Pictures in the mirror mode; Поверните экран ЖКД на 180 градусов.; Индикатор; Изображение в зеркальном режиме
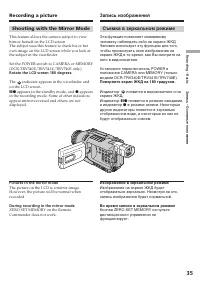
35 Recording – Basics Запись – Основные положения Shooting with the Mirror Mode This feature allows the camera subject to viewhim-or herself on the LCD screen.The subject uses this feature to check his or herown image on the LCD screen while you look atthe subject in the viewfinder. Set the POWER sw...
Страница 36 - Indicators are not recorded on tapes.; Индикаторы не записываются на ленты.; Remaining battery time/; Этот индикатор отображается в течение пяти секунд
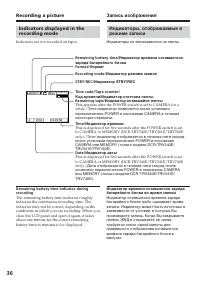
36 Indicators displayed in therecording mode Indicators are not recorded on tapes. Remaining battery time indicator duringrecording The remaining battery time indicator roughlyindicates the continuous recording time. Theindicator may not be correct, depending on theconditions in which you are record...
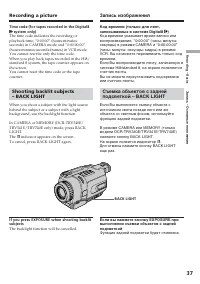
Страница 37 - Time code (for tapes recorded in the Digital8; indicator appears on the screen.; Функция задней подсветки будет отменена.; BACK LIGHT
37 Recording – Basics Запись – Основные положения Time code (for tapes recorded in the Digital8 system only) The time code indicates the recording orplayback time, “0:00:00” (hours:minutes:seconds) in CAMERA mode and “0:00:00:00”(hours:minutes:seconds:frames) in VCR mode.You cannot rewrite only the ...
Страница 38 - and “NIGHTSHOT” indicators flash on; Using Super NightShot; and “NIGHTSHOT” indicators; Using the NightShot Light; и “NIGHTSHOT” начнут; Использование подсветки ночной съемки; Infrared rays emitter/
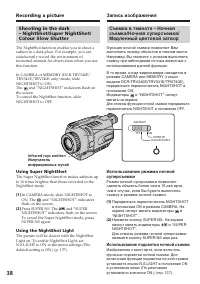
38 Shooting in the dark– NightShot/Super NightShot/Colour Slow Shutter The NightShot function enables you to shoot asubject in a dark place. For example, you cansatisfactorily record the environment ofnocturnal animals for observation when you usethis function. In CAMERA or MEMORY (DCR-TRV340E/TRV34...
Страница 39 - Using Colour Slow Shutter; and “COLOUR SLOW SHUTTER”; • Do not use the NightShot mode in bright places; • Не используйте функцию ночной съемки в
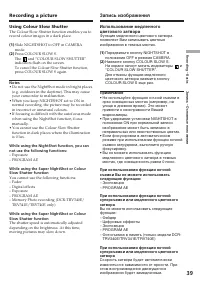
39 Recording – Basics Запись – Основные положения Recording a picture Using Colour Slow Shutter The Colour Slow Shutter function enables you torecord colour images in a dark place. ( 1 ) Slide NIGHTSHOT to OFF in CAMERAmode. ( 2 ) Press COLOUR SLOW S.The and “COLOUR SLOW SHUTTER” indicators flash on...
Страница 40 - NightShot Light; Подсветка ночной съемки; Запись по таймеру самозапуска
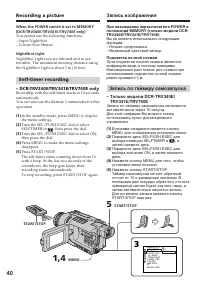
40 When the POWER switch is set to MEMORY(DCR-TRV340E/TRV341E/TRV740E only) You cannot use the following functions:– Super NightShot– Colour Slow Shutter NightShot Light NightShot Light rays are infrared and so areinvisible. The maximum shooting distance usingthe NightShot Light is about 3 m (10 fee...
Страница 41 - To stop the countdown; Для остановки обратного отсчета
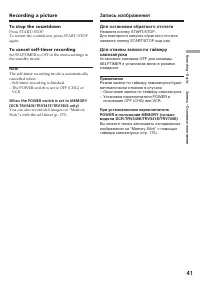
41 Recording – Basics Запись – Основные положения To stop the countdown Press START/STOP.To restart the countdown, press START/STOPagain. To cancel self-timer recording Set SELFTIMER to OFF in the menu settings inthe standby mode. Note The self-timer recording mode is automaticallycancelled when:– S...
Страница 42 - You can search for the next recording start point.; Checking recordings; EDITSEARCH; END SEARCH; кнопки; Проверка записи
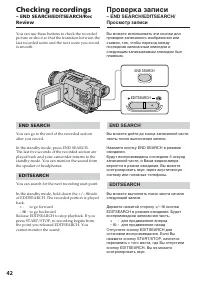
42 You can use these buttons to check the recordedpicture or shoot so that the transition between thelast recorded scene and the next scene you recordis smooth. END SEARCH You can go to the end of the recorded sectionafter you record. In the standby mode, press END SEARCH.The last five seconds of th...
Страница 43 - Rec Review; Просмотр записи; Нажмите кратковременно сторону –; • Функции END SEARCH, EDITSEARCH и
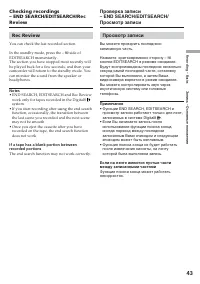
43 Recording – Basics Запись – Основные положения Checking recordings– END SEARCH/EDITSEARCH/RecReview Rec Review You can check the last recorded section. In the standby mode, press the – 7 side of EDITSEARCH momentarily.The section you have stopped most recently willbe played back for a few seconds...
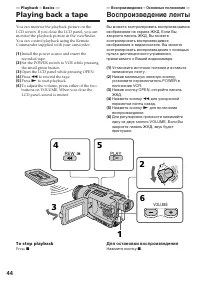
Страница 44 - To stop playback; Playing back a tape; VOLUME; Для остановки воспроизведения; Воспроизведение – Основные положения; Воспроизведение ленты
44 You can monitor the playback picture on theLCD screen. If you close the LCD panel, you canmonitor the playback picture in the viewfinder.You can control playback using the RemoteCommander supplied with your camcorder. ( 1 ) Install the power source and insert therecorded tape. ( 2 ) Set the POWER...
Страница 45 - When monitoring on the LCD screen; DISPLAY
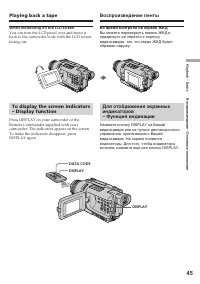
45 Playback – Basics Воспроизведение – Основные положения When monitoring on the LCD screen You can turn the LCD panel over and move itback to the camcorder body with the LCD screenfacing out. To display the screen indicators– Display function Press DISPLAY on your camcorder or theRemote Commander s...
Страница 46 - About date/time and various settings; Set the POWER switch to VCR, then; Различные установки
46 About date/time and various settings Your camcorder automatically records not onlypictures on the tape but also the recording data(date/time or various settings when recorded) (Data code) . Use the Remote Commander for this operation. 1 Set the POWER switch to VCR, then playback a tape. 2 Press D...
Страница 47 - Notes on the data code function; Примечания по функции кода данных
47 Playback – Basics Воспроизведение – Основные положения Playing back a tape Notes on the data code function • The data code function works only for tapes recorded in the Digital8 system. • Various settings of the recording data are not recorded when recording images on “MemoryStick”s (DCR-TRV340E/...
Страница 48 - To advance the tape; Для ускоренной перемотки ленты вперед
48 Playing back a tape Various playback modes To operate video control buttons, set the POWERswitch to VCR. To playback pause (view a stillimage) Press X during playback. To resume normal playback, press X or N . To advance the tape Press M in the stop mode. To resume normal playback, press N . To r...
Страница 49 - To view pictures at double speed; In the various playback modes; В различных режимах воспроизведения
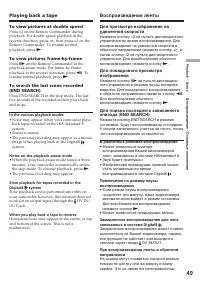
49 Playback – Basics Воспроизведение – Основные положения Playing back a tape To view pictures at double speed Press × 2 on the Remote Commander during playback. For double speed playback in thereverse direction, press , then press × 2 on the Remote Commander. To resume normalplayback, press N . To ...
Страница 50 - Передача сигнала
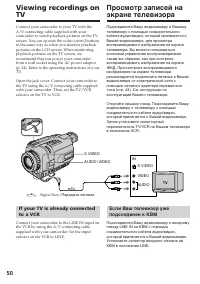
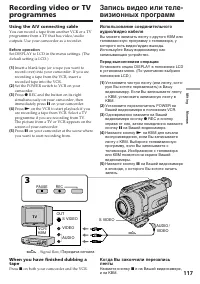
50 Connect your camcorder to your TV with theA/V connecting cable supplied with yourcamcorder to watch playback pictures on the TVscreen. You can operate the video control buttonsin the same way as when you monitor playbackpictures on the LCD screen. When monitoringplayback pictures on the TV screen...
Страница 51 - – European models only; If your TV has an S video jack; Viewing the recording on TV; TV; – Только европейские модели
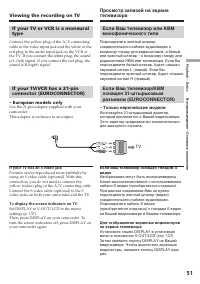
51 Playback – Basics Воспроизведение – Основные положения If your TV or VCR is a monauraltype Connect the yellow plug of the A/V connectingcable to the video input jack and the white or thered plug to the audio input jack on the VCR orthe TV. If you connect the white plug, the soundis L (left) signa...
Страница 52 - Before operation; — Advanced Recording Operations —; Перед эксплуатацией
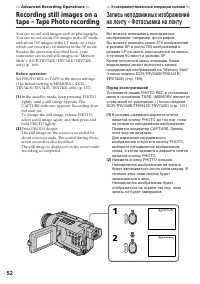
52 You can record still images such as photographs.You can record about 510 images in the SP modeand about 765 images in the LP mode on a tapewhich can record for 60 minutes in the SP mode.Besides the operation described here, yourcamcorder can record still images on “MemoryStick”s (DCR-TRV340E/TRV3...
Страница 53 - • During Tape Photo recording, you cannot; To record clear and less fluctuated still images; • Во время фотосъемки на ленту Вы не
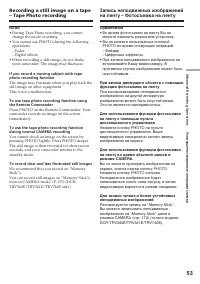
53 Advanced Recording Operations Усовершенствованные операции съемки Recording a still image on a tape– Tape Photo recording Notes • During Tape Photo recording, you cannot change the mode or setting. • You cannot use PHOTO during the following operations:– Fader– Digital effects • When recording a ...
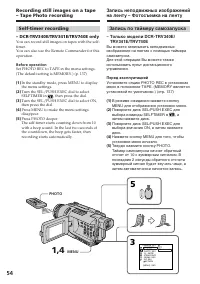
Страница 55 - To cancel self-timer recording
55 Advanced Recording Operations Усовершенствованные операции съемки To cancel self-timer recording In the standby mode, set SELFTIMER to OFF inthe menu settings.You cannot cancel self-timer recording using theRemote Commander. Note The self-timer recording mode is automaticallycancelled when:– Self...
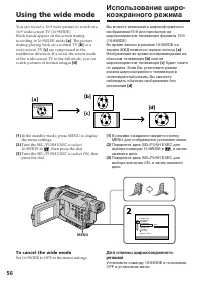
Страница 56 - To cancel the wide mode; Set 16:9WIDE to OFF in the menu settings.; Using the wide mode; или на
56 You can record a 16:9 wide picture to watch on a16:9 wide-screen TV (16:9WIDE).Black bands appear on the screen duringrecording in 16:9WIDE mode [ a ] . The picture during playing back on a normal TV [ b ] or a wide-screen TV [ c ] are compressed in the widthwise direction. If you set the screen ...
Страница 57 - In the wide mode; В широкоэкранном режиме
57 Advanced Recording Operations Усовершенствованные операции съемки In the wide mode You cannot operate the following functions:– OLD MOVIE– BOUNCE– Memory Photo recording (DCR-TRV340E/ TRV341E/TRV740E only) During recording You cannot select or cancel the wide mode.When you cancel the wide mode, s...
Страница 58 - MONOTONE; Только введение изображения
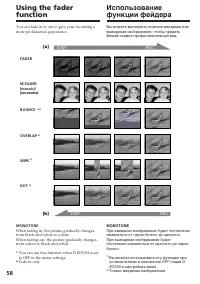
58 You can fade in or out to give your recording amore professional appearance. MONOTONE When fading in, the picture gradually changesfrom black-and-white to colour.When fading out, the picture gradually changesfrom colour to black-and-white. 1) You can use this function when D ZOOM is set to OFF in...
Страница 59 - To cancel the fader function; Using the fader function; При введении изображения; Для отмены функции фейдера; Использование функции фейдера
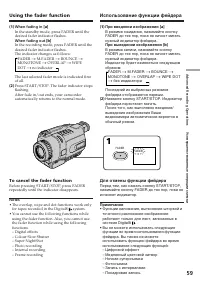
59 Advanced Recording Operations Усовершенствованные операции съемки ( 1 ) When fading in [ a ] In the standby mode, press FADER until thedesired fader indicator flashes. When fading out [ b ] In the recording mode, press FADER until thedesired fader indicator flashes.The indicator changes as follow...
Страница 60 - Note on the bounce function; settings; Примечание по функции перескакивания; установках меню
60 Using the fader function When you select OVERLAP, WIPE, or DOT Your camcorder automatically stores the picturerecorded on tape. While the picture is beingstored, the indicators flash fast, and the picturefrom tape appears on the screen. At this stage,the picture may not be recorded clearly,depend...
Страница 61 - : The colour and brightness of the; The picture appears in sepia.; SEPIA; : Яркость света будет
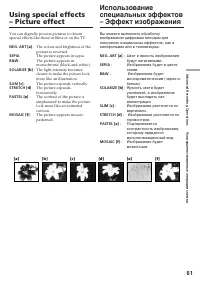
61 Advanced Recording Operations Усовершенствованные операции съемки You can digitally process pictures to obtainspecial effects like those in films or on the TV. NEG. ART [ a ] : The colour and brightness of the picture is reversed. SEPIA : The picture appears in sepia. B&W : The picture appear...
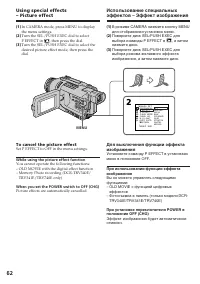
Страница 62 - To cancel the picture effect; Set P EFFECT to OFF in the menu settings.; While using the picture effect function; Picture effects are automatically cancelled.; эффектов
62 ( 1 ) In CAMERA mode, press MENU to displaythe menu settings. ( 2 ) Turn the SEL/PUSH EXEC dial to selectP EFFECT in , then press the dial. ( 3 ) Turn the SEL/PUSH EXEC dial to select thedesired picture effect mode, then press thedial. To cancel the picture effect Set P EFFECT to OFF in the menu ...
Страница 63 - STILL
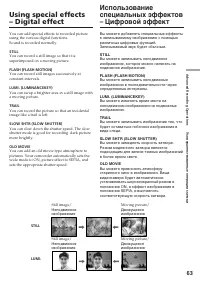
63 Advanced Recording Operations Усовершенствованные операции съемки Using special effects– Digital effect You can add special effects to recorded pictureusing the various digital functions.Sound is recorded normally. STILL You can record a still image so that it issuperimposed on a moving picture. ...
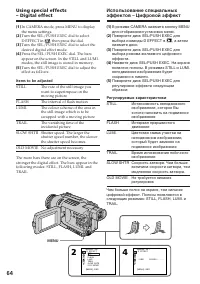
Страница 64 - Items to be adjusted
64 Using special effects– Digital effect ( 1 ) In CAMERA mode, press MENU to displaythe menu settings. ( 2 ) Turn the SEL/PUSH EXEC dial to selectD EFFECT in , then press the dial. ( 3 ) Turn the SEL/PUSH EXEC dial to select thedesired digital effect mode. ( 4 ) Press the SEL/PUSH EXEC dial. The bar...
Страница 65 - To cancel the digital effect; Для отмены цифрового эффекта
65 Advanced Recording Operations Усовершенствованные операции съемки Using special effects– Digital effect To cancel the digital effect Set D EFFECT to OFF in the menu settings. Notes • The following functions do not work during digital effects:– Fader– Photo recording– Super NightShot– Colour Slow ...
Страница 67 - To cancel the PROGRAM AE function; Using the PROGRAM AE function
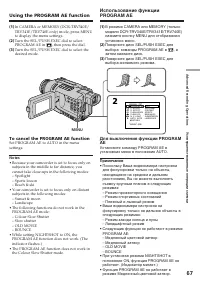
67 Advanced Recording Operations Усовершенствованные операции съемки ( 1 ) In CAMERA or MEMORY (DCR-TRV340E/TRV341E/TRV740E only) mode, press MENUto display the menu settings. ( 2 ) Turn the SEL/PUSH EXEC dial to selectPROGRAM AE in , then press the dial. ( 3 ) Turn the SEL/PUSH EXEC dial to select ...
Страница 69 - backgrounds; ночных сцен) с большой достоверностью; NIGHTSHOT в положение ON
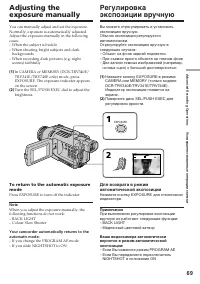
69 Advanced Recording Operations Усовершенствованные операции съемки You can manually adjust and set the exposure.Normally, exposure is automatically adjusted.Adjust the exposure manually in the followingcases:– When the subject is backlit– When shooting bright subjects and dark backgrounds – When r...
Страница 70 - To return to the autofocus mode; Focusing manually; FOCUS; • Если Вы хотите выполнить изменение; Ручная фокусировка
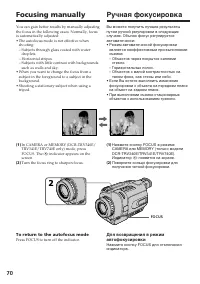
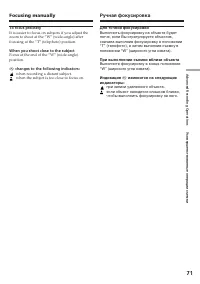
70 You can gain better results by manually adjustingthe focus in the following cases. Normally, focusis automatically adjusted:• The autofocus mode is not effective when shooting:– Subjects through glass coated with water droplets. – Horizontal stripes.– Subjects with little contrast with background...
Страница 71 - To focus precisely; Для точной фокусировки
71 Advanced Recording Operations Усовершенствованные операции съемки Focusing manually To focus precisely It is easier to focus on subjects if you adjust thezoom to shoot at the “W” (wide-angle) afterfocusing at the “T” (telephoto) position. When you shoot close to the subject Focus at the end of th...
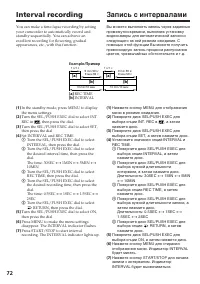
Страница 72 - Interval recording; Запись с интервалами; Пример; REC TIME
72 You can make a time-lapse recording by settingyour camcorder to automatically record andstandby sequentially. You can achieve anexcellent recording for flowering, gradualappearances, etc., with this function. ( 1 ) In the standby mode, press MENU to displaythe menu settings. ( 2 ) Turn the SEL/PU...
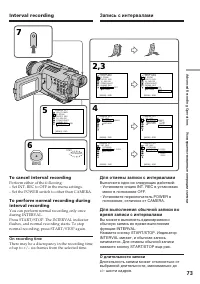
Страница 73 - To cancel interval recording; On recording time; Для отмены записи с интервалами; меню в положение OFF.; О длительности записи
73 Advanced Recording Operations Усовершенствованные операции съемки Interval recording To cancel interval recording Perform either of the following:– Set INT. REC to OFF in the menu settings.– Set the POWER switch to other than CAMERA. To perform normal recording duringinterval recording You can pe...
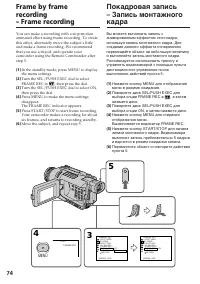
Страница 75 - To cancel the frame recording; The last recorded cut is longer than other cuts.; Для отмены записи монтажного кадра; установках меню в положение OFF.
75 Advanced Recording Operations Усовершенствованные операции съемки Frame by frame recording– Frame recording To cancel the frame recording Perform either of the following:– Set FRAME REC to OFF in the menu settings.– Set the POWER switch to other than CAMERA. Note The remaining tape time is not in...
Страница 76 - Superimposing a title; VACATION; Повторяйте пункты; Наложение титра
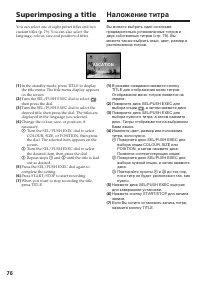
76 You can select one of eight preset titles and twocustom titles (p. 79). You can also select thelanguage, colour, size and position of titles. ( 1 ) In the standby mode, press TITLE to displaythe title menu. The title menu display appearson the screen. ( 2 ) Turn the SEL/PUSH EXEC dial to select ,...
Страница 77 - To use a custom title; If you want to use a custom title, select; TITLE; перед пунктом 2. Затем; Для использования собственного титра; при выполнении
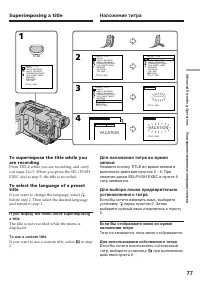
77 Advanced Recording Operations Усовершенствованные операции съемки To superimpose the title while youare recording Press TITLE while you are recording, and carryout steps 2 to 5. When you press the SEL/PUSHEXEC dial at step 5, the title is recorded. To select the language of a presettitle If you w...
Страница 78 - Title setting; Установка титра; • Цвет титра изменяется следующим; Во время воспроизведения
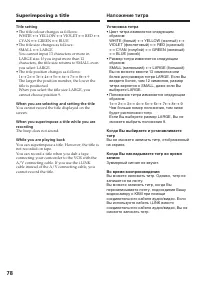
78 Superimposing a title Title setting • The title colour changes as follows: WHITE y YELLOW y VIOLET y RED y CYAN y GREEN y BLUE • The title size changes as follows: SMALL y LARGE You cannot input 13 characters or more inLARGE size. If you input more than 12characters, the title size returns to SMA...
Страница 79 - Turn the SEL/PUSH EXEC dial to select
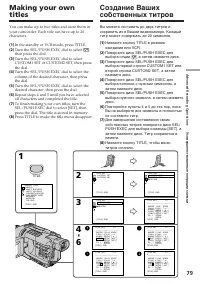
79 Advanced Recording Operations Усовершенствованные операции съемки Making your owntitles You can make up to two titles and store them inyour camcorder. Each title can have up to 20characters. ( 1 ) In the standby or VCR mode, press TITLE. ( 2 ) Turn the SEL/PUSH EXEC dial to select , then press th...
Страница 80 - To change a title you have stored; To erase a character; Making your own titles; Если Вы выберите установку [; выберите пустую часть.
80 To change a title you have stored In step 3, select CUSTOM1 SET or CUSTOM2SET, depending on which title you want tochange, then press the SEL/PUSH EXEC dial.Turn the SEL/PUSH EXEC dial to select [ C ], then press the dial to delete the title. The last characteris erased. Enter the new title as de...
Страница 81 - Keep pressing the –; Inserting a scene; Удерживайте нажатой сторону –; Вставка эпизода
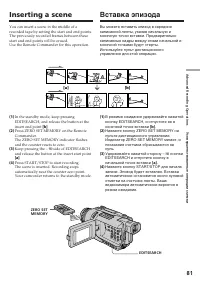
81 Advanced Recording Operations Усовершенствованные операции съемки You can insert a scene in the middle of arecorded tape by setting the start and end points.The previously recorded frames between thesestart and end points will be erased.Use the Remote Commander for this operation. ( 1 ) In the st...
Страница 82 - • The zero set memory function works only for; • Функция памяти установки нулевой отметки
82 Inserting a scene Notes • The zero set memory function works only for tapes recorded in the Digital8 system. • The picture and the sound may be distorted at the end of the inserted section when it is playedback. If a tape has a blank portion betweenrecorded portions The zero set memory function m...
Страница 84 - • Picture effect functions work only for tapes; Pictures processed by picture effect functions; • Функция эффекта изображения работает
84 Notes • Picture effect functions work only for tapes recorded in the Digital8 system. • You cannot process externally input scenes using the picture effect functions. • You cannot record pictures on a tape on your camcorder when you have processed thepicture using the picture effect function.Howe...
Страница 85 - Set D EFFECT to OFF in the menu settings.
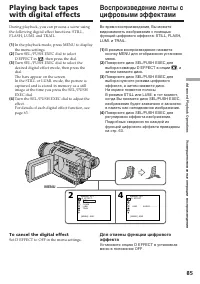
85 Advanced Playback Operations Усовершенствованные операции воспроизведения During playback, you can process a scene usingthe following digital effect functions: STILL,FLASH, LUMI. and TRAIL. ( 1 ) In the playback mode, press MENU to displaythe menu settings. ( 2 ) Turn SEL/PUSH EXEC dial to select...
Страница 86 - • Digital effect functions work only for tapes; Pictures processed by digital effect functions; • Функция цифрового эффекта работает
86 Playing back tapes with digitaleffects Notes • Digital effect functions work only for tapes recorded in the Digital8 system. • You cannot process externally input scenes using digital effect functions. • You cannot record images on a tape on your camcorder when you have processed the imageusing d...
Страница 87 - indicators which showing the direction to; PB ZOOM; : Изображение перемещается
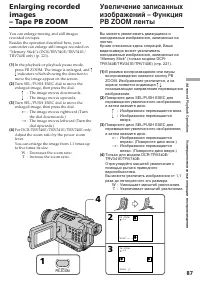
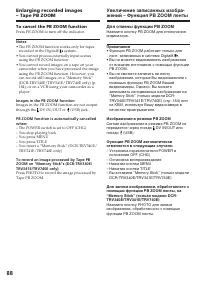
87 Advanced Playback Operations Усовершенствованные операции воспроизведения You can enlarge moving and still imagesrecorded on tapes.Besides the operation described here, yourcamcorder can enlarge still images recorded on“Memory Stick”s (DCR-TRV340E/TRV341E/TRV740E only) (p. 221). ( 1 ) In the play...
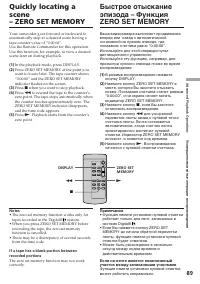
Страница 88 - To cancel the PB ZOOM function; Для отмены функции PB ZOOM; • Функция PB ZOOM работает только для; Изображения в режиме PB ZOOM; – Установка переключателя POWER в
88 Enlarging recorded images– Tape PB ZOOM To cancel the PB ZOOM function Press PB ZOOM to turn off the indicator. Notes • The PB ZOOM function works only for tapes recorded in the Digital8 system. • You cannot process externally input scenes using the PB ZOOM function. • You cannot record images on...
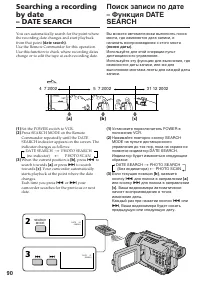
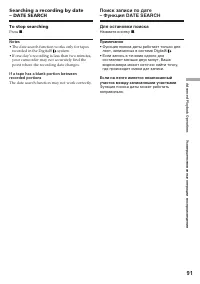
Страница 91 - To stop searching; • The date search function works only for tapes; Для остановки поиска; Нажмите кнопку; • Функция поиска даты работает только для
91 Advanced Playback Operations Усовершенствованные операции воспроизведения Searching a recording by date– DATE SEARCH To stop searching Press x . Notes • The date search function works only for tapes recorded in the Digital8 system. • If one day’s recording is less than two minutes, your camcorder...
Страница 92 - Searching for a photo; Поиск фото
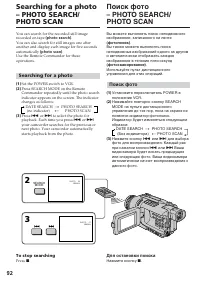
92 You can search for the recorded still imagerecorded on tape (photo search) . You can also search for still images one afteranother and display each image for five secondsautomatically (photo scan) . Use the Remote Commander for theseoperations. Searching for a photo ( 1 ) Set the POWER switch to ...
Страница 93 - Scanning photo; To stop scanning; Фотосканирование; Для остановки сканирования
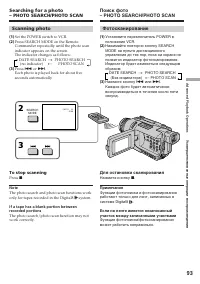
93 Advanced Playback Operations Усовершенствованные операции воспроизведения Scanning photo ( 1 ) Set the POWER switch to VCR. ( 2 ) Press SEARCH MODE on the RemoteCommander repeatedly until the photo scanindicator appears on the screen.The indicator changes as follows: DATE SEARCH t PHOTO SEARCH (n...
Страница 94 - — Editing —; Dubbing a tape; Using the A/V connecting cable; • Set DISPLAY to LCD in the menu settings. (The; Монтаж; Перезапись ленты; Перед выполнением операции
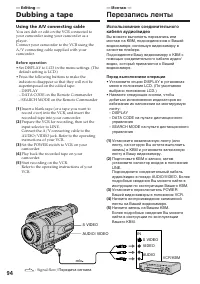
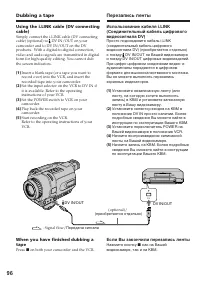
94 — Editing — Dubbing a tape Using the A/V connecting cable You can dub or edit on the VCR connected toyour camcorder using your camcorder as aplayer.Connect your camcorder to the VCR using theA/V connecting cable supplied with yourcamcorder. Before operation • Set DISPLAY to LCD in the menu settin...
Страница 95 - If your VCR is a monaural type; Если Вы закончили перезапись ленты; Если Ваш КВМ монофонического типа
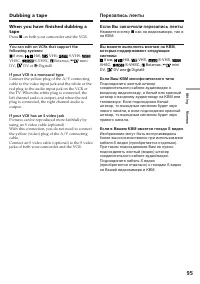
95 Editing Монтаж When you have finished dubbing atape Press x on both your camcorder and the VCR. You can edit on VCRs that support thefollowing systems: 8 mm, Hi8, VHS, S-VHS, VHSC, S-VHSC, Betamax, mini DV, DV or Digital8 If your VCR is a monaural type Connect the yellow plug of the A/V connectin...
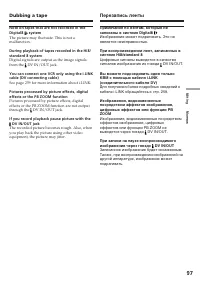
Страница 97 - See page 259 for more information about i.LINK.; If you record playback pause picture with the
97 Editing Монтаж Dubbing a tape Note on tapes that are not recorded in theDigital8 system The picture may fluctuate. This is not amalfunction. During playback of tapes recorded in the Hi8/standard 8 system Digital signals are output as the image signalsfrom the DV IN/OUT jack. You can connect one V...
Страница 98 - Изменить порядок
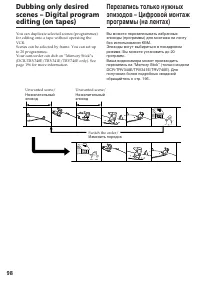
98 You can duplicate selected scenes (programmes)for editing onto a tape without operating theVCR.Scenes can be selected by frame. You can set upto 20 programmes.Your camcorder can dub on “Memory Stick”s(DCR-TRV340E/TRV341E/TRV740E only). Seepage 196 for more information. Dubbing only desiredscenes ...
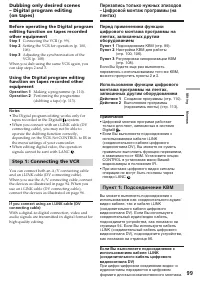
Страница 99 - • The Digital program editing works only for; Step 1: Connecting the VCR; • Цифровой монтаж программ работает; Пункт
99 Editing Монтаж Dubbing only desired scenes– Digital program editing(on tapes) Before operating the Digital programediting function on tapes recordedother equipment Step 1 Connecting the VCR (p. 99). Step 2 Setting the VCR for operation (p. 100,106). Step 3 Adjusting the synchronization of theVCR ...
Страница 100 - Step 2: Setting the VCR to; to; Set the IR SETUP code; Press MENU to display the menu settings.; , чтобы послать управляющий сигнал; Установка кода IR SETUP
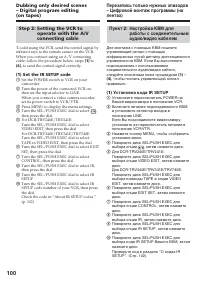
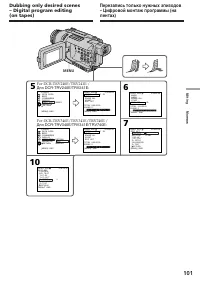
100 Step 2: Setting the VCR to operate with the A/Vconnecting cable To edit using the VCR, send the control signal byinfrared rays to the remote sensor on the VCR.When you connect using an A/V connectingcable, follow the procedure below, steps ( 1 ) to ( 4 ) , to send the control signal correctly. (...
Страница 102 - Компонент телевизора/КВМ
102 Dubbing only desired scenes– Digital program editing(on tapes) Note on IR SETUP codes Digital program editing is not possible if the VCRdoes not support IR SETUP codes. About IR SETUP codes The IR SETUP code is stored in the memory ofyour camcorder. Be sure to set the correct code tomatch your V...
Страница 103 - Buttons to cancel recording pause on the VCR; pause is; Кнопки для отмены паузы записи на КВМ; паузы записи служит кнопка
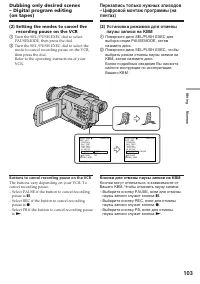
103 Editing Монтаж ( 2 ) Setting the modes to cancel therecording pause on the VCR 1 Turn the SEL/PUSH EXEC dial to selectPAUSEMODE, then press the dial. 2 Turn the SEL/PUSH EXEC dial to select themode to cancel recording pause on the VCR,then press the dial.Refer to the operating instructions of yo...
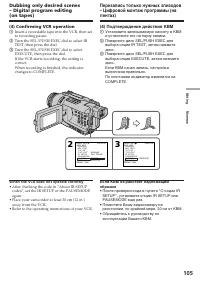
Страница 105 - Confirming VCR operation; When the VCR does not operate correctly; • After checking the code in “About IR SETUP; Подтверждение действия КВМ; • После проверки кода в пункте “О кодах IR
105 Editing Монтаж ( 4 ) Confirming VCR operation 1 Insert a recordable tape into the VCR, then setto recording pause. 2 Turn the SEL/PUSH EXEC dial to select IRTEST, then press the dial. 3 Turn the SEL/PUSH EXEC dial to selectEXECUTE, then press the dial.If the VCR starts recording, the setting isc...
Страница 106 - Step 2: Setting the VCR to operate
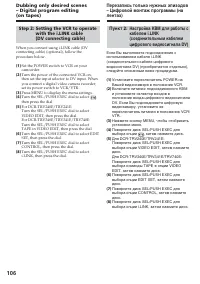
106 Dubbing only desired scenes– Digital program editing(on tapes) Step 2: Setting the VCR to operate with the i.LINK cable(DV connecting cable) When you connect using i.LINK cable (DVconnecting cable) (optional), follow theprocedure below. ( 1 ) Set the POWER switch to VCR on yourcamcorder. ( 2 ) T...
Страница 107 - You cannot dub the titles and display indicators.
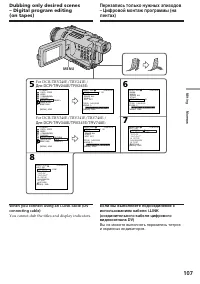
107 Editing Монтаж Dubbing only desired scenes– Digital program editing(on tapes) When you connect using an i.LINK cable (DVconnecting cable) You cannot dub the titles and display indicators. 5 7 6 8 VIDEO EDIT MARK UNDO ERASE ALL START EDIT SET IR 0:08:55:06 TOTAL 0:00:00:00SCENE 0 [MENU] : END VID...
Страница 108 - Step 3: Adjusting the
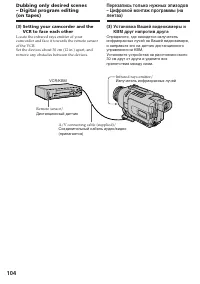
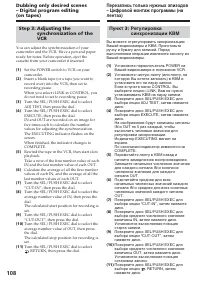
108 Dubbing only desired scenes– Digital program editing(on tapes) Step 3: Adjusting the synchronization of theVCR You can adjust the synchronization of yourcamcorder and the VCR. Have a pen and paperready for notes. Before operation, eject thecassette from your camcorder if inserted. ( 1 ) Set the ...
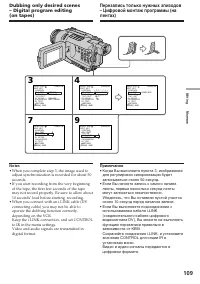
Страница 109 - • When you complete step 3, the image used to; • Когда Вы выполните пункта 3, изображение
109 Editing Монтаж Notes • When you complete step 3, the image used to adjust synchronization is recorded for about 50seconds. • If you start recording from the very beginning of the tape, the first few seconds of the tapemay not record properly. Be sure to allow about10 seconds’ lead before startin...
Страница 110 - Действие
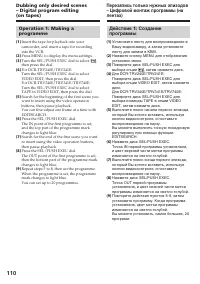
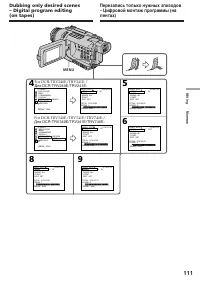
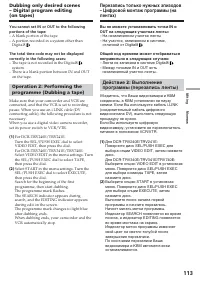
110 Dubbing only desired scenes– Digital program editing(on tapes) Operation 1: Making aprogramme ( 1 ) Insert the tape for playback into yourcamcorder, and insert a tape for recordinginto the VCR. ( 2 ) Press MENU to display the menu settings. ( 3 ) Turn the SEL/PUSH EXEC dial to select , then pres...
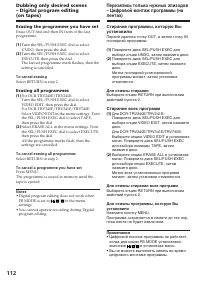
Страница 112 - Erasing the programme you have set; To cancel erasing; Erasing all programmes; To cancel erasing all programmes; Select RETURN in step 2.; To cancel a programme you have set; • Digital program editing does not work when; Для отмены стирания; Стирание всех программ; Для отмены стирания всех программ; • Цифровой монтаж программы не работает,
112 Dubbing only desired scenes– Digital program editing(on tapes) Erasing the programme you have set Erase OUT first and then IN from of the lastprogramme. ( 1 ) Turn the SEL/PUSH EXEC dial to selectUNDO, then press the dial. ( 2 ) Turn the SEL/PUSH EXEC dial to selectEXECUTE, then press the dial.T...
Страница 113 - Digital8
113 Editing Монтаж Dubbing only desired scenes– Digital program editing(on tapes) You cannot set IN or OUT to the followingportions of the tape: – A blank portion of the tape– A portion recorded in a system other than Digital8 The total time code may not be displayedcorrectly in the following cases:...
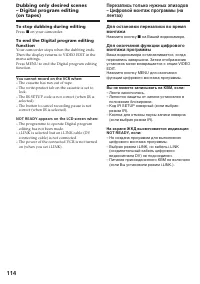
Страница 114 - To stop dubbing during editing; You cannot record on the VCR when:
114 To stop dubbing during editing Press x on your camcorder. To end the Digital program editingfunction Your camcorder stops when the dubbing ends.Then the display returns to VIDEO EDIT in themenu settings.Press MENU to end the Digital program editingfunction. You cannot record on the VCR when: – T...
Страница 115 - Set the POWER switch to VCR.; After capturing images and sound; DV OUT в разделе; После записи изображений и звука; VIDEO
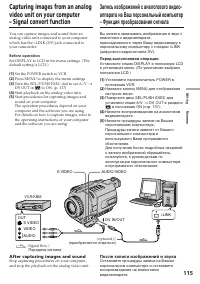
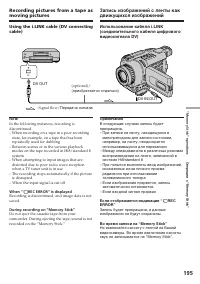
115 Editing Монтаж Capturing images from an analogvideo unit on your computer– Signal convert function You can capture images and sound from ananalog video unit connected to your computerwhich has the i.LINK (DV) jack connected toyour camcorder. Before operation Set DISPLAY to LCD in the menu settin...
Страница 116 - • You need to install software that supports the; If your computer has a USB jack; • Вам необходимо установить программное
116 Capturing images from an analogvideo unit on your computer– Signal convert function Notes • You need to install software that supports the exchange video signals. • Depending on the state of the analog video signals, your computer may not be able tooutput the images correctly when you convertana...
Страница 118 - • To enable smooth transition, we recommend; • Для обеспечения плавного перехода
118 Recording video or TVprogrammes Notes • To enable smooth transition, we recommend that you do not mix pictures recorded in theHi8/standard 8 with the Digital8 system on atape. • If you fast-forward or slow-playback on the other equipment, the image being recordedmay fluctuate. When recording fro...
Страница 119 - DV OUT
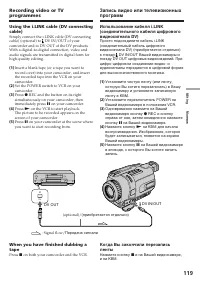
119 Editing Монтаж Recording video or TVprogrammes Using the i.LINK cable (DV connectingcable) Simply connect the i.LINK cable (DV connectingcable) (optional) to DV IN/OUT of yourcamcorder and to DV OUT of the DV products.With a digital-to-digital connection, video andaudio signals are transmitted i...
Страница 121 - : A tape that contains the scene to be
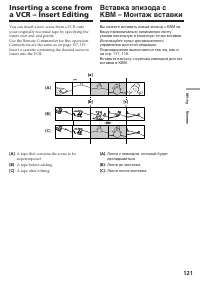
121 Editing Монтаж You can insert a new scene from a VCR ontoyour originally recorded tape by specifying theinsert start and end points.Use the Remote Commander for this operation.Connections are the same as on page 117, 119.Insert a cassette containing the desired scene toinsert into the VCR. [ A ]...
Страница 123 - To change the insert end point; When the inserted picture is played back; Skip step 3 and 4. Press
123 Editing Монтаж Inserting a scene from a VCR– Insert Editing To change the insert end point Press ZERO SET MEMORY again after step 5 tomake the ZERO SET MEMORY indicatordisappear and begin from step 3. Notes • The zero set memory function works only for tapes recorded in the Digital8 system. • Pi...
Страница 124 - Прикладная программа:; DirectX 8.0a или более поздняя версия
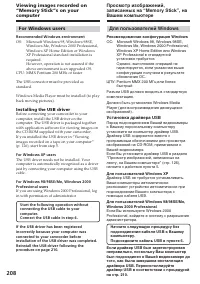
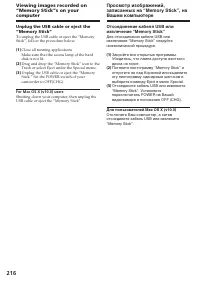
124 If you connect your camcorder and yourcomputer using the USB cable, you can viewpictures live from your camcorder and picturesrecorded on a tape on your computer (USBStreaming function).Furthermore, if you capture images recorded ona tape from your camcorder to your computer,you can process or e...
Страница 125 - MB VRAM video card, Minimum 800; • Operations are not guaranteed for either the; • Выполнение операций не гарантируется и
125 Editing Монтаж Viewing images recorded on a tape onyour computer (Windows users only) Display: 4 MB VRAM video card, Minimum 800 × 600 dot Hi colour (16 bit colour, 65,000 colours), DirectDraw display driver capability (At 800 × 600 dot or less, 256 colours and less, this product will notoperate...
Страница 126 - Installing the USB driver; Установка драйвера USB
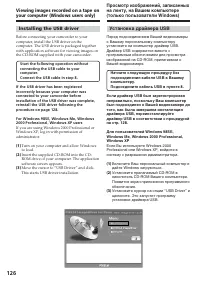
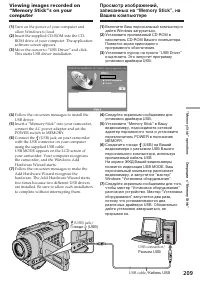
126 Viewing images recorded on a tape onyour computer (Windows users only) Installing the USB driver Before connecting your camcorder to yourcomputer, install the USB driver on thecomputer. The USB driver is packaged togetherwith application software for viewing images onthe CD-ROM supplied with you...
Страница 127 - Set the POWER switch to CAMERA or VCR.
127 Editing Монтаж ( 4 ) Follow the on-screen messages to install theUSB driver. ( 5 ) Connect the AC power adaptor to yourcamcorder and then to a wall socket. ( 6 ) Set the POWER switch to CAMERA or VCR. ( 7 ) Select USB STREAM to ON in in the menu settings (p.137). ( 8 ) With the CD-ROM inserted, ...
Страница 128 - If you cannot install the USB driver; Step 1: Uninstall the incorrect USB driver
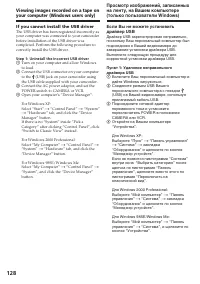
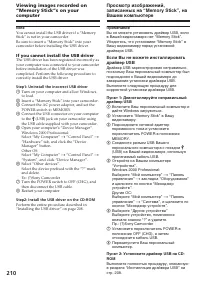
128 If you cannot install the USB driver The USB driver has been registered incorrectly asyour computer was connected to your camcorderbefore installation of the USB driver wascompleted. Perform the following procedure tocorrectly install the USB driver. Step 1: Uninstall the incorrect USB driver 1 ...
Страница 129 - Windows 98SE/Windows 98 Tweede editie
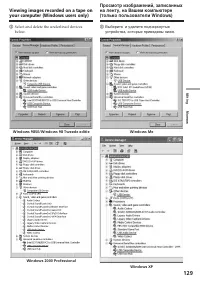
129 Editing Монтаж 5 Select and delete the underlined devicesbelow. Viewing images recorded on a tape onyour computer (Windows users only) Windows 98SE/Windows 98 Tweede editie Windows Me Windows 2000 Professional Windows XP Просмотр изображений, записанныхна ленту, на Вашем компьютере(только пользо...
Страница 130 - Restart your computer.; Step 2: Install the USB driver on the CD-ROM; Перезагрузите Ваш компьютер.
130 6 Set the POWER switch to OFF (CHG) on yourcamcorder, and then disconnect the USBcable. 7 Restart your computer. Step 2: Install the USB driver on the CD-ROM Perform the entire procedure described in“Installing the USB driver” on page 126. Viewing images recorded on a tape onyour computer (Windo...
Страница 131 - Select the language for installation.
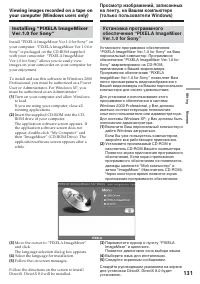
131 Editing Монтаж Viewing images recorded on a tape onyour computer (Windows users only) Installing “PIXELA ImageMixerVer.1.0 for Sony” Install “PIXELA ImageMixer Ver.1.0 for Sony” onyour computer. “PIXELA ImageMixer Ver.1.0 forSony” is packaged on the CD-ROM suppliedwith your camcorder. “PIXELA Im...
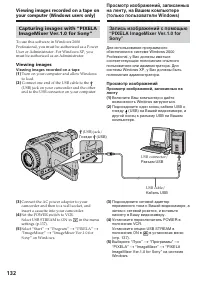
Страница 132 - Viewing images; Просмотр изображений
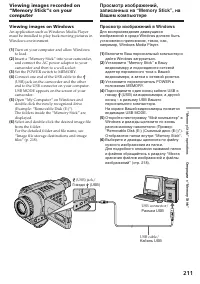
132 Capturing images with “PIXELAImageMixer Ver.1.0 for Sony” To use this software in Windows 2000Professional, you must be authorized as a PowerUser or Administrator. For Windows XP, youmust be authorized as an Administrator. Viewing images Viewing images recorded on a tape( 1 ) Turn on your comput...
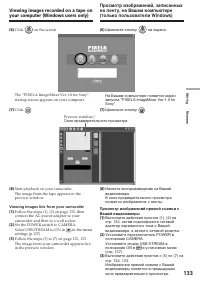
Страница 133 - Click
133 Editing Монтаж ( 6 ) Click on the screen. The “PIXELA ImageMixer Ver.1.0 for Sony”startup screen appears on your computer. ( 7 ) Click . ( 8 ) Start playback on your camcorder.The image from the tape appears in thepreview window. Viewing images live from your camcorder( 1 ) Follow the steps (1),...
Страница 134 - Capturing images; Capturing moving pictures; Запись изображений; Запись неподвижных изображений
134 Viewing images recorded on a tape onyour computer (Windows users only) Capturing images Capturing still images( 1 ) Click . ( 2 ) Click at the point to capture using the preview window. The captured imageappears on the thumbnail list window. Capturing moving pictures ( 1 ) Click . ( 2 ) Click at...
Страница 135 - • When you view images on your computer with; If any trouble occurs; Close all running applications, then restart it.; • При просмотре изображений на Вашем; Если возникнут какие-либо проблемы
135 Editing Монтаж Notes • When you view images on your computer with the USB connection, the following may occur.This is not a malfunction:– The image may fluctuate– The image may contain noise, etc.– The image does not appear properly if the TV colour system used for the image signaldiffers to the...
Страница 136 - To close on-line help; Notes on using your computer; Communications with your computer; Для закрытия встроенной помощи
136 Seeing the on-line help(operating instructions) of“PIXELA ImageMixer Ver.1.0 forSony” “PIXELA ImageMixer Ver.1.0 for Sony” isprovided with on-line help (operatinginstructions). ( 1 ) Click button located in the upper-right corner of the screen.The “ImageMixer’s Manual” screen appears. ( 2 ) You ...
Страница 137 - — Customizing Your Camcorder —; Выполнение индивидуальных; Изменение установок меню
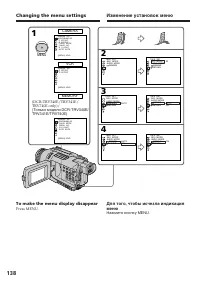
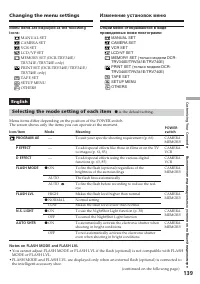
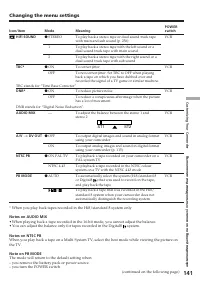
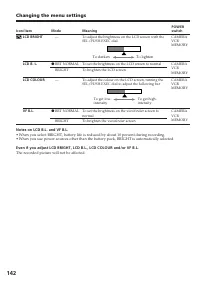
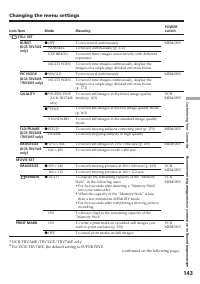
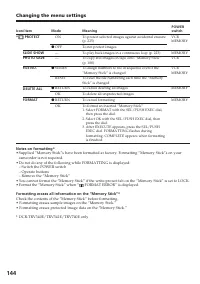
137 Customizing Your Camcorder Выполнение индивидуальных установок на Вашей видеокамере — Customizing Your Camcorder — Changing the menusettings To change the mode settings in the menusettings, select the menu items with the SEL/PUSH EXEC dial. The default settings can bepartially changed. First, se...
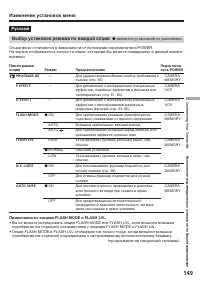
Страница 149 - Выбор установок режима по каждой опции; является установкой по умолчанию.; Примечания по опциям FLASH MODE и FLASH LVL
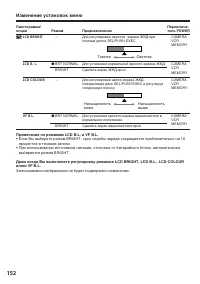
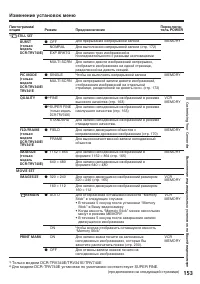
149 Customizing Your Camcorder Выполнение индивидуальных установок на Вашей видеокамере Русский Выбор установок режима по каждой опции z является установкой по умолчанию. Опции меню отличаются в зависимости от положения переключателя POWER.На экране отображаются только те опции, которыми Вы можете о...
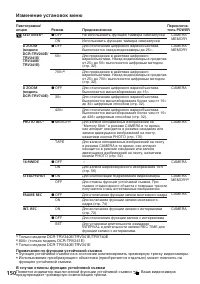
Страница 150 - Режим; Примечания по функции устойчивой съемки; функцию устойчивой съемки.; В случае отмены функции устойчивой съемки; Появится индикатор выключенной функции устойчивой съемки
150 Изменение установок меню Пиктограмма/опция SELFTIMER 1) D ZOOM (моделиDCR-TRV240E/TRV241E/TRV340E/TRV341E) D ZOOM (модельDCR-TRV740E) PHOTO REC 1) 16:9WIDE STEADYSHOT FRAME REC INT. REC Переключа-тель POWER CAMERAMEMORY CAMERAMEMORY CAMERA CAMERA CAMERA CAMERAMEMORY 3) CAMERA CAMERA Режим z OFF ...
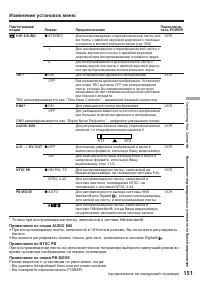
Страница 151 - HiFi SOUND; Примечания по опции AUDIO MIX
151 Customizing Your Camcorder Выполнение индивидуальных установок на Вашей видеокамере Пиктограмма/опция HiFi SOUND TBC* TBC расшифровывается как “Time Base Corrector” - временной базовый корректор . DNR* DNR расшифровывается как “Digital Noise Reduction” - цифровое уменьшение помех. AUDIO MIX A/V ...
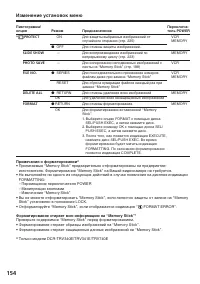
Страница 154 - PROTECT; Примечания о форматировании; Stick” установлен в положение LOCK.; Форматирование стирает всю информацию на “Memory Stick”*
154 Изменение установок меню Пиктограмма/опция * PROTECT SLIDE SHOW PHOTO SAVE FILE NO. DELETE ALL FORMAT Режим ON z OFF — — z SERIES RESET z RETURN OK z RETURN OK Предназначение Для защиты выбранных изображений отслучайного стирания (стр. 225) Для отмены защиты изображений. Для воспроизведения изоб...
Страница 155 - PIC PRINT; Примечание о команде PRINT SET
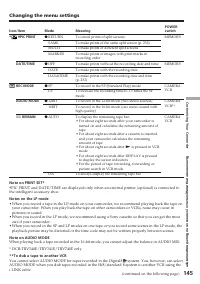
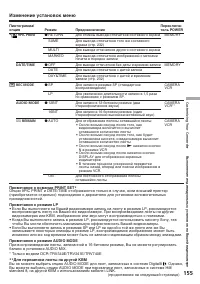
155 Customizing Your Camcorder Выполнение индивидуальных установок на Вашей видеокамере Изменение установок меню Пиктограмма/опция * 9PIC PRINT DATE/TIME REC MODE AUDIO MODE q REMAIN Примечание о команде PRINT SET * Опции 9PIC PRINT и DATE/TIME отображаются только в случае, если внешний принтер(прио...
Страница 156 - Примечания о режиме DEMO MODE; FRANÇAIS; Предназначение
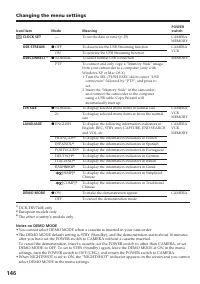
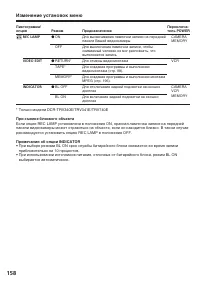
156 Изменение установок меню Пиктограмма/опция CLOCK SET USB STREAM USBCONNECT 1) LTR SIZE LANGUAGE DEMO MODE 1) Только модель DCR-TRV740E 2) Только европейские модели 3) Только модели для других стран Примечания о режиме DEMO MODE • Вы не можете выбрать команду DEMO MODE, если в Вашу видеокамеру вс...
Страница 157 - DATA CODE
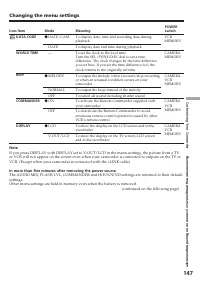
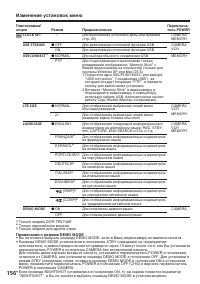
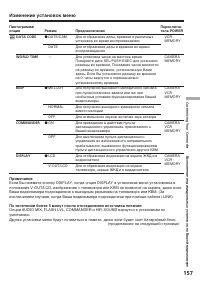
157 Customizing Your Camcorder Выполнение индивидуальных установок на Вашей видеокамере Изменение установок меню Пиктограмма/опция DATA CODE WORLD TIME BEEP COMMANDER DISPLAY Режим z DATE/CAM DATE — z MELODY NORMAL OFF z ON OFF z LCD V-OUT/LCD Предназначение Для отображения даты, времени и различных...
Страница 158 - При съемке близкого объекта; приблизительно на 10 процентов.
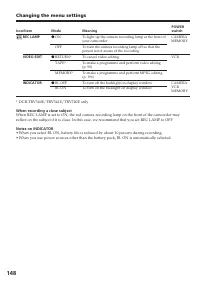
158 Изменение установок меню Пиктограмма/опция REC LAMP VIDEO EDIT INDICATOR Режим z ON OFF z RETURN* TAPE* MEMORY* z BL OFF BL ON Предназначение Для высвечивания лампочки записи на переднейпанели Вашей видеокамеры Для выключения лампочки записи, чтобыснимаемый человек не мог распознать, чтовыполняе...
Страница 159 - On file format; Typical image data file name; Dsc00001.jpg: This file name appears on the; Using a “Memory Stick”; — “Memory Stick” operations —; Операции с “Memory Stick”; О формате файлов; Типичное имя файла данных изображения; Использование “Memory Stick”
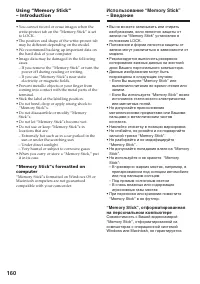
159 “Memory Stick” operations Операции с “Memory Stick” – DCR-TRV340E/TRV341E/TRV740E only You can record and play back images on a“Memory Stick” supplied with your camcorder.You can easily play back, record or deleteimages. You can exchange image data with otherequipment such as your computer etc.,...
Страница 161 - Notes on image data compatibility
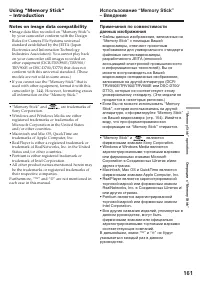
161 “Memory Stick” operations Операции с “Memory Stick” Using “Memory Stick”– Introduction Notes on image data compatibility • Image data files recorded on “Memory Stick”s by your camcorder conform with the DesignRules for Camera File Systems universalstandard established by the JEITA (JapanElectron...
Страница 162 - Inserting “Memory Stick”; mark facing; Ejecting the “Memory Stick”; Press the “Memory Stick” once lightly.; When the access lamp is lit or flashing; Установка “Memory Stick”; был; Извлечение “Memory Stick”; Легко нажмите “Memory Stick” один раз.; Если лампочка доступа горит или мигает
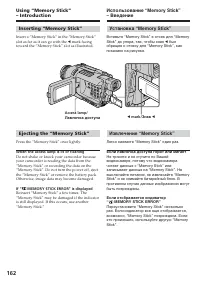
162 Inserting “Memory Stick” Insert a “Memory Stick” in the “Memory Stick”slot as far as it can go with the b mark facing toward the “Memory Stick” slot as illustrated. Ejecting the “Memory Stick” Press the “Memory Stick” once lightly. When the access lamp is lit or flashing Do not shake or knock yo...
Страница 163 - а затем нажмите диск.
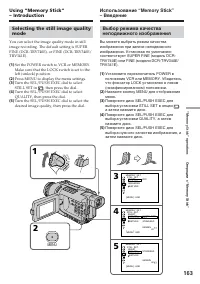
163 “Memory Stick” operations Операции с “Memory Stick” Selecting the still image qualitymode You can select the image quality mode in stillimage recording. The default setting is SUPERFINE (DCR-TRV740E), or FINE (DCR-TRV340E/TRV341E). ( 1 ) Set the POWER switch to VCR or MEMORY.Make sure that the L...
Страница 164 - Image quality settings; Setting; quality in your camcorder.; Установки качества изображения; Установка; обеспечивает самое
164 Image quality settings Setting Meaning SUPER FINE (SFN) This is the highest image(DCR-TRV740E quality in your camcorder. only) The number of still imagesyou can record is less thanin FINE mode. The image iscompressed to about 1/3. FINE (FINE) Use this mode when youwant to record high qualityimag...
Страница 165 - Selecting the image size; Выбор размера изображения
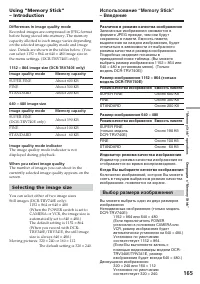
165 “Memory Stick” operations Операции с “Memory Stick” Using “Memory Stick”– Introduction Differences in image quality mode Recorded images are compressed in JPEG formatbefore being stored into memory. The memorycapacity allotted to each image varies dependingon the selected image quality mode and ...
Страница 166 - Движущиеся изображения:
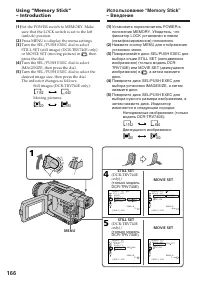
166 ( 1 ) Set the POWER switch to MEMORY. Makesure that the LOCK switch is set to the left(unlock) position. ( 2 ) Press MENU to display the menu settings. ( 3 ) Turn the SEL/PUSH EXEC dial to selectSTILL SET (still image) (DCR-TRV740E only)or MOVIE SET (moving picture) in , then press the dial. ( 4...
Страница 167 - Image size settings/Beeldformaat-instellingen; SFN; Maximum recording time/; FINE
167 “Memory Stick” operations Операции с “Memory Stick” Using “Memory Stick”– Introduction Image size settings/Beeldformaat-instellingen Indicator/ Индикатор Setting/ Установка Meaning/ Значение Recording/ Playback/ Запись Воспроизведение 1152 × 864* Records 1152 × 864 still images./ 1152 SFN 1152 З...
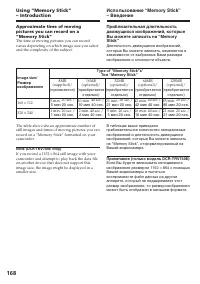
Страница 168 - 64 still image with your; Type of “Memory Stick”s/
168 Approximate time of movingpictures you can record on a“Memory Stick” The time of moving pictures you can recordvaries depending on which image size you selectand the complexity of the subject. The table above shows approximate number ofstill images and times of moving pictures you canrecord on a...
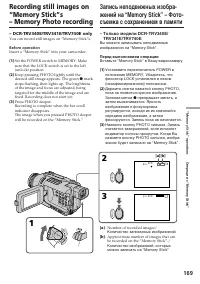
Страница 169 - You can record still images on “Memory Stick”s.; Insert a “Memory Stick” into your camcorder.; Вставьте “Memory Stick” в Вашу видеокамеру.; съемка с сохранением в памяти
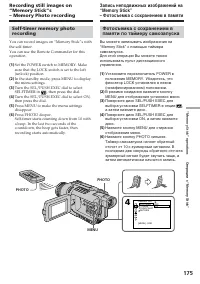
169 “Memory Stick” operations Операции с “Memory Stick” – DCR-TRV340E/TRV341E/TRV740E only You can record still images on “Memory Stick”s. Before operation Insert a “Memory Stick” into your camcorder. ( 1 ) Set the POWER switch to MEMORY. Makesure that the LOCK switch is set to the left(unlock) posi...
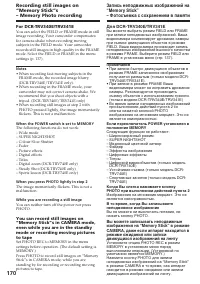
Страница 170 - • When recording fast-moving subjects in the; When the POWER switch is set to MEMORY; • При записи быстро движущихся объектов в
170 Recording still images on“Memory Stick”s– Memory Photo recording For DCR-TRV340E/TRV341E You can select the FIELD or FRAME mode in stillimage recording. Your camcorder compensatesfor camera-shake when recording movingsubjects in the FIELD mode. Your camcorderrecords still images in high quality ...
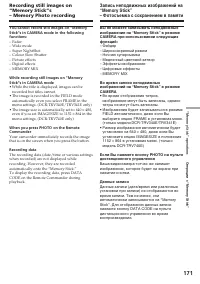
Страница 171 - • While the title is displayed, images can be; • Во время отображения титров,
171 “Memory Stick” operations Операции с “Memory Stick” You cannot record still images on “MemoryStick”s in CAMERA mode in the followingfunctions: – Fader– Wide mode– Super NightShot– Colour Slow Shutter– Picture effects– Digital effects– MEMORY MIX While recording still images on “MemoryStick”s in ...
Страница 172 - Recording images continuously; MULTI SCRN (Recording image size is 640; изображений размером 640; Режим MULTI SCRN
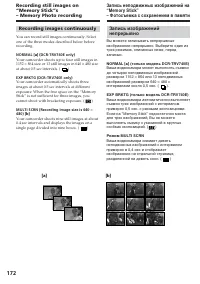
172 Recording still images on“Memory Stick”s– Memory Photo recording Recording images continuously You can record still images continuously. Selectone of the three modes described below beforerecording. NORMAL [ a ] (DCR-TRV740E only) Your camcorder shoots up to four still images in1152 × 864 size o...
Страница 174 - FULL” appears on the screen and you; When recording in the multi screen mode; 80, even if you set; During recording still images continuously; Если емкость “Memory Stick” заполнена; На экране появится индикация “; При записи в мульти-экранном режиме; 64 в установках меню (только модель
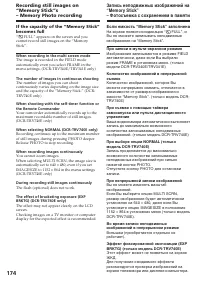
174 If the capacity of the “Memory Stick”becomes full “ FULL” appears on the screen and you cannot record still images on the “MemoryStick”. When recording in the multi screen mode The image is recorded in the FIELD modeautomatically even you select FRAME in themenu settings. (DCR-TRV340E/TRV341E on...
Страница 177 - (цветовая рирпроекция
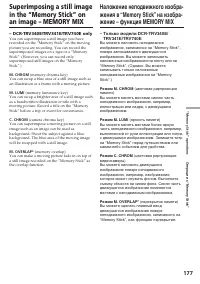
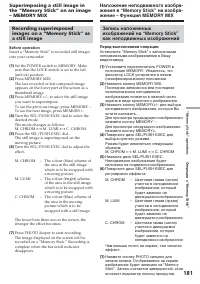
177 “Memory Stick” operations Операции с “Memory Stick” Superimposing a still imagein the “Memory Stick” onan image – MEMORY MIX – DCR-TRV340E/TRV341E/TRV740E only You can superimpose a still image you haverecorded on the “Memory Stick” on the movingpicture you are recording. You can record thesuper...
Страница 178 - Set the POWER switch to CAMERA.; Синий фон
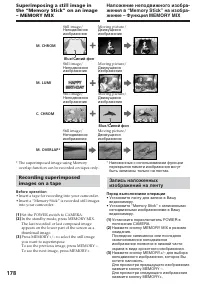
178 * The superimposed image using Memory overlap function can be recorded on tapes only. Recording superimposedimages on a tape Before operation • Insert a tape for recording into your camcorder.• Insert a “Memory Stick” is recorded still images into your camcorder. ( 1 ) Set the POWER switch to CA...
Страница 179 - M. OVERLAP – No adjustment necessary; MEMORY; M. OVERLAP – Не требуется никаких
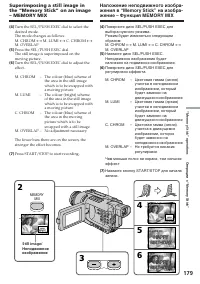
179 “Memory Stick” operations Операции с “Memory Stick” ( 4 ) Turn the SEL/PUSH EXEC dial to select thedesired mode.The mode changes as follows:M. CHROM y M. LUMI y C. CHROM y M. OVERLAP ( 5 ) Press the SEL/PUSH EXEC dial.The still image is superimposed on themoving picture. ( 6 ) Turn the SEL/PUSH ...
Страница 180 - Для изменения установки режима
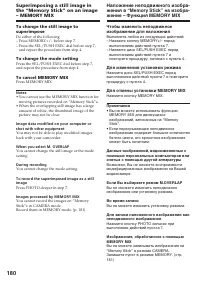
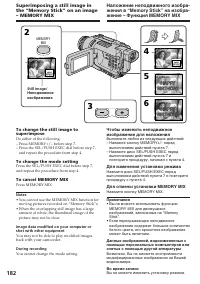
180 Superimposing a still image inthe “Memory Stick” on an image– MEMORY MIX To change the still image tosuperimpose Do either of the following:– Press MEMORY+/– before step 7.– Press the SEL/PUSH EXEC dial before step 7, and repeat the procedure from step 4. To change the mode setting Press the SEL...
Страница 182 - and repeat the procedure from step 4.; To change the mode setting; • You cannot use the MEMORY MIX function for; During recording; You cannot change the mode setting.
182 Superimposing a still image inthe “Memory Stick” on an image– MEMORY MIX 2 4 5 6 M. CHROM M. LUMI M. LUMI M. LUMI I I I • • • • I • • • • • • 100–0021 100–0021 3 100–0021 100–0021 MEMORY MIX Still image/ Неподвижноеизображение To change the still image tosuperimpose Do either of the following:– ...
Страница 183 - Sample images; The image size is automatically set to 640; Образцы изображений
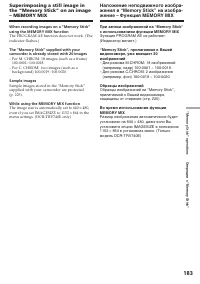
183 “Memory Stick” operations Операции с “Memory Stick” When recording images on a “Memory Stick”using the MEMORY MIX function The PROGRAM AE function does not work. (Theindicator flashes.) The “Memory Stick” supplied with yourcamcorder is already stored with 20 images – For M. CHROM: 18 images (suc...
Страница 184 - • Установите кассету с лентой, записанную в
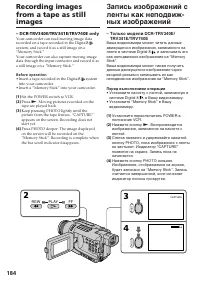
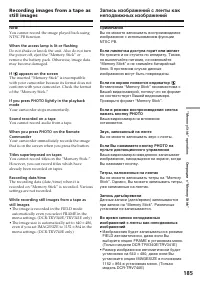
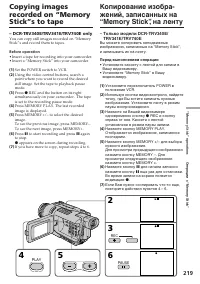
184 – DCR-TRV340E/TRV341E/TRV740E only Your camcorder can read moving image datarecorded on a tape recorded in the Digital8 system, and record it as a still image on a“Memory Stick.”Your camcorder can also capture moving imagedata through the input connector and record it asa still image on a “Memor...
Страница 185 - Your camcorder stops momentarily.; Вы не можете записывать звук с ленты.; Титры, наложенные на лентах; • Изображение будет записываться в режиме
185 “Memory Stick” operations Операции с “Memory Stick” Recording images from a tape asstill images Note You cannot record the image played back usingNTSC PB function. When the access lamp is lit or flashing Do not shake or knock the unit. Also do not turnthe power off, eject the “Memory Stick” orre...
Страница 186 - If your TV or VCR has an S video jack; S VIDEO; КВМ
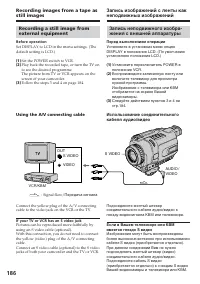
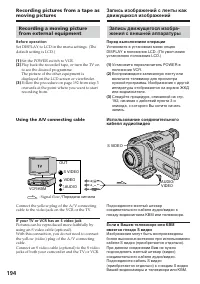
186 Recording a still image fromexternal equipment Before operation Set DISPLAY to LCD in the menu settings. (Thedefault setting is LCD.) ( 1 ) Set the POWER switch to VCR. ( 2 ) Play back the recorded tape, or turn the TV onto see the desired programme.The picture from TV or VCR appears on thescree...
Страница 187 - In the following instances, “; REC ERROR”, и запись будет
187 “Memory Stick” operations Операции с “Memory Stick” Using the i.LINK cable (DV connectingcable) Note In the following instances, “ REC ERROR” is displayed and recording is not possible.Record undistorted images.– When recording on a tape in a poor recording state, for example, on a tape that has...
Страница 188 - • Insert a tape recorded in the Digital8 system; SAV I NG; END; PHOTO BUTTON
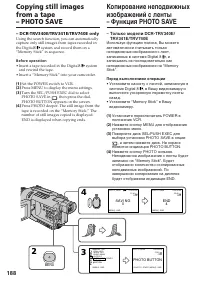
188 Copying still imagesfrom a tape– PHOTO SAVE – DCR-TRV340E/TRV341E/TRV740E only Using the search function, you can automaticallycapture only still images from tapes recorded inthe Digital8 system and record them on a“Memory Stick” in sequence. Before operation • Insert a tape recorded in the Digi...
Страница 189 - To stop copying; • The image is recorded in the FIELD mode; Для остановки копирования
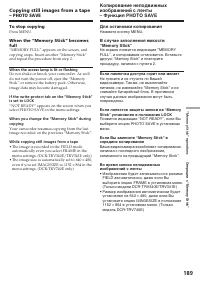
189 “Memory Stick” operations Операции с “Memory Stick” To stop copying Press MENU. When the “Memory Stick” becomesfull “MEMORY FULL” appears on the screen, andcopying stops. Insert another “Memory Stick”and repeat the procedure from step 2. When the access lamp is lit or flashing Do not shake or kn...
Страница 190 - To stop recording; Для остановки записи; : The recording time can be recorded on the
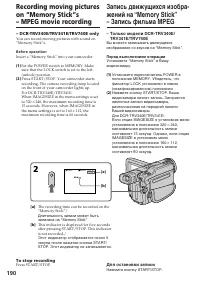
190 – DCR-TRV340E/TRV341E/TRV740E only You can record moving pictures with sound on“Memory Stick”s. Before operation Insert a “Memory Stick” into your camcorder. ( 1 ) Set the POWER switch to MEMORY. Makesure that the LOCK switch is set to the left(unlock) position. ( 2 ) Press START/STOP. Your camc...
Страница 191 - Sound is recorded in monaural.
191 “Memory Stick” operations Операции с “Memory Stick” Recording moving pictures on“Memory Stick”s– MPEG movie recording Note Sound is recorded in monaural. When the POWER switch is set to MEMORY The following functions do not work:– Wide mode– SUPER NIGHTSHOT– Colour Slow Shutter– Fader– Picture e...
Страница 192 - • Установите записанную кассету с лентой в; Нажмите кнопку START/STOP или; PAUSE
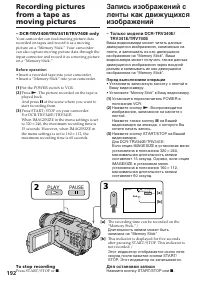
192 – DCR-TRV340E/TRV341E/TRV740E only Your camcorder can read moving picture datarecorded on tapes and record it as a movingpicture on a “Memory Stick.” Your camcordercan also capture moving picture data through theinput connector and record it as a moving pictureon a “Memory Stick.” Before operati...
Страница 195 - – Between scenes or in the various playback; When “
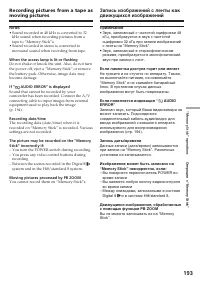
195 “Memory Stick” operations Операции с “Memory Stick” Using the i.LINK cable (DV connectingcable) Note In the following instances, recording isdiscontinued.– When recording on a tape in a poor recording state, for example, on a tape that has beenrepeatedly used for dubbing – Between scenes or in t...
Страница 196 - Making the programme; Создание программы
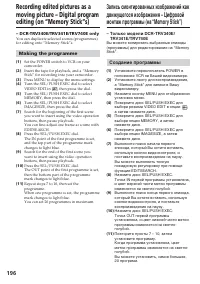
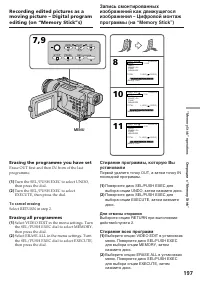
196 Recording edited pictures as amoving picture – Digital programediting (on “Memory Stick”s) – DCR-TRV340E/TRV341E/TRV740E only You can duplicate selected scenes (programmes)for editing onto “Memory Stick”s. Making the programme ( 1 ) Set the POWER switch to VCR on yourcamcorder. ( 2 ) Insert the ...
Страница 200 - NOT READY appears on the LCD screen when:; – The programme to operate Digital program; If you set over the maximum recording time; – Не создана программа для выполнения
200 NOT READY appears on the LCD screen when: – The programme to operate Digital program editing has not been made. – The “Memory Stick” is not inserted.– The write-protect tab on the “Memory Stick” is set to LOCK. When “Memory Stick” does not have enoughspace to record LOW MEMORY appears on the scr...
Страница 201 - To stop memory photo playback; Нажмите кнопку MEMORY PLAY.
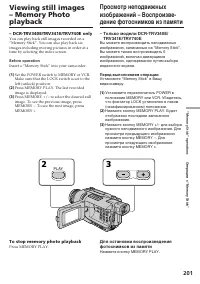
201 “Memory Stick” operations Операции с “Memory Stick” – DCR-TRV340E/TRV341E/TRV740E only You can play back still images recorded on a“Memory Stick”. You can also play back siximages including moving pictures in order at atime by selecting the index screen. Before operation Insert a “Memory Stick” ...
Страница 203 - INDEX; Имя файла данных
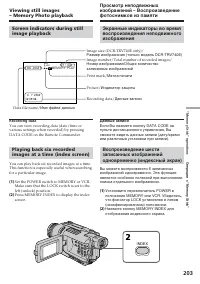
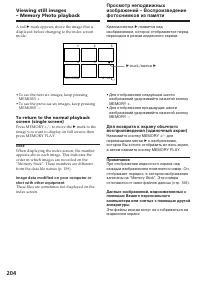
203 “Memory Stick” operations Операции с “Memory Stick” Screen indicators during stillimage playback Recording data You can view recording data (date/time orvarious settings when recorded) by pressingDATA CODE on the Remote Commander. Playing back six recordedimages at a time (index screen) You can ...
Страница 204 - Красная метка; метка
204 A red B mark appears above the image that is displayed before changing to the index screenmode. • To see the next six images, keep pressing MEMORY +. • To see the previous six images, keep pressing MEMORY –. To return to the normal playbackscreen (single screen) Press MEMORY +/– to move the B ma...
Страница 205 - Нажмите кнопку MPEG; To stop MPEG movie playback; Press MPEG
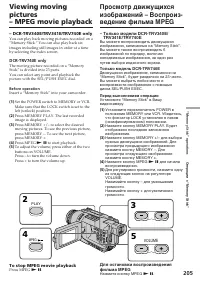
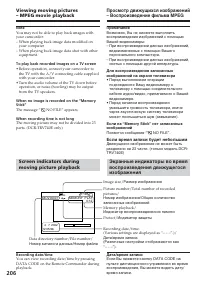
205 “Memory Stick” operations Операции с “Memory Stick” – DCR-TRV340E/TRV341E/TRV740E only You can play back moving pictures recorded on a“Memory Stick.” You can also play back siximages including still images in order at a timeby selecting the index screen. DCR-TRV740E only The moving picture recor...
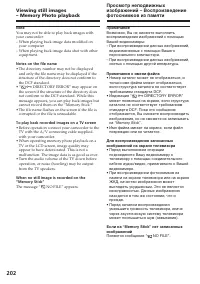
Страница 206 - – When playing back image data shot with other; To play back recorded images on a TV screen; • Before operation, connect your camcorder to; When recording time is not long; Если время записи будет небольшим
206 Note You may not be able to play back images withyour camcorder:– When playing back image data modified on your computer. – When playing back image data shot with other equipment. To play back recorded images on a TV screen • Before operation, connect your camcorder to the TV with the A/V connec...
Страница 207 - JPEG format; Viewing images using computer
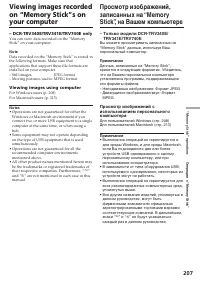
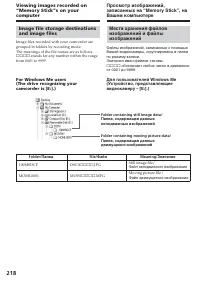
207 “Memory Stick” operations Операции с “Memory Stick” Viewing images recordedon “Memory Stick”s onyour computer – DCR-TRV340E/TRV341E/TRV740E only You can view data recorded on the “MemoryStick” on your computer. Note Data recorded on the “Memory Stick” is stored inthe following formats. Make sure...
Страница 208 - For Windows users; Recommended Windows environment; CPU: MMX Pentium 200 MHz or faster; For Windows XP users; Для пользователей Windows; Рекомендованная конфигурация Windows; ЦПУ: Pentium MMX 200 МГц или более; Для пользователей Windows XP
208 Viewing images recorded on“Memory Stick”s on yourcomputer For Windows users Recommended Windows environment OS: Microsoft Windows 98, Windows 98SE,Windows Me, Windows 2000 Professional,Windows XP Home Edition or WindowsXP Professional standard installation isrequired.However, operation is not as...
Страница 209 - Разъем USB
209 “Memory Stick” operations Операции с “Memory Stick” Viewing images recorded on“Memory Stick”s on yourcomputer ( 1 ) Turn on the power of your computer andallow Windows to load. ( 2 ) Insert the supplied CD-ROM into the CD-ROM drive of your computer. The applicationsoftware screen appears. ( 3 ) ...
Страница 210 - Step1: Uninstall the incorrect USB driver; Step2: Install the USB driver on the CD-ROM
210 Viewing images recorded on“Memory Stick”s on yourcomputer Note You cannot install the USB driver if a “MemoryStick” is not in your camcorder.Be sure to insert a “Memory Stick” into yourcamcorder before installing the USB driver. If you cannot install the USB driver The USB driver has been regist...
Страница 211 - Viewing images on Windows; Set the POWER switch to MEMORY.; Просмотр изображений в Windows
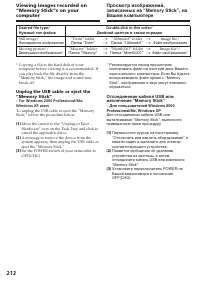
211 “Memory Stick” operations Операции с “Memory Stick” Viewing images on Windows An application such as Windows Media Playermust be installed to play back moving pictures inWindows environment. ( 1 ) Turn on your computer and allow Windowsto load. ( 2 ) Insert a “Memory Stick” into your camcorder,a...
Страница 212 - * Copying a file to the hard disk of your; Нужный тип файла; “Dcim” folder
212 * Copying a file to the hard disk of your computer before viewing it is recommended. Ifyou play back the file directly from the“Memory Stick,” the image and sound maybreak off. Unplug the USB cable or eject the“Memory Stick” – For Windows 2000 Professional/Me,Windows XP users To unplug the USB c...
Страница 213 - For Macintosh users; Recommended Macintosh environment; and a slot loading type CD-ROM drive; Для пользователей Macintosh; Рекомендованная конфигурация Macintosh; • iBook или Power Mac G4 со стандартно
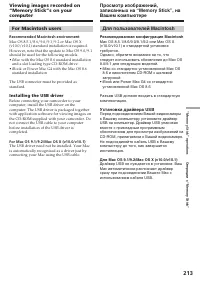
213 “Memory Stick” operations Операции с “Memory Stick” For Macintosh users Recommended Macintosh environment Mac OS 8.5.1/8.6/9.0/9.1/9.2 or Mac OS X(v10.0/v10.1) standard installation is required.However, note that the update to Mac OS 9.0/9.1should be used for the following models.• iMac with the...
Страница 215 - Viewing images on Macintosh; Просмотр изображений в Macintosh
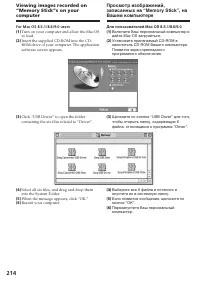
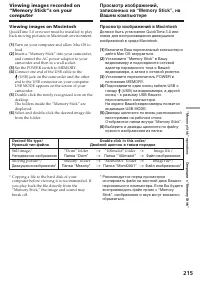
215 “Memory Stick” operations Операции с “Memory Stick” Viewing images on Macintosh QuickTime 3.0 or newer must be installed to playback moving pictures in Macintosh environment. ( 1 ) Turn on your computer and allow Mac OS toload. ( 2 ) Insert a “Memory Stick” into your camcorder,and connect the AC...
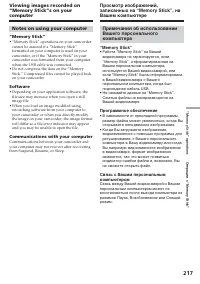
Страница 217 - • “Memory Stick” operations on your camcorder; Software; • Depending on your application software, the; “Memory Stick”; • Работа “Memory Stick” на Вашей; Программное обеспечение; • В зависимости от прикладной программы,
217 “Memory Stick” operations Операции с “Memory Stick” Notes on using your computer “Memory Stick” • “Memory Stick” operations on your camcorder cannot be assured if a “Memory Stick”formatted on your computer is used on yourcamcorder, or if the “Memory Stick” in yourcamcorder was formatted from you...
Страница 218 - Папка; ssss
218 Folder containing moving picture data/ Папка, содержащая данныедвижущихся изображений Folder containing still image data/ Папка, содержащая данныенеподвижных изображений Image file storage destinationsand image files Image files recorded with your camcorder aregrouped in folders by recording mod...
Страница 220 - During copying; You cannot record the index screen.; If you press EDITSEARCH during pause mode; Memory playback stops.; Во время копирования; Вы не можете записать индексный экран.
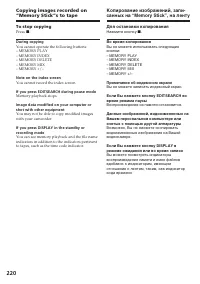
220 To stop copying Press x . During copying You cannot operate the following buttons:– MEMORY PLAY– MEMORY INDEX– MEMORY DELETE– MEMORY MIX– MEMORY +/– Note on the index screen You cannot record the index screen. If you press EDITSEARCH during pause mode Memory playback stops. Image data modified o...
Страница 221 - Опция
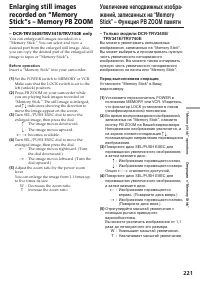
221 “Memory Stick” operations Операции с “Memory Stick” Enlarging still imagesrecorded on “MemoryStick”s – Memory PB ZOOM – DCR-TRV340E/TRV341E/TRV740E only You can enlarge still images recorded on a“Memory Stick.” You can select and view adesired part from the enlarged still image. Also,you can cop...
Страница 222 - To cancel memory PB ZOOM mode; Moving pictures recorded on “Memory Stick”s; The PB ZOOM mode does not work.; Для отмены режима PB ZOOM памяти; Нажмите кнопку PB ZOOM.
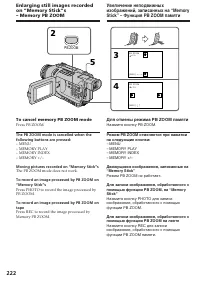
222 5 2 PB ZOOM 3 4 PB ZOOM × 5.0 [EXEC] : T t PB ZOOM × 5.0 [EXEC] : r R To cancel memory PB ZOOM mode Press PB ZOOM. The PB ZOOM mode is cancelled when thefollowing buttons are pressed: – MENU– MEMORY PLAY– MEMORY INDEX– MEMORY +/– Moving pictures recorded on “Memory Stick”s The PB ZOOM mode does ...
Страница 224 - To view recorded images on TV; Для остановки показа слайдов
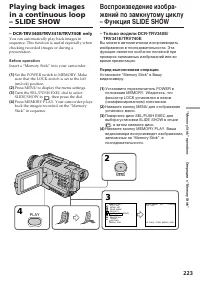
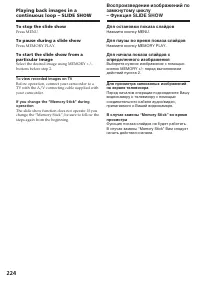
224 Playing back images in acontinuous loop – SLIDE SHOW To stop the slide show Press MENU. To pause during a slide show Press MEMORY PLAY. To start the slide show from aparticular image Select the desired image using MEMORY +/–buttons before step 2. To view recorded images on TV Before operation, c...
Страница 225 - ” рядом с названием
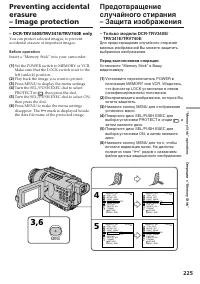
225 “Memory Stick” operations Операции с “Memory Stick” – DCR-TRV340E/TRV341E/TRV740E only You can protect selected images, to preventaccidental erasure of important images. Before operation Insert a “Memory Stick” into your camcorder. ( 1 ) Set the POWER switch to MEMORY or VCR.Make sure that the L...
Страница 226 - To cancel image protection; You cannot protect images.; Для отмены защиты изображения
226 Preventing accidental erasure– Image protection To cancel image protection Select OFF in step 5, then press the SEL/PUSHEXEC dial. Note Formatting erases all information on the“Memory Stick”, including the protected imagedata. Before formatting a “Memory Stick”, checkits contents. If the write-p...
Страница 227 - Deleting selected images; To cancel deleting an image; DELETE; Для отмены удаления изображения; к изображению и; • Вы не сможете удалить защищенное
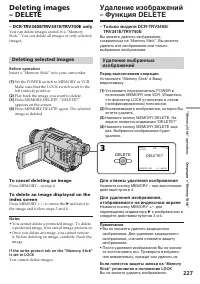
227 “Memory Stick” operations Операции с “Memory Stick” – DCR-TRV340E/TRV341E/TRV740E only You can delete images stored in a “MemoryStick.” You can delete all images or only selectedimages. Deleting selected images Before operation Insert a “Memory Stick” into your camcorder. ( 1 ) Set the POWER swi...
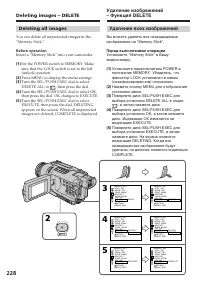
Страница 228 - Удаление всех изображений
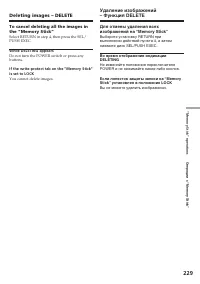
228 Deleting images – DELETE Deleting all images You can delete all unprotected images in the“Memory Stick.” Before operation Insert a “Memory Stick” into your camcorder. ( 1 ) Set the POWER switch to MEMORY. Makesure that the LOCK switch is set to the left(unlock) position. ( 2 ) Press MENU to disp...
Страница 229 - Deleting images – DELETE; While DELETING appears; You cannot delete images.
229 “Memory Stick” operations Операции с “Memory Stick” Deleting images – DELETE To cancel deleting all the images inthe “Memory Stick” Select RETURN in step 4, then press the SEL/PUSH EXEC. While DELETING appears Do not turn the POWER switch or press anybuttons. If the write-protect tab on the “Mem...
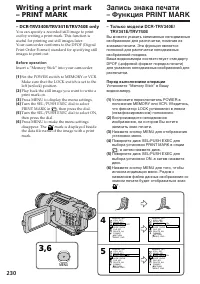
Страница 231 - To cancel writing of print marks; You cannot write print marks on still images.; Moving pictures; Для отмены записи знаков печати; Движущиеся изображения
231 “Memory Stick” operations Операции с “Memory Stick” Writing a print mark– PRINT MARK To cancel writing of print marks Select OFF in step 5, then press the SEL/PUSHEXEC dial. If the write-protect tab on the “Memory Stick”is set to LOCK You cannot write print marks on still images. Moving pictures...
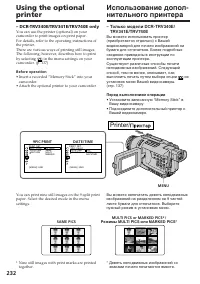
Страница 232 - in the menu settings on your; • Insert a recorded “Memory Stick” into your; из; • Установите записанную “Memory Stick” в; Режимы MULTI PICS или MARKED PICS*
232 – DCR-TRV340E/TRV341E/TRV740E only You can use the printer (optional) on yourcamcorder to print images on print paper.For details, refer to the operating instructions ofthe printer.There are various ways of printing still images.The following, however, describes how to printby selecting in the m...
Страница 233 - Using the optional printer; You cannot print moving pictures.; Когда “Memory Stick” не содержит файлов; На экране появляется индикация “
233 “Memory Stick” operations Операции с “Memory Stick” Using the optional printer You can make prints with the recording dateand/or recording time. Select the desired modein the menu settings. Images recorded in the multi screen mode You cannot print images recorded in the multiscreen mode on stick...
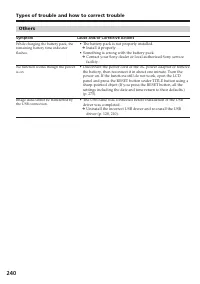
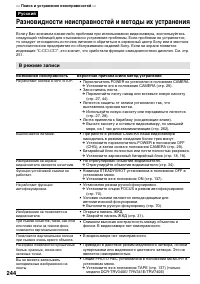
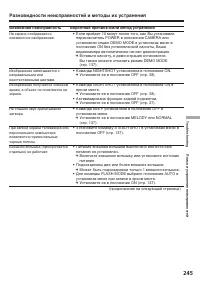
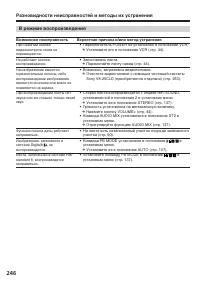
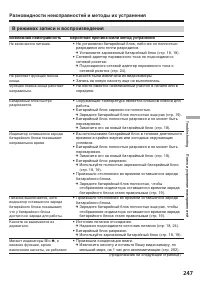
Страница 244 - В режиме записи; Возможная неисправность; Разновидности неисправностей и методы их устранения
244 Если у Вас возникла какая-либо проблема при использовании видеокамеры, воспользуйтесьследующей таблицей для отыскания и устранения проблемы. Если проблема не устраняется,то следует отсоединить источник питания и обратиться в сервисный центр Sony или в местноеуполномоченное предприятие по обслужи...
Страница 247 - Не включается питание.
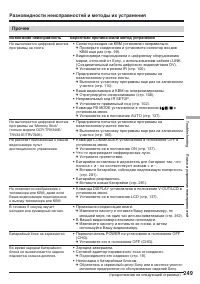
247 Troubleshooting Поиск и устранение неисправностей Разновидности неисправностей и методы их устранения В режимах записи и воспроизведения Возможная неисправность Вероятная причина и/или метод устранения • Не установлен батарейный блок, либо же он полностью разрядился или почти разрядился. c Устан...
Страница 248 - Не функционирует “Memory Stick”.
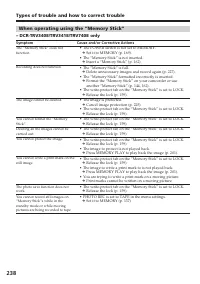
248 Разновидности неисправностей и методы их устранения При эксплуатации с использованием “Memory Stick” – Только модели DCR-TRV340E/TRV341E/TRV740E Возможная неисправность Вероятная причина и/или метод устранения • Переключатель POWER не установлен в положение MEMORY. c Установите его в положение M...
Страница 249 - Батарейный блок не заряжается.
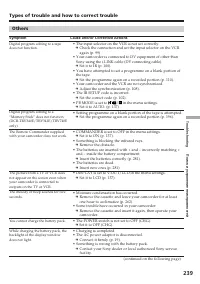
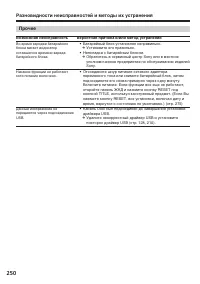
249 Troubleshooting Поиск и устранение неисправностей Разновидности неисправностей и методы их устранения Прочее Возможная неисправность Вероятная причина и/или метод устранения • Селектор входов на КВМ установлен неправильно. c Проверьте соединение и установите селектор входовКВМ еще раз (стр. 99)....
Страница 250 - • Батарейный блок установлен неправильно.
250 Разновидности неисправностей и методы их устранения Прочее Возможная неисправность Вероятная причина и/или метод устранения • Батарейный блок установлен неправильно. c Установите его правильно. • Неполадка с батарейным блоком. c Обратитесь в сервисный центр Sony или в местноеуполномоченное предп...
Страница 251 - Пятизначная индикация; Индикация самодиагностики
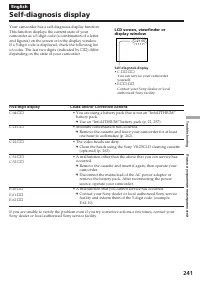
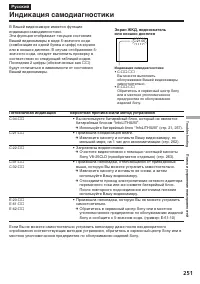
251 Troubleshooting Поиск и устранение неисправностей Русский Индикация самодиагностики В Вашей видеокамере имеется функцияиндикации самодиагностики.Эта функция отображает текущее состояниеВашей видеокамеры в виде 5-значного кода(комбинация из одной буквы и цифр) на экранеили в окошке дисплея. В слу...
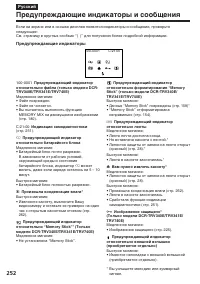
Страница 252 - Предупреждающие индикаторы и сообщения; может
252 C:21:00 100–0001 Если на экране или в окошке дисплея появятся индикаторы и сообщения, проверьтеследующее:См. страницу в круглых скобках “( )” для получения более подробной информации. Предупреждающие индикаторы Русский Предупреждающие индикаторы и сообщения 100-0001 Предупреждающий индикатор отн...
Страница 253 - Предупреждающие сообщения
253 Troubleshooting Поиск и устранение неисправностей Предупреждающие индикаторы и сообщения Предупреждающие сообщения • CLOCK SET Установите дату и время (стр. 25). • FOR “InfoLITHIUM” Используйте батарейный блок “InfoLITHIUM” (стр. 257) BATTERY ONLY • Q Z TAPE END Лента в кассете закончилась.* • Q...
Страница 254 - — Additional Information —; What is the “Digital8 system”?; Playback system; The Digital8 system or Hi8; Что такое “Система Digital8 ”?; , обязательно воспроизводите ее на; является фирменным знаком.; Система воспроизведения; Система Digital8 или Hi8
254 — Additional Information — Digital8 system,recording and playback What is the “Digital8 system”? This video system has been developed to enabledigital recording to Hi8 /Digital8 video cassette . Usable cassette tapes We recommend using Hi8 /Digital8 video cassette.*The recording time when you us...
Страница 255 - Display during automatic detection of system; Playing back an NTSC-recorded tape; Copyright signal; When you play back; При воспроизведении
255 Additional Information Дополнительная информация Digital8 system, recording andplayback Display during automatic detection of system The Digital8 system or Hi8 /standard 8 system is automatically detected, and theplayback system is automatically switched to.During switching of systems, the scree...
Страница 258 - О батарейном блоке “InfoLITHIUM”; Как хранить батарейный блок
258 About the “InfoLITHIUM” batterypack • Have spare battery packs handy for two or three times the expected recording time, andmake a trial recordings before taking the actualrecording. • Do not expose the battery pack to water. The battery pack is not water-resistant. Remaining battery time indica...
Страница 259 - About the name “i.LINK”
259 Additional Information Дополнительная информация About i.LINK The DV jack on this unit is an i.LINK-compliantDV input/output jack. This section describes thei.LINK standard and its features. What is “i.LINK”? i.LINK is a digital serial interface for handlingdigital video, digital audio and other...
Страница 260 - Функции i.LINK на этом аппарате
260 About i.LINK i.LINK baud rate i.LINK’s maximum baud rate varies according tothe equipment. Three maximum baud rates aredefined: S100 (approx. 100 Mbps*)S200 (approx. 200 Mbps)S400 (approx. 400 Mbps) The baud rate is listed under “Specifications” inthe operating instructions of each equipment. It...
Страница 261 - Using your camcorder abroad; PAL system; Brazil; NTSC system; Бразилия; Система NTSC
261 Additional Information Дополнительная информация Using your camcorderabroad Using your camcorder abroad You can use your camcorder in any country orarea with the AC power adaptor supplied withyour camcorder within 100 V to 240 V AC, 50/60Hz. Your camcorder is a PAL system basedcamcorder. If you ...
Страница 262 - Moisture condensation; Note on moisture condensation; Конденсация влаги; Если произошла конденсация влаги; Примечание по конденсации влаги
262 Maintenanceinformation andprecautions Moisture condensation If your camcorder is brought directly from a coldplace to a warm place, moisture may condenseinside your camcorder, on the surface of the tape,or on the lens. In this state, the tape may stick tothe head drum and be damaged or yourcamco...
Страница 263 - Maintenance information; Cleaning the video heads; indicator and “; Cleaning the LCD screen; Очистка видеоголовок
263 Additional Information Дополнительная информация Maintenance information Cleaning the video heads To ensure normal recording and clear pictures,clean the video heads. When you playback/record in the Digital8 system The video head may be dirty when:• Mosaic-pattern noise appears on the playback p...
Страница 264 - Charging the built-in rechargeable battery:; • Connect your camcorder to wall socket using
264 Maintenance information andprecautions Charging the built-inrechargeable battery Your camcorder is supplied with a built-inrechargeable battery installed to retain the dateand time, etc., regardless of the setting of thePOWER switch. The built-in rechargeable batteryis always charged as long as ...
Страница 265 - Precautions; Camcorder operation; Меры предосторожности; Эксплуатация видеокамеры
265 Additional Information Дополнительная информация Maintenance information andprecautions Precautions Camcorder operation • Operate your camcorder on 7.2 V (battery pack) or 8.4 V (AC power adaptor). • For DC or AC operation, use the accessories recommended in these operating instructions. • If an...
Страница 266 - Camcorder care; • Remove the tape, and periodically turn on the; Connection to your computer; Уход за видеокамерой; • Вынимайте кассету с лентой и; Подсоединение к Вашему компьютеру
266 Maintenance information andprecautions Camcorder care • Remove the tape, and periodically turn on the power, operate the CAMERA and VCR sectionsand play back a tape for about three minuteswhen your camcorder is not to be used for along time. • Clean the lens with a soft brush to remove dust. If ...
Страница 267 - AC power adaptor; Сетевой адаптер переменного тока
267 Additional Information Дополнительная информация Maintenance information andprecautions AC power adaptor • Unplug the unit from the wall socket when you are not using it for a long time. To disconnectthe mains lead, pull it out by the plug. Neverpull the mains lead itself. • Do not operate the u...
Страница 268 - If batteries are leaking
268 Maintenance information andprecautions Battery pack • Use only the specified charger or video equipment with the charging function. • To prevent accident from a short circuit, do not allow metal objects to come into contact withthe battery terminals. • Keep the battery pack away from fire.• Neve...
Страница 271 - Технические характеристики; Видеокамера
271 Additional Information Дополнительная информация Русский Технические характеристики При преобразовании в режим 35mm (мм) фотокамеры46 – 1 150 mm (мм)Модель DCR-TRV740E:3,6 – 54 mm (мм)При преобразовании в режим 35мм фотокамерыРежим фотокамеры:48 – 720 mm (мм)Режим памяти:40 – 600 mm (мм) Цветова...
Страница 273 - — Quick Reference —; Camcorder
273 Quick Reference Оперативный справочник — Quick Reference — Identifying parts andcontrols Camcorder 1 Lens cap (p. 29) 2 LCD screen (p. 29) 3 OPEN button (p. 29) 4 VOLUME –/+ button (p. 44) 5 Battery pack (p. 18) 6 BATT (battery) release lever (p. 18) 7 POWER switch (p. 29) 8 START/STOP button (p...
Страница 274 - Identifying parts and controls
274 Identifying parts and controls qa SUPER NS/COLOUR SLOW S button (p. 38) qs Focus ring (p. 70) qd Lens qf Microphone qg Camera recording lamp (p. 29) qh Infrared rays emitter (p. 38) qj Video control buttons (p. 44, 48) x STOP (stop) m REW (rewind) N PLAY (playback) M FF (fast-forward) X PAUSE (p...
Страница 276 - • The intelligent accessory shoe supplies power
276 Identifying parts and controls es Power zoom lever (p. 32) ed Intelligent accessory shoe ef PB ZOOM button (p. 87, 221) eg TITLE button (p. 76) eh PHOTO button (p. 52, 169) ej “Memory Stick” slot* (p. 162) ek Access lamp* (p. 162) el END SEARCH button (p. 42, 49) * DCR-TRV340E/TRV341E/TRV740E on...
Страница 277 - rs; Attach the lens cap to the grip strap as illustrated.; Видоискатель
277 Quick Reference Оперативный справочник Identifying parts and controls rs ra r; rf rd rg r; Viewfinder (p. 34) ra LOCK switch* (p. 29) rs Grip strap rd MIC (PLUG IN POWER) jack Connect an external microphone(optional). This jack also acceptsa “plug-in-power” microphone. rf i (headphones) jack rg ...
Страница 278 - Eyecup; Наглазник
278 rj rl t; rk rh rh Eyecup rj Viewfinder lens adjustment lever (p. 34) rk OPEN/EJECT switch (p. 27) rl Tripod receptacle (base) Make sure that the length of the tripod screwis less than 5.5 mm (7/32 inch). Otherwise,you cannot attach the tripod securely and thescrew may damage your camcorder. t; C...
Страница 279 - S VIDEO jack; Fasten the grip strap firmly.; ts; Гнездо S VIDEO; Пристегните ремень для захвата надежно.
279 Quick Reference Оперативный справочник ta S VIDEO jack (p. 50, 94, 186) ts AUDIO/VIDEO jack (p. 50, 94, 186) td DV IN/OUT jack (p. 96, 187) The DV IN/OUT jack is i.LINK compatible. tf (USB) jack (p. 126, 208) Fastening the grip strap Fasten the grip strap firmly. Identifying parts and controls t...
Страница 281 - To prepare the Remote Commander; Notes on the Remote Commander; • Point the remote sensor away from strong light; • Направляйте датчик дистанционного
281 Quick Reference Оперативный справочник To prepare the Remote Commander Insert 2 R6 (size AA) batteries by matching the +and – on the batteries to the + and – in the batterycompartment. Notes on the Remote Commander • Point the remote sensor away from strong light sources such as direct sunlight ...
Страница 282 - LCD screen and Viewfinder/; Экран ЖКД и видоискатель; wh; or indicator appears.; Рабочие индикаторы; Окошко дисплея; Появляется индикация ,
282 Identifying parts and controls Operation indicators LCD screen and Viewfinder/ Экран ЖКД и видоискатель 50 min REC 0:00:00 M.FADER16:9WIDESEPIA 1 6 B I T T W DATE 0 1 SEARCH ZERO SET MEMORY A/V DV SP 2 4567 890qa qs 3 1 qdqf qh ql wa w; ws wf wd wg qk qj qg wh 2 wj 3 1 Recording mode (p. 29) / M...
Страница 283 - This indicator appears in the viewfinder.
283 Quick Reference Оперативный справочник Identifying parts and controls qs Manual focusing (p. 70) qd Self-timer (DCR-TRV340E/TRV341E/ TRV740E only) (p. 40, 54, 175) qf STBY/REC (p. 29) /Video control mode (p. 48) qg Tape counter (p. 36) /Time code (p. 36) / Self-diagnosis display (p. 241) /Tape P...
Страница 285 - Алфавитный указатель; У – Я
285 Quick Reference Оперативный справочник Русский Алфавитный указатель А, Б, В, Г Батарейный блок .................. 18Батарейный блок “InfoLITHIUM” .................... 257 Вариообъективы ................... 32Введение/выведение ............ 58Время воспроизведения ...... 23Время записи .............