Страница 2 - En g l i sh; Vision; W ARNING; Русский; ПРЕДУПРЕЖДЕНИЕ; or
2 En g l i sh We l co m e ! Congratulations on your purchase of this SonyHandycam Vision camcorder. With your Handycam Vision you can capture life’s preciousmoments with superior picture and soundquality.Your Handycam Vision is loaded with advancedfeatures, but at the same time it is very easy tou...
Страница 4 - Оглавление
4 Русский Оглавление Проверка прилагаемых принадлежностей ........ 5 Руководство по быстрому запуску ............ 8 Подготовка к эксплуатации Использование данного руководства ............... 10Пункт 1 Подготовка источника питания .......... 12 Установка батарейного блока ........................ 12...
Страница 5 - W ireless Remot e Commander
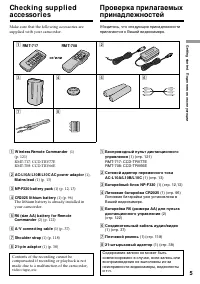
5 G etting s tarted Подготовка к эксплуатации Ch e ck i n g su p p l i e da cce sso r i e s Contents of the recording cannot becompensated if recording or playback is notmade due to a malfunction of the camcorder,video tape, etc. 1 W ireless Remot e Commander (1) (p. 121)RMT-717: CCD-TRV77ERMT-708: ...
Страница 8 - Руководство по быстрому запуску; был; Установка кассеты
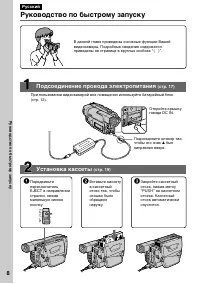
8 Руководство по быстрому запуску Русский Руководство по быстрому запуску В данной главе приведены основные функции Вашейвидеокамеры. Подробные сведения содержатсяприведены на странице в круглых скобках “( )”. Откройте крышкугнезда DC IN. Подсоедините штекер так,чтобы его знак 4 был направлен вверх....
Страница 9 - Запись изображения; Видоискатель; Нажмите кнопку
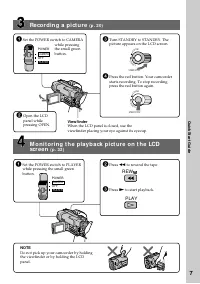
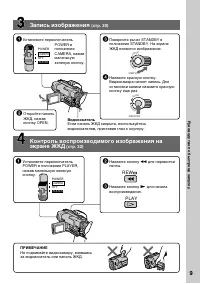
9 Руководство по быстрому запуску LO CK START/STOP S TA N D B Y LO CK START/STOP S TA N D B Y Запись изображения (стр. 20) Видоискатель Если панель ЖКД закрыта, воспользуйтесьвидоискателем, приставив глаз к окуляру. Контроль воспроизводимого изображения наэкране ЖКД (стр. 32) ПРИМЕЧАНИЕ Не поднимайт...
Страница 10 - — Ge t t i n g st a r t e d —; Usi n g t h i s m a n u a l; Ty p e s o f d i f f e r e n ce s; N o t e o n TV co l o u r sy st e m s; — Подготовка к эксплуатации —; Использование данного; Типы отличий
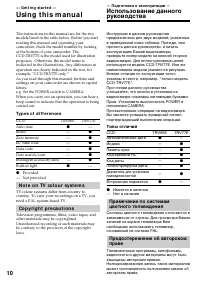
10 — Ge t t i n g st a r t e d — Usi n g t h i s m a n u a l The instructions in this manual are for the twomodels listed in the table below. Before you startreading this manual and operating yourcamcorder, check the model number by lookingat the bottom of your camcorder. TheCCD-TRV77E is the model ...
Страница 11 - • Do not let your camcorder get wet. Keep your
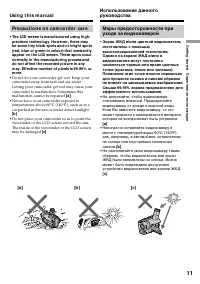
11 G etting s tarted Подготовка к эксплуатации [a ] [b ] [c] Usi n g t h i s m a n u a l Pr e ca u t i o n s o n ca m co r d e r ca r e • The LCD screen is manuf act ured using high-precision t echnology. How ever, t here maybe some t iny black spot s and/ or bright spot s(red, blue or green in colo...
Страница 12 - I n st a l l i n g t h e b a t t e r y p a ck; Slide the battery pack down.; To r e m o v e t h e b a t t e r y p a ck; Af t er inst alling t he bat t ery pack; St e p 1 Pre p a r i n g t h e; BATT RELEASE; Установка батарейного блока; Передвиньте батарейный блок вниз.; Для снятия батарейного блока; После установки батарейного блока; Пункт 1 Подготовка
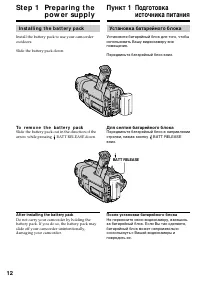
12 I n st a l l i n g t h e b a t t e r y p a ck Install the battery pack to use your camcorderoutdoors. Slide the battery pack down. To r e m o v e t h e b a t t e r y p a ck Slide the battery pack out in the direction of thearrow while pressing BATT RELEASE down. Af t er inst alling t he bat t ery...
Страница 13 - St e p 1 Pr e p a r i n g t h e p o w e r; Connect the mains lead to the mains.; normal charge; is completed. To fully charge; Пункт 1 Подготовка источника; был направлен вверх.; нормальная зарядка; завершена. Для полной
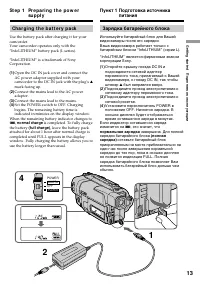
13 G etting s tarted Подготовка к эксплуатации POWER OFF PLAYER CAMERA St e p 1 Pr e p a r i n g t h e p o w e r su p p l y Ch a r g i n g t h e b a t t e r y p a ck Use the battery pack after charging it for yourcamcorder.Your camcorder operates only with the“InfoLITHIUM” battery pack (L series). “...
Страница 14 - “– – – – min” appears in the display window.; Plug t he mains lead deeply; Примечание
14 Not e Prevent metallic objects from coming into contactwith the metal parts of the DC plug of the ACpower adaptor. This may cause a short-circuit,damaging the AC power adaptor. Remaining bat t ery t ime indicat or The remaining battery time indicator in thedisplay window roughly indicates the rec...
Страница 15 - Re co r d i n g t i m e /; Ch a r g i n g t i m e /
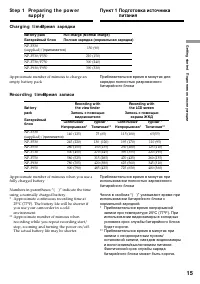
15 G etting s tarted Подготовка к эксплуатации Re co r d i n g t i m e / Время записи Approximate number of minutes when you use afully charged battery Numbers in parentheses “( )” indicate the timeusing a normally charged battery.* Approximate continuous recording time at 25 ° C (77 ° F). The batte...
Страница 16 - Af t er charging t he bat t ery pack; Playing t ime; После зарядки батарейного блока
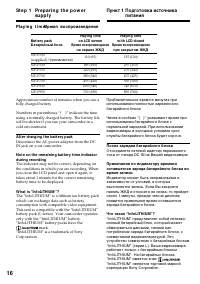
16 Pl a y i n g t i m e / Время воспроизведения Approximate number of minutes when you use afully charged battery Numbers in parentheses “( )” indicate the timeusing a normally charged battery. The battery lifewill be shorter if you use your camcorder in acold environment. Af t er charging t he bat ...
Страница 17 - Co n n e ct i n g t o t h e m a i n s; на
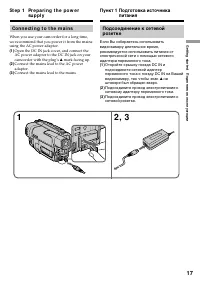
17 G etting s tarted Подготовка к эксплуатации Co n n e ct i n g t o t h e m a i n s When you use your camcorder for a long time,we recommend that you power it from the mainsusing the AC power adaptor. (1 ) Open the DC IN jack cover, and connect theAC power adaptor to the DC IN jack on yourcamcorder...
Страница 18 - • The AC power adaptor can supply power even; Using a car bat t ery; • Питание от сетевого адаптера переменного
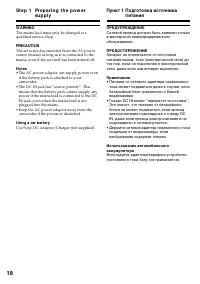
18 St e p 1 Pr e p a r i n g t h e p o w e r su p p l y Пункт 1 Подготовка источника питания W ARNING The mains lead must only be changed at aqualified service shop. PRECAUTION The set is not disconnected from the AC powersource (mains) as long as it is connected to themains, even if the set itself ...
Страница 19 - To e j e ct a ca sse t t e; Not e; PUSH; St e p 2 I n se r t i n g a; Для извлечения кассеты; Пункт 2 Установка
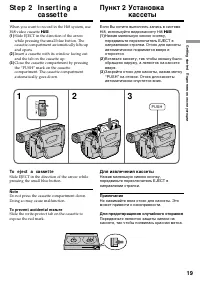
19 G etting s tarted Подготовка к эксплуатации When you want to record in the Hi8 system, useHi8 video cassette H . (1 ) Slide EJECT in the direction of the arrowwhile pressing the small blue button. Thecassette compartment automatically lifts upand opens. (2 ) Insert a cassette with its window faci...
Страница 20 - — Re co r d i n g – Ba si cs —; Re co rd i n g a p i ct u re; Your camcorder automatically focuses for you.; Микрофон
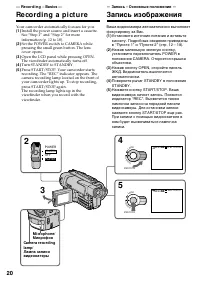
20 4 5 LO CK START/STOP S TA N D B Y LO CK START/STOP S TA N D B Y 40min SP H STBY 0:00:00 2 POWER OFF PLAYER CAMERA 40min SP H REC 0:00:01 3 — Re co r d i n g – Ba si cs — Re co rd i n g a p i ct u re Your camcorder automatically focuses for you. (1 ) Install the power source and insert a cassette....
Страница 21 - A d j u st i n g t h e LCD scr e e n; indicator appears in the; M irror mode; Примечания; Регулировка экрана ЖКД; Зеркальный режим; ярче
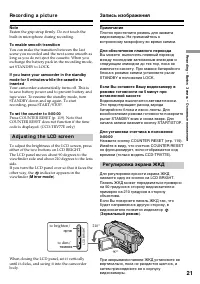
21 R ecording – B asic s Запись – Основные положения LCD BRIGHT Not e Fasten the grip strap firmly. Do not touch thebuilt-in microphone during recording. To enable smoot h t ransit ion You can make the transition between the lastscene you recorded and the next scene smooth aslong as you do not eject...
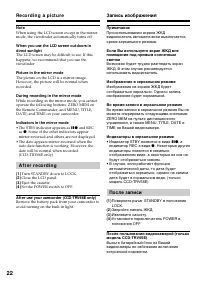
Страница 22 - Pr; A f t e r r e co r d i n g; • Индикатор STBY появится в виде; После записи
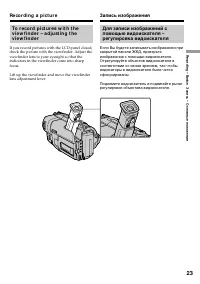
22 Re co r d i n g a p i ct u r e Not e When using the LCD screen except in the mirrormode, the viewfinder automatically turns off. W hen you use t he LCD screen out doors indirect sunlight The LCD screen may be difficult to see. If thishappens, we recommend that you use theviewfinder. Pict ure in t...
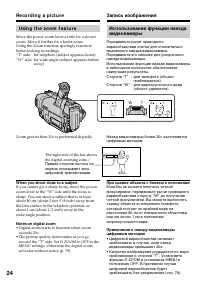
Страница 24 - Usi n g t h e zo o m f e a t u r e; Zoom greater than 20; W hen you shoot close t o a subject; • Digital zoom starts to function when zoom; Сторона “W” : для широкоугольного вида; При съемке объекта с близкого положения; • Цифровой вариообъектив начинает
24 T W T W T W W T Usi n g t h e zo o m f e a t u r e Move the power zoom lever a little for a slowerzoom. Move it further for a faster zoom.Using the Zoom function sparingly results inbetter-looking recordings.“T” side: for telephoto (subject appears closer)“W” side: for wide-angle (subject appears...
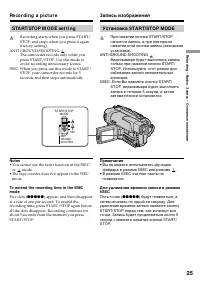
Страница 25 - STA RT/STOP M OD E se t t i n g; Not es; • You cannot use the fader function in the 5SEC; ANTI GROUND SHOOTING; • Вы не можете использовать функцию
25 R ecording – B asic s Запись – Основные положения STA RT/STOP M OD E se t t i n g : Recording starts when you press START/STOP, and stops when you press it again(factory setting). ANTI GROUND SHOOTING : The camcorder records only while youpress START/STOP. Use this mode toavoid recording unnecess...
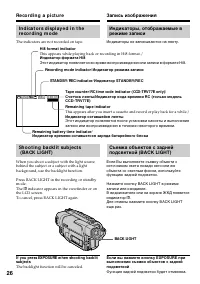
Страница 26 - BACK LIGHT; Recording mode indicat or/; Индикаторы не записываются на ленту.; Hi8 f ormat indicat or; This appears while playing back or recording in Hi8 format./; Индикатор формата Hi8; Remaining t ape indicat or
26 I n d i ca t o r s d i sp l a y e d i n t h er e co r d i n g m o d e The indicators are not recorded on tape. Sh o o t i n g b a ck l i t su b j e ct s ( BA CK LI GHT) When you shoot a subject with the light sourcebehind the subject or a subject with a lightbackground, use the backlight function...
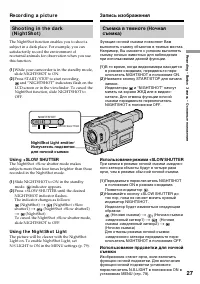
Страница 27 - and “NIGHTSHOT” indicators flash on the; Usi n g +SLOW SHUTTER; Night Shot Light emit t er/; и “NIGHTSHOT” начнут; Использование режима +SLOW SHUTTER
27 R ecording – B asic s Запись – Основные положения NIGHTSHOT OFF ON + SLOW SHUTTER Sh o o t i n g i n t h e d a r k( N i g h t Sh o t ) The NightShot function enables you to shoot asubject in a dark place. For example, you cansatisfactorily record the environment ofnocturnal animals for observatio...
Страница 28 - • Do not use the NightShot function in bright; The +SLOW SHUTTER but t on does not w ork:
28 Re co r d i n g a p i ct u r e Not es • Do not use the NightShot function in bright places (ex. outdoors in the daytime). This maycause your camcorder to malfunction. • When you keep setting NIGHTSHOT to ON in normal recording, the picture may be recordedin incorrect or unnatural colours. • If fo...
Страница 30 - Ch e ck i n g t h e re co rd i n g; EN D SEA RCH; The end search function does not work.; Проверка записи; END SEARCH
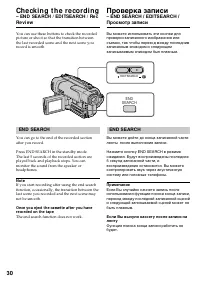
30 Ch e ck i n g t h e re co rd i n g – EN D SEA RCH / ED I TSEA RCH / Re cRe v i e w You can use these buttons to check the recordedpicture or shoot so that the transition betweenthe last recorded scene and the next scene yourecord is smooth. EN D SEA RCH You can go to the end of the recorded secti...
Страница 31 - ED I TSEA RCH; You can search for the next recording start point.; Re c Re v i e w; You can check the last recorded section.; Нажмите кратковременно сторону – (
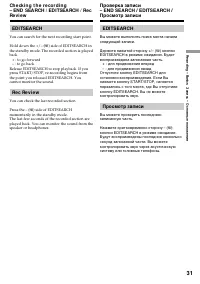
31 R ecording – B asic s Запись – Основные положения Ch e ck i n g t h e r e co r d i n g– EN D SEA RCH / ED I TSEA RCH / Re cRe v i e w ED I TSEA RCH You can search for the next recording start point. Hold down the +/– ( Œ ) side of EDITSEARCH in the standby mode. The recorded section is playedback...
Страница 32 - — Pl a y b a ck – Ba si cs —; Pl a y i n g b a ck a t a p e; Open the LCD panel while pressing OPEN.; To st o p p l a y b a ck; — Воспроизведение – Основные положения—; Воспроизведение ленты; Для остановки воспроизведения
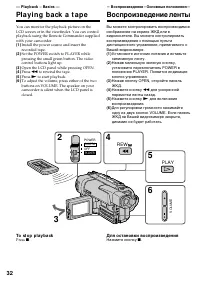
32 — Pl a y b a ck – Ba si cs — Pl a y i n g b a ck a t a p e You can monitor the playback picture on theLCD screen or in the viewfinder. You can controlplayback using the Remote Commander suppliedwith your camcorder. (1 ) Install the power source and insert therecorded tape. (2 ) Set the POWER swit...
Страница 33 - DISPLAY; W hen monit oring on t he LCD screen; . You can adjust the angle of the; Во время контроля на экране ЖКД
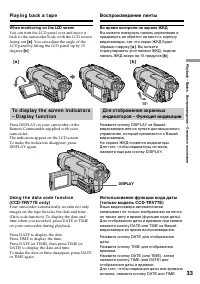
33 P laybac k – B asic s Воспроизведение – Основные положения To d i sp l a y t h e scr e e n i n d i ca t o r s– D i sp l a y f u n ct i o n Press DISPLAY on your camcorder or theRemote Commander supplied with yourcamcorder.The indicators appear on the LCD screen.To make the indicators disappear, p...
Страница 34 - Not e on t he dat a code f unct ion; Примечание по функции кода даты
34 If you press DATA CODE on the RemoteCommander, the date and time when yourecorded are simultaneously displayed. Press itagain to make them disappear. Not e on t he dat a code f unct ion If an index signal is marked on the tape, the RCtime code is written, or PCM after recording ismade on the tape...
Страница 35 - V a r i o u s p l a y b a ck m o d e s; To a d v a n ce t h e t a p e; Для ускоренной перемотки ленты назад; – только модель CCD-TRV77E
35 P laybac k – B asic s Воспроизведение – Основные положения V a r i o u s p l a y b a ck m o d e s To operate control buttons, set the POWERswitch to PLAYER. To v i e w a st i l l p i ct u r e ( p l a y b a ckp a u se ) Press P during playback. To resume playback, press P or ( . To a d v a n ce t ...
Страница 36 - To v i e w t h e p i ct u r e a t d o u b l e sp e e d; In t he various playback modes
36 Pl a y i n g b a ck a t a p e Для просмотра изображения наудвоенной скорости – только модель CCD-TRV77E Нажмите кнопку × 2 на пульте дистанционного управления во время воспроизведения. Длявоспроизведения на удвоенной скорости вобратном направлении нажмите кнопку < , а затем нажмите кнопку × 2 ...
Страница 37 - Передача сигнала
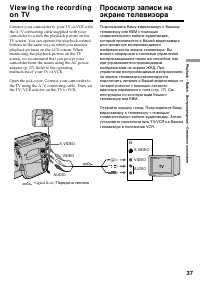
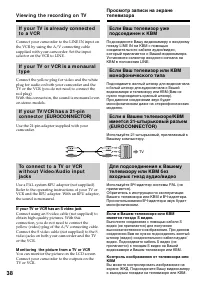
37 P laybac k – B asic s Воспроизведение – Основные положения Vi e w i n g t h e re co r d i n go n TV Connect your camcorder to your TV or VCR withthe A/V connecting cable supplied with yourcamcorder to watch the playback picture on theTV screen. You can operate the playback controlbuttons in the s...
Страница 38 - V i e w i n g t h e r e co r d i n g o n TV; TV
38 I f y o u r TV i s a l r e a d y co n n e ct e dt o a V CR Connect your camcorder to the LINE IN input onthe VCR by using the A/V connecting cablesupplied with your camcorder. Set the inputselector on the VCR to LINE. I f y o u r TV o r V CR i s a m o n a u r a lt y p e Connect the yellow plug fo...
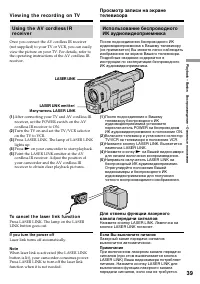
Страница 39 - To ca n ce l t h e l a se r l i n k f u n ct i o n; If you t urn t he pow er of f; Laser link turns off automatically.; LASER LINK
39 P laybac k – B asic s Воспроизведение – Основные положения Usi n g t h e A V co r d l e ss I Rr e ce i v e r Once you connect the AV cordless IR receiver(not supplied) to your TV or VCR, you can easilyview the picture on your TV. For details, refer tothe operating instructions of the AV cordless ...
Страница 40 - M ENU; Ph o t o re co r d i n g; This mode records a still picture for about seven seconds./; — Усовершенствованные операции съемки —; Фотосъемка; Нажмите кнопку PHOTO сильнее.
40 (1 ) While your camcorder is in the standby mode,select the photo mode in the MENU settings(p. 79). (2 ) Keep pressing PHOTO lightly until a stillpicture appears. CAPTURE appears.Recording does not start yet.To change the still picture, release PHOTO,select a still picture again, and then press a...
Страница 41 - Ph o t o r e co r d i n g
41 Advanc ed R ecording Operat ions Усовершенствованные операции съемки Not es • During photo recording, you cannot change the mode or setting of the following functions:– Digital effect– Fader– PROGRAM AE– Picture effect– Exposure– Wide mode– Backlight– NightShot +Slow shutter • The PHOTO button do...
Страница 42 - CI N EM A; back on a normal TV; Usi n g t h e w i d e m o d e; CINEM A; CINEMA
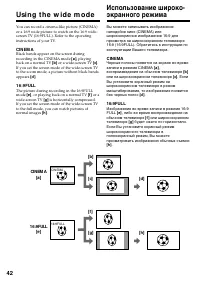
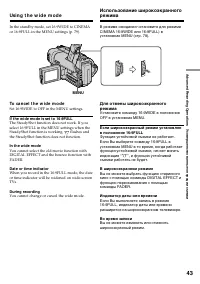
42 You can record a cinema-like picture (CINEMA)or a 16:9 wide picture to watch on the 16:9 wide-screen TV (16:9FULL). Refer to the operatinginstructions of your TV. CI N EM A Black bands appear on the screen duringrecording in the CINEMA mode [a ] , playing back on a normal TV [b] or a wide-screen ...
Страница 43 - To ca n ce l t h e w i d e m o d e; Set 16:9WIDE to OFF in the MENU settings.; If t he w ide mode is set t o 16:9FULL; flashes and; In t he w ide mode; You cannot change or cancel the wide mode.; ”, и функция устойчивой; В широкоэкранном режиме
43 Advanc ed R ecording Operat ions Усовершенствованные операции съемки Usi n g t h e w i d e m o d e In the standby mode, set 16:9WIDE to CINEMAor 16:9FULL in the MENU settings (p. 79). To ca n ce l t h e w i d e m o d e Set 16:9WIDE to OFF in the MENU settings. If t he w ide mode is set t o 16:9FU...
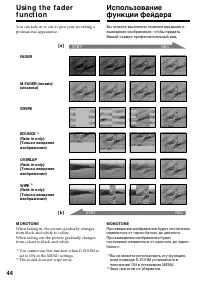
Страница 44 - M ONOTONE; The sound does not wipe away.; FADER; MONOTONE; Звук при этом не убирается.
44 You can fade in or out to give your recording aprofessional appearance. Usi n g t h e f a d e rf u n ct i o n M ONOTONE When fading in, the picture gradually changesfrom black-and-white to colour.When fading out the picture gradually changesfrom colour to black-and-white. *1) You cannot use this ...
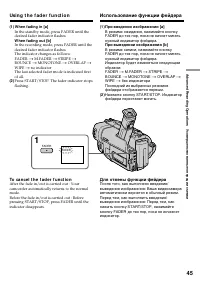
Страница 45 - Usi n g t h e f a d e r f u n ct i o n; To ca n ce l t h e f a d e r f u n ct i o n; Использование функции фейдера; При введении изображения; Для отмены функции фейдера
45 Advanc ed R ecording Operat ions Усовершенствованные операции съемки Usi n g t h e f a d e r f u n ct i o n (1 ) W hen f ading in [ a] In the standby mode, press FADER until thedesired fader indicator flashes. W hen f ading out [b ] In the recording mode, press FADER until thedesired fader indica...
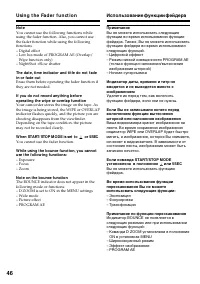
Страница 46 - – NightShot +Slow shutter; W hen START/ STOP M ODE is set t o; You cannot use the fader function.; Not e on t he bounce f unct ion; Usi n g t h e Fa d e r f u n ct i o n; – Ночная суперсъемка; Примечание по функции перескакивания; ON в установках MENU
46 Not e You cannot use the following functions whileusing the fader function. Also, you cannot usethe fader function while using the followingfunctions.– Digital effect– Low lux mode of PROGRAM AE (Overlap/ Wipe function only) – NightShot +Slow shutter The dat e, t ime indicat or and t it le do not...
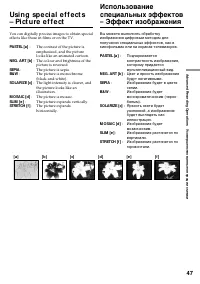
Страница 47 - : The colour and brightness of the; The picture is sepia.; SEPIA; : Яркость света будет
47 Advanc ed R ecording Operat ions Усовершенствованные операции съемки You can digitally process images to obtain specialeffects like those in films or on the TV. PASTEL [a] : The contrast of the picture isemphasized, and the picturelooks like an animated cartoon. NEG. ART [b] : The colour and brig...
Страница 48 - PICTURE EFFECT
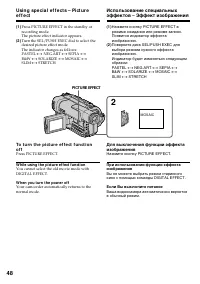
48 2 MOSAIC PICTURE EFFECT Usi n g sp e ci a l e f f e ct s – Pi ct u r ee f f e ct (1 ) Press PICTURE EFFECT in the standby orrecording mode.The picture effect indicator appears. (2 ) Turn the SEL/PUSH EXEC dial to select thedesired picture effect mode.The indicator changes as follows:PASTEL ˜ NEG....
Страница 49 - Неподвижное изображение; STILL
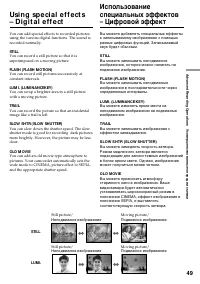
49 Advanc ed R ecording Operat ions Усовершенствованные операции съемки Usi n g sp e ci a l e f f e ct s– D i g i t a l e f f e ct You can add special effects to recorded picturesusing the various digital functions. The sound isrecorded normally. STILL You can record a still picture so that it issup...
Страница 50 - DIGITAL EFFECT; It ems t o adjust
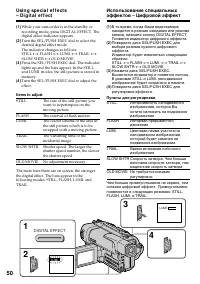
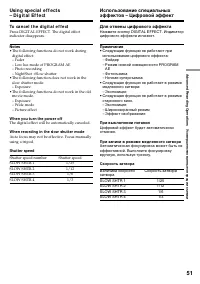
50 Usi n g sp e ci a l e f f e ct s– D i g i t a l e f f e ct 3 4 LUMI. 1 2 LUMI. DIGITAL EFFECT (1 ) While your camcorder is in the standby orrecording mode, press DIGITAL EFFECT. Thedigital effect indicator appears. (2 ) Turn the SEL/PUSH EXEC dial to select thedesired digital effect mode.The indi...
Страница 51 - To ca n ce l t h e d i g i t a l e f f e ct; Для отмены цифрового эффекта
51 Advanc ed R ecording Operat ions Усовершенствованные операции съемки Usi n g sp e ci a l e f f e ct s– D i g i t a l Ef f e ct To ca n ce l t h e d i g i t a l e f f e ct Press DIGITAL EFFECT. The digital effectindicator disappears. Not es • The following functions do not work during digital effe...
Страница 53 - Usi n g t h e PROGRA M A E f u n ct i o n; Нажмите кнопку PROGRAM AE.
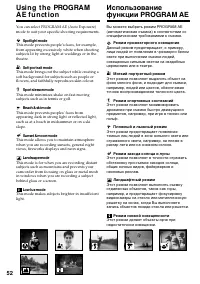
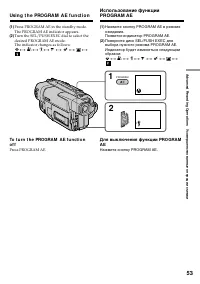
53 Advanc ed R ecording Operat ions Усовершенствованные операции съемки Usi n g t h e PROGRA M A E f u n ct i o n 1 PROGRAM 2 A (1) Press PROGRAM AE in the standby mode.The PROGRAM AE indicator appears. (2) Turn the SEL/PUSH EXEC dial to select thedesired PROGRAM AE mode.The indicator changes as fol...
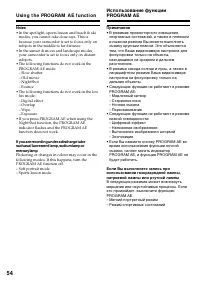
Страница 54 - Notes; • In the spotlight, sports lesson and beach & ski; • В режимах прожекторного освещения,
54 Notes • In the spotlight, sports lesson and beach & ski modes, you cannot take close-ups. This isbecause your camcorder is set to focus only onsubjects in the middle to far distance. • In the sunset & moon and landscape modes, your camcorder is set to focus only on distantsubjects. • The ...
Страница 55 - faithfully; Note; ночных сцен) с большой достоверностью
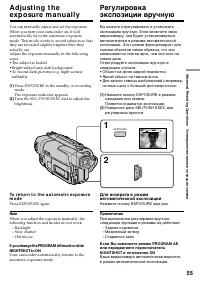
55 Advanc ed R ecording Operat ions Усовершенствованные операции съемки You can manually adjust and set the exposure.When you turn your camcorder on, it willautomatically be in the automatic exposuremode. This mode works to record subjects so thatthey are recorded slightly brighter than theyactually...
Страница 56 - FOCUS; Fo cu si n g m a n u a l l y; droplets; To r e t u r n t o t h e a u t o f o cu s m o d e; Фокусировка вручную; воды
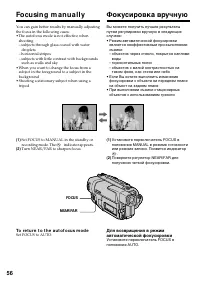
56 FOCUS NEAR/ FAR Fo cu si n g m a n u a l l y You can gain better results by manually adjustingthe focus in the following cases:•The autofocus mode is not effective when shooting– subjects through glass coated with water droplets – horizontal stripes– subjects with little contrast with backgrounds...
Страница 57 - To r e co r d d i st a n t su b j e ct s; When you shoot close to the subject; Для съемки удаленных объектов; Следующие индикаторы могут появиться
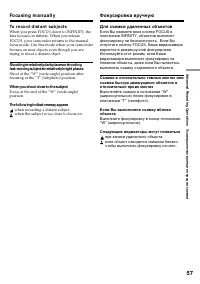
57 Advanc ed R ecording Operat ions Усовершенствованные операции съемки To r e co r d d i st a n t su b j e ct s When you press FOCUS down to INFINITY, thelens focuses on infinity. When you releaseFOCUS, your camcorder returns to the manualfocus mode. Use this mode when your camcorderfocuses on near...
Страница 58 - Su p e r i m p o si n g a t i t l e; VACATION; TITLE; Наложение титра
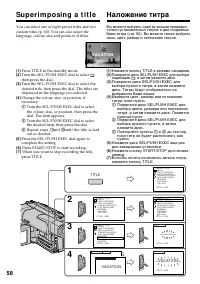
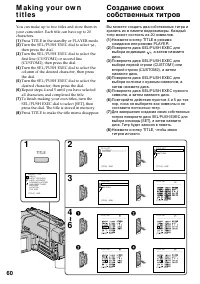
58 Su p e r i m p o si n g a t i t l e You can select one of eight preset titles and twocustom titles (p. 60). You can also select thelanguage, colour, size and position of titles. (1) Press TITLE in the standby mode. (2) Turn the SEL/PUSH EXEC dial to select , then press the dial. (3) Turn the SEL/...
Страница 59 - • Цвет титра изменяется следующим образом:
59 Advanc ed R ecording Operat ions Усовершенствованные операции съемки To su p e r i m p o se t h e t i t l e w h i l e y o ua r e r e co r d i n g Press TITLE while you are recording, and carryout steps 2 to 5. When you press the SEL/PUSHEXEC dial at step 5, the title is superimposed. To se l e ct...
Страница 61 - To ch a n g e a t i t l e y o u h a v e st o r e d; To delet e t he t it le; M a k i n g y o u r o w n t i t l e s; Если Вы выбрали команду [; вернуться к предыдущему экрану.; Для удаления титра
61 Advanc ed R ecording Operat ions Усовершенствованные операции съемки To ch a n g e a t i t l e y o u h a v e st o r e d In step 3, select CUSTOM1 or CUSTOM2,depending on which title you want to change,then press the SEL/PUSH EXEC dial. Turn theSEL/PUSH EXEC dial to select [ M ], then press the di...
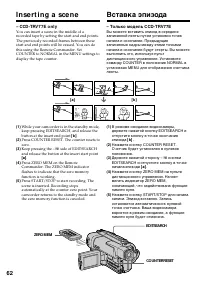
Страница 62 - I n se r t i n g a sce n e; – CCD -TRV 7 7 E o n l y; Keep pressing the –; Вставка эпизода; – Только модель CCD-TRV77E; Держите нажатой сторону –
62 I n se r t i n g a sce n e – CCD -TRV 7 7 E o n l y You can insert a scene in the middle of arecorded tape by setting the start and end points.The previously recorded frames between thesestart and end points will be erased. You can dothis using the Remote Commander. SetCOUNTER to NORMAL in the ME...
Страница 63 - • The zero memory function does not work when; W hen START/ STOP M ODE is set t o or 5SEC; You cannot use the zero memory function.; • Функция памяти нуля не работает, если
63 Advanc ed R ecording Operat ions Усовершенствованные операции съемки Not es • The zero memory function does not work when the RC time code is displayed. • The picture and the sound may be distorted at the end of the inserted section when it is playedback. If you re-record on t he sect ion w hich ...
Страница 64 - – CCD -TRV 6 6 E o n l y; CA UTI ON; – Только модель CCD-TRV66E; ВНИМАНИЕ
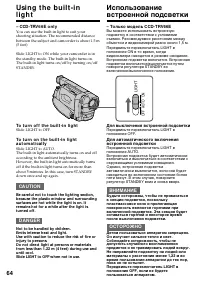
64 Usi n g t h e b u i l t -i nl i g h t OFF AUT O ON LIGHT – CCD -TRV 6 6 E o n l y You can use the built-in light to suit yourshooting situation. The recommended distancebetween the subject and camcorder is about 1.5 m(5 feet). Slide LIGHT to ON while your camcorder is inthe standby mode. The buil...
Страница 65 - Re p l a ci n g t h e b u l b; Замена лампы накаливания
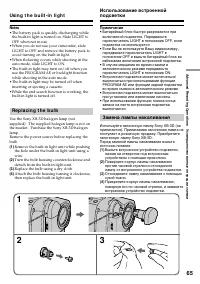
65 Advanc ed R ecording Operat ions Усовершенствованные операции съемки Notes • The battery pack is quickly discharging while the built-in light is turned on. Slide LIGHT toOFF when not in use. • When you do not use your camcorder, slide LIGHT to OFF and remove the battery pack toavoid turning on th...
Страница 66 - • When replacing the bulb, use only the Sony; Usi n g t h e b u i l t -i n l i g h t; • При замене лампы накаливания
66 CA UTI ON • When replacing the bulb, use only the Sony XB-3D halogen lamp (not supplied) to reducethe risk of fire. • To prevent possible burn hazard, disconnect the power source before replacing and do nottouch the bulb until the bulb becomes coolenough to handle (for about 30 minutes ormore). N...
Страница 67 - — A d v a n ce d Pl a y b a ck Op e r a t i o n s —; To ca n ce l t h e d i g i t a l e f f e ct f u n ct i o n; Усовершенствованные операции воспроизведения —
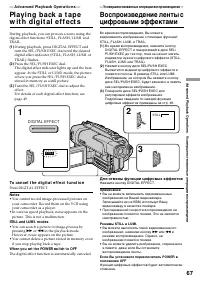
67 Advanc ed P laybac k Operat ions Усовершенствованные операции воспроизведени 2 3 1 STILL STILL DIGITAL EFFECT — A d v a n ce d Pl a y b a ck Op e r a t i o n s — Pl a y i n g b a ck a t a p ew i t h d i g i t a l e f f e ct s During playback, you can process a scene using thedigital effect functi...
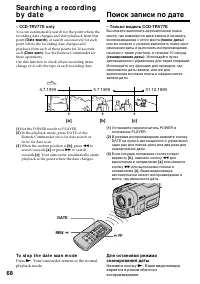
Страница 68 - Поиск записи по дате; To st o p t h e d a t e sca n m o d e
68 – CCD -TRV 7 7 E o n l y You can automatically search for the point where therecording date changes and start playback from thatpoint (Dat e search) , or search successively for each point where the recording date changes andplayback from each of these points for 10 secondseach (Dat e scan) . Use...
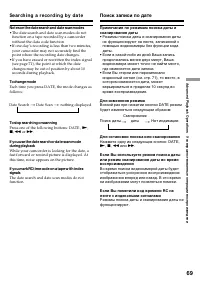
Страница 69 - Se a r ch i n g a r e co r d i n g b y d a t e; Notes on the date search and date scan modes
69 Advanc ed P laybac k Operat ions Усовершенствованные операции воспроизведени Se a r ch i n g a r e co r d i n g b y d a t e Notes on the date search and date scan modes • The date search and date scan modes do not function on a tape recorded by a camcorderwithout the data code function. • If one ...
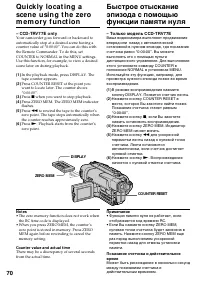
Страница 71 - You can scan the beginning of a desired scene; или легко найти
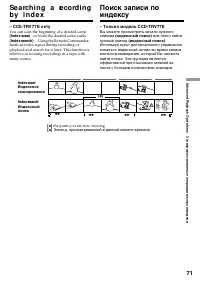
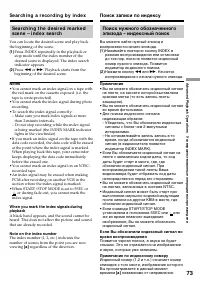
71 Advanc ed P laybac k Operat ions Усовершенствованные операции воспроизведени – CCD -TRV 7 7 E o n l y You can scan the beginning of a desired scene (Index scan) or locate the desired scene easily (Index search) . Using the Remote Commander, mark an index signal during recording orplayback and sea...
Страница 72 - M a r k i n g a n i n d e x si g n a l; INDEX; Se a r ch i n g a r e co r d i n g b y i n d e x; Поиск записи по индексу
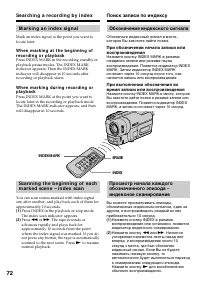
72 M a r k i n g a n i n d e x si g n a l Mark an index signal at the point you want tolocate later. W h e n m a r k i n g a t t h e b e g i n n i n g o fr e co r d i n g o r p l a y b a ck Press INDEX MARK in the recording standby orplayback pause modes. The INDEX MARKindicator appears. Then the IN...
Страница 74 - Er a si n g a n i n d e x si g n a l; You can erase an unnecessary index signal.; You cannot erase the index signal on a tape.; Index signals marked w it h VCRs; This will not affect the recorded sound or picture.; Index signals marked w it h your camcorder
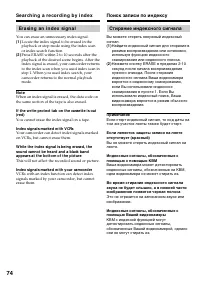
74 Er a si n g a n i n d e x si g n a l You can erase an unnecessary index signal. (1 ) Locate the index signal to be erased in theplayback or stop mode using the index scanor index search function. (2 ) Press ERASE within 2 to 10 seconds after theplayback of the desired scene begins. After theindex...
Страница 75 - — Ed i t i n g o n Ot h e r Eq u i p m e n t —; D u b b i n g a t a p e; Set the POWER switch to PLAYER.; —Монтаж на другую аппаратуру —; Перезапись ленты; Начните запись на Вашем КВМ.; Если Вы закончили перезапись ленты
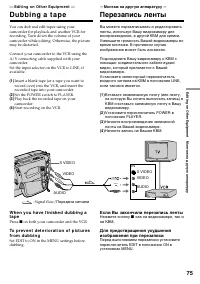
75 E diting on Ot her E quipment Монтаж на другую аппаратуру — Ed i t i n g o n Ot h e r Eq u i p m e n t — D u b b i n g a t a p e You can dub and edit tapes using yourcamcorder for playback and another VCR forrecording. Turn down the volume of yourcamcorder while editing. Otherwise, the picturemay...
Страница 76 - If your VCR is a monaural t ype; mini; Если Ваш КВМ монофонического типа
76 D u b b i n g a t a p e If you have displayed t he screen indicat ors ont he TV Make the indicators disappear by pressingDISPLAY so that they will not be superimposedon the edited tape. You can edit on VCRs t hat have Video/ Audioinput s and support t he f ollow ing syst ems h 8 mm, H Hi8, j VHS,...
Страница 77 - TIM E CODE W RITE
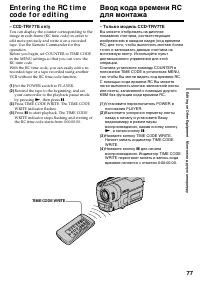
77 E diting on Ot her E quipment Монтаж на другую аппаратуру – CCD -TRV 7 7 E o n l y You can display the counter corresponding to theimage in each frame (RC time code) in order toedit more precisely and write it on a recordedtape. Use the Remote Commander for thisoperation.Before you begin, set COU...
Страница 78 - To st o p w r i t i n g t h e RC t i m e co d e
78 To st o p w r i t i n g t h e RC t i m e co d e Press p (or any video control button). To w r i t e t h e RC t i m e co d e f r o m t h ee n d o f t h e RC t i m e co d e r e co r d e dse ct i o n In step 2, rewind the tape to the scene to whichthe RC time code has been written, and carry outstep...
Страница 79 - — Cu st o m i zi n g Y o u r Ca m co r d e r —; Изменение установок MENU
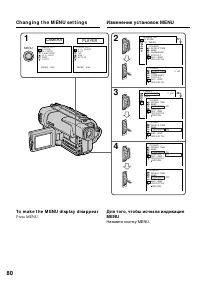
79 C ustomizing Your C amc order Выполнение индивидуальных установок на видеокамере — Cu st o m i zi n g Y o u r Ca m co r d e r — Ch a n g i n g t h e M EN Use t t i n g s To change the mode settings in the MENUsettings, select the menu items with the SEL/PUSH EXEC dial. The factory settings can be...
Страница 81 - Se l e ct i n g t h e m o d e se t t i n g o f e a ch i t e m; is the factory setting.
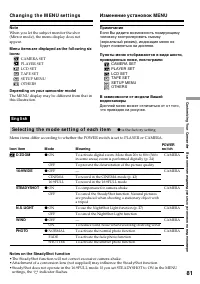
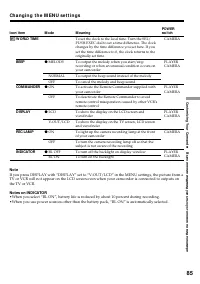
81 C ustomizing Your C amc order Выполнение индивидуальных установок на видеокамере Ch a n g i n g t h e M EN U se t t i n g s Not e When you let the subject monitor the shot(Mirror mode), the menu display does notappear. M enu it ems are displayed as t he f ollow ing sixicons: CAMERA SETPLAYER SETL...
Страница 86 - Выбор установок режима по каждому пункту; Примечания по функции устойчивой съемки
86 Русский Выбор установок режима по каждому пункту r заводская установка. Пункты меню отличаются в зависимости от того, установлен переключатель POWER вположение PLAYER или CAMERA. Пиктограмма/пункт D ZOOM 16:9WIDE STEADYSHOT N.S. LIGHT WIND PHOTO Режим r ON OFF r OFFCINEMA16:9FULL r ONOFF r ON OFF...
Страница 87 - Примечание по воспроизведению NTSC PB; будет выбрана установка “BRIGHT”.
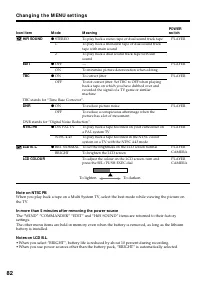
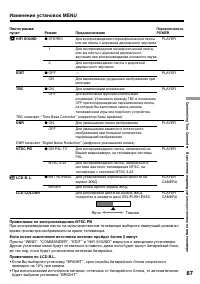
87 C ustomizing Your C amc order Выполнение индивидуальных установок на видеокамере Изменение установок MENU Пиктограмма/пункт HiFi SOUND EDIT TBC ТВС означает “Time Base Corrector” (корректор базы времени). DNR DNR означает “Digital Noise Reduction” (цифровое уменьшение помех). NTSC PB LCD B. L. LC...
Страница 88 - Примечания по режиму LP; записанных в режиме LP на других видеокамерах или КВМ.; Примечания по установке ORC; выполните установку заново.
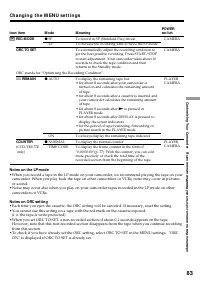
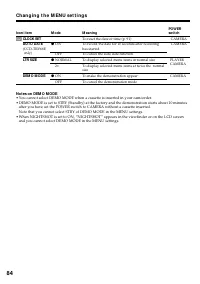
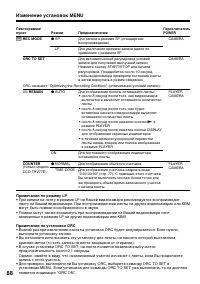
88 Изменение установок MENU Пиктограмма/пункт REC MODE ORC TO SET ORC означает “Optimizing the Recording Condition” (оптимизация условий записи). Ò REMAIN COUNTER Режим r SP LP r AUTO ON r NORMAL TIME CODE Предназначение Для записи в режиме SP (стандартноевоспроизведение)Для увеличения времени запис...
Страница 89 - Примечания по режиму DEMO MODE
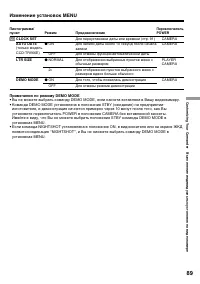
89 C ustomizing Your C amc order Выполнение индивидуальных установок на видеокамере Изменение установок MENU Примечания по режиму DEMO MODE • Вы не можете выбрать команду DEMO MODE, если кассета вставлена в Вашу видеокамеру.• Команда DEMO MODE установлена в положение STBY (ожидание) на предприятии- ...
Страница 90 - примерно на 10 процентов во время записи.
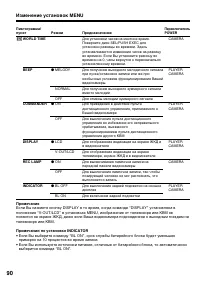
90 Изменение установок MENU Пиктограмма/пункт WORLD TIME BEEP COMMANDER DISPLAY REC LAMP INDICATOR Режим r MELODY NORMAL OFF r ON OFF r LCD V-OUT/LCD r ON OFF r BL OFF BL ON Предназначение Для установки часов на местное время.Поверните диск SEL/PUSH EXEC дляустановки разницы во времени. Здесьустанав...
Страница 91 - Turn the SEL/PUSH EXEC dial to select
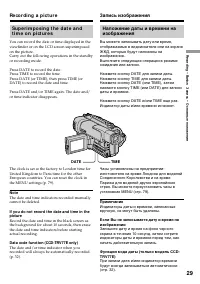
91 C ustomizing Your C amc order Выполнение индивидуальных установок на видеокамере Re se t t i n g t h e d a t ea n d t i m e The clock is set at the factory to London time forUnited Kingdom to Paris time for the otherEuropean countries.The date and time are held in memory by thelithium battery. If...
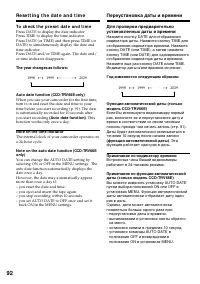
Страница 92 - To ch e ck t h e p r e se t d a t e a n d t i m e; The year changes as f ollow s:; function works only once a day.; Not e on t he t ime indicat or; back ON in the MENU settings.; Re se t t i n g t h e d a t e a n d t i m e; Год изменяется следующим образом:; функция работает один раз в день.; Примечание по индикатору времени; Переустановка даты и времени
92 To ch e ck t h e p r e se t d a t e a n d t i m e Press DATE to display the date indicator.Press TIME to display the time indicator.Press DATE (or TIME) and then press TIME (orDATE) to simultaneously display the date andtime indicator.Press DATE and/or TIME again. The date and/or time indicator d...
Страница 93 - — A d d i t i o n a l I n f o r m a t i o n —; Se l e ct i n g t h e ca sse t t e t y p e; W h a t i s v i d e o Hi 8; — Дополнительная информация —; Выбор типа кассеты; Что такое video Hi8; * “XR” означает “улучшенная разрешающая
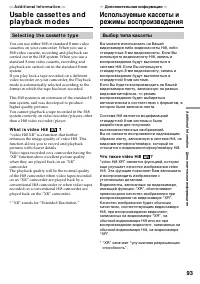
93 Addit ional Inf ormat ion Дополнительная информация n — A d d i t i o n a l I n f o r m a t i o n — Usa b l e ca sse t t e s a n dp l a y b a ck m o d e s Se l e ct i n g t h e ca sse t t e t y p e You can use either Hi8 or standard 8 mm videocassettes on your camcorder. When you use aHi8 video c...
Страница 94 - W h e n y o u p l a y b a ck; N o t e o n A FM Hi Fi st e r e o; Playing back an NTSC-recorded t ape; При выполнении воспроизведения; Примечание по системе AFM HiFi
94 Usa b l e ca sse t t e s a n d p l a y b a ckm o d e s W h e n y o u p l a y b a ck The Playback mode (SP/LP) and system (Hi8/standard 8 mm) are automatically selectedaccording to the format in which the tape hasbeen recorded. The quality of the recordedpicture in the LP mode, however, will not b...
Страница 95 - STEREO Стерео
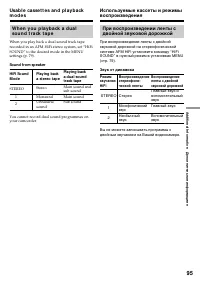
95 Addit ional Inf ormat ion Дополнительная информация n W h e n y o u p l a y b a ck a d u a lso u n d t r a ck t a p e When you play back a dual sound track taperecorded in an AFM HiFi stereo system, set “HiFiSOUND” to the desired mode in the MENUsettings (p. 79). Sound f rom speaker HiFi Sound Pl...
Страница 97 - Ch a n g i n g t h e l i t h i u m b a t t e r y
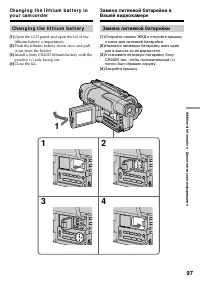
97 Addit ional Inf ormat ion Дополнительная информация n Ch a n g i n g t h e l i t h i u m b a t t e r y (1 ) Open the LCD panel and open the lid of thelithium battery compartment. (2 ) Push the lithium battery down once and pullit out from the holder. (3 ) Install a Sony CR2025 lithium battery wit...
Страница 103 - Поиск и устранение неисправностей; В режиме записи; Возможная неисправность
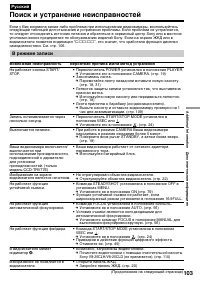
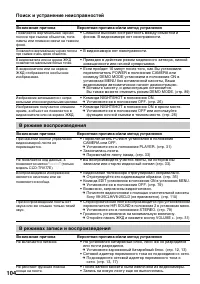
103 Addit ional Inf ormat ion Дополнительная информация n Русский Поиск и устранение неисправностей Если у Вас возникла какая-либо проблема при использовании видеокамеры, воспользуйтесь следующей таблицей для отыскания и устранения проблемы. Если проблема не устраняется, то следует отсоединить источ...
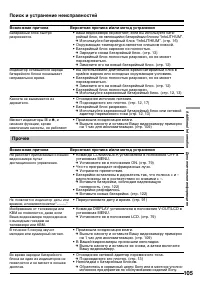
Страница 105 - Прочее; Возможная причина
105 Addit ional Inf ormat ion Дополнительная информация n Поиск и устранение неисправностей Возможная причина Вероятная причина и/или метод устранения • Ваша видеокамера не работает, если Вы используете бата- рейный блок, не являющийся батарейным блоком “InfoLITHIUM”. m Используйте батарейный блок “...
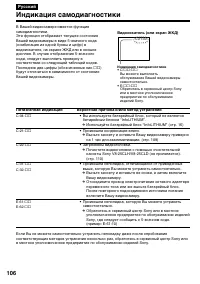
Страница 106 - Индикация самодиагностики
106 Пятизначная индикация Вероятная причина и/или метод устранения • Вы используете батарейный блок, который не является батарейным блоком “InfoLITHIUM”. m Используйте батарейный блок “InfoLITHIUM” (стр. 16) • Произошла конденсация влаги. m Выньте кассету и оставьте Вашу видеокамеру примернона 1 час...
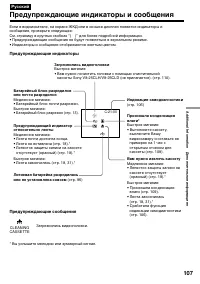
Страница 107 - Предупреждающие индикаторы; Загрязнились видеоголовки; Предупреждающие сообщения; Загрязнились видеоголовки.; Предупреждающие индикаторы и сообщения; CLEANING; Вам нужно извлечь кассету; • Лента закончилась
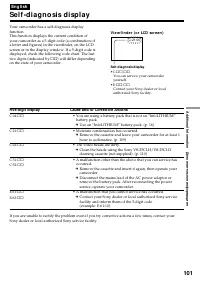
107 Addit ional Inf ormat ion Дополнительная информация n C:21:00 Если в видоискателе, на экране ЖКД или в окошке дисплея появятся индикаторы исообщения, проверьте следующее:См. страницу в круглых скобках “( )” для более подробной информации.• Предупреждающие сообщения не будут появляться в зеркальн...
Страница 108 - Usi n g y o u r ca m co r d e r a b r o a d; PAL syst em; Brazil; NTSC syst em; Бразилия; Система NTSC
108 Usi n g y o u r ca m co r d e r a b r o a d You can use your camcorder in any country orarea with the AC power adaptor supplied withyour camcorder within 100 V to 240 V AC,50/60 Hz. Your camcorder is a PAL system basedcamcorder. If you want to view the playbackpicture on a TV, it must be a PAL s...
Страница 109 - M o i st u r e co n d e n sa t i o n; I f m o i st u r e co n d e n sa t i o n o ccu r r e d; Not e on moist ure condensat ion; Конденсация влаги; Если произошла конденсация влаги; Примечание по конденсации влаги
109 Addit ional Inf ormat ion Дополнительная информация M a i n t e n a n cei n f o r m a t i o n a n dp re ca u t i o n s M o i st u r e co n d e n sa t i o n If your camcorder is brought directly from a coldplace to a warm place, moisture may condenseinside your camcorder, on the surface of the ta...
Страница 110 - M a i n t e n a n ce i n f o r m a t i o n; Cl e a n i n g t h e v i d e o h e a d; indicator and “; Not e on video heads; Cl e a n i n g t h e LCD scr e e n; Примечание по видеоголовкам; Чистка экрана ЖКД
110 M a i n t e n a n ce i n f o r m a t i o n Cl e a n i n g t h e v i d e o h e a d To ensure normal recording and clear pictures,clean the video heads. The video head may bedirty when:• The v indicator and “ CLEANING CASSETTE” message appear one after anotheror the v indicator flashes on the LCD ...
Страница 111 - Caut ion; Pr e ca u t i o n s; Ca m co r d e r o p e r a t i o n; Внимание; Меры предосторожности; Эксплуатация видеокамеры
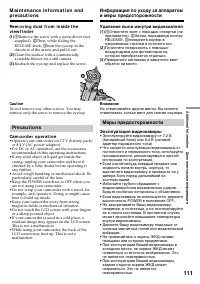
111 Addit ional Inf ormat ion Дополнительная информация M a i n t e n a n ce i n f o r m a t i o n a n dp r e ca u t i o n s Re m o v i n g d u st f r o m i n si d e t h ev i e w f i n d e r (1 ) 1 Remove the screw with a screwdriver (not supplied). 2 Then, while sliding the RELEASE knob, 3 turn the...
Страница 112 - Относительно обращения с лентами
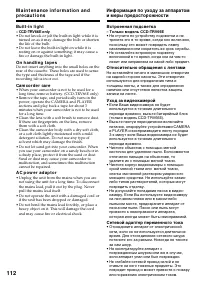
112 Bu i l t -i n l i g h t – CCD-TRV66E only • Do not knock or jolt the built-in light while it is turned on as it may damage the bulb or shortenthe life of the bulb. • Do not leave the built-in light on while it is resting on or against something; it may cause afire or damage the built-in light. O...
Страница 113 - N o t e s o n d r y b a t t e r i e s; If bat t eries are leaking; Примечание к сухим батарейкам
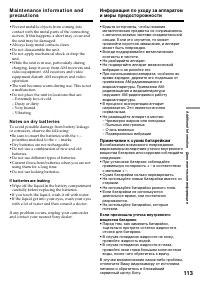
113 Addit ional Inf ormat ion Дополнительная информация M a i n t e n a n ce i n f o r m a t i o n a n dp r e ca u t i o n s • Prevent metallic objects from coming into contact with the metal parts of the connectingsection. If this happens, a short may occur andthe unit may be damaged. • Always keep...
Страница 115 - Технические характеристики; Видеокамера
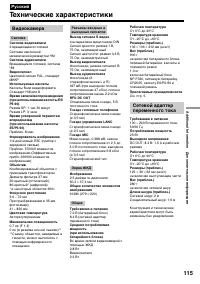
115 Addit ional Inf ormat ion Дополнительная информация Русский Технические характеристики Рабочая температура От 0 ° С до 40 ° С Температура хранения От –20 ° С до +60 ° С Размеры (приблиз.) 102 × 106 × 212 мм (ш/в/г) Вес (приблиз.) 900 гне включая батарейного блока,литиевой батарейки, кассеты ипле...
Страница 117 - I d e n t i f y i n g t h e p a r t s a n d co n t r o l s; PLAY (воспроизведение
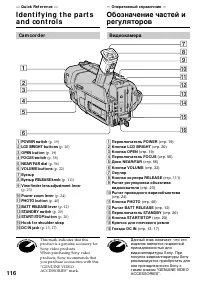
117 Quic k R eferenc e Оперативный справочник !¶ Video cont rol but t ons (p. 32, 35) p STOP (stop) 0 REW (rewind) ( PLAY (playback) ) FF (fastforward) P PAUSE (pause) The control buttons light up when you set thePOWER switch to PLAYER. !• EDITSEARCH but t on (p. 31) !ª LASER LINK but t on (p. 39) @...
Страница 120 - control jack is used for
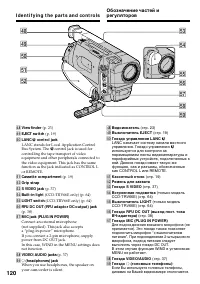
120 %ª %£ $• %º %™ $ª %¡ %¢ %§ %¶ %• %∞ I d e n t i f y i n g t h e p a r t s a n d co n t r o l s $• View f inder (p. 23) $ª EJECT sw it ch (p. 19) %º LANC l cont rol jack LANC stands for Local Application ControlBus System. The l control jack is used for controlling the tape transport of videoequi...
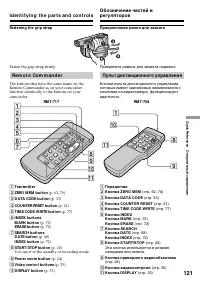
Страница 121 - Fasten the grip strap firmly.; Re m o t e Co m m a n d e r; You use it in the standby or recording mode.; Пульт дистанционного управления
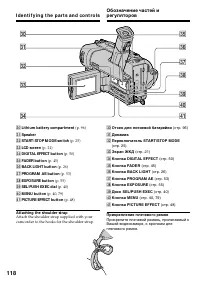
121 Quic k R eferenc e Оперативный справочник Fast ening t he grip st rap Fasten the grip strap firmly. Re m o t e Co m m a n d e r The buttons that have the same name on theRemote Commander as on your camcorderfunction identically to the buttons on yourcamcorder. I d e n t i f y i n g t h e p a r t...
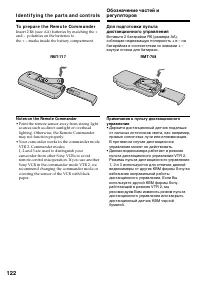
Страница 122 - To p r e p a r e t h e Re m o t e Co m m a n d e r; Not es on t he Remot e Commander; • Point the remote sensor away from strong light
122 I d e n t i f y i n g t h e p a r t s a n d co n t r o l s To p r e p a r e t h e Re m o t e Co m m a n d e r Insert 2 R6 (size AA) batteries by matching the +and – polarities on the batteries tothe + – marks inside the battery compartment. Not es on t he Remot e Commander • Point the remote sen...
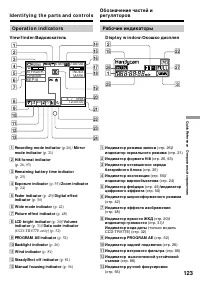
Страница 123 - Op e r a t i o n i n d i ca t o r s; V i e w f i n d e r /; STBY; I NDEX
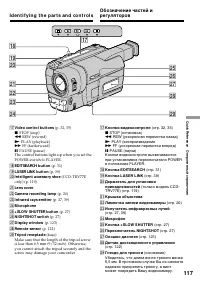
123 Quic k R eferenc e Оперативный справочник Op e r a t i o n i n d i ca t o r s Рабочие индикаторы V i e w f i n d e r / Видоискатель D i sp l a y w i n d o w / Окошко дисплея 1 Recording mode indicat or (p.26)/ M irror mode indicat or (p. 21) 2 Hi8 f ormat indicat or (p. 26, 93) 3 Remaining bat t...
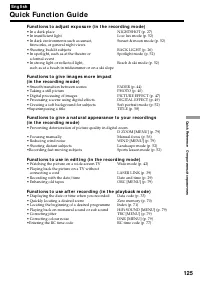
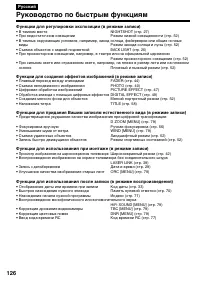
Страница 126 - Руководство по быстрым функциям
126 Функции для регулировки экспозиции (в режиме записи) • В темном месте NIGHTSHOT (стр. 27) • При недостаточном освещении Режим низкой освещенности (стр. 52) • В темных окружающих условиях, например, заход солнца, фейерверки или общие ночные виды Режим захода солнца и луны (стр. 52) • Съемка объек...
Страница 128 - Алфавитный указатель; У – Я; Sony Corporation
128 Русский Алфавитный указатель А, Б, В, Г Батарейный блок .................. 12 Батарейный блок “InfoLITHIUM” ...................... 17 Вариообъектив ...................... 24 Введение/выведение изображения ....................... 44 Внешний микрофон (не прилагается) ..................... 120 Восп...