
Увлажнители Stadler Form Eva - инструкция пользователя по применению, эксплуатации и установке на русском языке. Мы надеемся, она поможет вам решить возникшие у вас вопросы при эксплуатации техники.
Если остались вопросы, задайте их в комментариях после инструкции.
"Загружаем инструкцию", означает, что нужно подождать пока файл загрузится и можно будет его читать онлайн. Некоторые инструкции очень большие и время их появления зависит от вашей скорости интернета.

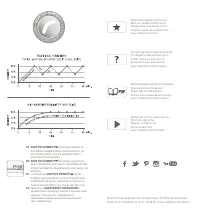
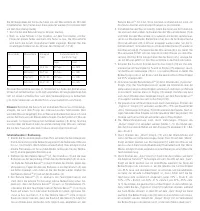
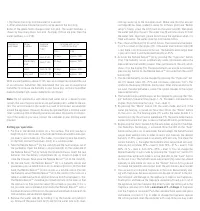
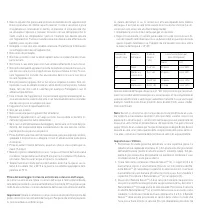

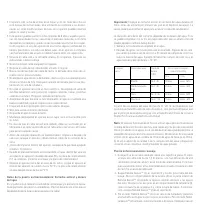


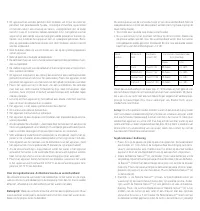
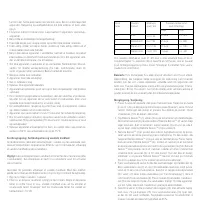


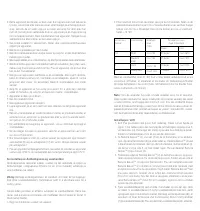


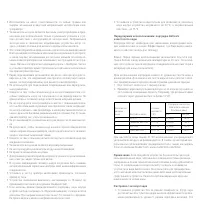

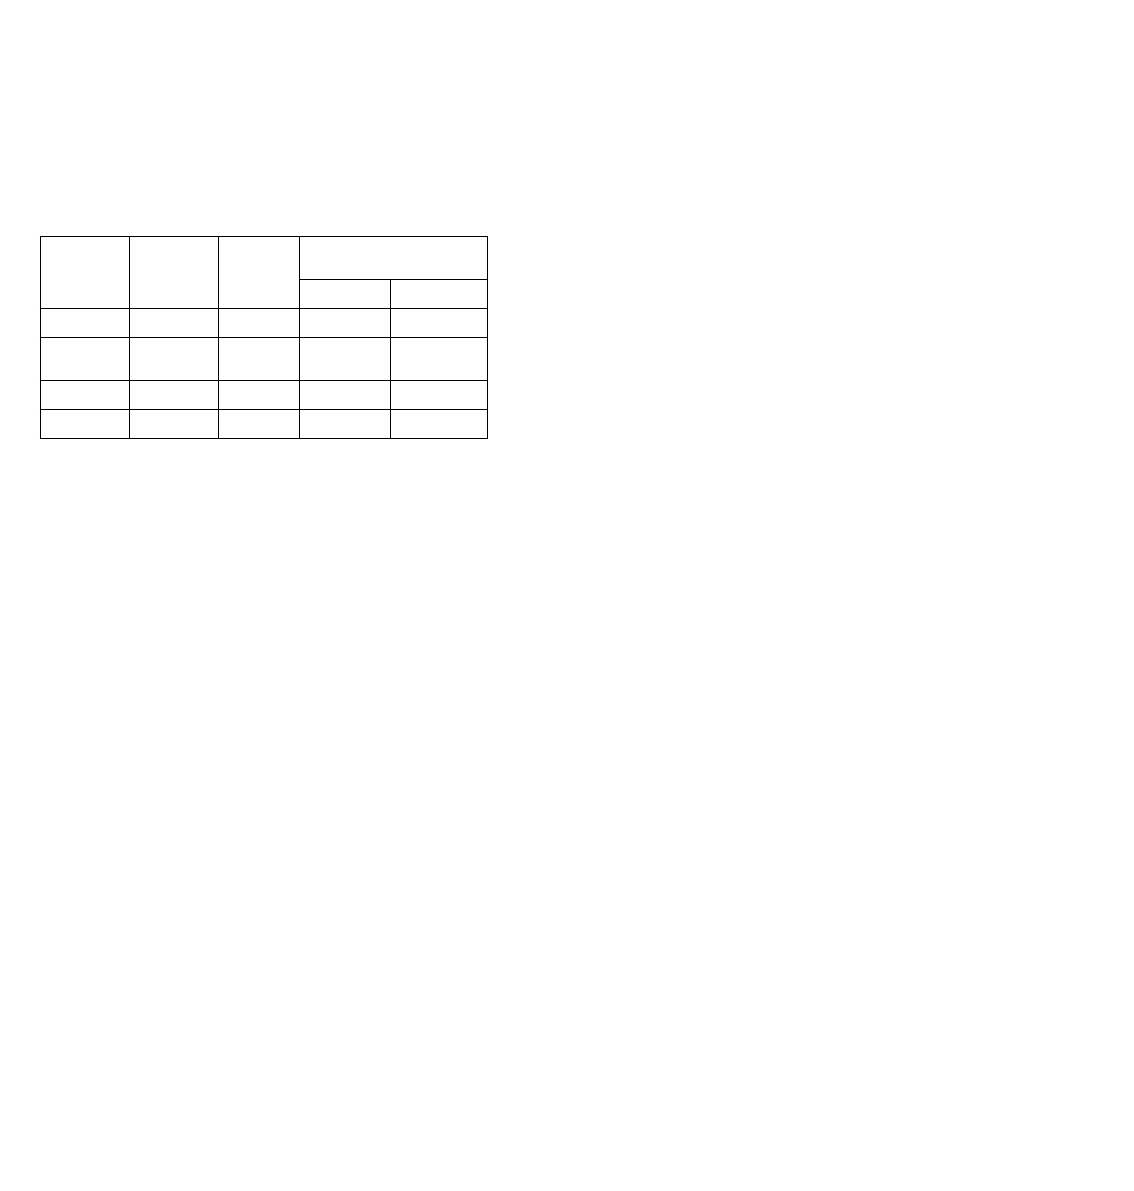
1. Dip the testing strips into the water for a second.
2. After around one minute the results can be seen on the test strip.
Some of the green fields change colour into pink. The water hardness is
shown by how many boxes turn pink. Example: If three are pink, then the
water hardness is >14 °dH.
Number of
pink boxes
Water
hardness
Degree of
hardness
(°dH)
Cartridge will last for
(with 4 liter/day)
Days
Liter
0/1
Soft
From 4
°dH
90 days
approx. 360 L
2
Moderately
hard
From 7
°dH
45 days
approx. 180 L
3
Hard
From 14
°dH
30 days
approx. 120 L
4
Very hard
From 21
°dH
15 days
approx. 60 L
With a water hardness above 21 °dH, we can no longer recommend the use
of an ultrasonic humidifier. We recommend that you use an evaporative
humidifier to increase the humidity in your house (e.g. an Oskar humidifier
made by Stadler Form: www.stadlerform.com/Oskar).
Note:
Do not operate Eva with decalcified water out of a decalcification
system that uses the principle of an ion exchanger (salt is added to the wa-
ter). The salt contained in the water may lead to white dust accumulation
around the appliance. However, Eva may be operated from a drinking water
filter system (e.g. Brita). Should you be unsure about the quality or composi-
tion of the water in your area, contact the caretaker or your drinking water
provider.
Setting up / operation
1. Put Eva in the desired location on a flat surface. The mist reaches a
height of up to 1.4 m thanks to the high-performance humidification (out-
put level 5, warm mode on). This makes it possible to place Eva directly
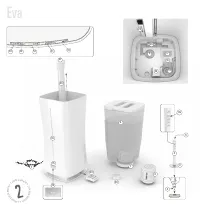
on the floor. Connect the power cord (1) to a suitable socket.
2. Take the Remote Sensor
TM
(2), the stand (3) and the two batteries out of
the packaging. Open the battery compartment (4) on the underside of
the Remote Sensor
TM
(2) by turning the lid anticlockwise. Insert the two
batteries into the battery compartment (4), as shown on page 4, and
close the lid again. Now place the Remote Sensor
TM
(2) on the stand (3).
3. On the one hand, the Remote Sensor
TM
(2) is a humidity sensor and
guarantees precise humidification by its external position. On the other
hand, the Remote Sensor
TM
(2) also serves as a remote control. Position
the humidity sensor Remote Sensor
TM
(2) in the centre of the room on a
table or a sideboard with an optimal distance from Eva between 3 – 5 m.
The Remote Sensor
TM
should be positioned centrally in the room so that
the room air can flow past the sensor (5) as freely as possible. If this is
not possible, we recommend positioning the Remote Sensor
TM
with a
minimum distance of 30 cm from the wall and a minimum distance of 2 m
from windows and ventilation openings.
4. Remove the water tank (6) by holding it by the handle and pulling it
up. Screw off the water tank lid (7) and fill the water tank with clean,
cold tap water up to the maximum mark. Make sure that the anticalc
cartridge (8) has been soaked in water for 24 hours prior (see “Before
setup“). Finally, screw the lid (7) back on the water tank (6). Then place
the water tank (6) in the unit. The water tray (9) will now slowly fill from
the water tank. Important: please do not move the appliance when it is
filled with water. The water could run into the electronics.
5. Press the on/off button (10) to switch Eva on. The current relative humid-
ity in % is shown on the display (15). If the water level indicator light (16)
is red, there is too little water in the unit. The humidification output level
is pre-set to level 2 and the desired humidity at 45 %.
6. Activate the Remote Sensor
TM
(2) by pressing the “Hygrostat” button
(11a). The humidity sensor automatically sends information about the
measured relative humidity several times per minute to the unit, which
shows it on the display (15). The measurement can also be activated by
pressing any button on the Remote Sensor
TM
(2) (aside from the on/off
button (10)).
7. The desired humidity can be changed by pressing the “Hygrostat” but-
ton (11) several times (35 – 75 % and continuous operation “CO”). The
symbol on the display (15) blinks during input. After a few seconds with-
out input, the selected value is saved. The symbol changes to the current
measured humidity.
8. The humidification performance can be changed by pressing the “Out-
put” button (12) several times (levels 1 – 5). The level is indicated on the
display (15) by horizontal bars (e.g. 1 bar = level 1).
9. By pressing the “Warm” button (13), the warm mode, and with it the
water pre-heating, is turned on. Now the LED on the “Warm” button
on the unit is on. The heating plate (17) warms the water before it is
turned to mist by the ultrasonic membrane (19). The warm mode creates
a pleasantly warm mist plus increases the humidification performance.
10. By pressing the “Auto” button (14), the auto mode, and with it the Adap-
tive Humidity
TM
Technology, is activated. Now the LED on the “Auto”
button on the unit is on. In auto mode, the unit adapts the humidification
output level automatically in order to reach and maintain the desired
humidity of 45 % quietly and in an energy-efficient way. The lower the
current humidity is, the higher the humidification output level will auto-
matically be set (under 33 % = level 4, from 34 % – 37 % = level 3, from
38 % – 41 % = level 2, from 42 % – 45 % = level 1). You can change the
desired humidity in auto mode by pressing the “Hygrostat” button (11)
several times while auto mode is active (the LED on the “Auto” button
on the unit is on). The humidification output level (12) cannot be altered
manually in auto mode. As soon as the “Output” button (12) is pressed
to change the humidification output level, the auto mode is deactivated.
11. You can use Eva to disperse fragrances in the room. Be extremely spar-
ing with fragrances because an excessive dosage can result in the mal-
functioning of, and damage to, the appliance. In order to use fragrances,
briefly press and release the fragrance container (20) and pull it out of
the appliance. Let the fragrance drip directly onto the cotton pad in the
fragrance container (20). Add a
maximum of 1 – 2 drops
of fragrance
into the fragrance container! Push the container back again and press
and release it to lock it. Tip: in order to change the fragrance, remove
the cotton pad and clean the container with soap. Now you may insert
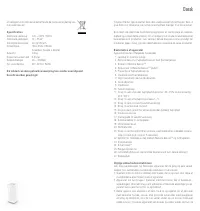
Характеристики

Остались вопросы?Не нашли свой ответ в руководстве или возникли другие проблемы? Задайте свой вопрос в форме ниже с подробным описанием вашей ситуации, чтобы другие люди и специалисты смогли дать на него ответ. Если вы знаете как решить проблему другого человека, пожалуйста, подскажите ему :)


