
Триммеры Ryobi RBC52FSBOS 5133002545 - инструкция пользователя по применению, эксплуатации и установке на русском языке. Мы надеемся, она поможет вам решить возникшие у вас вопросы при эксплуатации техники.
Если остались вопросы, задайте их в комментариях после инструкции.
"Загружаем инструкцию", означает, что нужно подождать пока файл загрузится и можно будет его читать онлайн. Некоторые инструкции очень большие и время их появления зависит от вашей скорости интернета.


22
English (Original instructions)
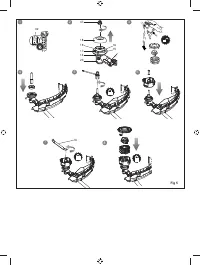
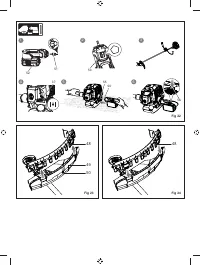
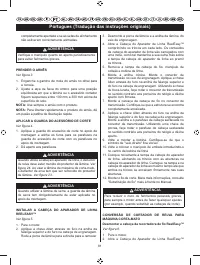
8. Place the Allen wrench through the hole in the upper
fl
ange washer and the hole in the gear head. Place the
washer and hex bolt into the drive connector. Using
a wrench, turn the hex bolt counterclockwise and
tighten.
9. Reinstall the spool. Make sure the symbol for “straight
shaft” is visible.
10. Replace the bump knob by inserting it into the centre
of the line spool.
11. Replace the string trimmer head cover, aligning latches
with openings in the string trimmer head. Press cover
and string trimmer head together until both latches
snap securely into the openings.
12. Install the cutting line. Refer to "String replacement"
later in the manual for additional information.
WARNING
To reduce the risk of serious personal injury, always
stop the engine before making any adjustments, such
as changing cutting heads.
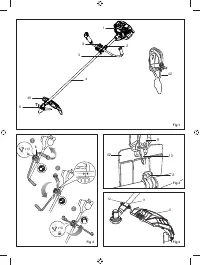
CONVERTING FROM GRASS TRIMMER TO
BRUSHCUTTER (TRI-ARC™ BLADE)
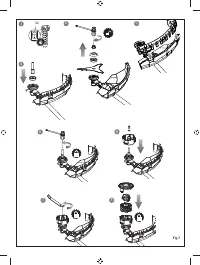
Removing the ReelEasy™ string trimmer head
See
fi
gure 6.
1. Stop the engine.
2. Open the ReelEasy™ String Trimmer Head by
depressing the latches on each side. The contents of
the bump head are spring loaded, so keep your other
hand over the string head cover while depressing the
latches.
3. Remove the string head cover, bump knob, and line
spool.
4. Place the Allen wrench through the hole in the upper
fl
ange washer and the hole in the gear head. Using a
wrench, turn the hex bolt clockwise to remove.
5. Remove the washer and the string head housing from
the drive connector.
6. Using a combination wrench, turn the drive connector
clockwise to remove.
7. Remove the cupped washer from the gear shaft and
retain for later use.
NOTE:
Store the disassembled parts together for later
use.
WARNING
When using the Tri-Arc™ blade, the grass de
fl
ector
must be removed from the blade guard.
See
fi
gure 23.
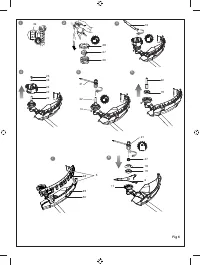
Installing the Tri-Arc™ blade
See
fi
gure 6.
To reduce the risk of injury, keep the blade protector on the
blade at all times. Remove the blade protector only during
cutting operations.
1. Centre the blade on the upper
fl
ange washer and
make sure the blade sits
fl
at. Install the cupped
washer and make sure it sits well into the gear shaft.
Install the blade washer with the raised centre away
from the blade.
2. Install the blade nut.
3. Place the Allen wrench through the hole in the
upper
fl
ange washer and the hole in the gear head.
Using the combination wrench, turn the blade nut
counterclockwise and tighten.
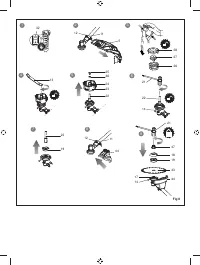
CONVERTING FROM BRUSHCUTTER (TRI-ARC™
BLADE) TO GRASS TRIMMER
Removing the Tri-Arc™ blade
See
fi
gure 7.
1. Stop the engine.
2. Place the Allen wrench through the hole in the upper
fl
ange washer and the hole in the gear head. Turn
blade nut clockwise to remove.
3. Remove the blade nut, cupped washer, and blade and
retain for later use.
4. Attach the grass de
fl
ector to the blade guard by
placing the two locking tabs into the two notches;
tighten the screw.
NOTE:
Store the disassembled parts together for later
use.
Installing the ReelEasy™ string trimmer head
See
fi
gure 7.
1. Install the cupped washer. Install the drive connector
into the gear shaft. Place the Allen wrench through the
hole in the upper
fl
ange washer and the hole in the
gear head. Using the combination wrench, turn the
drive connector counterclockwise and tighten securely.
2. Place the string head housing on the drive connector.
Make sure the housing is fully seated.
3. Place the Allen wrench through the hole in the upper
fl
ange washer and the hole in the gear head. Place the
washer and hex bolt into the drive connector. Using
a wrench, turn the hex bolt counterclockwise and
tighten.
4. Reinstall the spool. Make sure the symbol for “straight
shaft” is visible.
5. Replace the bump knob by inserting it into the centre
of the line spool.


